The Art of Wargaming: List Building
Greetings from Virginia. I wanted to start by introducing myself. I began my journey into tabletop wargaming as many of us do, with a force of plastic warriors from Games Workshop’s, Warhammer Fantasy.
I reveled in the joy of High elves before slowly getting bored with the game. I found a winning strategy ended up with who had spent more USD and not who had built a better force on paper or led his troops better.
I moved from Warhammer to a new game I had seen at my FLGS, Flames of War (FoW). This game seemed to have it all. Tactics, list building, and strong individual models (Yup I thought King Tigers were invincible, how quaint young me was.)
I then moved to California and didn’t play or look at the models I had for three years. Fast forward and I found myself in Northern Virginia where I met up with a group who included NDNG very own Mitch “Don’t mention Meta” Reed. They taught me the basics of the game, and I began my “Year of Losing.” I fondly remember coming to the store in Chantilly a few times a week and getting soundly trumped every time.
Slowly, over time several things became apparent to me. This was not Warhammer, and I needed to learn how to move troops around the table safely (across the open field is not a safe move order) or at least expeditiously.
Second, the game rewarded players who built good lists. To those points, I wanted to share what I have learned in my time playing, especially the list building aspect of the game. The skill of list building took me from a new player, who lost 100% of his games, to one year later placing 2nd at Masters and winning more than I lose.
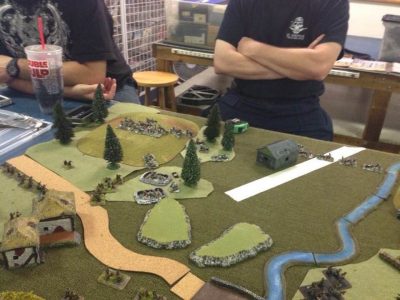
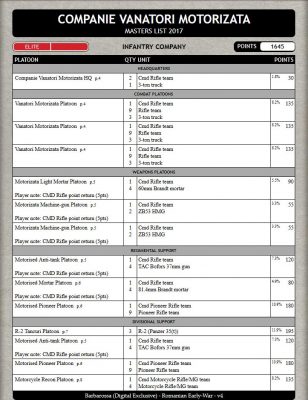
So, what goes into good list building? I will be writing under the assumption that the version being used is V4. Below, I have added the list I brought with me to Masters 2017. This list I designed to be an aggressive force.
Before you can learn ways to get assaults to work or sneaky ways to deal with tanks, you have to know how to build a good list. First, you need to decide if you are building a list that you want to attack with or defend.
This will affect the number of points you dedicate to types of teams. Once you decide what you want to focus the list to excel at you can start adding in the following five basic ideas:
- Recce
- Platoon count
- Threat types
- Template weapons
- Reserves
These core ideas will ensure your list is the most competitive it can be before the game starts. Let’s look at each of these points in some detail.
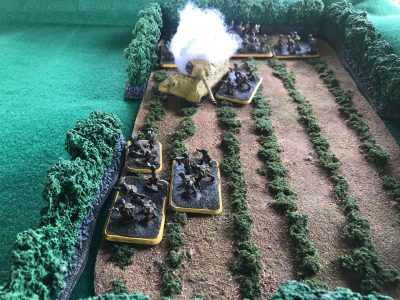
RECCE: To be aggressive in FoW you absolutely must include at least one recce platoon or more if you can. The Spearhead move is so powerful, even if it’s only netting you four inches. That is the difference between an assault or not. They can also get your force into places your opponent may not have thought you could be, or as quickly. Recce also have another major use. Limiting the enemies’ movement or use of ambushes against your force.
FORMATION PLATOON COUNT: Next you need to make sure you don’t build a fragile list. I don’t mean use heavy tanks vice light tanks, or tanks vs infantry. I mean, make sure you have enough formation strength to prevent your Company running off the table by some prejudice shots by your opponent. The list maximized formation platoons to prevent the company from running. 10 platoons may be overkill, but this list allows for it.
THREAT TYPES: No force can deal with every threat, so you must clump similar threats into three basic categories: Armored Threat, Infantry Threat and Template Threat. Each presents a set of useful tactics and threats that must be countered. My Masters list dealt with Tanks with the Anti-Tank guns and the Support Tanks. I dealt with Infantry with my own rifles with attached HMG and a few template weapons. Finally, the enemies’ own templates are dealt best with by either quick moving ground forces or counter-battery fire. Make sure you have at least one option to deal with each of the three main threats.
TEMPLATE WEAPONS: In v4 templates became very dangerous, you would be doing a disservice to yourself if you didn’t include at least one. Mortars are particularly cost-effective to get comparable results as a larger caliber template. Rockets are equally useful. In the Romanian list, I tried to get as many templates as I could without using large guns. The cost-effectiveness is just that good. As much as those 25 pdrs are useful as direct fire AT guns, they are not as cheap as the 3in mortars that do almost the same thing to infantry dug on the objective.
RESERVES: At tournaments, a major factor in deciding who will win, and who will lose is the use of reserves. FoW is built around a mechanic sharing the same name. This mechanic will win you games, or, it will lose you games. It has gone through changes in the versions, but the idea remains the same. Your army must be able to fight under less than ideal force strength.
With the Mission Matrix, there are ways to minimize your chances of having to use reserves. But, the fact remains, you must expect them. When designing your list, keep in mind the 40% rule. That rule is: Make sure that you can fight a battle with 40% off the table for the whole game.
With delayed reserves, and a 5+ roll to bring a reserve on, many games can end before you get a reserve platoon on the table. So, I try and design lists that allow for the most individual models on the table.
A fantastic way to do reserves is to have a monster platoon. A King Tiger, a Crocodile platoon, etc. something that by itself represents 40% of your force. This is not always possible, but its something to strive for. Sometimes two platoons are needed to get reach 40%. I see forces at tournaments that end up with 1-2 platoons on the table, or 55% of the force of table because they can’t make easy calls on reserve options. The tourney table is not the time to decide what you’ll place in reserve.
If it sounds like I’m going to keep referencing my Masters list, I’m not, I promise, here is another list many of you may be familiar with:
The Stuart Swarm of Doom! This list may seem to contradict rule #2 of making sure you have options for everything. Without peeling old scabs off, one of the reasons this list has done so well by me is, (Scout Tanks was/is broken) but also it splits up very easily.
This list was built not to play long drawn out games. But, rather, to exploit the reserves of my opponent. If I had to use reserves the main fighting elements would be on the table (Tanks). If my opponent had reserves, I woud rush them before they could reinforce their position. This eliminated the need to have template weapons.
The Romanian list is a more well-rounded example of list building, that can do a lot of mission types well. The Stuart list would be a niche list, designed with a specific win condition. Both are capable of winning and losing equally. The Romanian list suffers against strong tank forces, while the Stuart list struggles when the enemy is entrenched and at 100%. Now to be more defensive, I would suggest building lists that counter-attack well.
The game, especially V4 really punishes sitzkrieg lists. Gone are the days of the arty park that can just pummel an attacker into oblivion, or infantry that never shoots win by outlasting the opponent.
A “defensive” list should include cheap infantry and a mobile component to exploit gaps or weakened forces, or simply be able to get where they need to be quickly after a bad Scattered Reserves roll.
A final note on list building; it may seem that some lists are easy to win with, or some never had a chance. To some extent that’s true. Some lists are great from a historical view of what was in the field, but are miserable on the table.
At its core, FoW is a dice game, to see can roll the most 6s. Any list that rolls more dice will statistically do better than those that don’t. For example, it may seem that the Romanians I brought to Masters wouldn’t stand a chance against Matilda II and Valentines, but because I rolled more dice, (and some decent movement and assaults) was able to kill the tank formation down to the HQ tank.
Even if you need 6+ firepower checks, if you roll enough dice, you will get your 6s. Do you need to run a horde list to achieve these results? No. Even with a Heavy Tank Formation, you can do this, it just requires a strategy of massed shooting and shooting priority targets.
I hope that some of this has been helpful. I know when I started playing if someone would have explained list building to me, the “Year of Losing” would have been less painful, or at least shorter.
James Copeland can be found most Sundays in Norfolk, Va. Playing games at Atlantis Comics and Games, shameless plug for our FLGS and 757th Rangers Club. If your ever in town and want to get a game going, get in touch with us at
Thanks for your thoughts and you’ve made some good points. Looking at your army list at 115 points I would say that you could have the best of all worlds for MW. What would your army look like at 71 points for MW?
The scout tanks card has been changed to 2 pts per unit that can use it in AF, all units must use it if any do .
I would use the following. This isn’t using anything from Armored Fist, and is from my Dessert Rats book, but unless I’m up against a ton of heavy tanks, it has done well.
It plays very fast. The Planned raid allows me to reposition objectives, the recce gets me closer, I dash on turn one, and move and assault turn two after hosing with MG fire to pin.
(fowlists.blogspot.com)
Planned Raid (Command Cards) – After objectives placed, move one objective 4″/10cm (1 pts)
Honey Armoured Squadron HQ (p.28) – 4x Honey (7 pts)
– Short Halts – Tactical 14″/35cm (1 pts)
– Scout Tanks (10 pts)
Honey Armoured Troop (p.29) – 3x Honey (5 pts)
Honey Armoured Troop (p.29) – 3x Honey (5 pts)
Honey Armoured Troop (p.29) – 3x Honey (5 pts)
Honey Armoured Troop (p.29) – 3x Honey (5 pts)
New Zealand Divisional Cavalry HQ (Command Cards) – 2x Honey (3 pts)
Honey Armoured Troop (p.29) – 3x Honey (5 pts)
Honey Armoured Troop (p.29) – 3x Honey (5 pts)
Universal Carrier Patrol (p.34) – 3x Universal Carrier (2 pts)
Universal Carrier Patrol (p.34) – 3x Universal Carrier (2 pts)
Universal Carrier Patrol (p.34) – 3x Universal Carrier (2 pts)
Universal Carrier Patrol (p.34) – 3x Universal Carrier (2 pts)
Humber Armoured Car Troop (p.38) – 3x Humber (3 pts)
Motor Platoon (p.33) – 4x Bren Gun Teams, 1x Boys anti-tank Rifle & 1x 2″ Mortar (8 pts)
71 Points
Scout Tanks is a force card and lists Honey Armoured Troops as applicable units. So that would be 14 pts, possibly 16 depending on how the Div Cav HQ argument ends up.
Great article James… For a quick note, I would never wear such a shirt…. Unless I was on acid
Scout Tanks is a force card and lists Honey Armoured Troops as applicable units. So that would be 14 pts, possibly 16 depending on how the Div Cav HQ argument ends up.
Thanks James, nice article. You brought out some really good points on list building. I couldn’t agree more on your view of reserves, but I’m not sold on recce especially in the LW/EW point costs.
The Stuart swarm well, if all your opponents would focus on killing off 3 platoons it would be a string of 3x 6-3 games that might not win the tournament. Is eveyone listening? Kill three platoons, PLEASE!
Peace 2U