Intelligence Preparation of the FOW Battlefield
By Chris Jackson
When a military staff at any level receives a mission from their higher headquarters, one of the first things they work on is an Intelligence Preparation of the Battlefield (IPB). This process defines the battlefield in terms of area, effects of the terrain, and how the terrain and the enemy will affect the ability of the unit to accomplish its assigned mission.
It provides the commander and staff a framework to determine how they will accomplish the mission by defining what decisions the commander needs to make about where to allocate his resources and what signs from the enemy to look for that indicate his intentions. Units are then assigned tasks based on these decisions and the process begins at the next lower headquarters.
In Flames of War (FOW), the player is the commander and the staff for his unit. IPB begins when the player is assigned a mission and an opponent. If “More Missions” is being used for a particular game, then the first decision becomes what posture to assume. However, the intricacies of that decision merit a separate article. Today we will assume an agreed upon scenario: No Retreat. We will also assume for planning purposes that we are defending with an 88 point Fast Company.
Flames of War Forces Team Yankee (Masters medium, 88 points) (1)
Regardless of the scenario played, if you defend you will always be looking to answer the same questions:
- Which part of the battlefield should I choose?
- Where is the best place for my objectives?
- If I have them, how do I utilize my obstacles?
- If I have them, Where is the best place for my “ranged in” markers?
- What should I have in ambush/reserve?
- Where is the best place for my ambushes?
- What is the most likely enemy Course of Action?
- What is the most dangerous enemy Course of Action
- How do I best array my available forces to handle both of those COAs?
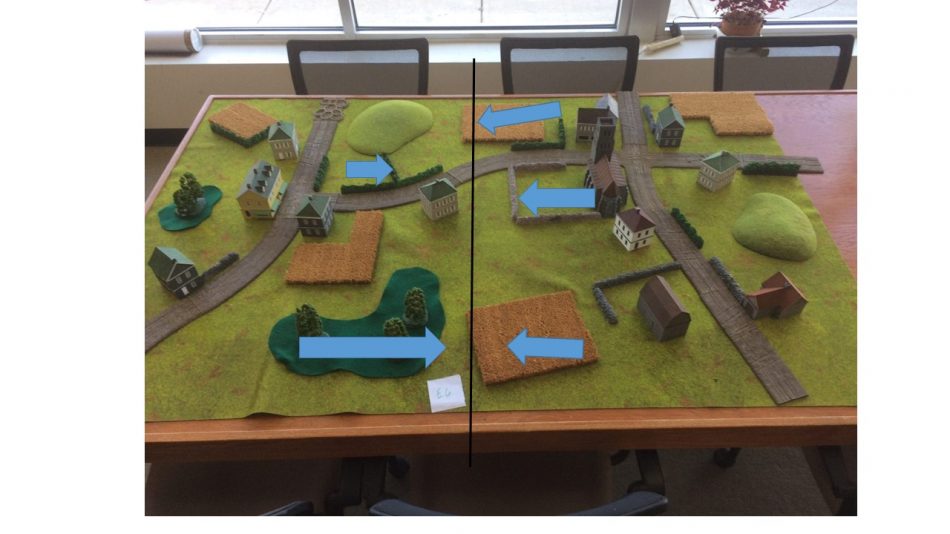
This first picture shows our battlefield. The first thing I look for is what are the avenues of approach. A good avenue of approach provides at the very least concealment from enemy fire. A great one allows you to approach completely out of line of sight. Our battlefield provides three AoA if moving right to left, and two, if moving left to right, as indicated by the blue arrows. Normally limiting the enemy’s avenues of approach is best, but in this case, having the woodline feed directly into the center of the board is a little scary, so I wouldn’t make my decision based on the greater number.
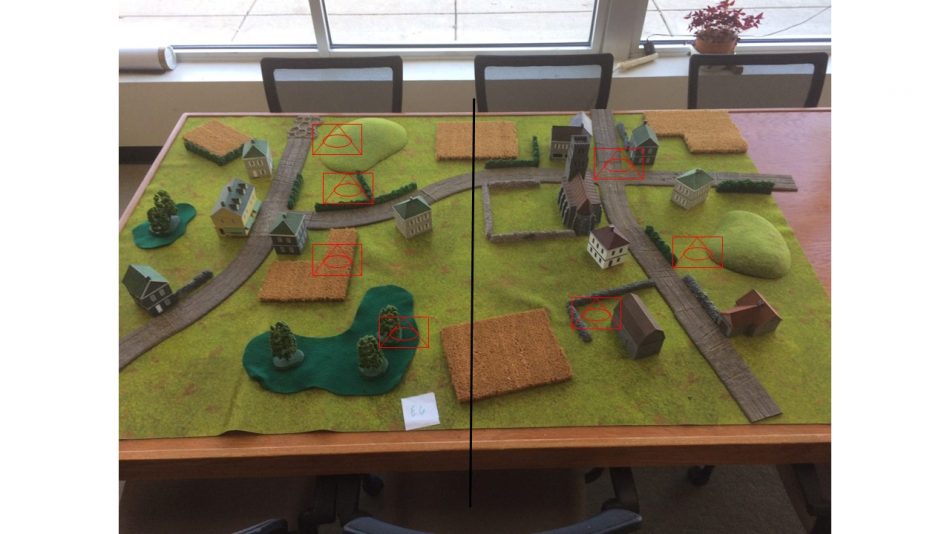
The second picture shows possible ambush reveal points. In this case, my ambush platoon is a 3 gun PAK 40 platoon. The places shown in the picture meet the criteria of having a decent field of fire into one of the predicted avenues of approach and a reasonable expectation of being outside 4″ of enemy forces for more than 1-2 turns.
This shows the left side having much more favorable ambush points with more available and the locations themselves being closer to predicted the battle area. Our ambush platoon will be available to lend a hand in defensive fire in the event of an enemy assault. The ambush points on the right side are mostly too far back, causing a penalty for shooting over 16 and our frontline platoon would be unsupported. This tips the balance. We will defend from the left. First question answered.
The hill at the top of the battlefield offers a great vantage point and takes away the concealment offered by the wheatfield. I want my opponent to come that way. Of course, what I want is diametrically opposed to what my opponent wants, so how to make him go where I want him to go? I have a number of tools at my disposal. The first is the objective that I place. If I place it as pictured in figure 3, then 99% of opponents will want to space out my defense and will place it as far forward as they can on the opposite side, as shown. I have just made attacking on that side a little more attractive. Next, I will place my minefields. I have 4 of them, If I use the to shut of the center, protecting both of my infantry platoons flanks, and leaving that top area open, I have made that side even more attractive. Next, I have a battery of nebelwerfers. I place their Ranged In Marker about 10 inches in front of his deployment area, to catch his infantry advancing. We have now answered questions 2-4, and 6.
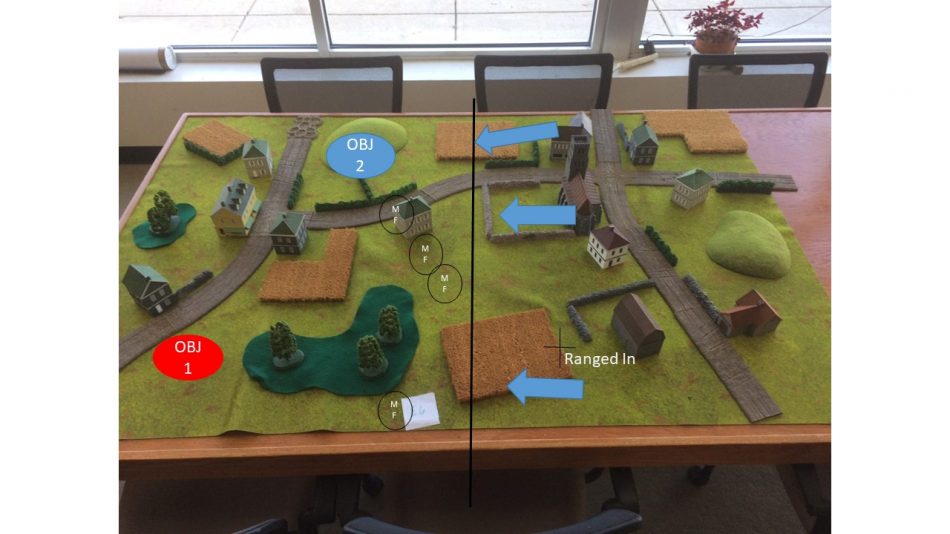
Finally, when I place my units, I place my light PAK 36 platoon on my right flank. Which means he would have to deal with a light AT, HQ Platoon and my ambush. If he goes to my left flank, where I want him to go, he takes the PAK36 platoon out of the equation, at least initially. It also requires longer for reinforcements to move into position. The infantry platoon and PAK 40 platoon should be able to hold long enough to get the reinforcements up into the fight.
Questions on the enemy course of action must be solved on a case by case basis. An all infantry Russian Horde will have different answers than a German Tiger company. Neither will resemble the COAs of a British Honey Squadron. In this case I was assuming they were Russians. Tanks or infantry would have essentially made no difference, only the mechanism for killing them would change.
The Most Likely COA is my opponent would do the math, see that he can at least negate the PAK 36 platoon, and send his main effort where I want it to go. Most dangerous would be to send someone to breach the minefields in the center and send armor through to the unprotected rear area. In that event, I would have to rely on the ambush, long range fire and artillery to stop the advance.
Your reserve and ambush decision is made the same way. Evaluate your enemy’s army. What are his key pieces of equipment? What scares you the most. Your ambush should be whatever kills that the best. In this example, assuming I was facing a Soviet Mixed Tankovy, my ambush would be the Pak 40 platoon, with my reserves being the Marders, the infantry gun platoon, and an infantry platoon. Against infantry, I would keep the infantry and put the Pak36’s in reserve as well.
During the 2018 Masters competition, I faced Pete Zerphy’s 62 point Armored Rifle Company on this table. The top picture is the initial results after 2 rounds. He had three Armored Rifle platoons, his HQ, SP mortars, T-30 SP howitzers, and three 6-pounder AT Guns. I set up exactly as described and reacted as predicted. I was able to ambush him moving up the road to devastating effect and steadily whittle down his forces until finally winning the game 7-2 in round two of the six round Master’s competition.
What a wonderful contribution to our activity; informative, relevant, interesting, educational; so many words comes to mind! And the pictures with the symbols; it can’t be any clearer than that! And presented by one of the very best players in the game! Too bad we don’t get more of these types of relevant essays; but then there’s only one Chris Jackson!
Sincerely I say thank you Chris!! And PLEASE give us more!!!
Carl
This is great. There must be thousands of FoW of players around the world, clapping there hands now. This is what I have been missing since I started playing this game and I’m sure there are lots of other players out there thinking the same. Thank you so very very much Chris.
Very clever. Very understandable. Very helpful, please do more of this.
Thanks for the compliments. Next article will focus on the same topic from the attacker’s point of view, followed by how to use the US Army principles of war in Flanes of War.
I’m eagerly awaiting its arrival! Hey; you’re not afraid of giving away your secrets are you? 🙂