D-Day US: Assault Company and Rifle Company
By Benny Christiansen
Hi, Ho Silver! Currahee! Rangers – lead the way!
One of the most (in)famous moments of the second world war seems to me to be D-Day. The landing on Omaha Beach was particularly hard but it was a huge undertaking and it must have been hard not to be awestruck at the sight of all the boats and airplanes.
With D-Day the Soviets finally had their second front opened. As I understand the history behind this, Stalin had been quite impatiently waiting for the Allies to put this operation into action to relieve some of the pressure on the Red Army.
In this article I’ll have a look at the Assault Company (also the veteran version) as well as Rifle Company (also the veteran version). I’ll try to make it like a tactical suggestion article, instead of the page-by-page version.
The book contains several other companies as well as missions and mission rules etc. I might mention a couple of obvious Command Cards, but I’ll leave them for another article.
The book presents the development of the two companies (29th and Fighting First) from assault company to rifle company. This makes it possible for you to chose the list that matches the period you’ll be playing, be it D-Day assault or some of the later missions.
I’ll try to be brief and to the point, as there are much to be considered in this new book.
In regards to Assault Company and Rifle Company as well as Armored Rifle Company and armor companies, they all come in “normal” versions as well as “veteran” versions. In this article I’ll take the “normal” version and work on that, and make references to any changes I might make in a Veteran list. All lists will be 100 pts.
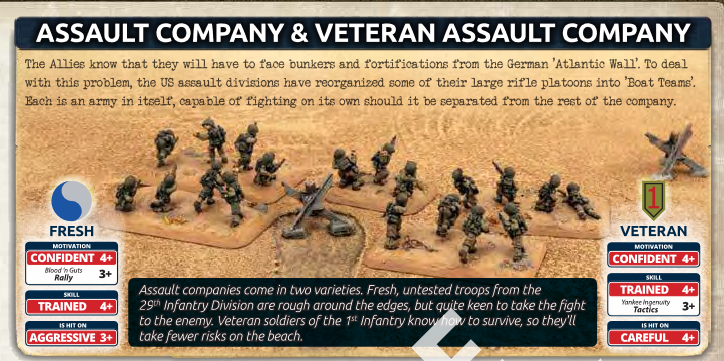
Assault Company – 29th Infantry Division
These boys are represented by the “Blue and Grey” (29th Infantry Division). The book provides you with a nice background story of the Division and major events on and immediately after the invasion. After August 15, they change into the Rifle Company. My initial assault list would look like this:
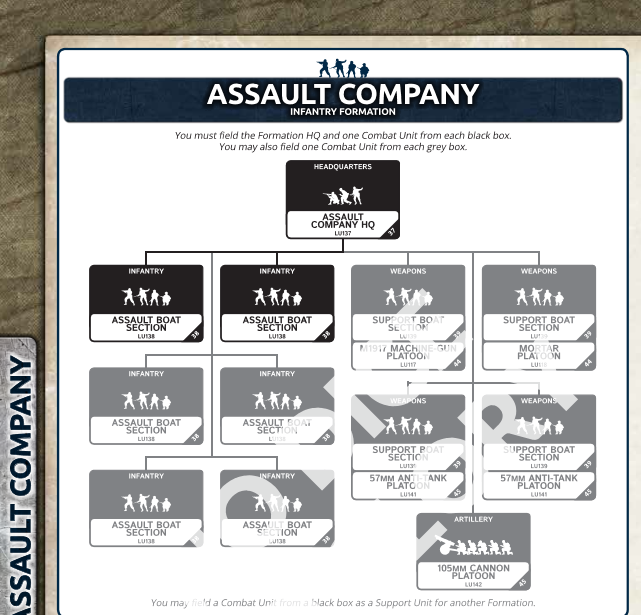
Assault Company Formation
Assault Company HQ – 2 teams
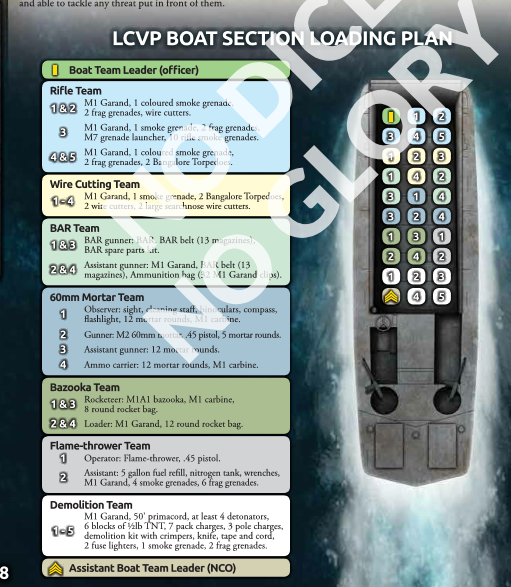
Assault Boat Section – 5 Rifle, 2 Bazooka, 1 60mm mortar and 1 flamethrower team
Assault Boat Section – 5 Rifle, 2 Bazooka, 1 60mm mortar and 1 flamethrower team
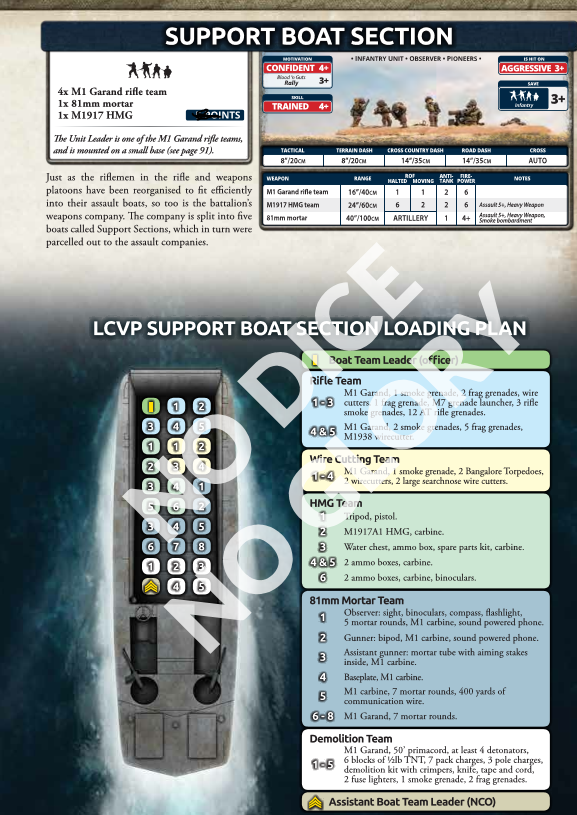
Support Boat Section – 4 Rifle, 1 81mm mortar and 1 HMG
Mortar Platoon – 4 * 81mm mortars
57mm Anti-Tank Platoon – 3 * 57mm guns
Support
m12 155mm Artillery Battery – 4* M12
Grasshopper – 1* L4 Grasshopper OP
P-47 Platoon – 2* P-47
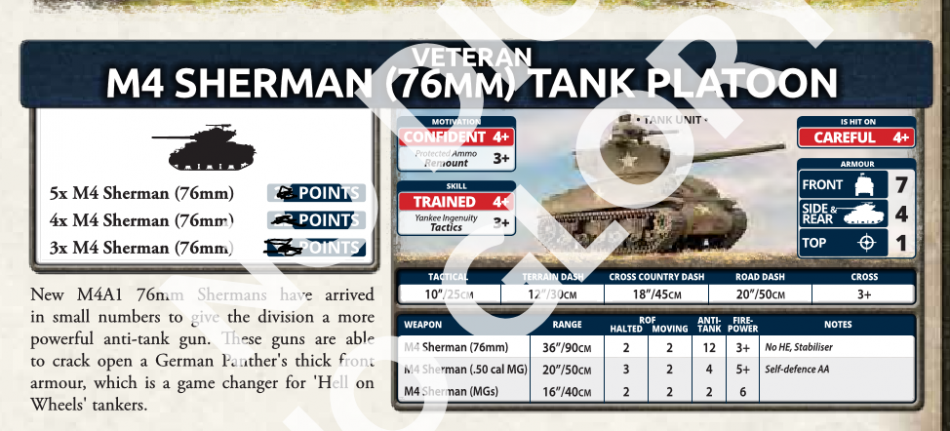
Veteran M4 Sherman (76mm) Tank Platoon – 4* M4 Sherman (76mm)
Veteran M4 Sherman Tank Platoon – 5* M4 Sherman (75mm)
With this list I’ve gone for a force that has the power to attack. It is loaded with smoke, lots of smoke, absolutely an incredible abundance of smoke, to make the list able to assault. The Support Boat Section has one 81mm Mortar capable of smoke. The Mortar platoon is naturally also able to smoke (81mm mortar again).
The M12 platoon can smoke, and finally, all the Shermans can shoot direct smoke. If you, for any reason, should find that the list lacks smoke, I can assure you, that there are enough support options to satisfy your cravings.
The choices for my list has been anything but simple. I have had a great temptation to field 4-6 Assault Boat Sections, as the formation allows it. It is my intuitive hunch telling me, that IF I wanted to create a really dangerous and strong list with this company, THAT might be the way to do it. The safe bet, however, would be to – like this – make a list of trained units like this, and add veteran units for the “punch”.
What I really like about the list is that you have to make some choices. Every time you take a Support Boat Section, you have to “deselect” something else. Be that an HMG platoon, mortar platoon or one of the two 57mm AT platoons, something has to “go” in order for you to get that Boat Section. So why do I want it so much? It’s flexible – it can assault, shoot and bombard and its all infantry teams (easy to swap hits if I need to).
The Grasshopper is here because I want to test it. It arrives from reserves on 3+, making it a relatively regular visitor on the battlefield. It has a range in skill on 3+, making it the perfect partner for the 155mm M12s.
The formation has access to a Cannon Platoon. These 105mm light howitzers were amazing in V3 if you ask me. I find myself very tempted to field them and test them in V4. They are Trained and thus only range in on 4+/5+. This is – in my point of view – balanced by the ability to field 6 of them.
In this case, I choose the M12 155mm Artillery Battery. I love their 3+ skill, but also their AT 15/FP Auto – ROF 1 direct shot. With a range of 24″/60cm, some German panzer units should be careful not to get too close to these monsters. While on the subject of artillery, a list with five templates and an airplane is also a lot of artillery, even if most of them consist of one team and some of them only have a range of 32″/80cm.
The two Sherman platoons have dual purposes. The 75mm platoons is the most assault oriented unit, but I see no reason why the 76mm platoon could not do it also. The 76mm has better front armor. The price of the Shermans is low enough to make it a “good buy”.
Assault Company (Veteran) – Big Red 1
The primary difference between the two versions of the Assault Company is very simple. The Veterans has “Careful” and their skills are “Trained 4+” but the special focus here is on the “Yankee Ingenuity – Tactics 3+“.
Both lists have the “Pioneers” special rule, allowing them to cross minefields on a 3+. An ability that will be very useful in the upcoming D-Day games.
There is a price difference, naturally, to ensure you pay for the extra abilities. A list could look like this:
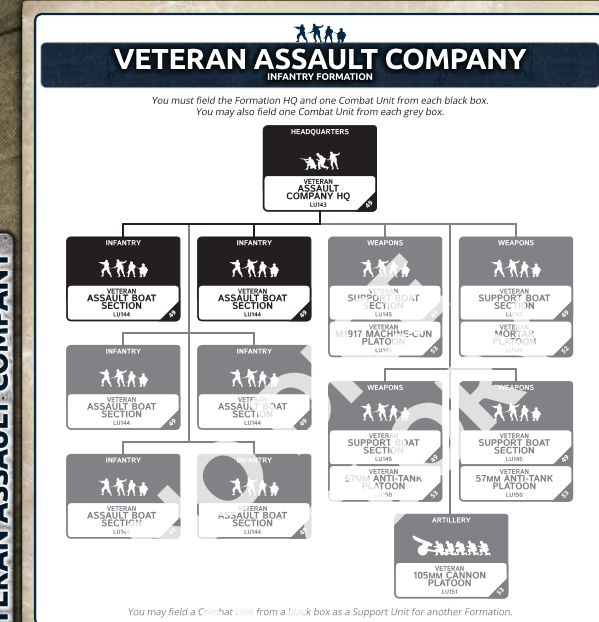
Veteran Assault Formation
Vet. Assault Company HQ – 2 teams
Vet. Assault Boat Section – 5 rifle teams, 2 bazookas, 1 60mm mortar, 1 flamethrower.
Vet. Assault Boat Section – 5 rifle teams, 2 bazookas, 1 60mm mortar, 1 flamethrower.
Vet. Support Boat Section – 4 rifle teams, 1 81mm mortar, 1 HMG
Vet. Mortar Platoon – 4 81mm mortars
Support
M12 155mm Artillery Battery – 4* M12
M4 Sherman Op Observation Post – 1* M4 Sherman
M15 & M16 AAA Platoon – 2* M15 & 2* M16
M4 Sherman (76mm) Tank Platoon – 5* M4 Sherman (76mm)
P-47 Platoon – 2* P-47
M8 Greyhound Cavalry Recon Patrol – 2* M8 Greyhound (37mm), 1 * Jeep (MG), 1* Jeep (60mm)
In the veteran version of the assault formations, I have chosen almost the same setup, with a few changes. Again the infantry can be played aggressively with the use of smoke to cover advances and/or assaults. Being hit on 4+ makes the infantry much more survivable in my opinion, so maybe you don’t need as much smoke as before, but to be honest, I don’t believe there is such a thing as “too much smoke”.
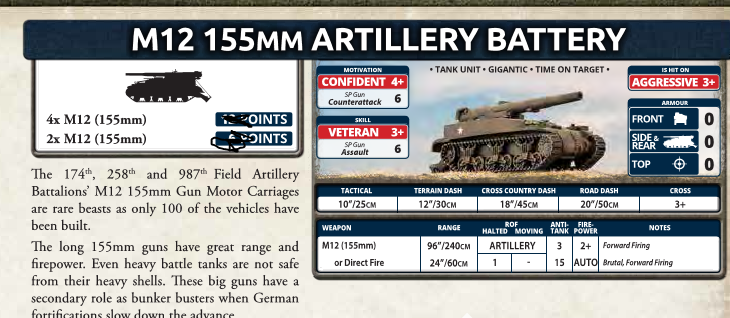
The 155s are in again, as they are too awesome not to have. I love the look and their abilities. I use the Sherman Observer in this list. It costs 1 point more than the Grasshopper, but it is also quite formidable as it can provide some support with the MG power it has, in case you need some emergency back up to your gun teams or similar. So I find the price to be fair.
The AAA platoon – I have been waiting for these boys to be back. With a front armor of 1, they have a good defense vs rifles, and I’d like that, as my primary role for them would be Anti-Air and Anti-assault unit. The M16 (Quad .50 cal) has a ROF 5, and both have range 20#/50cm.
These boys will surely make the Luftwaffe think twice before getting in range. They also provide a very decent defensive fire if need be. They are hit on 3+, tempting the opponent to shoot at these guys before assaults, as their biggest drawback in my opinion.
The Shermans are there to assault and to provide mobile, hard-hitting Anti-tank fire as well as smoke providers when need be.
The P-47 Thunderbolt Fighter Flight are in both my lists. This is due to 2 things. One – there will be access to Napalm bombs via Command Cards. I’d most likely want to try that out ASAP. The bombs (another special bomb is also available in Command Cards) are tempting for me also. With a skill of 4+ it can easily range in on flat ground, while it is a calculated risk to do so in terrain.
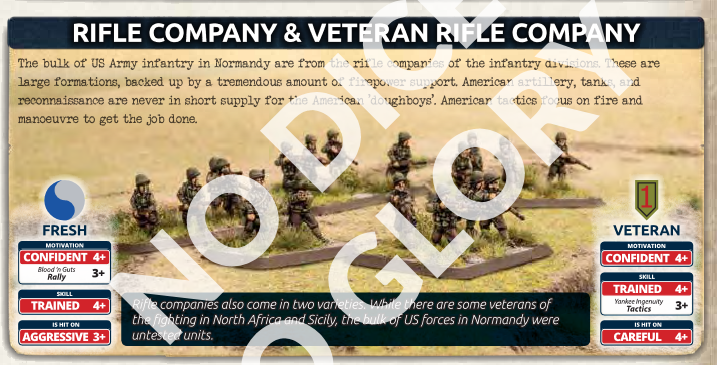
Rifle Company – 29th Infantry Division
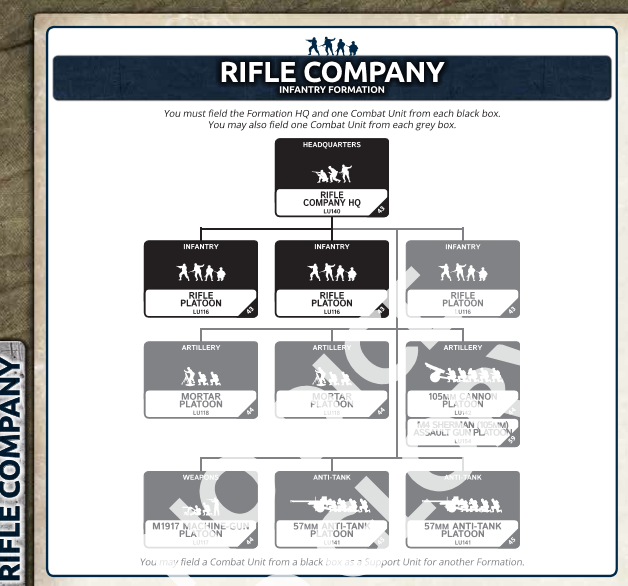
The change from assault company to infantry division gives the units different equipment and the formation has other choices. The way the book is made, I get the feeling of progression when playing a formation, something I to date, cannot recall any of the other V4 books being able to give me. I love how this gives me a feeling of fielding the same guys, but on different dates in history. More of that, please, BF.
A Rifle Company does not have the versatile basic units, that the Assault Company has. This makes the lists a bit different in my point of view. A 100 point formation could be something like this:
Rifle Formation
Rifle Division HQ – 2 teams
Rifle Platoon – 10 rifle teams, 1 bazooka. +1 bazooka.
Rifle Platoon – 10 rifle teams, 1 bazooka. +1 bazooka, +2 LMG, +1 HMG
Rifle Platoon – 10 rifle teams, 1 bazooka. +1 bazooka, +2 LMG, +1 HMG
Mortar Platoon – 4* 81mm mortars
Support
Chemical Mortars – 4* 4.2 inch Chemical Mortars (Command Card)
M4 Sherman (105mm) Assault Gun Platoon
3-Inch Tank Destroyer Platoon – 4* 3-inch guns
M8 Greyhound Cavalry Recon Patrol – 2* M8 Greyhound (37mm), 1 Jeep (MG), 1 Jeep (60mm)
105mm Field Artillery Battery – 4 *105mm howitzers + Cross of Lorraine command card

This is my idea of a fun list. Lots of infantry teams. Lots of artillery. Lots of units to put in reserve, if need be. If this is an attacking list, the Cross of Lorraine command card makes the 105mm artillery very dangerous with 2+ FP when using Repeat Bombardment. This can be essential, as the list needs something relatively certain to cause serious damage to a defender.
The biggest problem this list has is, for missions with reserves, it has to have guns in reserves. I’m sure I’ll eventually find a choice to remove and replace with things like Stuarts or Shermans, but for now, it is as it is four templates. More dangerous templates. A lot of FP 3+.
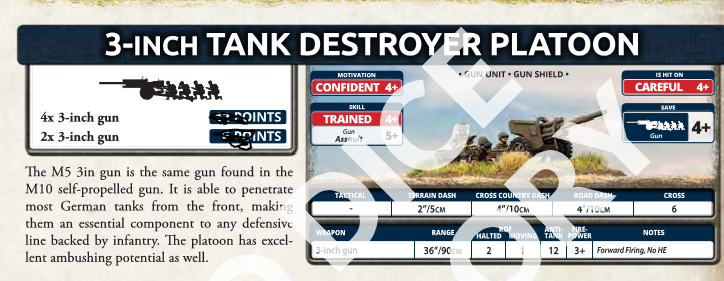
With the 3-inch Tank Destroyer platoon, you have a range of 36″/90cm with a solid AT12/FP3+. They are Careful and Confident and as such are relatively hard to hit. As I see it, you can place these boys in Ambush and wait for your opponent to expose his flanks and then blast away.
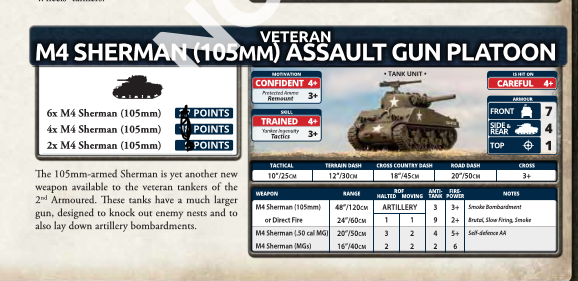
105mm Shermans are BACK. Oh, how I missed them!
Great review!
Dear Alex.
Thank you for your kind comment.
Thx Alex, nice and to the point!