Basing your Flames of War army – tricks and hints on how to create 15mm bases
An army marches on its stomach: Napoleon Bonaparte was right, but speaking of our games, we should misquote to “our armies march on their rectangular bases”. There is nothing more disappointing in seeing a well-painted army on poorly rendered bases – I’ve seen with my eyes tournament armies with their infantry merely stuck to the brown Battefront bases!
Basing your miniatures is not that difficult. First of all, you need a plan. For example, all my Flames of War Mid armies and my Team Yankee lists have two infantry platoons, as I really like to play with massed infantry. For this reason, I try to base the two units with a different “landscape”, so I can tell them apart at a glance, even when they assault the same target and mix up. For example, my US Armoured infantry platoon 1 is mounted on “urban” bases, while Platoon 2 is on “rural” ones.
We already discussed on “. So, time to go for the foot soldiers!
Easy level
Skills: minimal
Costs: minimal
If you want to use a quick and easy method, but with great results, you just need some dry sand in a box, PVA glue, some cotton ear sticks, and a base colour. Online shops will try to sell you the sand, but you can acquire it pretty easily and free if you go to a construction site and ask to get some medium grain sand. A biscuit box will contain enough sand for your army (well, maybe you will need two if you plan to do a Russian or Iranian list!).
Just glue your miniatures on their base, mix 50%-50% PVA glue and some water, and fill the base with this mix. The cotton swab is very good to spread and scatter the glue. If you can’t do under the miniature’s legs, use a toothpick.
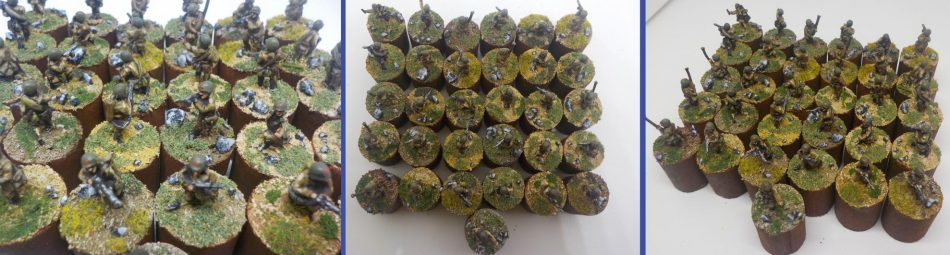 I painted these Russian infantrymen for my Tournament in Milan: one soldier for each player. I used the “simple” base system, using different shades of brown and light earth colours. Note the good effect of painting the “bigger” stones in dark grey and dry brushing with two levels of lighter grey.
Just place the base with glue in the box with sand, and remove the sand in excess. Let the glue dry (12 hours), and then use a watered-down colour you like for your bases. I think lighter colours work better because the miniature is more visible, but it’s totally up to you. Just remember real earth is normally between sand colour and a reddish-brown. A good idea to create different bases for different platoons is to have a lighter tone for one and a darker brownish on the other.
After the colour is also dry (a couple of hours, with acrylic paints), mix 50% – 50% the same colour you used with a lighter tone. If you used sand colour, you can mix with pure white, while brown doesn’t mix well with it (the result is too “muddy”) so you need just a lighter tone of the same color.
To finish the base, you can add some grass flock. For better results, just mix two different flocks, one greenish and one darker. , the smaller are good for 15mm scale.
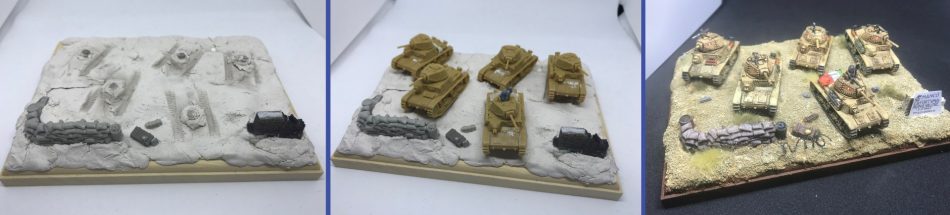 This is a Diorama I did for the first FOW tournament I organized in January 2019. The wooden base can be bought in the local DIY shop in the decoupage shelves. I just used the kids modelling paste to create the base, with some bits from my previous works, like an abandoned helmet on the crate and some sandbags. I also had the imprints of the tanks so they could be placed in position, with a magnet on the base and a magnet under each tank. The writing on the right is the famous sign placed after the war to celebrate the valour of the Italians crew, fighting superior British tanks with really small and under-gunned tanks. The base is done with the sand and PVA glue trick.
Medium level
Skills: medium
Costs: 20/50 dollars for a couple of Infantry units
If you want something more “spectacular”, you need to spend just more time and few more money. You still need dry sand, glue, etc, but also some ready-made bases. Battlefront has two plastic packs (one is rural and one is urban – just what we need!), while Baueda has a rural, urban and also a desert range. Again, if you prepare a list of the bases you’re going to do and have a plan, you can save money buying the right amount of bases from the start. Realizing you need two damn more small bases for your additional bazookas when you’ve completed the army is much more costly in time and money terms than understanding it before doing the whole army.
The Battlefront rural bases are really good: the sprues come with elements you can add to create a wide range of bases all different one from the other. Also, you can use these elements on the “normal” rectangular bases. Even with a single wheel or a German helmet, a base acquires a unique look. The urban base set is also good, but when you add elements on the “street” parts, you’ll notice some “holes” around the elements in the cobblestone.
Baueda bases are just too good. (disclaimer: I am the “official painter” for Baueda, but if you buy the raw bases I’m not going to earn anything.) They cost around 2 Dollars/Euros each, but they are finely sculpted. The holes are a bit smaller for V4 plastic infantry, so you need to be prepared to cut the infantry base. Also, some of them have still 5 holes, so you’ll need to fill the gap (maybe with an element from the Battlefront sprue). I really like the urban set, with lots of “city corners” you can use even for a large platoon like the British Rifle Platoon with 7+ bases, having a different layout for each base.
. I didn’t have the chance to try them, but they look awesome.
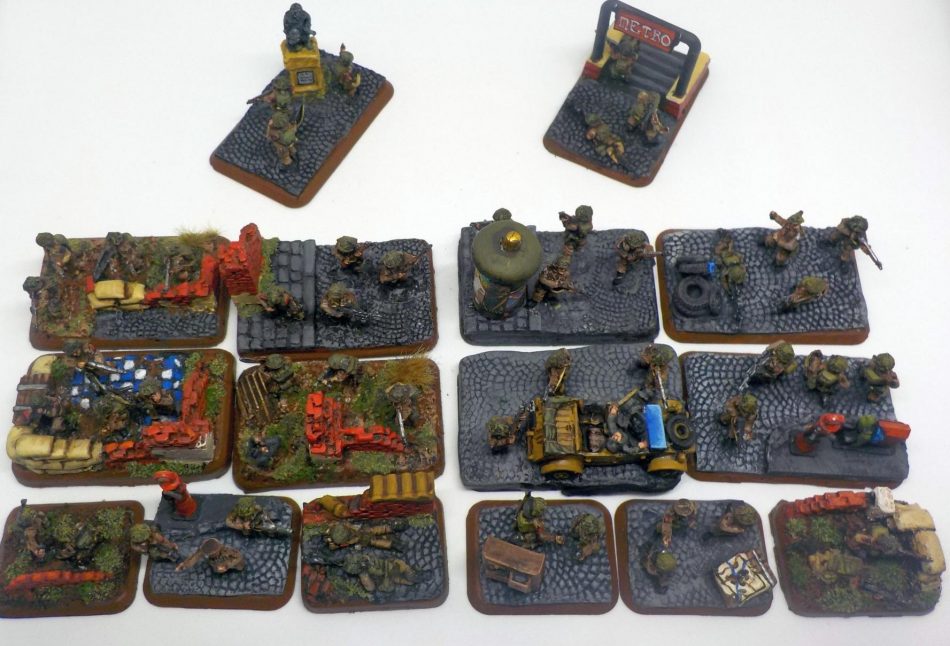
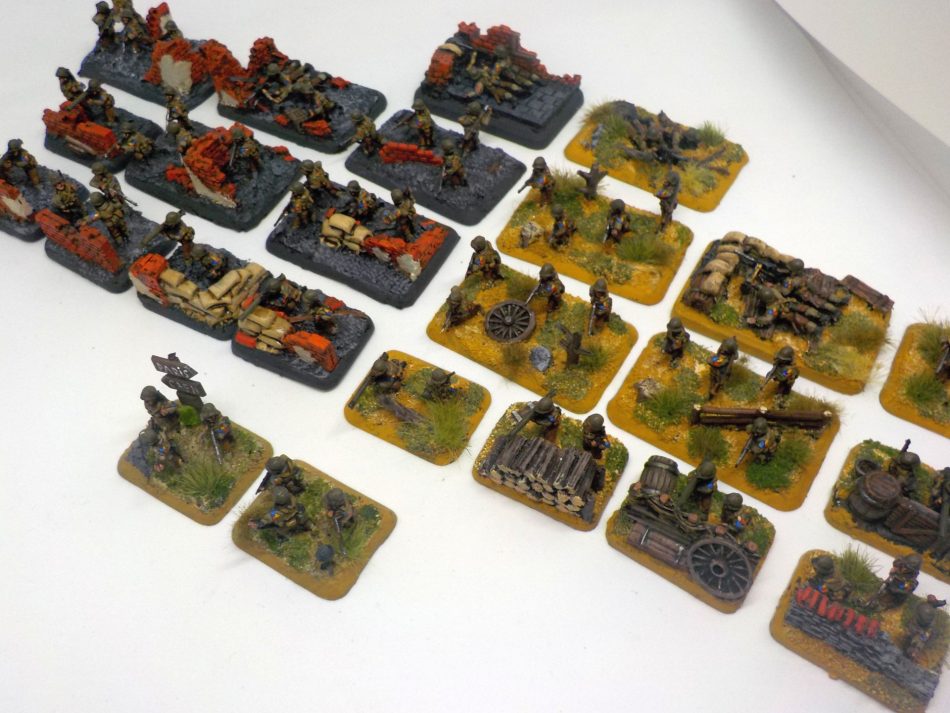 “All your base are belong to us!”: in this photo, you can immediately tell apart the two US platoons, one rural and one urban. Really useful during combined assaults.
Both Baueda and Battlefront have specific large bases for artillery, but the price to base your army will rise. However, it’s really good to have an army that is coherent and consistent.
I normally glue the miniatures on the bases after having painted both of them, and then I fill up the small gaps. It’s a good idea to have some sand on the base itself, especially on rural or ruin bases, to create a more convincing look. Be prepared to fill with some green stuff the remaining gaps, especially on the cobblestones bases (more on this later).
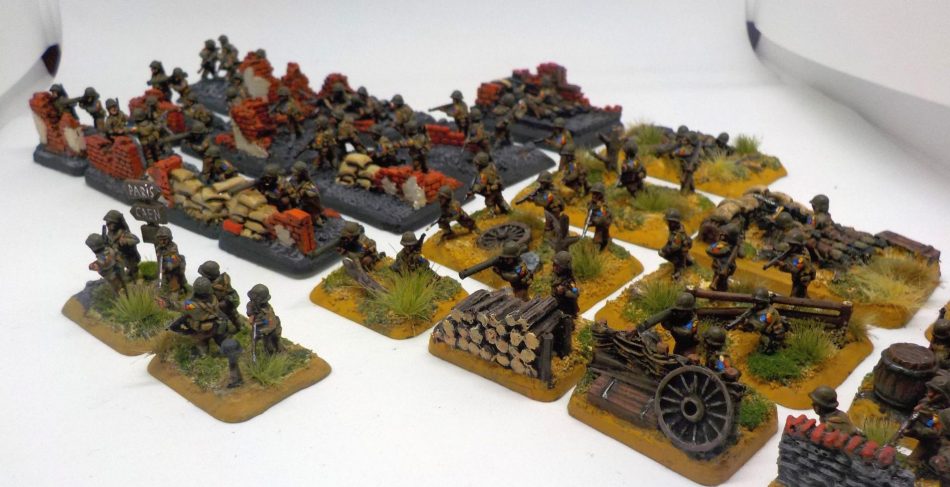 A closer look at the US bases. You can notice the mix of Baueda and Battlefront bases and elements.
Advanced
Skills: High, but you can do it!
Costs: 50+ Dollars
If you want to have truly unique bases, you need to create your own from scratch. Your “Bit Box” will be your best friend, since you can use any surviving bit from used sprue to create something new. The more the base and your creation tells a history, the better. For example, you can place a fuel tank and a wheel, like somebody left in a hurry under your assault, or build a small table on your artillery base with a commander watching the map and choosing the target. A tank wheel, an abandoned machinegun, a dead German soldier, a lonely helmet cut out from a figure you didn’t need, or a sign with “CAEN” can tell this story.
Baueda products and Battlefront bases are still really handy, as they are a really good source for elements like signs, bricks, broken doors. You will need a good cutter or a small saw to “extract” them. Also, you can try to create elements with green stuff, a two-part putty you can shape as you want (with skills and some tools). In the examples here, you will see elements I partially sculpted.
Another really good source for materials is Peter Pig: they have a wide range of 15mm “things”, from water well to fences, and a particularly good range of “30ies-40ies” Normandy street hardware, like gas pumps or abandoned furniture.
If you are looking for urban bases, really great help comes from the Green Stuff World rollers. This roller allows you to create cobblestones on the bases, using a thin layer of green stuff. You can find a very good video on how it works here – just remember to buy the 15mm scale rolls, or you’ll have gigantic stones.
(Watch to understand how to use very easily)
Here are some examples of bases I recently built for my new British Late war army
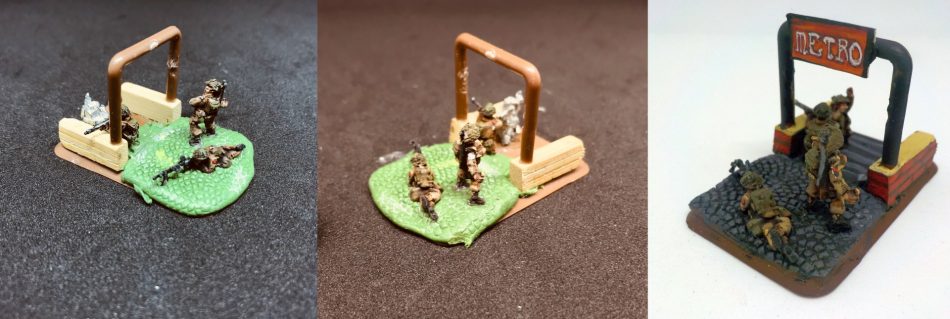 I know British troops didn’t fight in Paris, but I really liked the idea of urban fight near the Underground. Half of the base is made with the Green Stuff Roll, the other half is made with Chinese sticks cut and a sprue section with a “U” shape. The soldiers on the “stairs” have been cut in half to give the idea of people on a different level. The writing is printed with a colour printer and repainted.
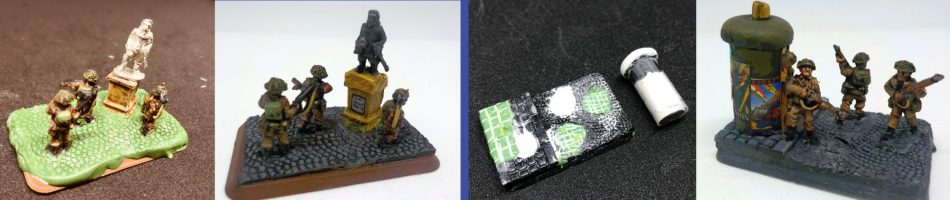 On the left, a very simple base: you just need a square base (like the counters you find in any boardgame) and a 15mm medieval miniature. You can do a statue in the middle of the street, just painting the “medieval” guy black with grey drybrush.
On the right, something more challenging. I used a Baueda base with a sidewalk and created a typical round newsstand/advert cylinder you can still see nowadays in Paris. I used the round box of my brushes filled with modeller past.
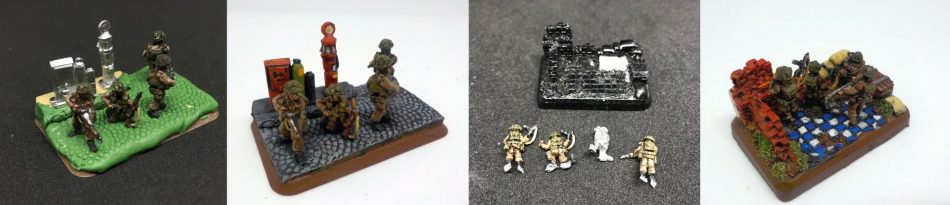 Left: I built the sidewalk with the same Chinese sticks, and covered with green stuff and the usual Roll. The Gas Station comes from the Peter Pig set.
On the right, a flat Baueda base with a floor tiles and some extra boxes. It’s generally better to place the miniature *after* you painted the bases, in this feature I did it before to give an idea of what we were achieving as a final effect.
 The commander needs to be visible all the time on the tabletop. So I decided to have a special base with a map, you can find it immediately and be sure he will help with morale checks. The map is from paper hankie and PVA glue. On the right, the PIAT on a modified Baueda base, ready to ambush a Tiger!
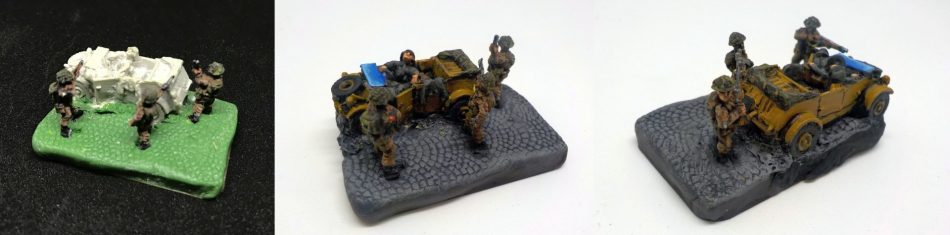 Not so easy: the Kubel wagon with dead Germans is from Peter Pig (you just need to cut the base, since they come in pairs). However, it’s a bit tricky to cover the rest of your base with cobblestones with the Roll.
 The final result: the better they are painted, the better you can ask them to fight during the tabletop battles!
Also, you can create small dioramas under your planes and helicopters. The oval FOW V4/Team Yankee shape is large enough for a destroyed tank, but you can use wood rectangular shapes – they don’t count in game terms so you can have a bigger base.
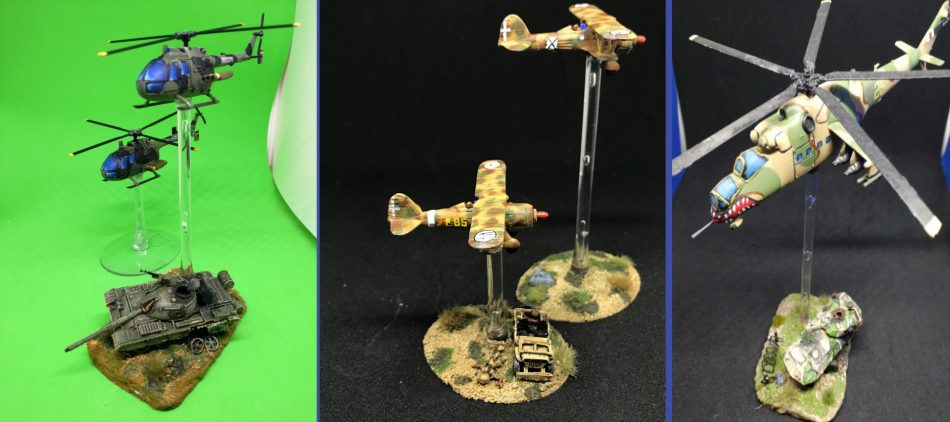 On the left. The destroyed T55 has a flank armour section and some wheels removed to simulate the internal explosion. The hatches on the back are also blown up, you just need to remove them from the plastic before assembling the tank and glue them in the open position. With the 15mm scale, it’s just enough if you paint some black around the greenish armour for the burnt.
Centre. There two Italian Falcos gunned some unlucky British soldier on his jeep. A good way to use carriages and trucks bought for V3.
Right. The Hind is flying on a destroyed US LAV. I did make some holes in the LAV’s armour to simulate the impact of the weapon and did some orange retouches to show the real hole, since in this scale it’s easy to miss it – black on black.
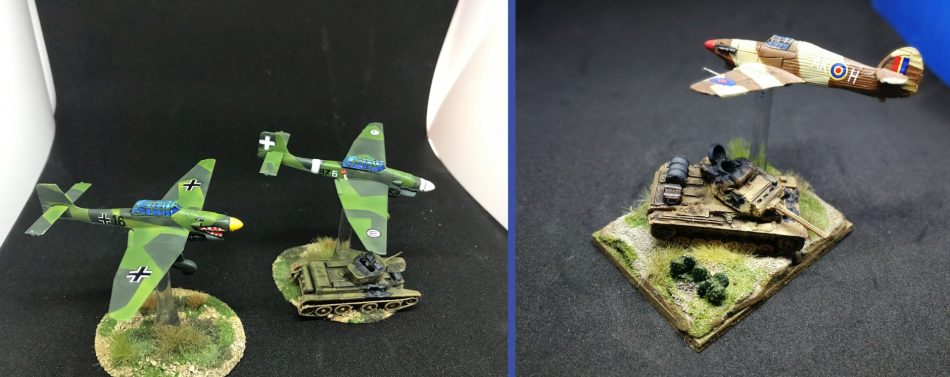
Left. These Stukas fly over a destroyed Russian tank. Again, to show the “hit” I did some grey touches on the edge.
Right. The Hurricane just destroyed a German Panzer. The cactus comes from a Baueda base – never throw away the bits!
Excellent article, very helpful and good to have base info in one place. Thank you.
What a wonderful and well written article. Once again you have outdone yourself. Helpful and informative. Thanks.
Regards Soren
wow, thanks! really happy for these compliments 🙂
Great article! Thanks for the detailed level comparison. Also some inspirational ideas. Basing is one of my favourite parts of putting together armies.
thanks 🙂
A great way to do a diorama under a plane is with 1/285th stuff.
I once put an L4 over some german armored cars as if they were being shelled.
https://tinyurl.com/y39oxsu7
https://tinyurl.com/y3anoffb
https://tinyurl.com/yxg6gys2
very good indeed!
Awesome