PSC Leo 1: A Review
By Alex H.
Photos by the author
Plastic Soldier Company (PSC) recently released their much-anticipated . If you follow their , you may have been aware that the initial run of kits was missing the driver’s hatch, but PSC quickly retooled the sprue, and to my understanding has replaced any boxes that were missing this piece. I received my box from PSC over the holidays and I am very pleased with the kit.
The box includes five models, which can be built as the German A1/A3 or Canadian C1 variants. As new Team Yankee player who has picked up the West Germans, PSC’s timing is great. Battlefront has announced a plastic Leopard 1 kit to support the release of the Dutch, Canadians, and Australians later in 2018. I suspect, however, we might not see BF’s plastic Leopard 1 until much later this year. If you cannot wait, PSC’s kit is definitely worth your money.
Starting with the price point, PSC’s kit is a great value with a retail price of $26.99 US, making the cost per model $5.40. As a generally frugal wargamer whose hobby funds are at the back-end of my family budget, without the PSC kit, I could not fathom fielding a Leopard 1 heavy force. (I have plans to field a 70 point Panzeraufklarungs Kompanie at an upcoming tournament with seven Leopard 1s, which I could not to do without the PSC kit.)
Assembly
PSC’s design of the sprue has minimized mold lines. Only the road wheels and cannon took more than a few strokes of a hobby knife and file to clean. Assembly of the model is straightforward and the majority of the parts fit snug. There was no need to trim any parts to secure a better fit.
I was particularly pleased with the ease of assembling the tracks, which lock on nicely to a set of rectangular pegs that protrude from the side of the hull, making this step near impossible to mess up. With this kit, there is less reason to fret over machine guns (MGs) breaking off the tanks. The connection between the MG and the gunner’s hatch is very sturdy as compared to other plastic and metal/resin models I have built for this scale.
I do have a few recommendations to improve the assembly process. If you build the hull according to the directions, lining up the top plate with the lower hull can be tricky unless you glue on the front hull plate first. The turret has a similar issue, but I found these could be worked around by gluing the upper and front pieces of the turret together before gluing this subassembly to the base of the turret, or alternatively, gluing all three parts together simultaneously. The tradeoff for these minor modeling challenges is that PSC was able to get some great details on the front hull plate, notably the headlights and reactive armor, and the sides of the turret, which will look great when painted.
Crew
Aside from a couple of difference between the Canadian and West German variants, the other optional components for this kit are the tank’s crew. The commander, gunner and driver’s hatches can all be modeled open or shut, and there is a well-sculpted figure for each crewman.
Magnetizing Turrets
My only quibble with this kit is its lack of a straightforward way to magnetize the turrets. I found a workaround that requires minimal modeling skill, but lacks direct contact between the magnets. This is done before the hull and turret are assembled, as the magnets will be inside the fully assembled model.
First, with the turret base inserted into the top hull plate, I used a side cutter to shave off a very small portion of the peg on the turret base, so that the peg is flush with the underside of the top hull plate. Then, I glued a 15×60 mm rare earth magnet on the underside of the top of hull plate, centered beneath the hole for the peg on the base of the turret, trying my best to avoid getting any glue in the hole for the peg. I mark my magnets with a fine tip marker for this, and to keep the alignment of the polarity consistent amongst my models.
After the glue sets (be patient so you do not accidentally rip off the first magnet with another magnet or a passing hobby tool), place the turret base peg into the hull plate and glue the top magnet to the inside of the bottom turret plate. This way the magnets self-align. From here, the tank can be assembled, with the obvious risk that should the magnets ever break off, you will probably never get them back in place without some very creative drilling and glue work.
I recommend testing the strength of your magnets before gluing them on to ensure that they are strong enough to hold the turret in place during transport and gameplay. Hopefully, PSC will find a way to design their future kits to be more compatible with magnets (perhaps in time for the other Leopard 1 variants and Gepard that PSC has teased on their Facebook page!).
Appearance and Details
These models look great once they are assembled. The design allowed PSC to get sharp details onto all the angles of the tank; nothing appears “flattened” or two dimensional. I do not consider myself a “tread-head” or “rivet-counter” so I did not scrutinize the design for historical accuracy.
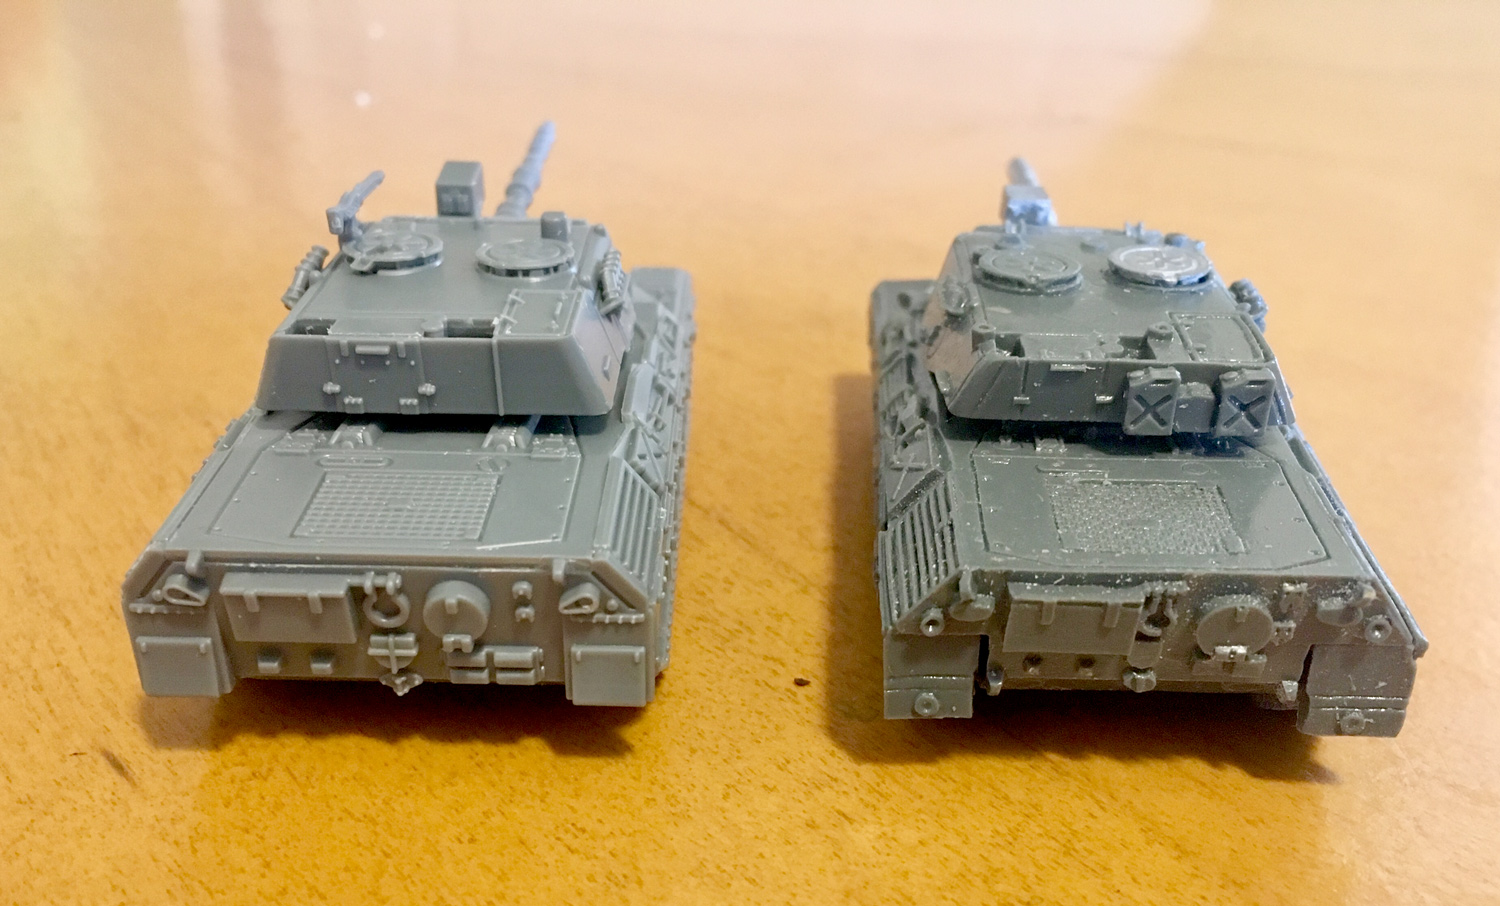
Overall, certain details on the PSC model have more emphasis, for lack of a better word, as compared to the Battlefront counterparts in my collection. I presume that this is the sculptor’s discretion in the challenging task of reducing a massive vehicle down to a 15 mm scale model. This is most noticeable in the details on the track skirts, cannon, rear hull plate, smoke launchers, machine gun, and trackpads.
I would not say that one company’s model is better or worse than the other, but I will complement PSC on their job of sculpting the smoke launchers, head lights and tail lights (yes, I do paint those) and the ridges on the cannon segments. Even with these differences, both models will look great together are there are no glaring differences in the size of the two models.
Overall, I would highly recommend this set for anyone who needs to add this ubiquitous main battle tank to their Cold War collection. I would definitely purchase more boxes if I decide to expand the Leopard 1 component of my West German force. I am excited to paint some NATO camouflage on these tanks and push the communist hordes back across the Iron Curtain!
Alex H. is from Southern California and started wargaming with Battletech and 5th Edition Warhammer Fantasy. His current focus is on historical games, with the occasional venture into sci-fi and fantasy games.