DBMM Battle report: Carthaginian vs Bosphoran
After , it’s time to deploy two armies and see how this ruleset works on the tabletop battle. As we told in the previous feature, we normally play 400 Army Points (AP) with 15 mm miniatures. In tournaments, we also use same period army: for this reason, here we have a 400 AP Later Carthaginian attacking the same size Bosphoran army. The two armies obviously never met in real History, but they came from the same DBMM period, the Classic 500 BC/476 AD. Will Hannibal prevail or meet another Zama?
My Army
I played the Carthaginian list: it’s really an eclectic army, where you can have tons of Elephants, a very good Cavalry wing but no heavy Knights at all. Also, you can have the classic Spear infantry (with an optional upgrade to Sp(S), the veterans under Hannibal) and lots of Auxiliary – the infantry you want to enter difficult and rough terrains. But you can even enroll some Gaul warbands, adding a significant punch against enemy infantry.
Having played any variations of the Carthaginian list (I love them, despite I’m theoretically a “roman” heir born in modern Mediolanum), I opted what I consider the best combination.
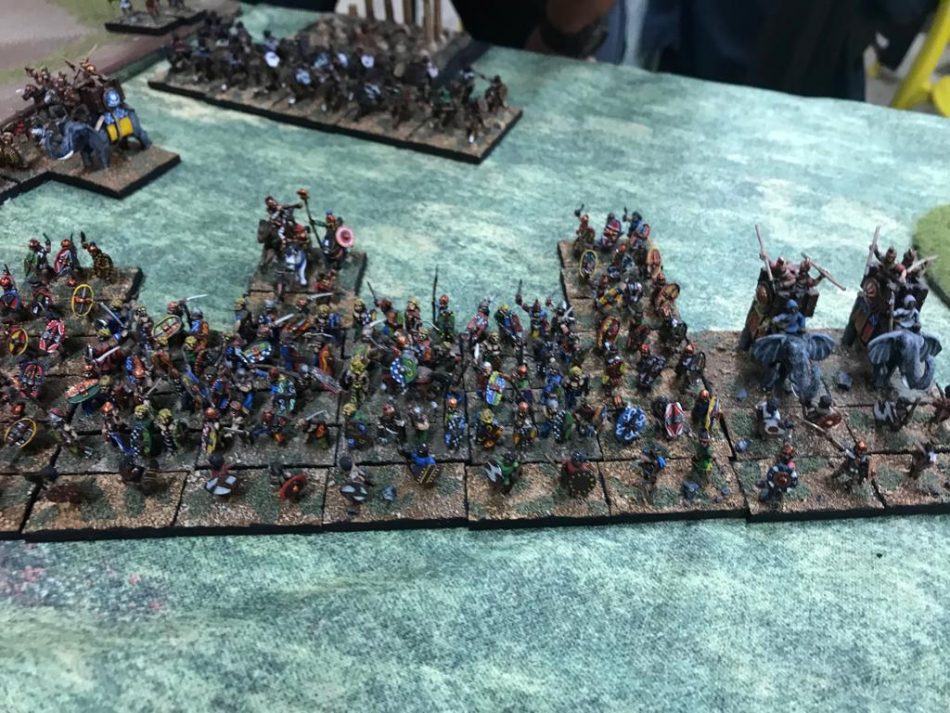 The central command. A strong command under the Brilliant general Hannibal, with 16 iWb(O) and 2 iEl(I). Some light infantry (Psiloi) helps to cover the Elephants from unwanted attention (like massed shooting) and brake down enemy infantry. Other iAx(S) have the duty to capture a middle size terrain or to cover the flanks.
 The “Terrain” wing. A Command with the elite Ax(S), some cavalry rCv(O) and 6 rSp(O). The Spears on the flank are normally a surprise and can be a game changer if the combat is Ax vs Ax in the open. Another El(I) provides a good deterrent for wandering knights.
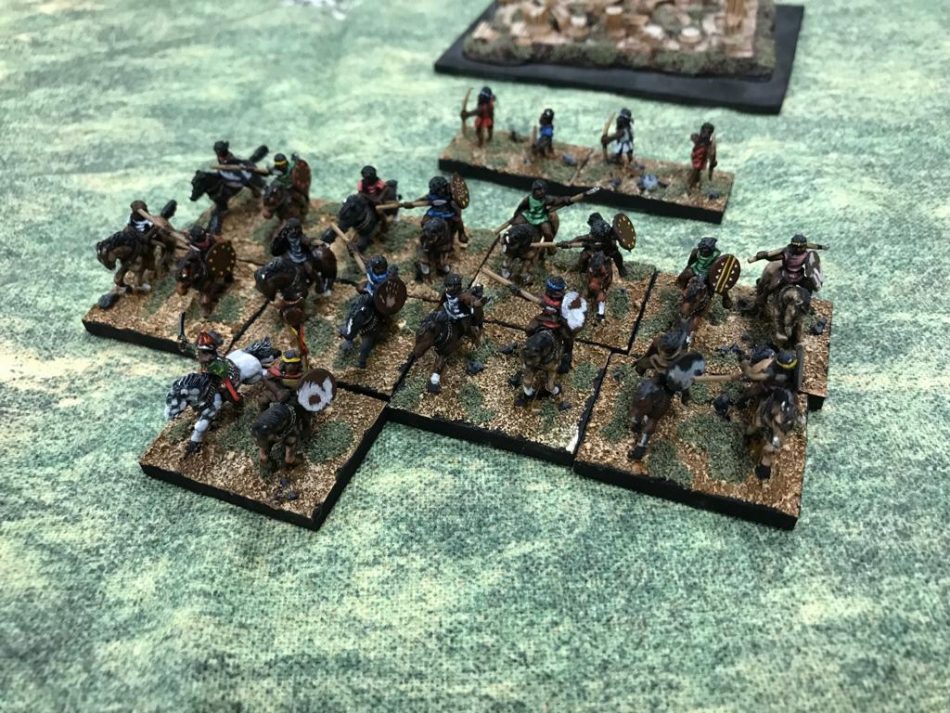 The Numidian Wing. 9 LH(O) with a regular dedicated sub-General. Also, some light Ps(O) and Ps(S), very good to protect the camp if placed near a rough or difficult terrain. This wing should never have a prolonged fight but used to quickly exploit gaps in the enemy line or clean away lesser quality light troops.
The idea is to attack the opponent center (usually, formed by heavy infantry like Legio or Phalanx) with the Wb, using the El(I) to counter the Wb’s natural killer, the heavy Knights (Kn). One wing has the task to control the terrains with its Ax(S), while the other is the small but fast moving reserve. The CinC is Brilliant, and this means you pay 25 AP more but you can double a single PIP die twice in the game. Also, you can change the order of the dice, so if you have assigned the highest die on the right flank and you need more PIP in the center, you can swap dice immediately with no maluses. A Brilliant General can also add, twice for game, +2 to his melee score, but Hannibal is a normal Cavalry, so he is not expected to fight too much. All these bonuses are cumulative, so you need to decide carefully which bonus to use: after two “genius stroke”, his tactical smartness it’s depleted.
The opponent army
My old chap Massimo Vecchia used his beloved Bosphoran army. I think you can tell a lot about a person from his wargaming choice: while I am truly a “regular” kind and play invariably with formed and ordered armies, Massimo is the “wild” kind, and he really loves to play with uncontrollable masses of Kns, looking for a devastating charge to determine the fate of the game. His army is made up by two commands of Bosforan Knights, the iKn(F)s. They are faster than usual Kn(O), but have some malus during the fights in the opponent bound, due to their lighter armour. His Kns have the quick kill rule over all my infantry: in game terms, while I need to double the result to kill a Kn with my infantry, he would just need to score a +1 over my infantry. Not the best situation, for my Sp, Ax and Wb. However, I had three El(I) that have quick kill over Kns. Would be enough to balance the fight?
Massimo also had a Roman Command Ally, with some Bds (the DBMM “legio” type) and lots of Ax(S)s. Using an Ally in DBMM is a very good option to add some troops your army is lacking. The Bosphoran is an excellent mounted army, but totally inadequate in controlling a difficult terrain. The Roman ally is a clever addition to supply the Bosphoran generals with a real strong infantry force. However, the Ally can be unreliable. If the first PIP is only “1”, the command refuses to engage in combat, and you also risk to see it fighting for the enemy.
The table set up and deployment
Later Carthaginian under Hannibal has an aggression level of 4 (the maximum, in DBMM terms). Hannibal attacked everywhere in his career. On the contrary, Bosphorans were very “peaceful” and so they have a factor of 0. So, no surprise I attacked. The attacker, in DBMM, deploys last, and this is a huge advantage. However, he also has much less control over the features on the table. Having an infantry army facing a Kn one, I tried to have difficult terrain to protect my Ax and Wb, very vulnerable in the open if charged by Kns. In the end, we had a single huge rough hill in the center/right section, a small wood on the right, and a good hill on the left.
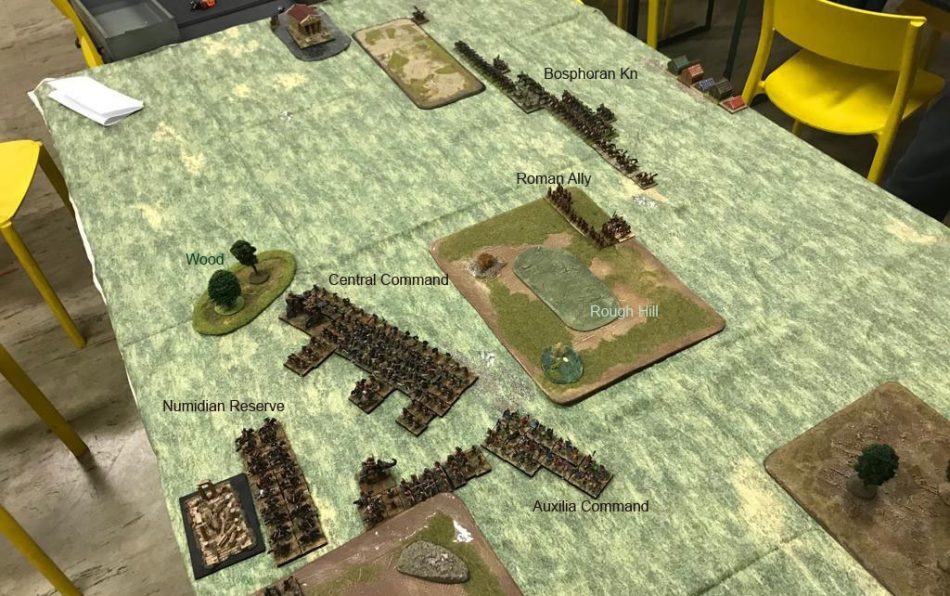
Massimo, as defender, deployed his army before mine: he placed two Kn commands in front of the open half of the table, and the Roman ally ready to capture the top of the hill. However, a rapid calculation proved I was only able to see less than 300 AP on the table, with his two knights command and the Roman Ally. We were missing a fourth of his army, that could be in flank march or in ambush somewhere on the table, out of my sight. I deployed my infantry behind the rough hill, with the El(I)s guarding the open left flank. At its side, I placed the Ax(S) command, to support the advance on the hill. finally, the Numidian light wing was deployed behind the main corps: their duty was to search for an open channel to get behind the enemy line.
First bounds
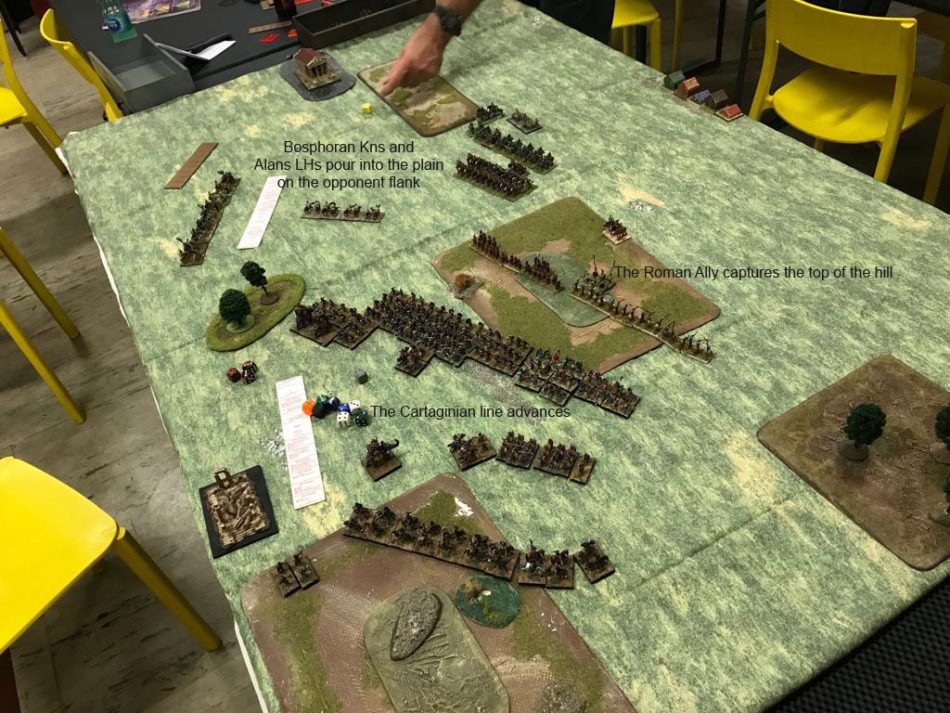 The defender has a final advantage: he can move first. Massimo used this advantage to swiftly secure the top of the hill with his Romans and to shift all his kn in the open half of the table. He would never be able to attack the rough hill with his mounted wing (over there, my Ax would benefit of a +1 for the upper ground, and his Kn a -1 for the impervious terrain, and also they wouldn’t quick kill the infantry), but could cover the flank of the Romans and support their position. Also, he revealed an ambush behind the left hill: an allied command of Alan LH(S). In total, Massimo had two allies but was lucky enough to have both of them perfectly reliable.
For an infantry army it is virtually impossible to face such a stronger mounted force, so in my round, I moved my infantry into the rough hill. Once I controlled it, it could be a pivotal hinge to advance towards his line being protected by the terrain. So, I moved my Wb and Ax up to the Roman position on top of the hill. I needed that hill, boys!
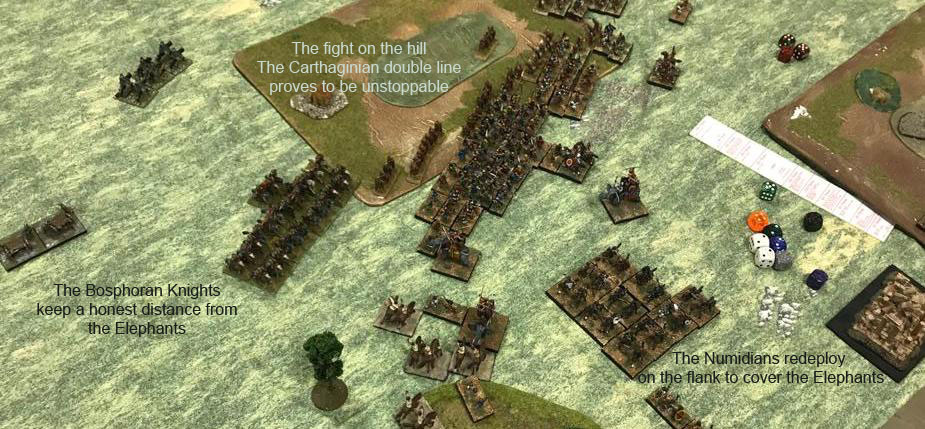
Massimo massed all his Kn on my left open flank. However, he didn’t dare to charge: over there, my two El(I) guarded the flank, and since they had quick kill on the Kn Massimo greatly feared them. This gave me time to maneuver the Numidian Command from behind the formation to my left, protecting the sides of the El. Since the Elephant flank was in danger, I used the special Brilliant ability to double the Numidian Command die and reach much faster the position I needed.
iEl are irregular bases: it’s very difficult to move them around, and the enemy normally can get on their flanks easily. Under DBMM, all bases have a Zone of Control (ZOC) on their front, a 4 cm square where the enemy can only retreat or charge the ZOCing base. For this reason, I used the light cavalry to cover the flanks of the Elephants: if Massimo would like to go on the pachyderm, he had to attack the LHs before, exposing his own flanks.
The Fight on Hamburger Hill
Massimiliano moved his Romans down the hill to attack my infantry center. Bd vs Wb are 4 vs 3, and they both have quick kill in their bound vs the opponent. Roman Ax(S) is exactly the same of my Ligurians Ax(S), but they enjoyed a +1 for being on higher terrain in the enemy bound. So, my Carthaginian line had to face a difficult task. However, my line had a single advantage: I could count on reserves. Almost my line was twice deeper than Massimiliano’s one, who had to thin stretch his Romans to a single base long line to cover the hill. Also, I had the flank on the right, so I began to close the flank of his formation.
In DBMM, when melee happens between two bases, you roll a dice and add it to the basic melee value of the fighting unit. Then, you compare it to the enemy doing the same. If the result is a tie, the two bases stand firmly. If one of them totals more than the other, the loser is pushed back of the distance of its own base – we call this outcome “a recoil”. This usually gives a -1 malus to the following combat, because of the overlapping enemy. If you manage to double the opponent score, you kill it. However, some units are particularly good versus some kinds of enemy, and so they have the dreaded “Quick kill”: with quick kill, you just need to roll higher than the enemy. For example, Kns and Wbs have quick kill on almost all infantry. If you manage to “lock” on the flank of an enemy base, you also need to roll simply higher than the flanked unit. Since it can’t recoil, being blocked by the flanking enemy, it’s destroyed.
The combat into the hill was quick and fierce. For some bounds, Massimo’s Roman Allied managed to push the Carthaginian line back, causing some losses on overlapped bases. But when I managed to get on his flank on the right, I quickly overturned the situation. The Roman command was quite small – its moral level was 16, so after 5 losses it becomes disheartened.
In DBMM, a command has its own morale level. If you lose more than one quarter, it becomes disheartened: it still fights on, but has a -1 all fighting values and is more reluctant to move towards the enemy, since any aggressive movement costs +1 PiP. If you lose more than one third of a Command’s elements, they all become demoralized and count as lost for the total of the army. When half of the bases are lost or demoralized, the whole army stops to fight and the game ends.
The Romans fall
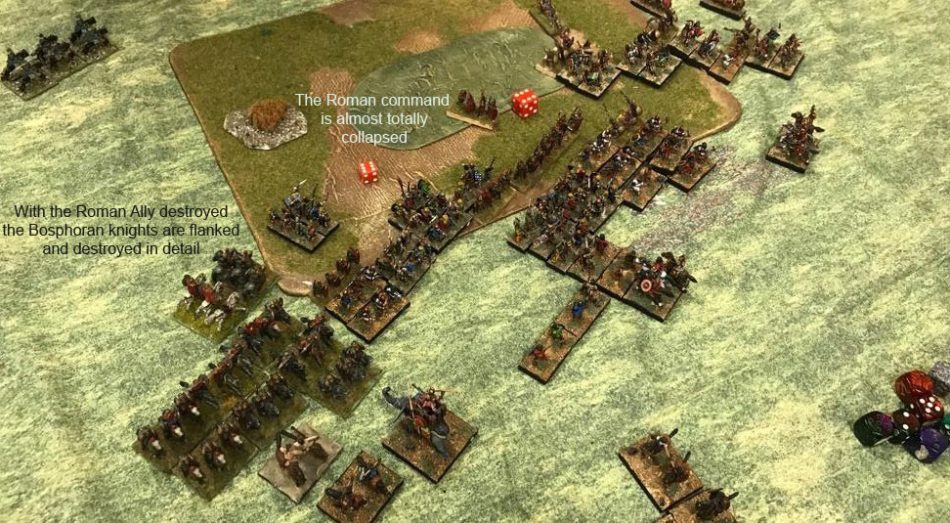
Pushing hard on the Romans, I managed to kill enough bases to fully demoralize the Allied command. This generated a huge problem on Massimo’s line: the Kns were committed in front of my two Els, waiting to see what happened on the hill on their flank. Since the Roman command was vaporized, they now had a flank totally exposed.
So, Massimo did what a true Bosphoran general would have done in real battle: he charged! A mass of Kns flew towards my line, entering the gap between the huge central hill and the small wood spot you can see on the center. The massed Kn charge is really fearful: imagine hundreds of knights armed with a 2 meters lance, wielded with both hands, charging a formation of Numidians and african Elephants.
The Kn destroyed easily the LH, but solid crashed on the Els.
So when the dust raised, we had a line of Kn bases with some holes, where the Elephants unleashed their might attacks, and the Numidians in full retreat. However, the infantry was emerging from the hill and getting on the Kn line’s flank and even behind it. Killing some Kn was enough to demoralize the central command: these losses, combined with the Roman Allied command already wiped out, were enough to finally compromise the Bosphoran total morale.
The final score was 20 – 5. Massimo managed to kill 20% of my army, and for this reason, he got four points (two for each 10%). The Numidian command was also disheartened, so he got another point for a total of five. The winner gets 25 minus the loser score, so the final score of 20-5, with a triumphant Hannibal entering in Panticapaeum city!