Afrika Korps Army Paint, Part I: Infantry and Guns
By Dennis Campbell AKA Matt Varnish
Photos by the Author
Part II will be vehicles
Hey gang, what’s going on? A few folks have DM’ed me on Facebook asking about my DAK force that have been up on a few Battle Reports, and how I painted them. So here is a how-to step by step (literally) on how I built and painted my force, which looks like:
Infantry and guns, Basing:
If you don’t have the pre-holed bases/and have gun teams, score with a sharp blade diagonally on the base, which makes any spackle filler or even just PVA GLue/Sand stick better.
Use the pink stuff, which turns white as it dries, so I know if still wet. [Editor’s note, I use the same method and tool as Matt to base my figures. I’ve found that adding a few drops of water, either to the base or the spreading tool helps spread the spackle, but too much water will make it smooth and not as “rocky”.]
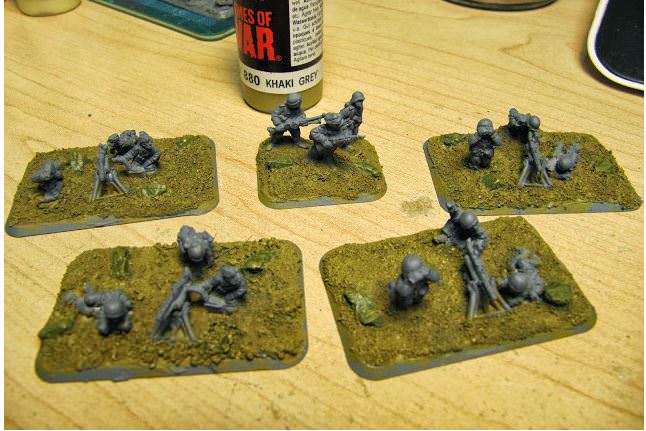
Here I have my Anti-Tank rifles, HMG and Mortars spackled and can be left to dry prior to gluing on the rocks and sand. I have an already-mixed tub of Qatari sand thanks to my brothers business dealings in the middle east, and some Gale Force 9 rocks mixed in. The keen observer will note my pzb-41s are facing the short edge not the long. My theory is, in Version 4, they have 360 degree Line of Sight, so I am not rebasing these!
Following an old Version 3 desert basing guide, it said to use Vallejo Brown Violet (how this is brown or violet….?) for the rocks, after everything else primed in grey
Next up is a liberal amount of medium brown. Vallejo Flat Earth works, but here I was low on Flat Earth and had plenty of British Uniform Brown. Use whatever you have, so long as its darker than Khaki Grey
Next up is Vallejo Khaki Grey (not very grey) heavy drybrushed over everything.
Now do TWO drybrush coats of Green Ochre (not very green either). The second drybrush somehow DOES make a difference.
Next, a light drybrush of Vallejo Iraqi Sand. Then a white on JUST the rocks. Basing is done for now. I add my clump foliage after everything is painted.
On to the infantry!
Paint the helmets Green Brown and the entire uniform Field Grey. For crew-served weapons like these MG-34 HMG tripods or the mortars, Green Brown as well.
Next up, paint the skin, Beige Brown for the rifles, whatever dark Metallic you have for the metal works, then highlight the helmets in Buff, trying to leave the ring detail on the rim. To wash the model, I suggest Army Painter Strong Tone, which shades everything for you.
Now the detail highlights: German Uniform 920 for the tunics, Green Grey 886 for the webbing and bread bags, Beige Brown for the canteen pouches, and Dark Grey for the boots. If you had any crew-served weapons, highlight them now either Green Ochre or Dark Sand (depends on the unit/time period)
Now you should have smart-looking infantry, and, naturally, the same principle applies to larger gun crews. These are captured and re-bored PaK-36(R) guns (ZIS-3) and I have my guns highlighted with Dark Sand and then scuffed up with some Dark Grey (next article)
Part II will have my steps for my Vehicles, but for now, here is a teaser of my objective markers:
I ended up winning Best Army at 2014 US Nationals because of the high-contrast style and also perhaps because of my printed maps and pin-up girls liberally spread around the army! The objective on the right is the Germans finding some ammo and skin-mags from a broken down abandoned Universal Carrier. Made very small and printed in a normal colour printer!
Matt Varnish, AKA Dennis Campbell, plays Team Yankee, Flames of War, and Black Powder in the frozen wastes of Canadia. Check out my youtube channel for hundreds of Battle Reports if you like here: