Bang for Buck: An Analysis of Bagration Soviet Artillery Options
By Richard Steer
Soviet artillery is quoted as being “the god of war”, so it is no surprise that there is a large array of artillery choices available in the book for Flames of War. Being so spoiled for choice leaves players with some difficult list-building decisions. Mortars or guns? One big battery or two smaller ones? Which of the 8pt units is the best? Is Soviet artillery even worth spending any points on in the first place?
To test this, I built a model that simulates each dice roll in the scenario being tested to find an outcome, then repeats that simulation thousands of times in order to find the likelihood of each particular outcome occurring. The targets are dug in Careful infantry teams, with five teams under the Artillery Template, or nine teams under a Salvo Template. The other assumptions are that the Spotting Team is the Formation Commander, and a +1 penalty is added for Ranging In on terrain.
It is important to remember that dice can do strange thing, and the numbers may not line up with your experience. There are always going to be patches of good or bad luck, or that one in a thousand chance which could occur in a game, but knowing the most likely outcome does help you have realistic expectations that can assist with your planning for the game.
 Comparison Between Nations
The first question I want to look at is how Soviet artillery in general compares to that of other nations. I have done this by calculating the average number of teams that are destroyed by a bombardment in the turn that you attempt to Range In, divided by the cost of the unit. The first comparison is between the typical medium mortar options of the four major nations, and the second is comparing towed four-gun batteries of Firepower 3+ artillery.
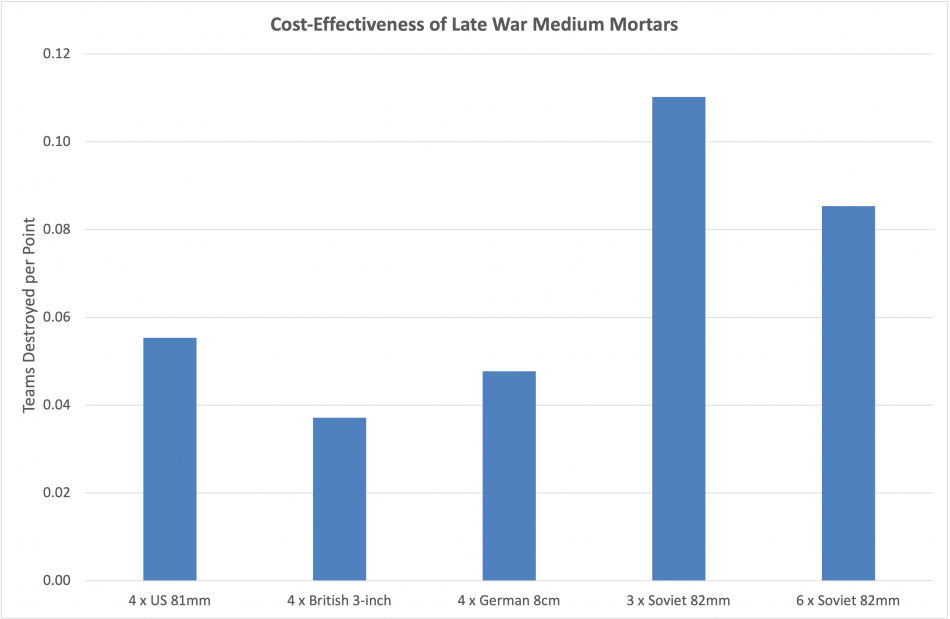
Soviet mortars offer very good value for the points due to their Aggressive rating not affecting their ability to bombard, and the small unit is only paying for three teams compared to other nations’ units of four. US and German mortars follow close quite a distance behind, while British 3-inch mortars suffer in this scenario due to paying for being Veteran, but Ranging In using a Trained Formation Commander.
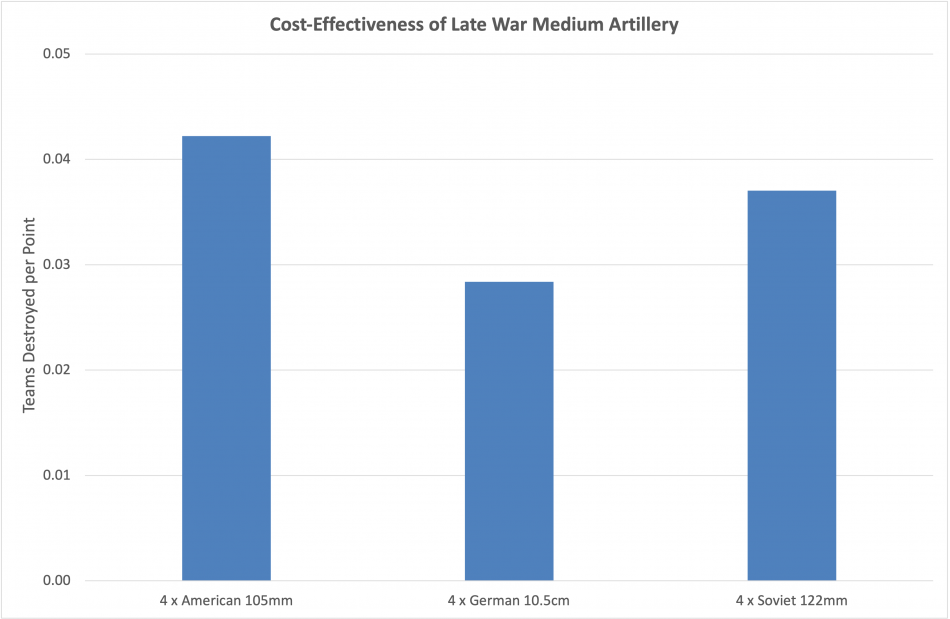
The true artillery batteries have a much lower cost-effectiveness than the mortars, since they are paying for greater range, a direct fire ability, and gun shields, none of which have any impact on this particular scenario. Once again Soviet artillery offers better value for money than the Germans, with the Americans being the standout here due to the effect of Time on Target.
Basic Comparison
Having established that Soviet artillery is pretty well priced in comparison to the other nations, I now want to examine their different options. As before, this is going to be measured as the average number of teams destroyed in the turn you attempt to range in, presented both as the raw damage that they do in the turn, and that damage per point spent on the unit. I have also included a unit of four 76mm guns firing direct at Concealed Careful targets at Long Range, to see how that compares to firing as artillery.
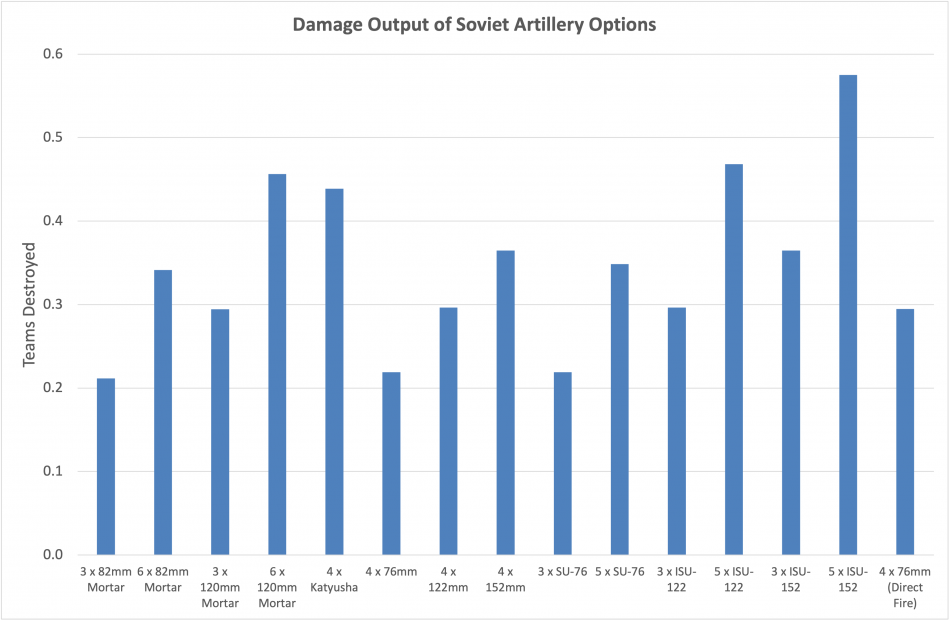
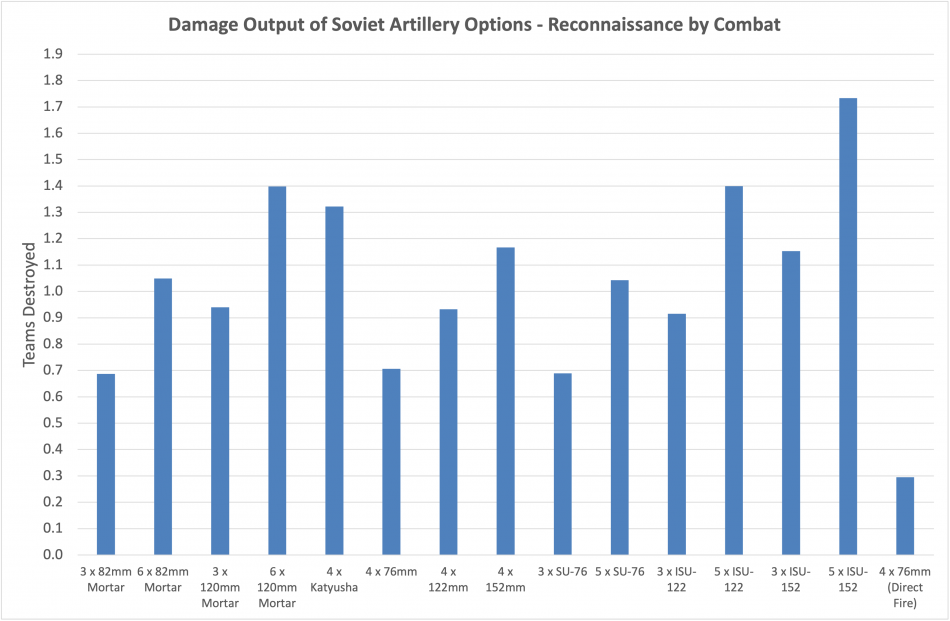
The most powerful Soviet artillery option is the big unit of ISU-152s (rerolled misses and Firepower 2+), followed by the the big units of ISU-122s and 120mm mortars (rerolled misses and Firepower 3+), and Katyushas (nine teams under their template in this scenario, instead of the five for everything else). The chart also shows that the mortar units with six teams are only about 1.5 times as effective as the smaller units, despite being twice the price.
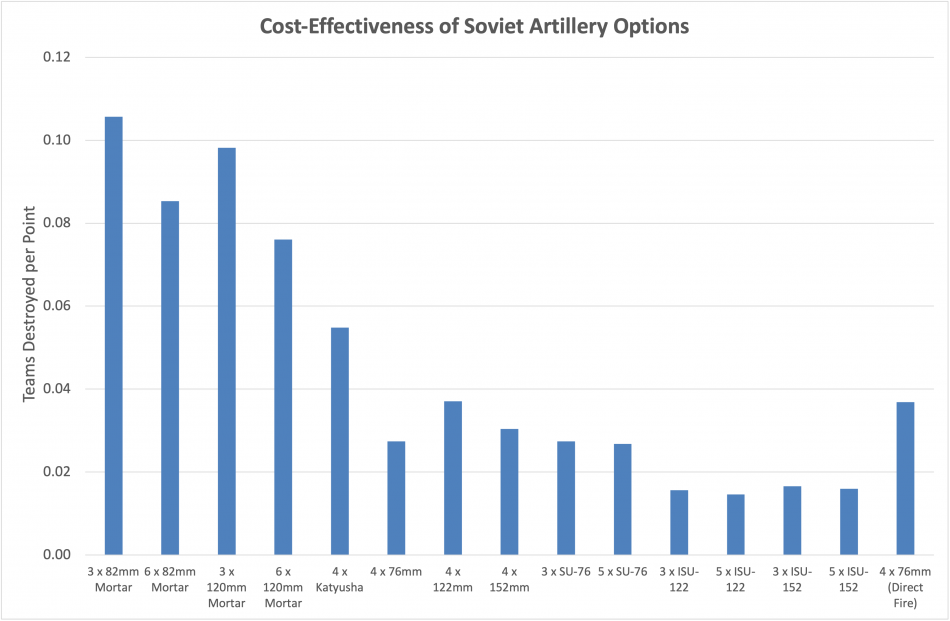
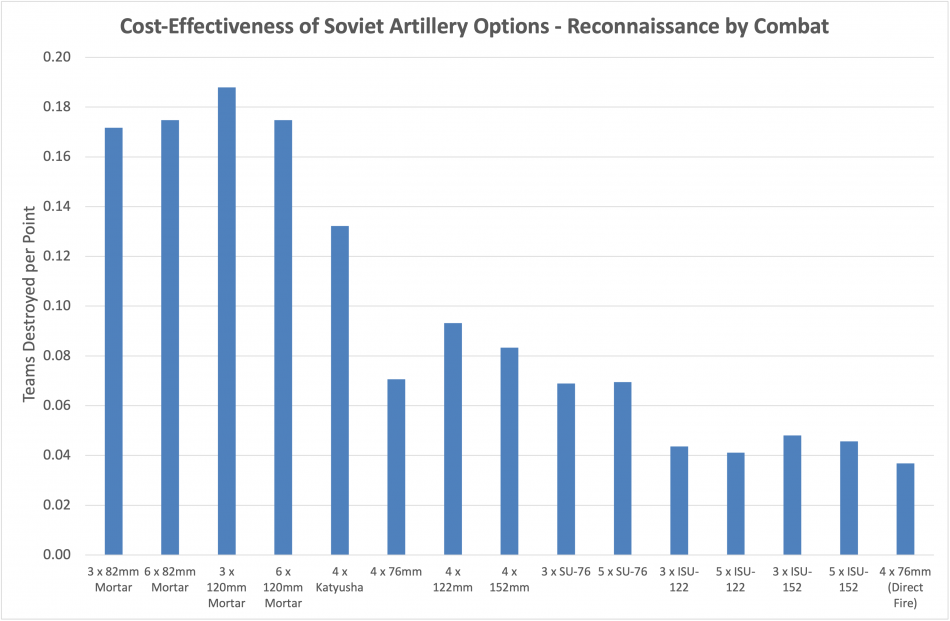
Turning this into cost-effectiveness, we see the mortars sitting at the top due to not having to pay for a direct fire capability etc. It’s not surprising that the heavily-armored ISUs are at the bottom end: very powerful, but expensive due to their heavy armor and high Anti-tank.
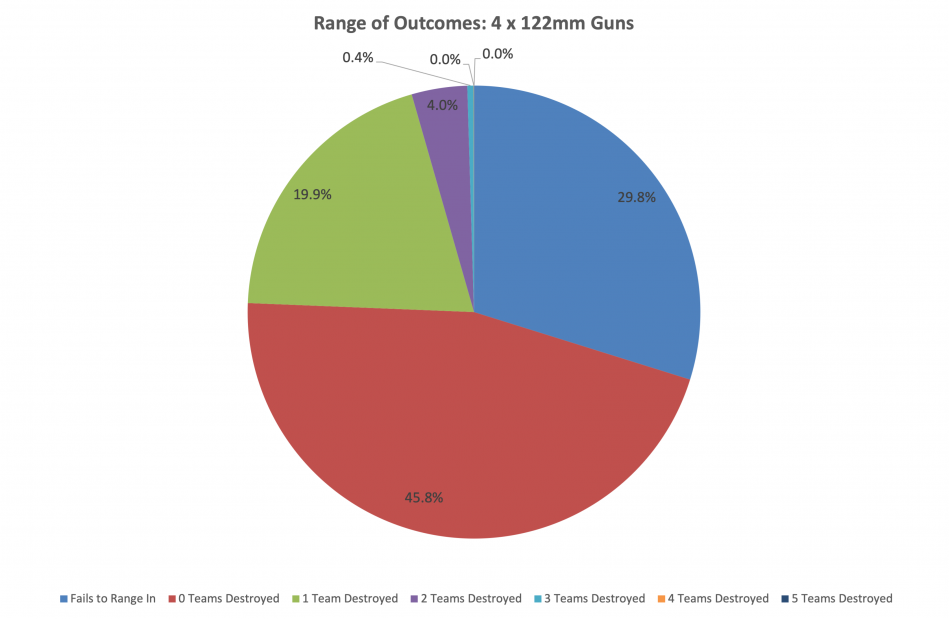
One thing that comes out of these charts is that no matter what type of artillery you are using, in the turn that you attempt to Range In on a target, the most likely outcome is that you are not going to destroy anything. To illustrate this, the next chart shows how likely each particular outcome is when attempting to range in a 122mm battery, giving only about a 25% chance of destroying at least one team.
 Reconnaissance by Combat
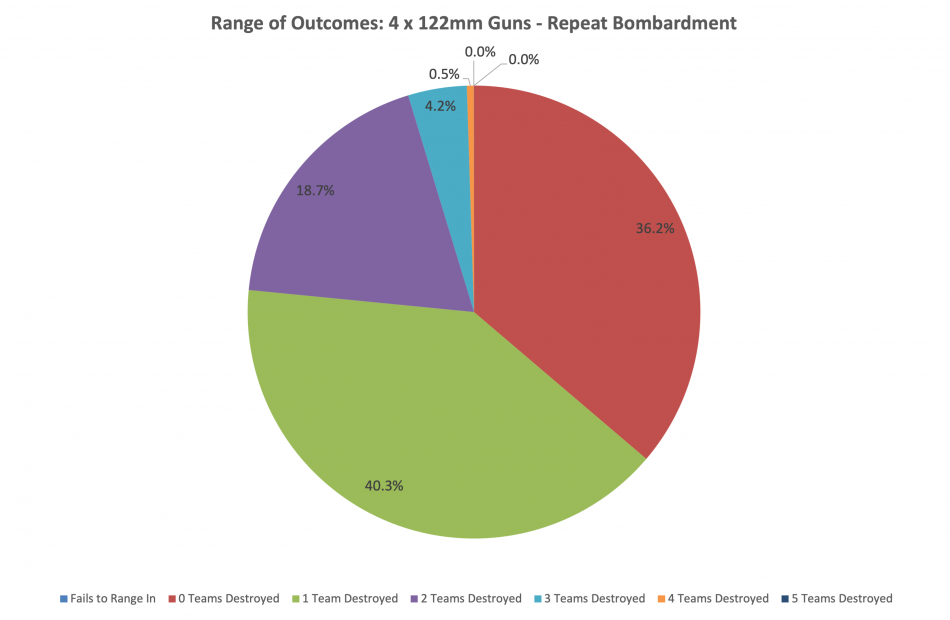
The includes a card called Reconnaissance by Combat. This allows you to reposition a Ranged In marker after deployment. This results in a big increase in their power due to getting an immediate Repeat Bombardment on a target of your choice. The card is not Limited, so it is possible to take the card for each of your artillery batteries.
For the princely sum of two points, the average damage output of any Soviet artillery battery is approximately tripled for Turn One. This 3x increase in power is consistent across all of the batteries, meaning that the better the artillery battery, the larger the damage increase caused by using the card.
Without the risk of failing to Range In, and with the targets rerolling successful saves, the likely outcome of the bombardment lifts significantly. For a battery of four 122mm guns, the most likely outcome is now destroying one team, and about a 25% chance of destroying more than that.
 Soviet Artillery Efficiency Rankings
The analysis produces a ranked list of artillery options, starting with the most cost-efficient bombardment, then working down through the next most efficient choice for the points.
- 3 x 82mm mortars
- 3 x 120mm mortars
- Upgrade to 6 x 82mm mortars
- Upgrade to 6 x 120mm mortars
- 4 x Katyusha
- 4 x 122mm guns
- 4 x 152mm guns
- 4 x 76mm guns or 3 x SU-76
- Upgrade to 5 x SU-76
- 3 x ISU-152
- 3 x ISU-122
- Upgrade to 5 x ISU-152
- Upgrade to 5 x ISU-122
To be fair, there are lots of reasons for ignoring this list. You may have some spare points and want to trade off a bit of efficiency for an increase in Firepower. You may not like the Katyusha’s 5+ Save. Or you may have another reason for taking a unit from further down the list (e.g. a secondary anti-tank capability or the Under the Cover of Smoke command card). This ranked list does, however, provide extra information to help you make those decisions.
 Summary
- Soviet artillery is good value compared to equivalent units from other nations.
- Artillery in general isn’t that good at digging out infantry, with most units doing it at an average rate of one team per turn.
- Doubling the size of a battery does not double its effectiveness.
- Reconnaissance by Combat has more value when used on your most powerful artillery units.
- Using ISUs as artillery is a waste of points as there are options that are just as effective for a fraction of the price, but if you are going to be taking them anyway then you might get some value out of applying Reconnaissance by Combat to them, to score some quick damage at the start of the game.
- The best bang for buck? The humble 82mm mortar.
I must say I just love this kind of article. Great work and very enjoyable reading. One problem with statistics is they are like mini-skirts. They show a lot, but conceal the most important. Yes at first glance the humble 82mm is best by for the points, but with a lot of ifs. Have a 3 team unit is less then optimal if it takes a casualty. The mortars are “soft” so can be pinned, they lack and form of self defence. They have low firepower so will most likely fail you when you need them the most.
Thanks Soren. I agree with what you say – there are a whole range of factors that go into the decision about what to take, most of which can’t be captured by statistics. It was a deliberate choice to focus solely on the effectiveness of the template.
It would definitely be possible to run more scenarios to try and capture some of those other aspects, e.g. do a round of shooting at the unit with some type of weapon, then see what effectiveness remains. I’d expect to see the ranking of the Katyusha crater and the SU-76 climbing, but the relative rankings of the towed weapons probably wouldn’t change as they’re all subject to the same vulnerabilities. It would also probably push the 82mm further ahead of the 120mm due to its 3+ save, so gut feel is that the top ranked unit in that scenario would be the 6-tube 82mm mortar company.
Nice to see the mathematics of this put down, but it only as noted offers one aspect I.e. what happens when I bombard, there are at least two major factors durability I.e how long are they likely to be effective for and deliverability are they always available to fire need also to be taken into consideration. In the case of mortars durability is at best average vs most counter battery fire and they osuffer from poorer deliverables ability by only recovering from pinning 50% of the time whilst the guns have similar issues. Howevet SPA are very hard to stop firing at you and have at least some defensive capability against most forms of assault so they have maximum deliverability and high durability which will often offset their cost deficiency when only looking at that.
Thanks Martin, I agree that durability is a gap in the analysis. I’ll update the model to take this into account and see what happens.
For those wondering about the impact of unit durability on this, I’ve checked what happens if the unit is first bombarded by a battery of 105s (Range In on first attempt, including effects of destruction of teams, pinning, and last stand), and get the following ranking:
1. 6 x 82mm mortars (i.e. don’t bother with the small unit)
2. Katyushas! (I really don’t believe they belong this high, and it highlights a limitation of modeling by scenario. Testing them against MG fire would produce a very different result)
3. 6 x 120mm mortars
4. 4 x SU-76 (again, a unit of three isn’t as effective)
5. Upgrade to 5 x SU-76
6. 4 x 122mm guns
7. 3 x ISU-152!
8. Upgrade to 5 x ISU-152!
9. 4 x 152mm guns
10. 3 x ISU-122
11. Upgrade to 5 x ISU-122
12. 4 x 76mm guns
13. Upgrade to 9 x 120mm mortars
14. Upgrade to 9 x 82mm mortars
I’ll look to publish an updated article that takes this into account at some point in the future.
Thanks for a fascinating and thorough analysis, it must have taken quite a while to do. Nice to see the 3 x 120mm mortars right up there as they’ve seemed pretty effective to me. Still not sure how to make effective use of ISU152’s though. ?