Bang for Buck: Bulge US Artillery Options Compared
By Richard Steer
is the latest release for Flames of War, covering the US forces in Northwest Europe from September 1944 through to the end of the war, and includes a vast array of artillery options for players to choose from. This is the third post in a series that analyzes the cost-effectiveness of artillery units in FOW, with the previous articles covering the and German forces from the Bagration series of books.
The analysis uses a model that simulates each dice roll in the scenario being tested to find an outcome, then repeats that simulation thousands of times in order to estimate the likelihood of each particular outcome occurring. The targets are dug in Careful infantry teams, with five teams under the Artillery Template, or nine teams under a Salvo Template. The other assumptions are that the Spotting Team is the Formation Commander, and a +1 penalty is added for Ranging In on terrain.
This analysis presents a long-term average outcome for a specific scenario. How a particular unit performs in a game will depend on a wide range of factors including terrain, players’ tactical choices, the makeup of the opposing force, and perhaps most importantly, the luck of the dice.
 Average Performance
The first measure of how effective an artillery unit is, is the average number of teams it will destroy in a turn. This is graphed in the chart below. The blue bars in the chart are for the turn that the battery attempts to Range In. This includes the three attempts to Range In, the impact that has on the score To Hit, and the benefit of Time on Target if the unit has it. The red bars are for a Repeat Bombardment, with the target teams rerolling saves.
The chart also includes a unit of 4 x Sherman (105mm) assault guns firing direct at Concealed Careful infantry teams at Short Range and Halted ROF, to see how that compares to using them as artillery.
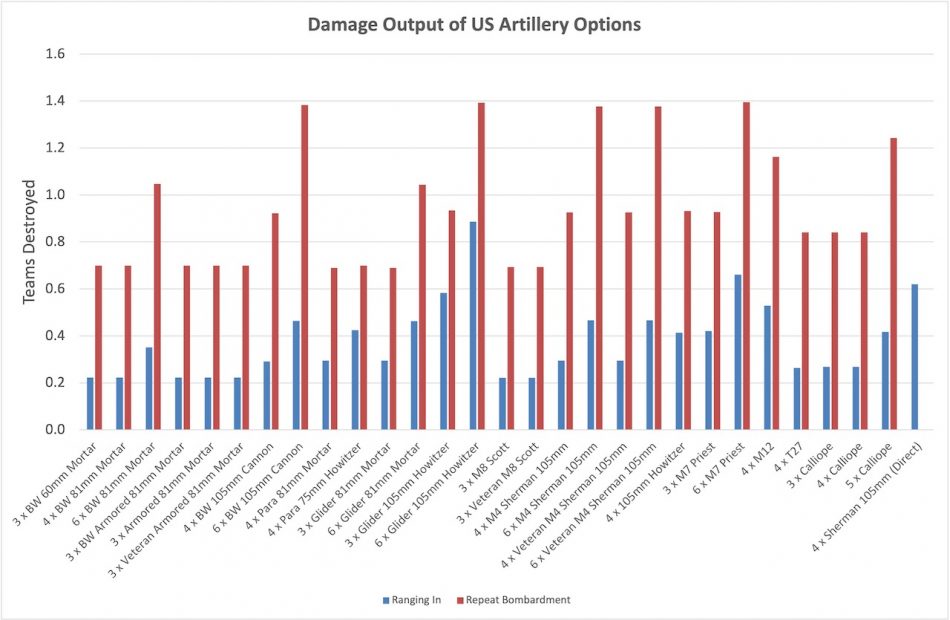
The standout performer is the Glider 105mm light howitzer battery, which is reasonable given its price. It benefits from being a Veteran unit, coming in a unit of up to six guns, being spotted for by a Veteran Formation Commander, and having Time on Target. On the surface, most of the other options are not that great, being unlikely to destroy any teams until they are able to Repeat, but it needs to be remembered that many of these units cost less than 5 points, so it is a case of getting what you pay for.
Taking the average damage output of the unit and dividing it by the cost of the unit gives a measure of cost-effectiveness. In this chart, the blue bars are the raw cost-effectiveness of the bombardment in the turn that it attempts to Range In. The red bars account for the unit’s Range, scaling the raw result by how much of the table the unit can cover when deployed 16″ in from the short table edge, and 8″ in from the long edge.
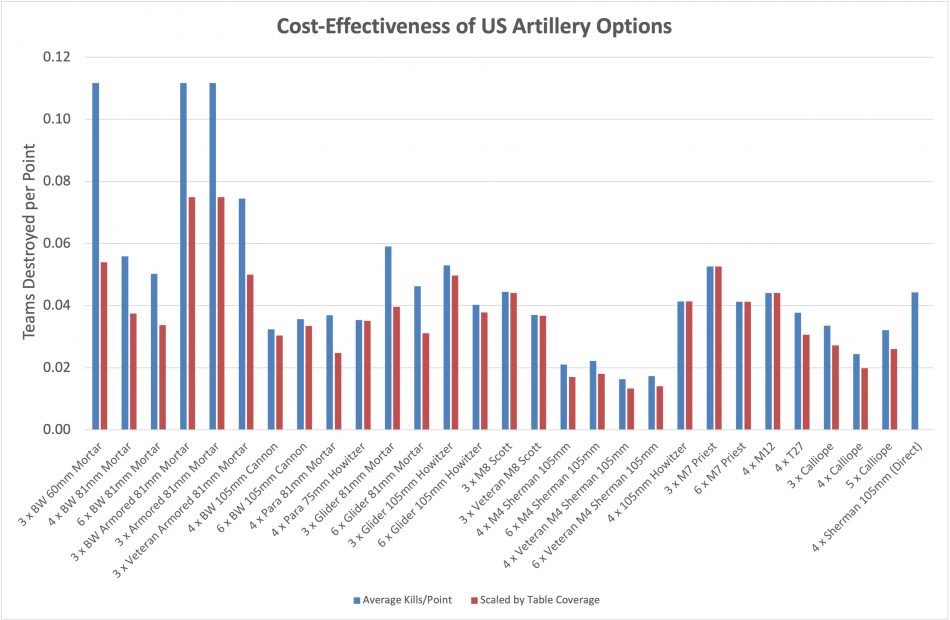
There are lots of factors that will affect this number. For example, mortars should always be more cost-effective than other weapons, because they are not paying for a direct-fire capability. The 2 point mortar platoons are very cost-effective, even after scaling for their short range. The 8 point Parachute Mortar Platoon on the other hand has very poor cost-effectiveness due to being Fearless. They perform well in absolute terms but are so expensive that if you are running a Parachute Rifle Company then you are probably going to get more value out of the other artillery units that are available to you.
The Sherman 105mm Assault Gun Platoons are the least cost-effective artillery unit in this analysis due to the cost of their armor. Contrast that to their performance in the direct fire role, which is better than most artillery units. This suggests that once they have fired their Smoke Bombardment, they are more valuable when providing close support rather than bombarding.
 Durability
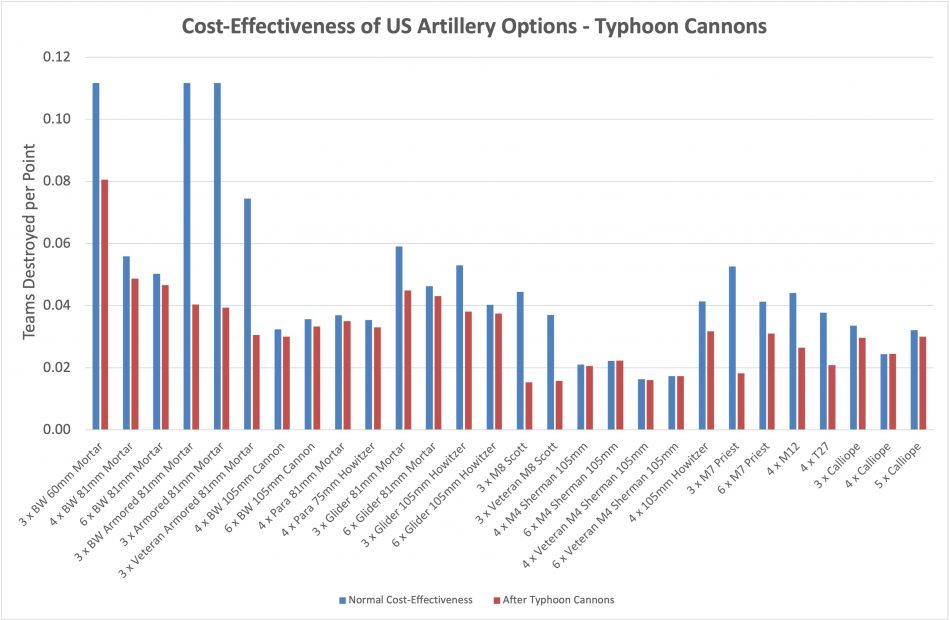
To assess how well a unit can continue to function over the course of a game, the next test involves an attack by my favorite unit for hunting down backfield units: the British Typhoon Fighter-bomber Flight. For the first test, the two Typhoons are attacking with Rockets. The aircraft arrive and attempt to Range In, Destroyed teams are removed, pinning, remounts and Last Stand tests are assessed if needed, and then the artillery unit attempts to fire a bombardment. The second test follows a similar pattern using the Typhoons’ cannons instead of rockets.
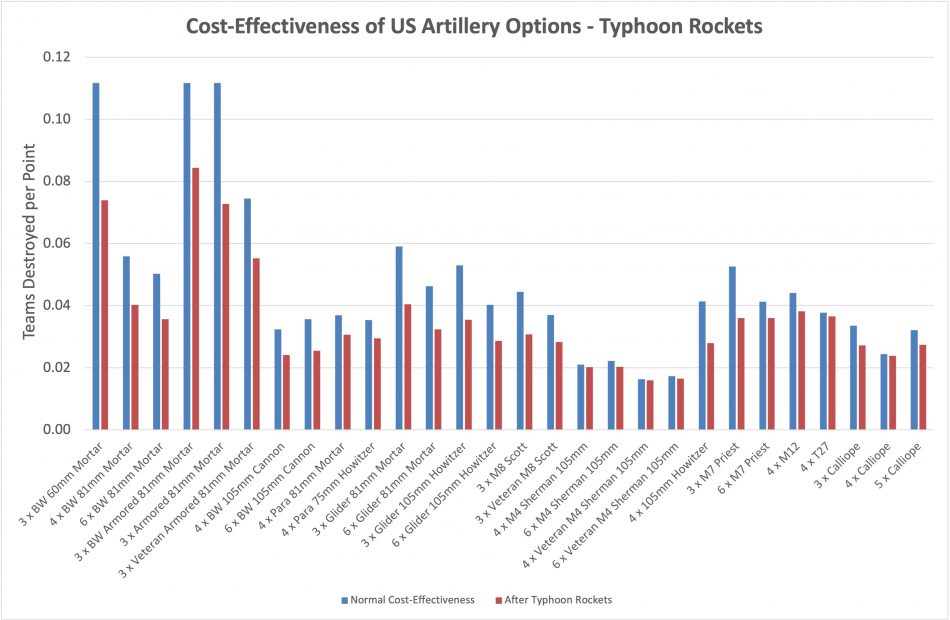
There are two general observations from this. The first is that self-propelled units (even the unarmored T27) are much more resilient against template weapons than towed units due to not becoming Pinned Down. Secondly, while three-gun units are an optimal size when at full strength, both towed and self-propelled units of this size very quickly lose effectiveness if the enemy is able to attack them.
The towed weapons cope better with being strafed due to the lower likelihood of becoming Pinned Down. On the other hand, the self-propelled units are much more vulnerable, with the three-gun batteries suffering particularly badly.
As an aside, while suggested that the Wespe may be underpriced relative to the towed 10.5cm howitzer, the relative pricing of the M7 Priest versus the 105mm howitzer appears to me to be very good.
 Effect of using an Observation Post
US infantry platoons have the Observer skill, allowing the unit leader to act as a spotting team for any friendly artillery battery. This gives the Americans access to more observers than other nations, raising the question of whether it is worth including a dedicated Observation Post in your Force.
While most units in Bulge: US has a Skill of Trained, the M7 Priest, 105mm howitzer, and M12 155mm batteries are Veteran. Bombardments are ranged in using the worst skill between the battery and the spotter, so using a Trained unit leader as the spotter means you cannot make use of the artillery battery’s extra skill. The dedicated Observation Post available to the Americans is an M4 Sherman for 3 points, offering a Ranging skill of 3+. The next test compares the cost-effectiveness of Ranging In using a Skill 4+ spotter versus paying that premium to be able to range in using a Skill 3+ spotter.

In all cases, taking the Sherman Observation Post results in a slight increase in the cost-effectiveness of the Veteran artillery batteries despite the extra cost. This is primarily due to the increased chance of Time on Target coming into play.
 US Artillery Efficiency Rankings
I have taken an average of all the results to rank the artillery options, starting with the most cost-efficient bombardment, then working down through the next most efficient choice for the points. As before, this is scaled by table coverage to account for Range.
This is presented as two separate ranked lists. The first is for the Veteran Parachute and Glider Rifle Companies, as their Veteran spotting teams increase the effectiveness of the Veteran artillery options. The second list is for the remaining formations which have Trained spotting teams. The units in brackets occupy a slot that has already been taken by another unit higher up on the list.
Parachute and Glider Rifle Companies
- 3 x M7 Priest
- 4 x M12
- (4 x 105mm howitzer)
- Upgrade to 6 x M7 Priest
- 3 x Glider 105mm light howitzer
- 3 x Glider 81mm mortars
- (4 x T27 Xylophone)
- (4 x Parachute 75mm howitzer)
- 4 x Parachute 81mm mortars
- Upgrade to 6 x Glider 105mm light howitzer
- Upgrade to 6 x Glider 81mm mortars
Other Formations
- 3 x Armored 81mm mortars, 3 x Battle Weary Armored 81mm mortars
- 3 x Battle Weary 60mm mortars
- 3 x Veteran Armored 81mm mortars
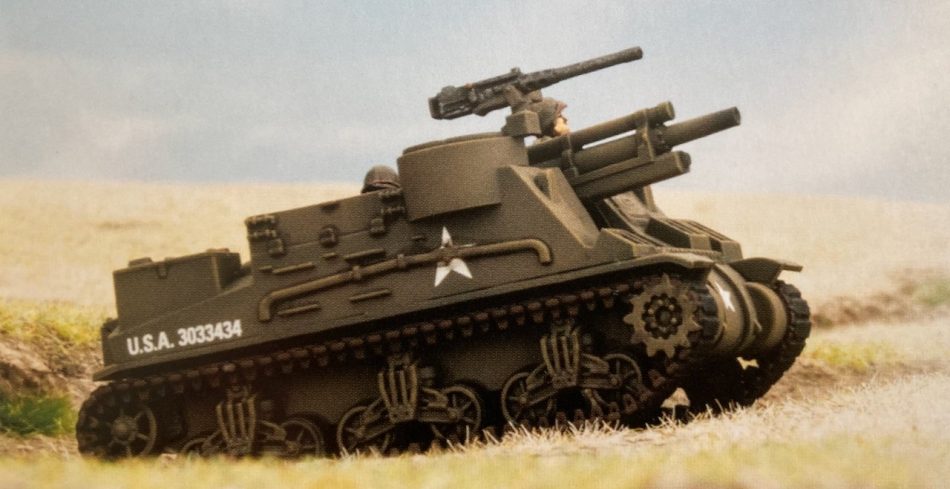
- 3 x M8 Scott
- 3 x M7 Priest
- (4 x Battle Weary 81mm mortars)
- 4 x M12
- 3 x Veteran M8 Scott
- (4 x 105mm howitzer)
- 4 or 6 x Battle Weary 105mm light howitzer
- (4 x T27 Xylophone)
- Upgrade to 6 x M7 Priest
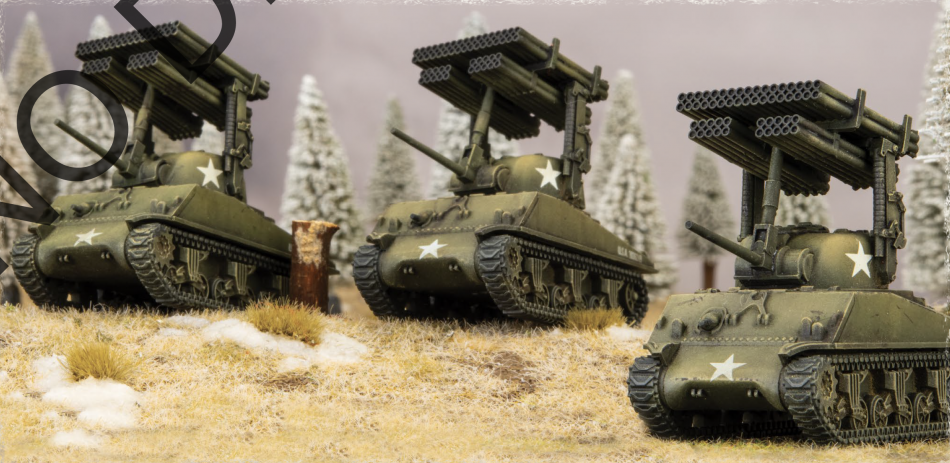
- 3 x Calliope
- (Upgrade to 6 x Battle Weary 81mm mortars)
- Upgrade to 5 x Calliope
- (Sherman 105mm)
- (Veteran Sherman 105mm)
 Summary
- As expected, the top-ranked positions are held by mortars, with the exception of the more expensive Glider and Parachute mortars.
- The Calliope and T27 rocket launchers, which should place well due to not paying for a direct fire capability, rank a long way down the list.
- The 105mm howitzer ranks slightly higher than the Battle Weary 105mm light howitzer due to Time on Target. It’s close enough that it should make no practical difference in game terms, and the light howitzer has benefits that aren’t captured in this analysis, as it is Careful and contributes to Formation morale.
- The Sherman 105mm assault guns are more cost-effective when used in a direct fire role rather than as artillery.
- It is worth taking a Sherman Observation Post if you field 105mm howitzers, M7s, or M12s.
- The best bang for the buck? Armored Mortars. Just don’t let them get shot at.
Richard I really like the articles that you have been doing on the cost effectivness of Artillery. Any thoughts on how the cost effectivness would change for a Calliope would change if you use the Battle Weary Card and then the Early Sherman card?
Thanks Howard. Adding those two command cards to the Calliope bumps the unit of three up in the rankings to sit above the M12. It still ranks behind the armored mortars and M7s. The cost reduction also pushes its average performance above the Spearhead 105mm Sherman used direct. Tough call, but personally I would probably still prefer the 105mm because of its flexibility and having a smoke bombardment.