Breakthrough: A FOW Battle Report
By Richard Steer
“Why aren’t more people choosing the Manoeuvre stance?”
I asked this question of my friend Bede after a day spent running a Late-War Soviet Forward Detachment at a recent Flames of War tournament. In several games, I had attacked Berlin: German armored forces with combinations of StuGs, Hetzers, Panthers, and Panzer IV/70s. Every player I faced had also chosen to attack, with that combination in the Battle Plans mission selector leading to our games being meeting engagements.
I can see the attraction of the Attack stance. It leads to faster and simpler missions, and you usually don’t have Reserves so you get all your toys on the table. However, I was thinking about the advantages the German forces had over my Soviets: Careful Veteran skill, high front armor, and good anti-tank weapons, and whether the Attack stance was making the most of those.
By choosing to attack, the German players had been forced to advance to take objectives, reducing their Rate of Fire, bringing their tanks towards the anti-tank weapons of my infantry, and allowing my Shermans and SU-76s to get into their side armor.
Furthermore, the objectives in Attack/Attack games are usually live immediately, making for shorter games that minimize the exposure of my tanks to their firepower. Surely, I argued, the Manoeuvre stance would have been a good option for the Germans in this matchup. Attack/Manoeuvre games usually last a minimum of six turns, which would give the defender plenty of time to sit back and shoot me to bits before needing to move to contest the objectives.
I was keen to try out my Soviet list against a different style of play to what I’d faced at the tournament, so Bede agreed to set up a game where he would take the Manoeuvre stance.
The Lists
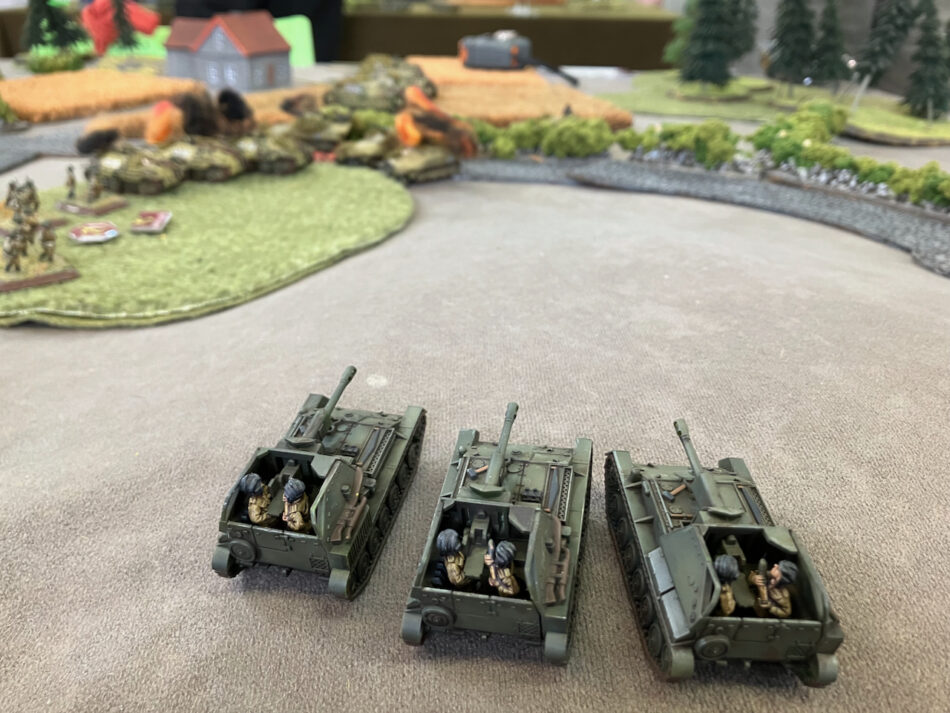
My Soviet force was a scaled-up version of my list from the tournament: a 90-point Forward Detachment from Berlin: Soviet with nine Hero 76mm Shermans and a full-sized Hero Guards Motor Rifle Company. This is a Swiss Army Knife of a formation: great Tactics and Assault stats, solid morale, and access to plenty of good anti-tank weapons.
I was going to include a battery of four SU-76s, but at the last minute, I swapped these out for a pair of 37mm Shturmoviks. In retrospect, I should have kept the SUs as they would have been a more reliable use of the points, but it was good to try a different unit.
I rounded out the list with a Tank Killer Battery of four M10s as a cheap source of more Anti-tank 12, and the Make Your Own Luck command card.
We spent a bit of time discussing the types of formations that could manoeuvre effectively against the Forward Detachment, and settled on the Clausewitz StuG Company from Berlin: German.
The core of the formation was two units of StuGs and one of StuHs. These are cheap Careful Veteran tanks with good armor. The StuHs aren’t quite as effective in the anti-tank role, but are still pretty handy and give the force an artillery template. Three SdKfz 251 Triple 15mm FlaK halftracks provide local air defense against the Shturmoviks.
Finally, support was provided by a unit of four Panthers and a large Berlin Fallschirmjager platoon. The Panthers have the armor and firepower to take on Shermans at long range at little risk to themselves, and at 36-points it is large enough to provide the required 40% Reserve for the 90-pt force in a single unit. The FJ Platoon is a large Fearless unit, with Panzerfausts and Panzerscrecks, that should be able to hold an objective against either infantry or tanks.

The Mission and Deployment
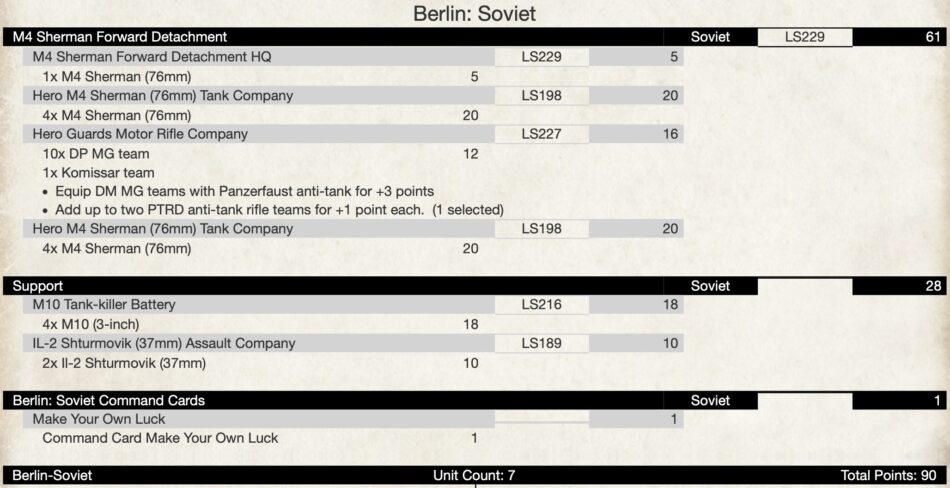
The mission we rolled up was Breakthrough. In many ways, this is a classic Attack/Manoeuvre mission. The Attacker has to capture objectives but doesn’t have to deal with minefields. The Defender doesn’t have any of their own objectives to capture but has to move out of their deployment area to cover the objectives the Attacker is chasing, with 40% of their force held in Reserve. The objectives go live on Turn 6.
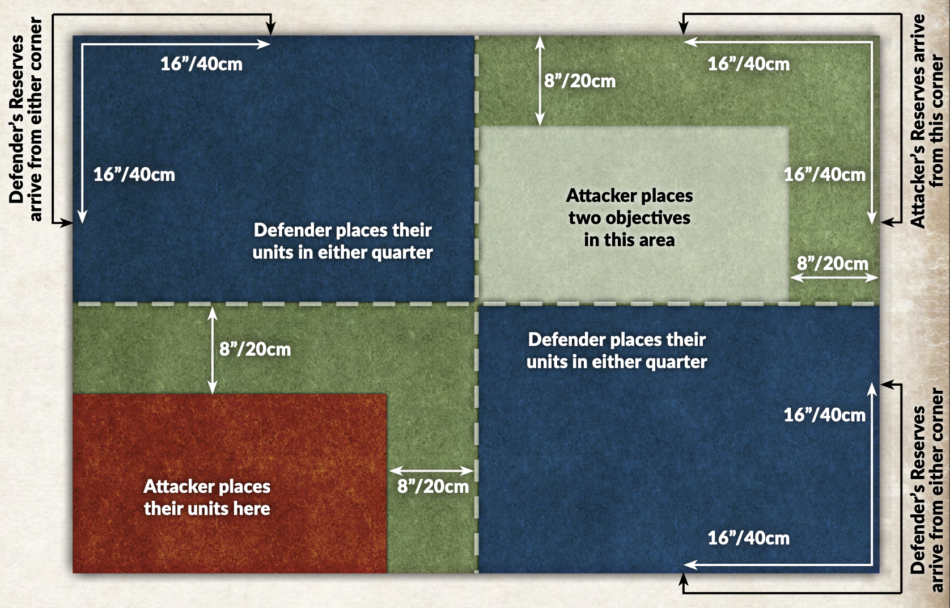
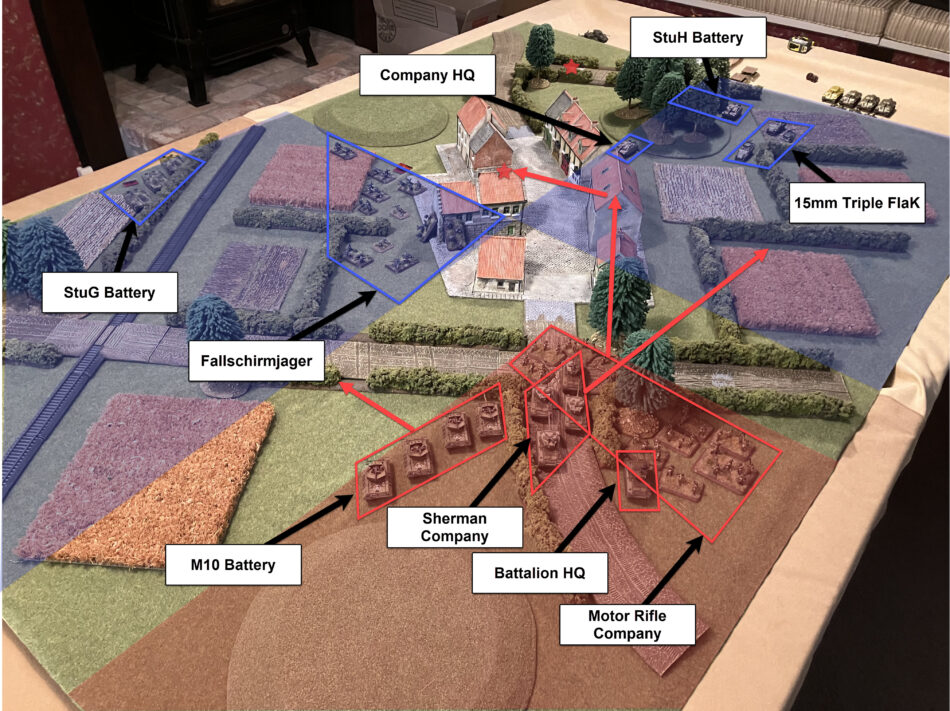
Bede deployed his FJ near the centre of the board, ready to move into buildings around the central objective. A battery of StuGs went down behind hedges on his right flank, with the second battery in Ambush. The StuHs hid behind the wood, while his Company HQ and the FlaK halftracks were on his right.
My plan was to focus on getting my infantry into the town and clear the FJ off the front objective. To support this, I placed the M10s to screen my left flank from the StuGs, and the Shermans on my right to force the FlaK halftracks to keep their distance. One unit of Shermans went into Flanking Reserves. I didn’t expect them to be strong enough to capture the rear objective, but rather their goal was to tie down the German reserves and prevent them from interfering in the town.
Early Moves
My first three turns were spent pushing my infantry forward into the town. A StuH bombardment during the German Turn 1 caught part of the unit in the open, pinning them down and causing some casualties. The infantry failed to rally on Turn 2, but didn’t suffer any further casualties and were able to move fully into the town during Turn 3.
As expected, the FJ took up positions on the objective in the town, but were content to remain Gone to Ground rather than engaging the Soviet infantry now occupying the buildings on the other side of the road.
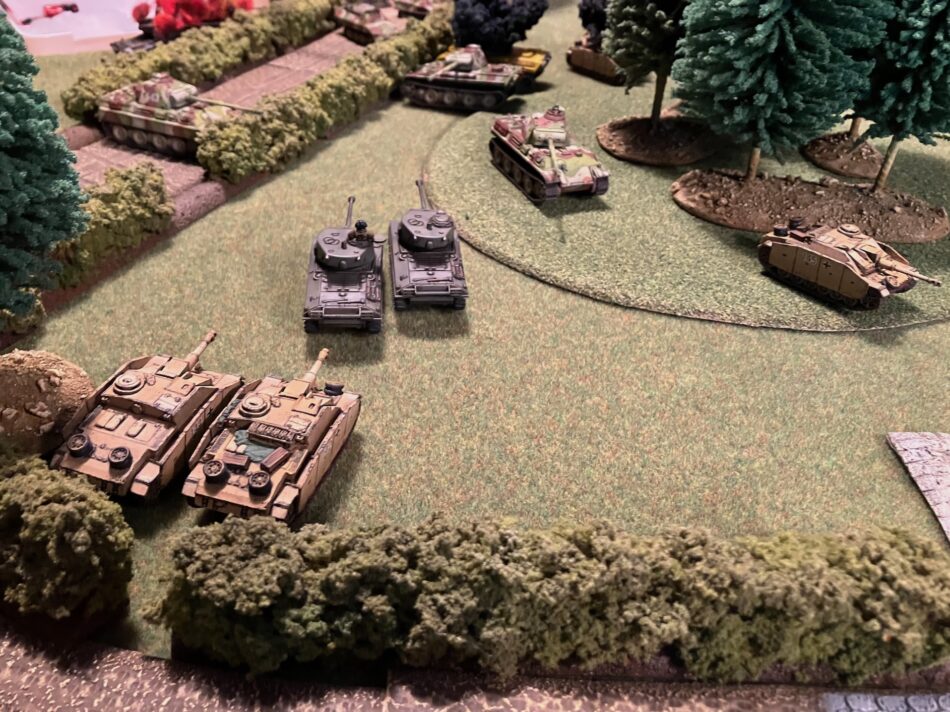
The StuG ambush dropped behind a hedge in front of my infantry in the German turn 1, targeting my Shermans. Poor shooting meant that their only achievement was two Bailed Out tanks, which quickly remounted. One StuG was destroyed by return fire. The two surviving StuGs fell back towards the wood to their rear, but the unit broke on Turn 3 after the loss of a second tank.

The M10s traded ineffectual long-range shots with the StuGs on my left. The Germans had the better of that exchange, and it was only some unlucky Firepower rolls that prevented me from losing more than one M10. I felt okay with that, though: the town was where this game was going to be won or lost, and every turn that the StuGs spent sitting back shooting at my M10s was a turn that they weren’t moving up to support the FJ.
Things weren’t looking so good at the other end of the board: the Panthers had arrived on Turn 2, and were set up ready to engage my Flanking Reserves as soon as they appeared.
The Flank March
My Flanking Reserves arrived on Turn 3. They entered a target-rich environment, with the Panthers and StuHs all sitting at short range. Over the next two turns, they managed to chip out one Panther and one StuH before being overwhelmed by the weight of firepower directed against them.
During this time the Shturmoviks arrived twice, bailing two Panthers, but not achieving anything of lasting value.
The Flanking Reserves had done their best: they had kept the Panthers and StuHs occupied for a couple of turns, inflicting some casualties, and those units were nowhere near the critical battle taking place in the town. It was now the start of the Soviet Turn 5, with one more turn before the objectives went live. Was it going to be enough?
The Town
Upon entering the town, my infantry found that the distance across the road was greater than 4″. With the FJ sitting happily Gone to Ground, rolling straight across the road into an assault from my current position, without being certain that I had the firepower to pin the defenders down, would have been very risky.
With the objective not going live until Turn 6, I decided to be patient and spend that turn moving into the empty buildings. Some lucky firepower rolls from shooting was followed by a small Turn 4 assault drove the defenders from the first building. With the FJ failing to rally, I was feeling pretty good about how the game was playing out. Everything was on track for clearing the final building on Turn 5 for a Turn 6 win.
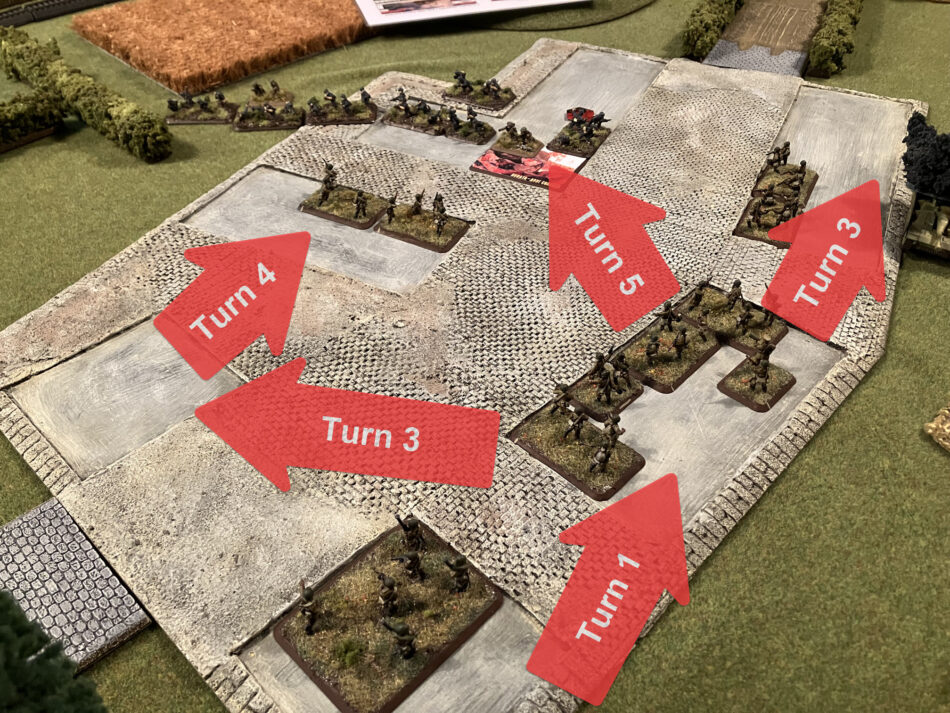
The Motor Rifles charged across the road and assaulted the last German-held building in the town. The FJ’s morale held and they counter-attacked. The Motor Rifles, surprised by the resistance, broke off in disarray.
Half of the fleeing Motor Rifle teams were caught in the open by MG fire from the German tanks, now free from eliminating my flank march. The unit finished the turn with just the unit leader, the Komissar, and an Anti-tank Rifle team as the only survivors of the failed assault. The FJ weren’t in much better condition, with just two surviving teams, but they still held the objective
It was now Turn 6. I was starting outside 4″/10cm of the objective, so I couldn’t win this turn. Meanwhile, the German armor was streaming towards the town. My confidence of one turn ago had evaporated. Everything was now going to have to go right for me to pull this one out of the fire.
End Game
Turn 6. The objectives were now live. The first thing I needed was for the surviving infantry to Rally, which the Kommisar ensured they did. Determined to avenge their fallen comrades, they ran back across the road for a second attempt at finishing off the FJ.
My M10s now swung into action. While one continued engaging the StuGs, the remaining two moved up to the town, raking the German infantry with .50cal fire. Two Shermans did the same, helping get the necessary five hits for the pin. The unit leader and Komissar launched their assault, survived the defensive fire, and finally destroyed the FJ, clearing the town.
I finished Turn 6 holding the objective, but with German armor moving up to contest, I wasn’t sure I would still be holding it come next turn.

The Germans moved a StuG and a Panther to within contesting range of the objective in their turn 6 and knocked out two more Shermans, but didn’t manage to kill any infantry teams. I was rapidly running out of tanks and my force was on the verge of breaking, so turn 7 was going to decide the outcome of the game.
One M10 put a high-velocity 3-inch round through the flank of the contesting StuG, reducing it to a smoking wreck. The other two M10s, sitting in a perfect position to engage the Panther as it entered the town, missed completely. My infantry also missed with their Panzerfausts. My last shooting for the turn was a Sherman. Rounding the corner of a building, it punched a 76mm hole clean through the Panther’s front armor, giving victory to the Soviets.
Reflections
Manoeuvre felt like a good German stance for this matchup. Having six turns before the objectives went live gave them time to make use of their firepower – they were just one turn too late reinforcing the front objective.
While the Soviets won in the end, the game could have gone either way. My formation was nearly broken in turn 6, which may not have been possible in a shorter Attack/Attack game. It only would have taken some better luck with a couple of firepower tests to have swung it in the Germans’ favor.
It was a fantastic game against a great opponent. I really enjoyed having the opportunity to set up a specific challenge for my list, and learning more about how it performs against a different style of play.
Just for info the Soviet’s 2 regiments ( 1223rd & 1239th ) with M10s were assigned to 2 Tank Corps ( 16th and 29th ) who had T-34/85s .
That’s great info. Thanks!
Great batrep and congrats to the Soviets on their tenacity.
Good pics too.
… and as a supplementary question: would the SU-76s aided you more than the Shturmoviks?
Thanks for the comment. I do think the SU-76s would have helped more. Maybe I wouldn’t be saying that if the Shturmoviks had paid off and destroyed a tank or two instead of just bailing them out, but having an artillery template available would definitely have made the FJ’s defense of the town more difficult.
Thank you for the report. The answer to “why player don’t manoeuvre” lies in win rates. The way most missions are constructed and they way reserves function the attacker is at an advantage in most of the missions. I have made a couple of “crunching the numbers” articles on BreakthroughAssault that shows what most players already feel, attacking is at an advantage at the moment.
Thanks again for the article. It made for some good reading.
Regards Soren
Thanks Soren, I enjoyed those articles you wrote. I wonder whether the win rate stats are being skewed by tournaments that limit the number of times each stance can be played? As in, does it seem like a bad choice because people are being forced to play the stance with lists that don’t suit it? The manoeuvre win rate might be a lot higher if it was only being played by people who were properly set up to play it.