Keep Calm – it’s Blitzkrieg-era British for Flames of War

By Richard Steer
The Early-War era has returned to Flames of War. 2026 and 2027 will see the release of three books covering the period from 1939 to 1941 for the 4th Edition of the rules. The first book in the series is Blitzkrieg, covering the French, German, and British forces involved in the German invasion of France in May and June 1940.
The British list in Blitzkreig represents the British Expeditionary Force (BEF) in France and Belgium. It covers those units present from the start of the invasion, through the evacuation from Dunkirk, and those still fighting after Dunkirk.
A word of warning for players who aren’t familiar with Early-War. The British list will look small and very restrictive compared to what you may be used to in Late-War. These limitations reflect the historical equipment that the British had available in France, and the way that they thought the war would need to be fought. You aren’t going to have all of the tools that your experience in Late-War tells you will need to build a good list, and this is part of the character that makes Early-War feel so different to the other eras. With that said, let’s dive in and see what they do have.

The Formations
The British have five formations to choose from, with three tank formations with options for Matilda infantry tanks and A13 cruiser tanks, one Rifle Company infantry formation, and a Divisional Cavalry reconnaissance formation. The Divisional Cavalry Squadron is noted as being limited to one per Force.

The Matilda Tank Companies
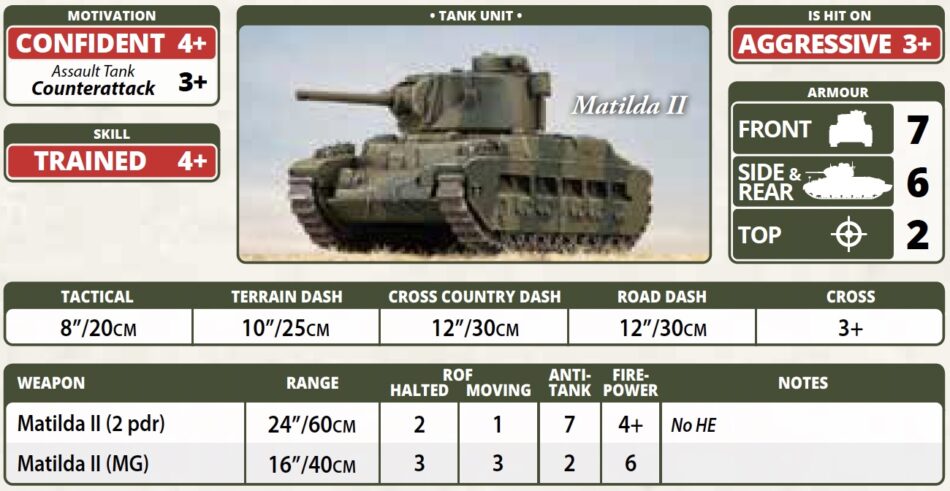
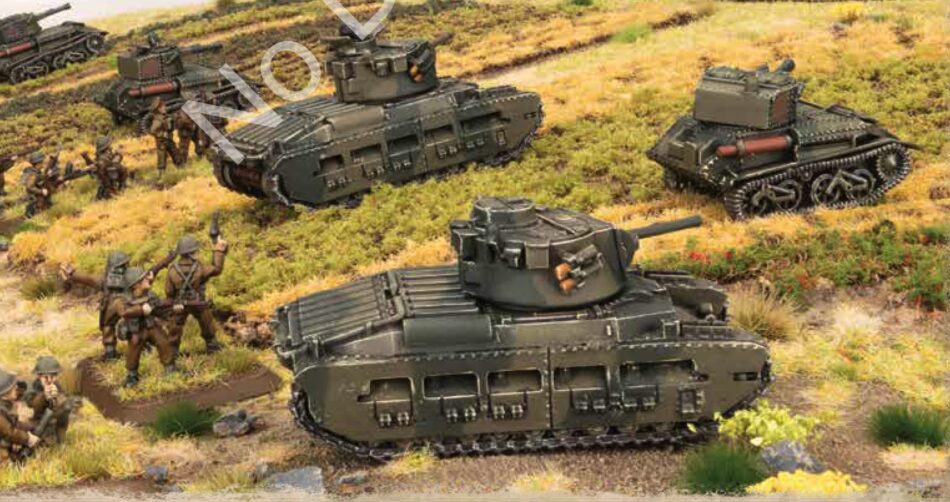
There are two flavors of Matilda Company, representing units from 1st Army Tank Brigade. The first Tank Company is built around the Matilda I, a slow, heavily-armored tank that is armed solely with a machine-gun. The second is focused on the Matilda II. Both companies have a similar structure: an HQ of one or two tanks, and four troops with different combinations of Matilda Troops.

The Matilda I is incredibly slow. It has a 6″/15cm Tactical move, so will struggle to keep up with the infantry it is meant to be supporting. Importantly, it doesn’t have the Methodical rule that has been given to the equally slow French tanks, that allows them to Break Off from Assaults using their Dash speed. If a Matilda I is in contact with an enemy team in an Assault and is forced to Break Off, it will be unable to move to be more than 6″/15cm away, and will be forced to surrender.

Matildas have incredibly tough armor for this period, and will pose problems for anyone not packing 88s. Where the British player may struggle is finding the points for them, with three Matilda IIs consuming about half of your points in a standard game. We also see the major downside of Early-War British armor, with the Matilda II having No HE, and there being no close-support tanks in the formations to help you dig out infantry and guns.
A13 Armoured Squadron
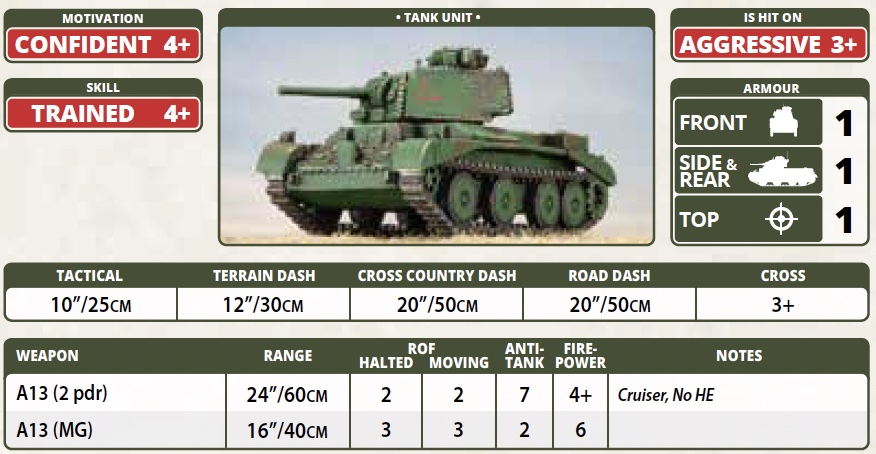
The third tank formation is the A13 Cruiser Squadron, containing a mixture of A13 cruiser tanks and Mk VI light tanks. These represent units from 1st Armoured Division.

Whereas the Matildas are slow and tough, the A13s are mobile but poorly protected, with Front 1 or 2 depending on the version that you take. The Cruiser special rule gives them Moving ROF 2 at +1 To Hit, reflecting the British doctrine of the time of firing on the move. Once again, the main guns have No HE, posing the tactical challenge of how, with such light armor and no cheap artillery templates, British tanks can overcome infantry and anti-tank guns.
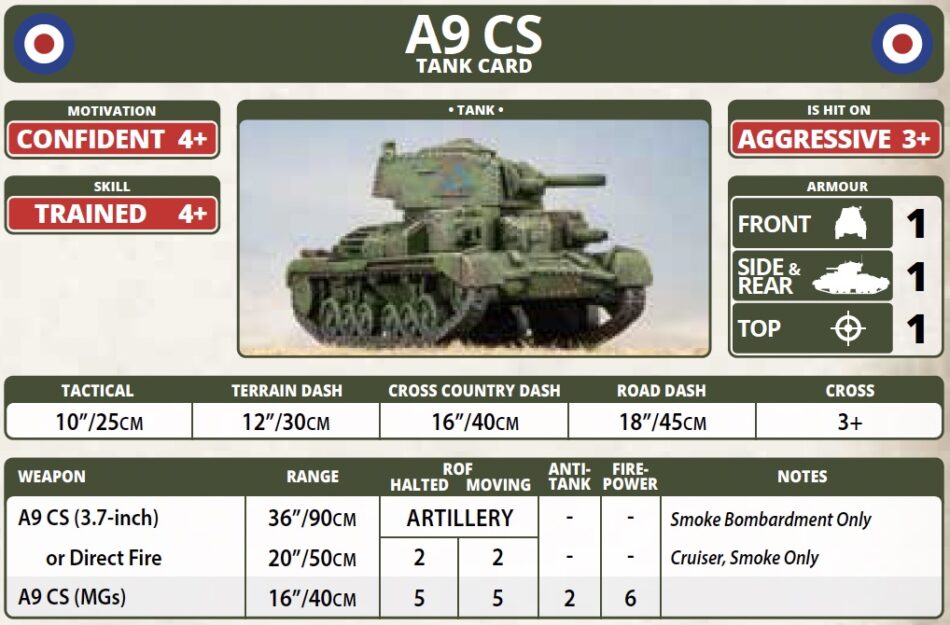
The Company HQ does have the option of including two A9 Close Support (CS) tanks, but the catch is that their main weapon can only fire smoke ammunition. The Smoke Bombardment Only rule allows them to fire two smoke bombardments per game instead of the usual one.
Rifle Company
The Rifle Company will feel familiar to Mid-War players, with similar units, ratings, and options between the two eras. As well as the usual two to three Rifle Platoons, the formation includes up to two HMG Platoons, three Scout Carrier Patrols, a 2-pounder anti-tank gun platoon, and a Mortar Section with a pair of 3-inch mortars.
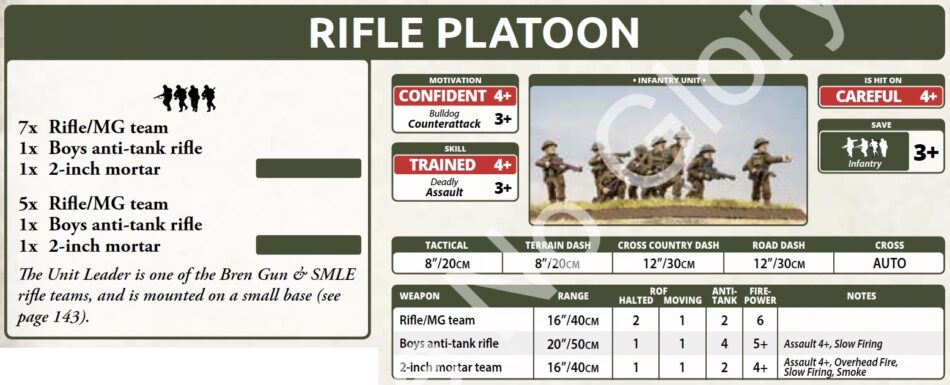
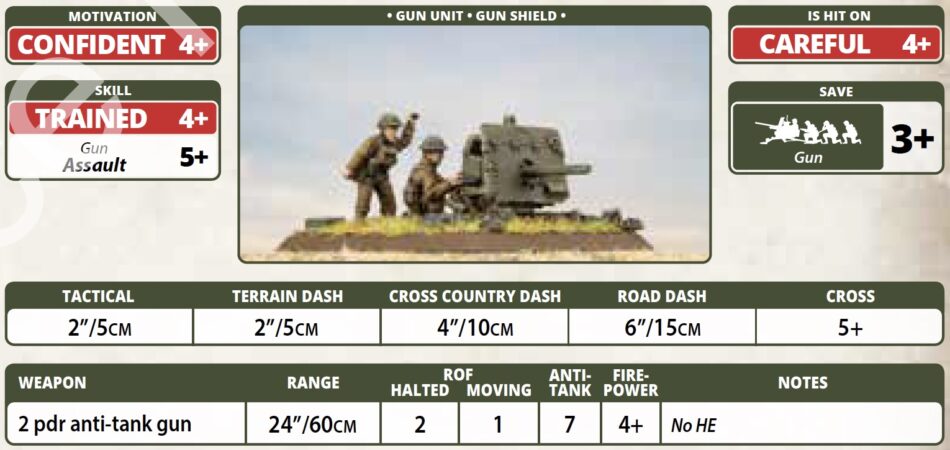
Between the Boys anti-tank rifles in the Rifle Platoons and the Scout Carriers, the Rifle Company has a lot of firepower against the light armor. For heavier targets, your primary defense is the platoon of 2-pounder anti-tank guns in the formation, plus up to another two platoons that are available as Support. The 2pdr is an excellent weapon, with Anti-tank 7 being enough to deal with most tanks, and its turntable mounting means that it does not have the Forward Firing rule. An additional historical option is provided by a command card for downgrading these to French 25mm anti-tank guns.
Divisional Cavalry
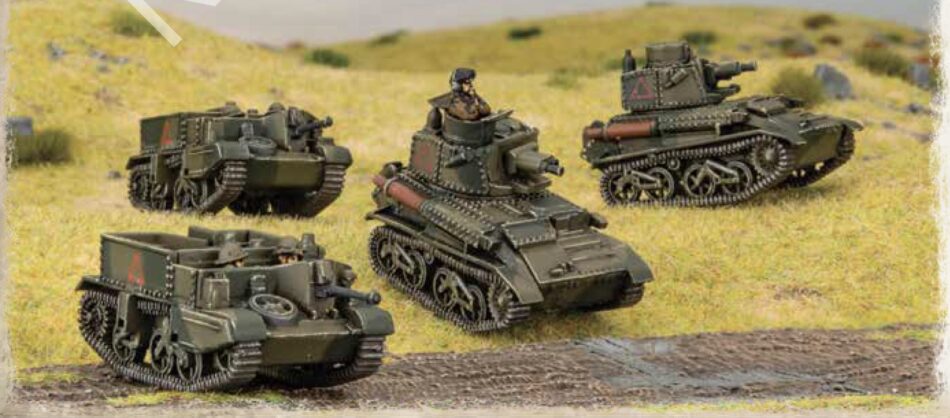
Blitzkrieg is unusual for a Flames of War book in that it includes reconnaissance formations in the book, rather than just in the Command Cards. For the British, this is the Divisional Cavalry Squadron, comprising two to four troops of Scout Carriers and two troops of Mk VI light tanks.
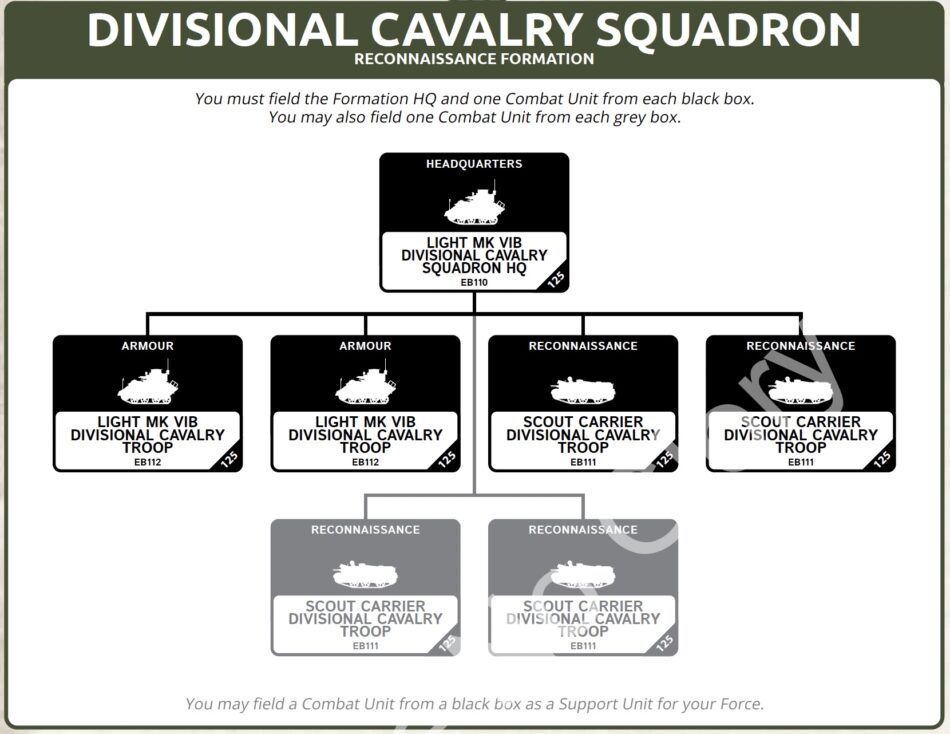
The question with recce formations is always whether the game will be dominated by large numbers of light vehicles. The Divisional Cavalry Squadron can put out a lot of machine-gun fire and Anti-tank 4 shots, but this comes at a price. The minimum-sized Divisional Cavalry Squadron is a third of the points limit for a normal game, and one point more expensive than a minimum A13 Squadron, so at first glance the balance looks like it might be okay.
Support Options
Rounding out the list is the support tree, with three artillery troops, two anti-tank troops, a reconnaissance platoon, and an artillery observer. There is no air support, and no anti-aircraft options. French formations and units can be included as Allied Support.

The list includes one Wildcard unit, the TOG 1 heavy tank. Only one of these tanks was ever built, which was ready for testing in September 1940, long after the BEF had been evacuated from France, and it never saw active service. The TOG offers all-round Armour 6, a hull-mounted 75mm gun with Firepower 3+, Cross Auto, and Assault 3+. If we ignore the fantasy aspect of the unit, that stat line has the potential to address some of the weaknesses in the British list. The question will be whether it is worth the cost in a game where 88s exist.

Closing Out
No Dice No Glory hasn’t been provided with a preview of the Blitzkrieg Command Cards, so we don’t know what is included in those outside of a few that are highlighted in the book. I expect that there will be additional flavor options in there to round out the lists, such as Highlanders and Territorials.
On that assumption, from a historical perspective the list looks good. All of the main units that I would expect to see are included, and the capabilities and limitations of the British equipment of the time seem to be well represented. Playing Blitzkrieg British is going to be an interesting challenge, that looks and feels exactly like it should.
Peter at Battlefront has always said that they wanted to make sure that Early-War was done properly. For the British in Blitzkrieg, that goal has been well and truly met.
So BF are using the same model for the Scout and Bren Gun carriers ?
From what we’ve seen, yes, it looks like they are repackaging the Universal Carrier sprue, rather than releasing new Scout Carrier and Bren Carrier models.
Why would anyone field A13s or Matilda IIs??? One can be bailed by rifle fire and the other one is extremely over-costed.
**cough** Armoured car and German HT spam lists , any Soviet made AFV .**cough**
Are they going to release or re-release the British motorcycle platoon ?
There is a command card for them, but I haven’t seen anything about models for them yet.
I’ve read every article on the website dealing with the upcoming Blitzkrieg book and the 3 armies within. Another article featuring Brits had an example force, It had 3 batteries of 4 each 18/25 pounders! Topping it off, they’re cheap compared to other army artillery. Here we go back to the “artillery park”, which was one of many reasons for having to create “dynamic points”. Some lessons are never learned.
The lists do look challenging but if I played Brits, I’d be looking at a rifle company, backed up with armor and artillery that provide smoke. Take advantage of the riflemen’s bulldog and deadly assault rules.
How much for 4 18/25lb guns?
14pts for four Careful Confident Veteran 18/25pdrs. Most of the concern seems to be about the price of the Territorial command card that downgrades them to Aggressive Confident Trained.