Flames of War Blitzkrieg book – the Early War theater finally arrives!

By Paolo Paglianti
It’s time to invade France – or defend it! For those who are not Flames of War fans, this may sound strange, but when publisher Battlefront launched version 4 of the game around 2017, it started with Mid War, namely the North African campaign and the invasion of the Eastern Front. A few years later came the Late War, from D-Day to Berlin, but until now nothing had been released about the Early period of the war.
After some delays – it was originally planned even a couple of years ago – Early War is finally arriving in shops (around mid February), and the NoDiceNoGlory staff received a preview copy of the first book of the period, Blitzkrieg. Over the holiday days I devoured the book, then discussed it with my great friend and V3 veteran Claudio Tiso, to get an idea of what awaits us in future Early War games!

Maginot Line, you will not withstand the excitement.
The book follows Battlefront’s now-standard compendium format, with a hefty 145 pages, and includes three complete army lists focused on the Western Front, with the invasion and capitulation of France in 1940. There are no Russians or Poles, therefore, but we find the German army, the French army, and the British BEF, each with its own dedicated section. There are also three Command Card decks, but at the time of writing we have not yet received the preview PDF. No big deal, as the book includes examples, which we will discuss later, and this is a more than welcome novelty.
In the coming days, on NDNG you will find in-depth articles on each army; for now we will limit ourselves to a first look at the three lists and what struck us on our initial reading.
After the usual historical introduction, starting with the rise of the Nazi party in Germany, the infamous pact with Communist Russia, and the invasion of Poland, the Blitzkrieg book begins with the aggressors, the German list.
The Germans are not very different from their Mid and Late War counterparts, as expected, having both the familiar “Third Reich” trait (Improved Last Stand at 3+) and the unmistakable Stormtrooper ability, which allows them to perform two special movement orders as long as they are different and the first one succeeds. The “Mounted Assault” also returns, allowing motorised infantry to assault while mounted in their Sd Kfz transports.
Here is the diagram of the formations available to German players.
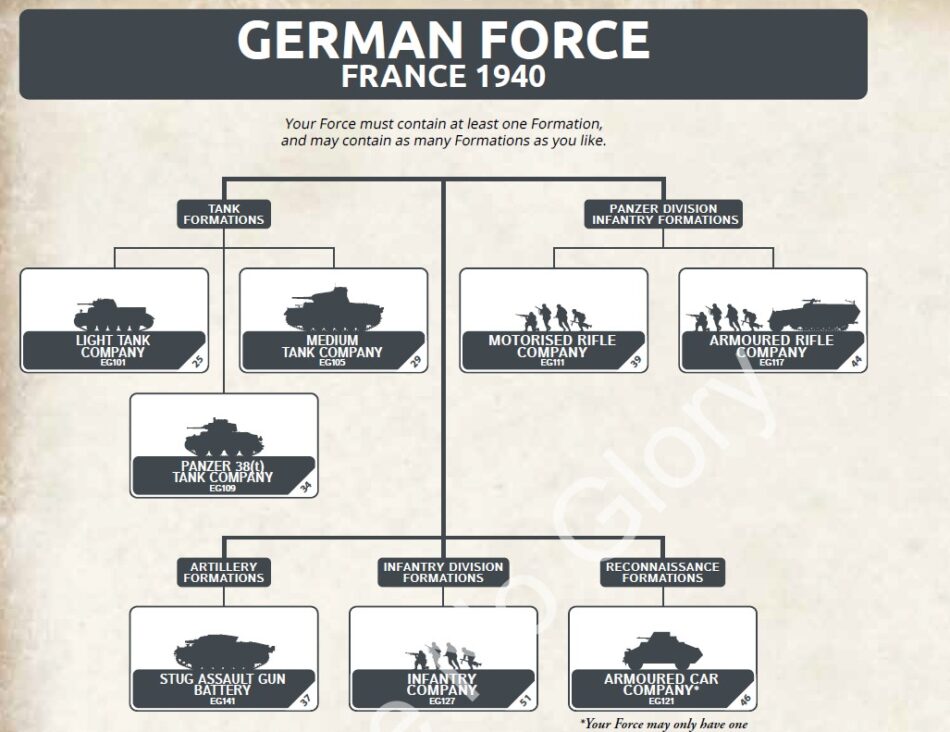
Among the tank formations, we find the Light and Medium formations – no Tigers or Panthers in Early War, obviously – and a formation of Panzer 38(t) of Czech origin. Infantry formations include the usual Rifle and Armoured, and the new Motorised Company also appears. There are no major changes on the infantry side, except that the points difference between Rifle and MG platoons is minimal (just 1 point). This allows players to field units with ROF 3/2 instead of 2/1, making it a no-brainer choice for us.
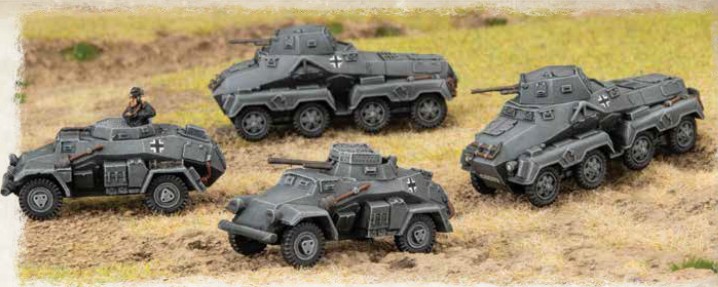
Rounding out the list are the StuG Assault Gun Battery; also the Armoured Car formation, which in Mid and Late War are usually relegated to Formation Cards – this will happen also in French and British book sections.
These formations allow players to field a mix of tanks from Panzer I to Panzer IV, with frontal armour values ranging from 1 to 3 and guns from AT 4 to AT 7. The Panzerbefehlswagen accompanying HQ units is a training tank armed with machine guns, useful for pinning infantry or absorbing hits instead of its more heavily armoured cousins. The StuGs are early versions of the vehicle we will later see in Mid and Late War, with a decent frontal armour of 4 and a respectable AT 7 gun.
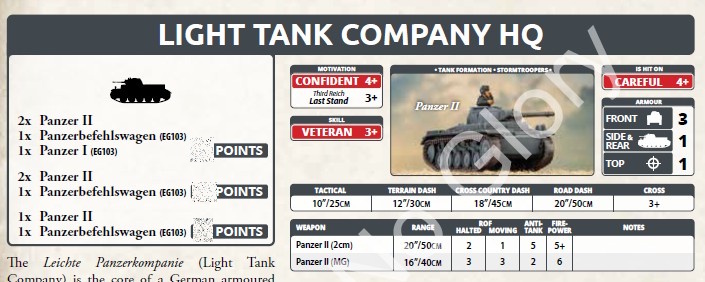
An interesting novelty: HQ units – and this broadly applies to all formations in the book – allow players to field a mix of different tanks. In the Light Tank formation, for example, you can go from a Panzer II paired with a Panzerbefehlswagen for 7 points, to two Panzer II, one Panzer I, and a Panzerbefehlswagen for a total of 13 points.However, often the secondary accompanying tanks are not in the HQ page, and you need to look for it in other pages/formations.
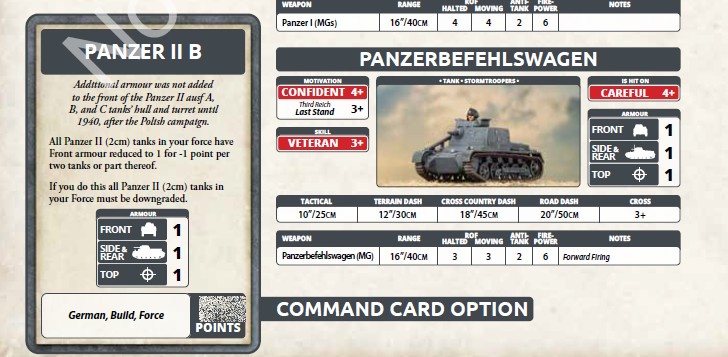
We immediately see that the new idea in the Blitzkrieg book is to include formation cards directly in the book itself, which is very convenient. For example, in the Light Tank formation we find the Panzer IIB downgrade, which reduces the frontal armour of Panzer II tanks to 1 in exchange for a significant points discount.
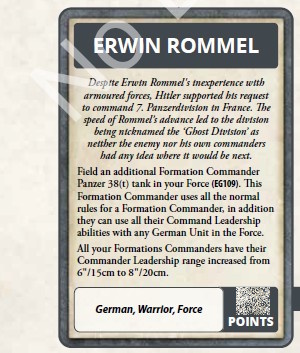
Another example is the Rommel Card, allowing the player to add a secondary HQ 2-Panzer 38 unit with all its bonuses for Morale, for a mere 10 points, and it’s all in the book – very handy!
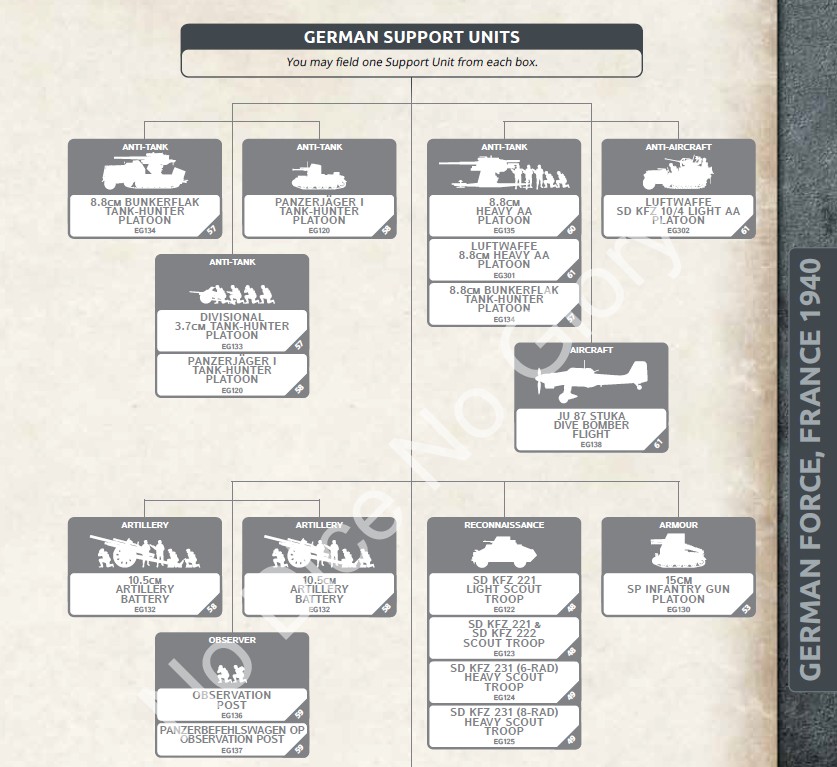
The support list is extensive. There are two “versions” of the 88 AA gun: the standard one at 24 points for four AT 14 guns, and the discounted Luftwaffe version (as seen in Late War), which costs 20 points but has lower Skill. Players who already field Germans in Mid War can reuse the Bunkerflak, essentially armoured trucks mounting an 88. They cost 10 points each and can be taken singly or in pairs. You can also field two Stuka Dive Bombers at 8 points, with AT 3 / FP 2+ – Germans are the only Blitzkrieg army with aircraft, by the way.
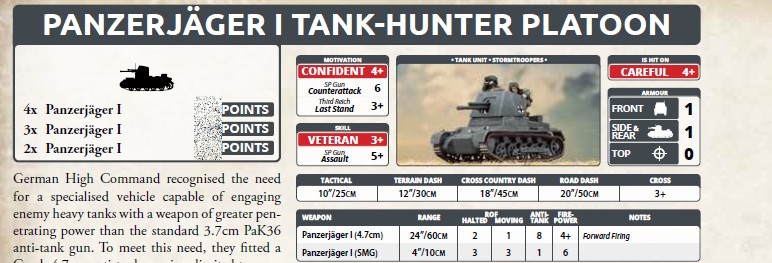
The new Panzerjägers also arrive: Marder-like tank destroyers on a Panzer I chassis with AT 8, more than respectable at 16 points for four vehicles.
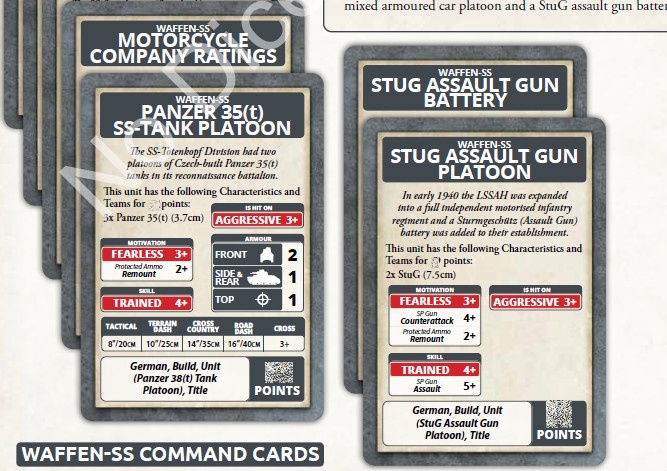
As in the Late War D-Day book, it is also possible to “convert” Wehrmacht formations into SS divisions, with better Morale but worse Skill, and they are hit on a 3+.
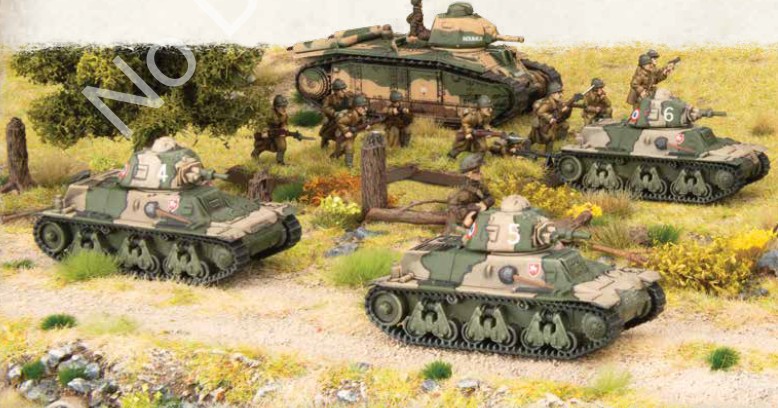
Let’s move on to the French, who make their Flames of War debut as the army defending the border with Germany. All Early War French units are hit on 3+, and have Morale and Skill 4+.
Here are their formations and supports.
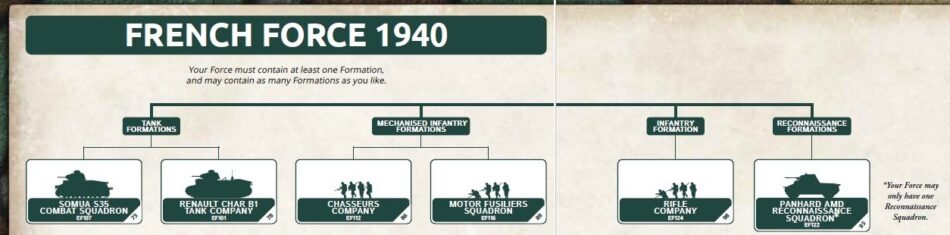
Among the tank formations, Somua S35s can be mixed with the lighter H39s.
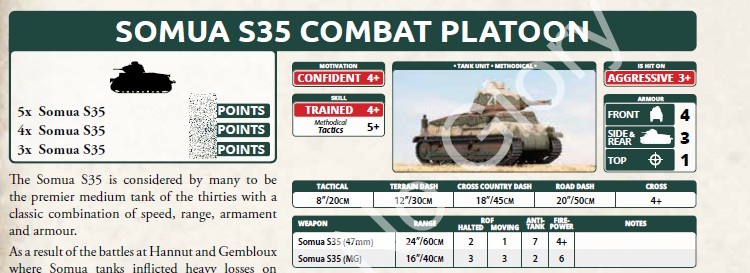
The S35s are excellent tanks with frontal armour 4 and an AT 7 gun (FP 4+), but they suffer from an 8” Tactical move and Cross 4+. The Hotchkiss fare even worse: AT 4 or 5 (FP 4+) and a 6” Tactical move, slower than infantry. Both, however, have the “Methodical” trait, allowing them to disengage from assaults using a Terrain Dash of 12” or 10”, Cross 3+. They also have worsened Tactics at 5+, so forget Blitz moves and crossing minefields. Five Somua S35 cost 29 points, while five Hotchkiss cost 15 points.
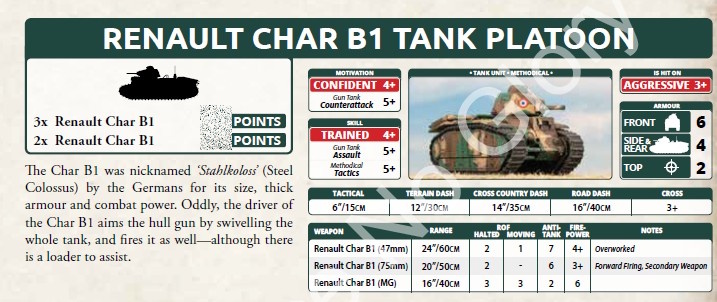
The heavy Renault Char B1 tanks are among the toughest of the Early War period: frontal armour 6, side 4, and top 2. Unfortunately, assaults are not their strong suit, as they have Assault and Counterattack 5+. They are slow as well: 6” Tactical and Cross 3+ (they also have Methodical). Their guns are AT 7 / FP 4+ or AT 6 / FP 3+. They are expensive: three Char B1 cost 30 points.
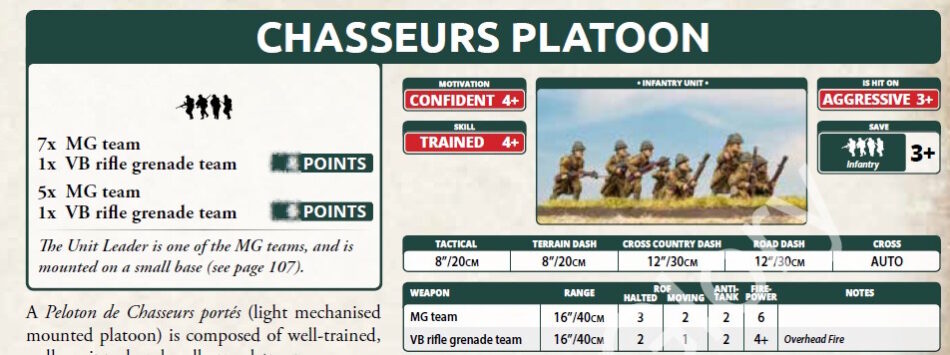
The French also have Rifle infantry (Compagnie de Fusiliers-Voltigeurs) and Motorised infantry (Chasseurs and Escadron de Fusiliers Portés), with the usual ROF 2/1 and ROF 3/2 respectively.
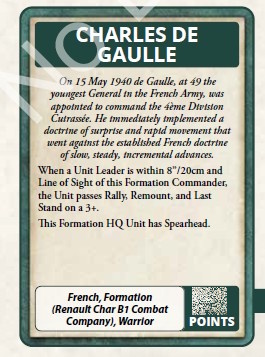
Could the Charles de Gaulle card be missing? The iconic French general, who would later lead Free France throughout the war, for just 5 points allows all units within 8” and in line of sight to re-roll Rally, Remount, and Last Stand on a 3+. He also grants the Spearhead ability!
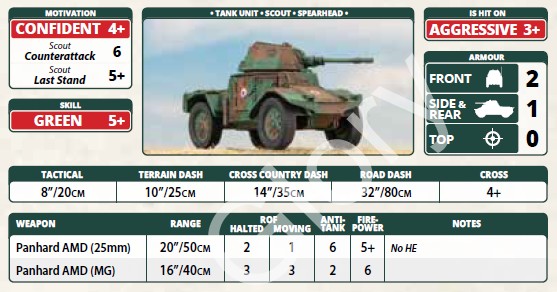
The scout formation is excellent, featuring the Panhard AMD: a platoon of five vehicles costs 11 points, but shoots better than many tanks of the period with AT 6 / FP 5+ (No HE) and three machine guns, with armour 2/1/0, Tactical 8”, and Cross Country Dash 14” (though Cross 4+).

Among the supports, we highlight the excellent 47mm anti-tank guns with AT 9 (unfortunately only available in pairs: two guns cost 6 points) and various artillery batteries, from 75mm guns to the classic 105mm. Note that both French and British lists can have a single allied platoon, but not a full allied formation, as in Mid or Late.
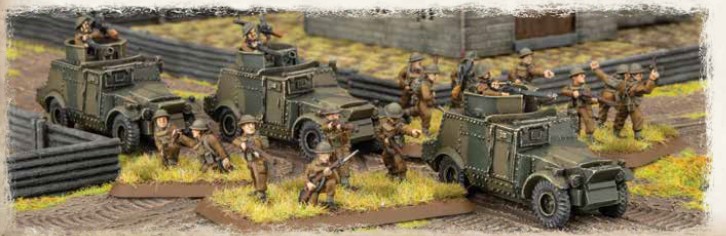
Finally, here are the British BEF. Here we see the diagram of their formations and supports, which is admittedly quite minimal.
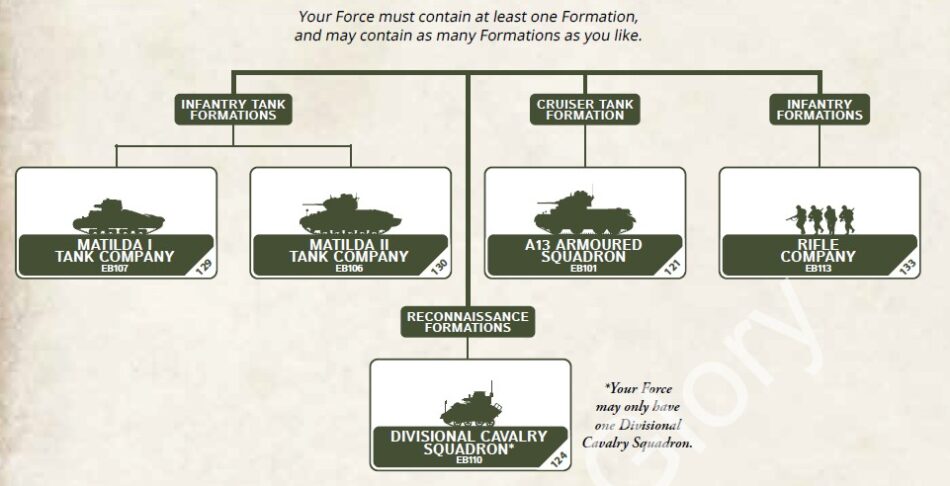
Among the tanks we find the Matilda I and II, unfairly ignored in Mid War British book (except as “additional” cards and therefore not usable in official tournaments, unfortunately).
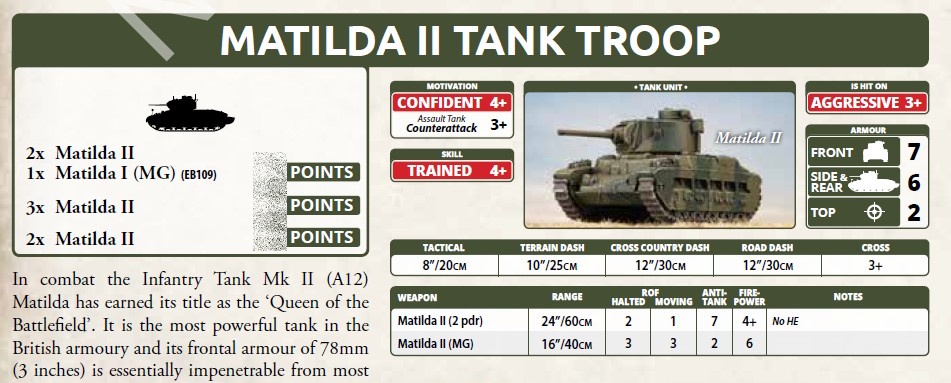
Matilda I tanks have excellent armour 6/5/1 but are armed only with machine guns (one in three may have a heavy machine gun with stats similar to the US .50 cal, AT 4 and FP 5+). Matilda II tanks are much tougher and more effective, with armour 7/6/2, Counterattack 3+, and an excellent 2-pdr gun at AT 7 / FP 4+, but they are extremely expensive: three tanks cost 51 points, basically half an army if you play the standard 100 point games.
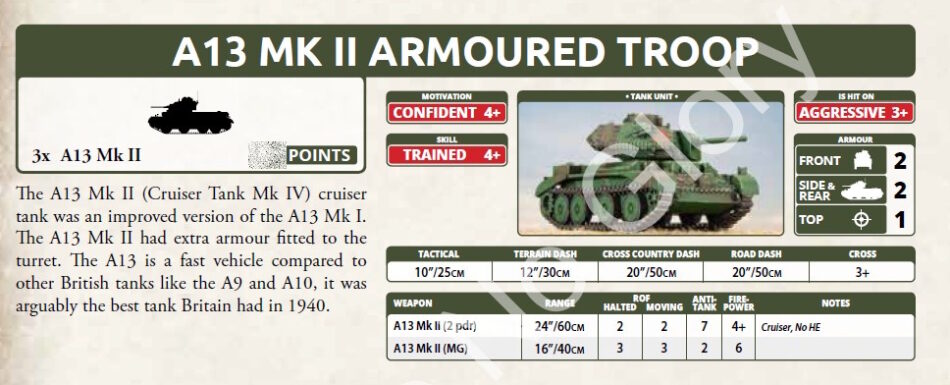
Among the other tanks, we note the new A13 entries: little more than armoured cars (armour 1/1/1 or 2/2/1 for the Mark II), armed with the 2-pdr AT 7 / FP 4+. They are also quite cheap: three Mark II cost 15 points. Their new “Cruiser” trait gives them ROF 2 even while moving, although, like Mid and Late War Americans, they suffer a +1 to hit. We also really like the Light Mk VI: three tanks for 9 points with the 15mm gun (AT 5 / FP 4+). Bad news for British players: all British tanks are Aggressive and are hit on 3+.

And of course, Monty is there as well. The Bernard Montgomery card allows the British to fight at dusk, as well as to pass Last Stand tests on a 3+.
No real surprises for the Rifle formation, which has roughly the same costs and stats seen in Mid War. Hit on 4+, with the usual Assault and Counterattack 3+ that make them very tough in close combat.
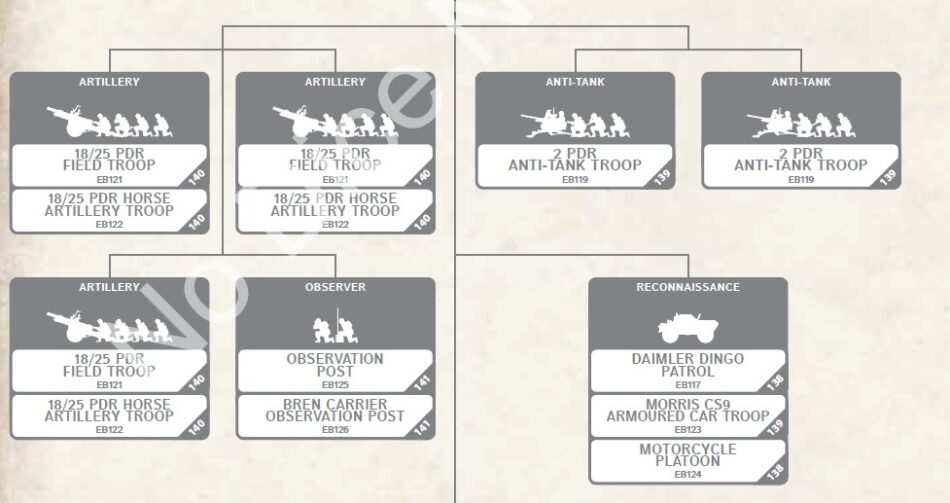
Few surprises among the supports as well: no aircraft, as already mentioned, and “early” artillery with 18-pdr and 25-pdr guns, also in horse-drawn versions and with a rule that allows them to use Blitz to “dismount” from transports. The 2-pdr gun is an excellent choice for Manoeuvre or Defend lists, as it provides a four-gun platoon with AT 6 for 10 points.
How Early War games will be?
Army Point costs clearly show that Early War battles will feature tanks, but in very limited numbers: two StuGs cost 21 points, four Panzer IV cost 35 points. For comparison, four Mid War Panzer IV with the same 7.5cm gun cost 24 points. Fielding Matildas is almost unthinkable: hit on 3+ with frontal armour 7, they cost over 50 points for three tanks. A couple of 88s and a lucky hit or two are enough to blow half an army sky-high.
A very direct example is the comparison between the cost of Panzer IVs in Early, Mid, and Late War (in the latter two cases using Dynamic Points 2025). Despite Mid and Late War tanks being far more powerful, with thicker armour and significantly more effective guns, the points cost clearly shows how fielding tank platoons in the Early War period is much more expensive in relative terms.
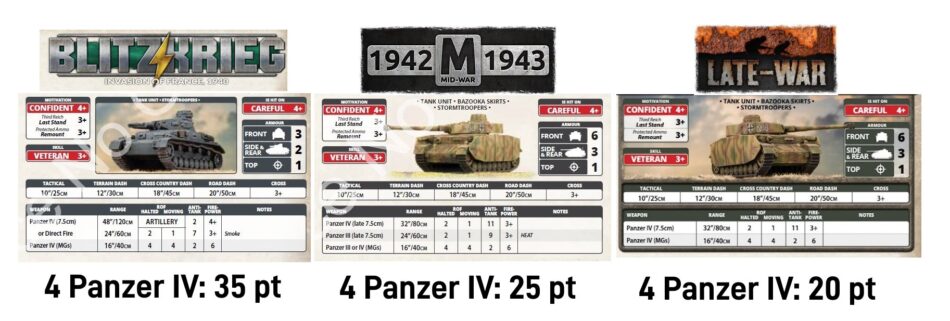
This reflects the game’s overall design philosophy well: in Early War, tanks are few, valuable, and often decisive, while as the conflict evolves they become progressively more numerous, specialised, and points-efficient within army lists, allowing for true armoured formations without completely sacrificing the rest of the force.
Infantry costs are roughly the same thru the Early-Late books. Take, for example, the new German Motorised Rifle Platoon: the 7-MG version, which includes a direct-fire mortar, costs 10 points, roughly the same as a Mid War German Panzergrenadier Platoon, which also costs 10 points for seven bases with an identical ROF profile (3/2). It’s a different story for German Armoured infantry, which for seven bases (and the usual mortar) plus four Sd Kfz cost a hefty 19 points, compared to 13 in Mid War and 12 in Late War.
As expected, the difference in cost ratios between tanks and infantry, already present between Mid and Late War, makes tanks even rarer in Early War. We find it more than likely to see British armies with A13 formations supported by infantry, and French armies with Somua tanks advancing slowly under infantry protection and wary of any assault. For the Germans, it is easy to imagine armies where infantry manoeuvres and assaults, supported by isolated platoons of Panzer II and III. A constant presence in every German army will be the Luftwaffe 88s, which for 20 points can destroy any tank in the game – potentially replaced by two Bunkerflak, more mobile but more expensive.
One more certainty: we will not return to the static infantry-versus-infantry stalemates of V3. Despite infantry being the protagonists of the Early War period, the presence of light tanks and scouts, and plenty of artillery capable of laying smoke bombardments, leads us to expect dynamic battles, especially in Manoeuvre stance. Can’t wait to see more books from Early War!
When are the DP coming out ?
🤣😂🤣
I see Les Parsons is already prepared to give his thoughts on point corrections. (LOL).
You know that’s what the comps players will be asking the day after the book comes out .
looking forward to this
The Char B1 heavy tank typically had a four-man crew: a Driver/Hull Gunner (operating the hull-mounted 75mm gun and driving), a Loader (for the main gun), a Radio Operator (located in the hull rear), and a Commander/Turret Gunner/Loader (handling the 47mm turret gun and command duties). This demanding role in the single-man turret made the commander incredibly busy, responsible for aiming, firing, loading, and directing the tank.
Crew Positions Breakdown:
Driver/Hull Gunner: Located in the front of the hull, responsible for driving and firing the hull’s main 75mm gun.
Loader: Assisted with loading the hull’s main gun.
Radio Operator: Stationed in the rear of the hull.
Commander/Turret Gunner/Loader: In the small turret, managing the 47mm gun, loading it, and commanding the tank, making for a very difficult job.
Challenges:
The single-man turret placed an overwhelming burden on the commander, hindering their ability to effectively command and fight simultaneously .
The hull gun’s aiming mechanism, relying on turning the entire tank, made aiming difficult .
The SOMUA S35 tank typically had a crew of three: a Driver, a Commander (who also served as Gunner and Loader), and a Radio Operator who assisted with loading and communication. Its major design flaw was the single-man turret, forcing the commander to multitask, though the radio operator could help load the main gun and coaxial machine gun, especially in tanks without radios .
Crew Roles:
Driver: Located in the front left of the hull, responsible for driving.
Commander/Gunner/Loader: In the turret, responsible for commanding, aiming the main gun (47mm SA35), and firing the coaxial machine gun.
Radio Operator/Assistant Loader: Sat to the driver’s right but moved to the turret to help load the main gun and machine gun, especially when radios were absent.
Key Challenges:
Overburdened Commander: The commander’s multiple roles limited situational awareness and target acquisition speed, according to The Tanks of World War II – Episode 8: Somua S 35 and War History Online.
Radio Issues: Many S35s lacked radios, making coordination difficult .
Well done info and analysis of both French tanks.
Great article on the book and what we can expect with these three armies! As a German player, I tend to play infantry formations (SS or FJ preferably) as core with armor and artillery in support through all 3 eras (EW, MW, LW) 90% of the time; so this analysis suits my playing style just fine.
I will say I’m still upset it took this long for BF to get to EW when veteran players of earlier versions are the ones who built the FoW following.