Barbarossa – Time to Invade Russia, or Defend the Motherland
By Paolo Paglianti
The Eastern Front opens up in Flames of War: the Early War period is becoming increasingly complete.
Battlefront is going all-in on Early War. Following the Blitzkrieg book, which we covered in this article, comes Barbarossa, the volume dedicated to the Eastern Front and the armies of Eastern Europe.
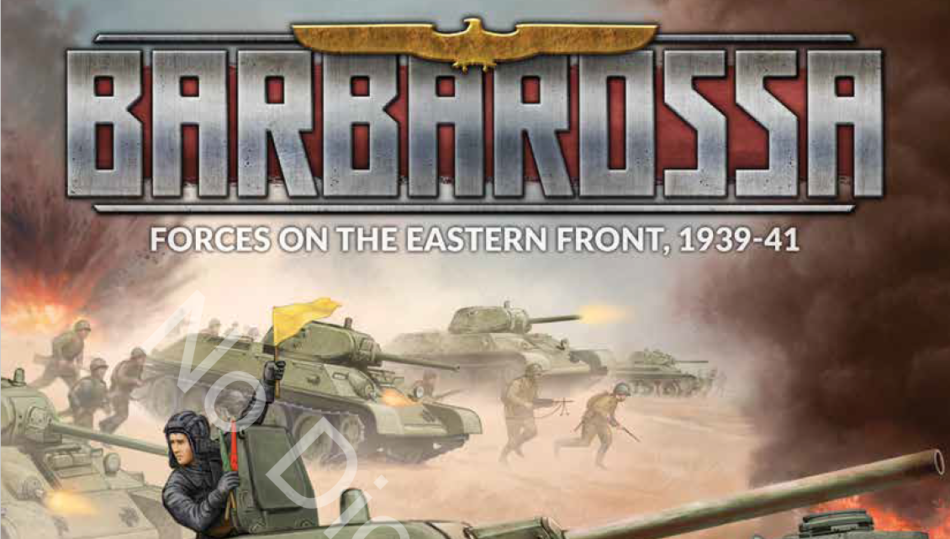
Barbarossa is another comprehensive army book, featuring several different nations. We have the Polish Army, which tried to defend its homeland against the combined invasion by Berlin and Moscow; the German Army, covering not only the invasion of Poland but also – as the book’s title suggests – Operation Barbarossa and the invasion of the Soviet Union. Then there are the Russian army and Finland defending their borders. Four nations, with a wealth of formations and support options, offering very different playstyles. In this article, we’ll take a first look at the book. Over the next few days, we’ll take a closer look on NDNG at each individual faction.
Barbarossa is a very interesting book that finally brings Early War to life. With this release, we’ll have six more factions available (the Romanians and Hungarians will arrive later as digital content, but by purchasing Barbarossa you’ll already have them included, at no extra cost).
As we’ve seen with D-Day and Bulge, and with Afrika Korps and Bagration for German forces in Mid War, the most recent army lists are obviously also the most competitive. There will be very little reason to play with the Blitzkrieg Germans anymore, as the Barbarossa Germans have pretty much everything their French campaign counterparts have, plus quite a few exciting new options, such as Panzer III tanks with AT 9 and the option to field SS units.
The Polish are an exception, as their 1939 list is much more compatible with Blitzkrieg. Players looking to be as competitive as possible will undoubtedly choose the German or Soviet lists from Barbarossa, which benefit from more powerful tanks with better AT ratings and generally come out on top when facing early-war tanks.
That said, as I mentioned in a recent article about my first Early War tournament, I’m really happy to see this new chapter of Flames of War, combined with the new missions, finally gaining momentum. New lists, new combinations, new armies to paint!
Polish Army
Battlefront actually gave away the Polish Army list back in September, and you can still download the PDF for free here. Better hurry, though, as Battlefront will probably decide to withdraw this little gift once Barbarossa hits the stores.
In any case, the Polish Army offers an interesting organizational structure, which you can see below.
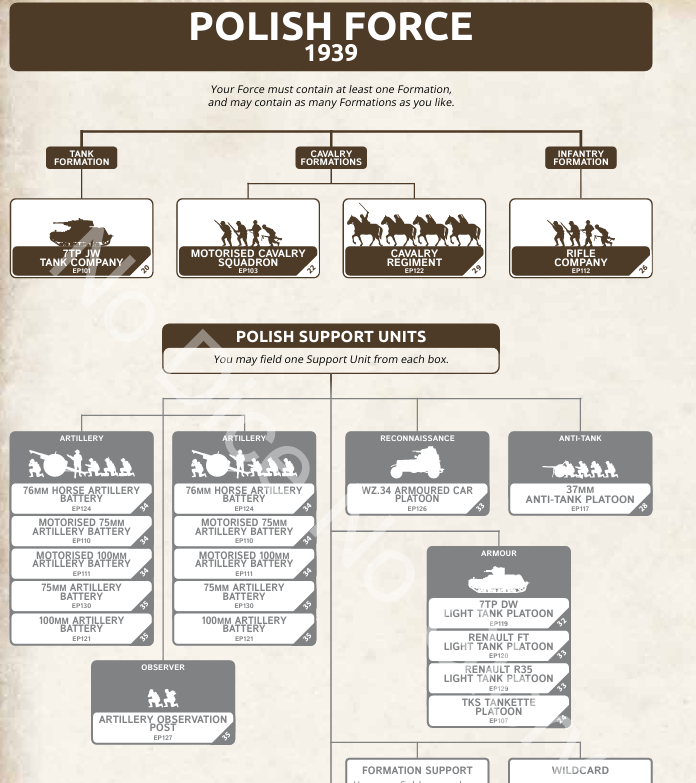
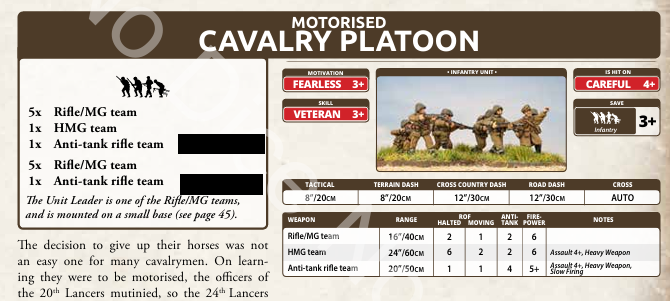
As you can see, the Polish lack tanks. They can’t even rely on Allied forces. There are two infantry formations to choose from: Motorised and Rifle. The Motorised Company is a pretty formidable formation, with both Motivation and Skill at 3+, and a 4+ Hit On rating. These are almost elite-level stats. However, its platoons come at a hefty price. A five-base platoon, including an HMG and an AT 4 anti-tank rifle, costs no less than nine points.
The formation even includes a motorcycle platoon with Spearhead, and – quite unusually for an Early War formation – a platoon of TKS tankettes or 7TP tanks. Unfortunately, there’s no mortar support whatsoever, meaning no smoke screens or additional artillery support.
The Rifle Company has less impressive stats, but is considerably cheaper. Motivation and Skill are both 4+ (although Last Stand and Rally are 3+), while the unit is Hit On 3+. A rather large 13-base Rifle Platoon costs 9 points.
Mortars are available, but they’re not particularly effective: two bases for two points. The same applies to the HMG platoon (three bases for three points) and the 76mm artillery, which comes with just two guns for five points.
One of the Polish Army’s most distinctive features is the Cavalry Regiment, which allows you to field up to four Lancer Platoons.
Normally, cavalry in Flames of War is treated as mounted infantry. In this particular case, however, Polish lancers can launch devastating charges against enemy infantry, hitting on a 2+ during the first round of an assault. They cannot, however, assault tanks or armoured vehicles: lances aren’t particularly effective against steel armour!
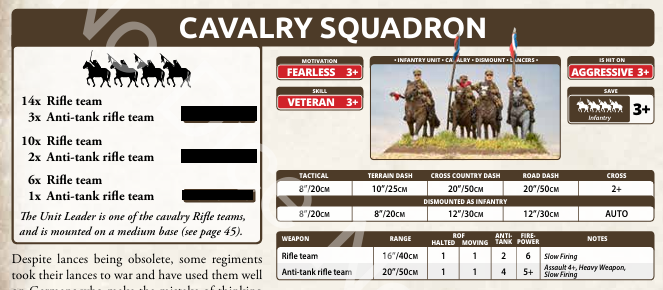
With Motivation and Skill at 3+, and Hit On 3+, Lancers can perform a 20-inch Cross Country Dash and charge up to six inches. Furthermore, unlike Rifle Platoons, each Lancer Platoon can include up to three AT 4 anti-tank rifles, making them some of the toughest infantry units to deal with when defending against tank assaults.
They’re certainly not cheap, though. A 14-base cavalry platoon with three anti-tank rifles costs a whopping 15 points. The formation also includes three HMG Platoons, a 37mm AT 6 anti-tank gun, a Spearhead Scout Platoon, the usual two-gun 76mm artillery option, and two armoured slots, which can be filled with TKS tankettes or WZ.34 armoured cars.
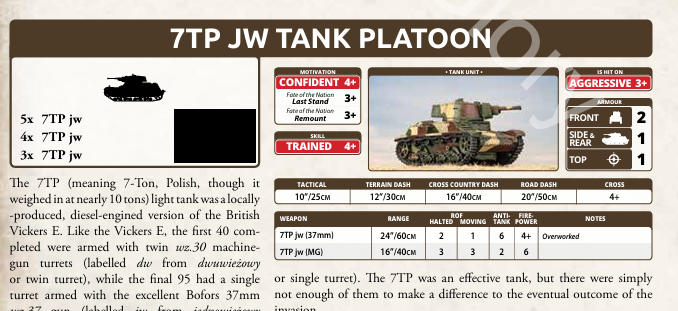
When it comes to tanks, as we said, the Poles are in a pretty bad position. Their options are limited to the tankettes and armoured cars we’ve already mentioned, plus the 7TP. The latter has a 2/1/1 armour rating and an Overworked AT 6 gun with FP 4+. With Skill 4+ and Cross 4+, it’s not particularly well suited to assaults, although it can certainly give them a try. And it’s not exactly cheap, either: five tanks cost 19 points, which works out at almost 4 points per tank.
For comparison, French Panhards have virtually identical stats and cost just 11 points for five vehicles – almost half the price. Sure, they are worse in assaults (5+), have a 2/1/0 armour rating, and their 25mm gun has AT 5 and FP 5+, but you can field almost twice as many of them for the same investment.
Among the support options, we find the Renault FT platoon, which is nothing particularly special in terms of stats, and the slightly better R35. The artillery options, on the other hand, are excellent. The 75mm guns have the same special rule as their French counterparts, meaning that deploying just two guns allows you to fire as if you had four. The 100mm guns can also be upgraded through Command Cards into an excellent 155mm battery with AT 9, making them a viable anti-tank option as well.
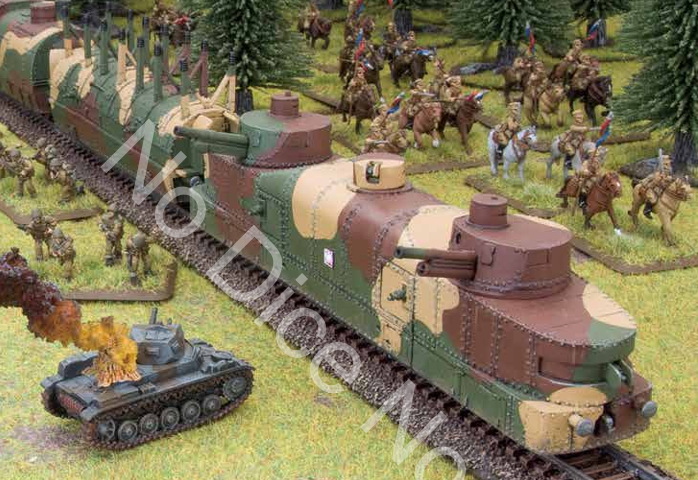
But the Polish Army’s real ace in the hole, apart from its cavalry, is the Armoured Train.
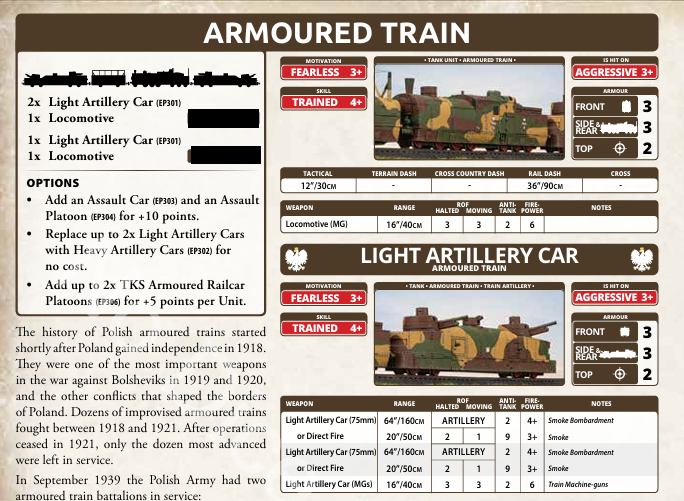
It includes artillery and assault platoons, and enters the battlefield as an Ambush. It’s certainly expensive, but when playing defensively it can be extremely effective. The Armoured Train really deserves an article of its own, and perhaps we’ll get around to writing one sooner or later. In fact, I wouldn’t rule out painting an entire Polish army just to have an excuse to field that armoured train!
From a competitive standpoint, the Poles look like an excellent defensive army. They have tons of relatively inexpensive infantry that can spread across the table and make life difficult for the enemy around the objectives, a good selection of guns of various types capable of keeping medium and light tanks at bay, and 40 easy reserve points that can be invested in the armoured train.
If you position the railway tracks intelligently at the start of the game, the train can keep the enemy busy long enough to reach turn six and secure a victory for the Polish player. This is particularly true now that the defender wins by keeping the opponent more than 4″ away from the objectives.
GERMAN ARMY
The Germans were already featured in the Blitzkrieg book, but here we find a more modern and powerful version of the army. The Barbarossa army list covers the period up to 1941, and therefore includes more advanced units and weapons. Here’s the organisation chart for the available formations and support options.
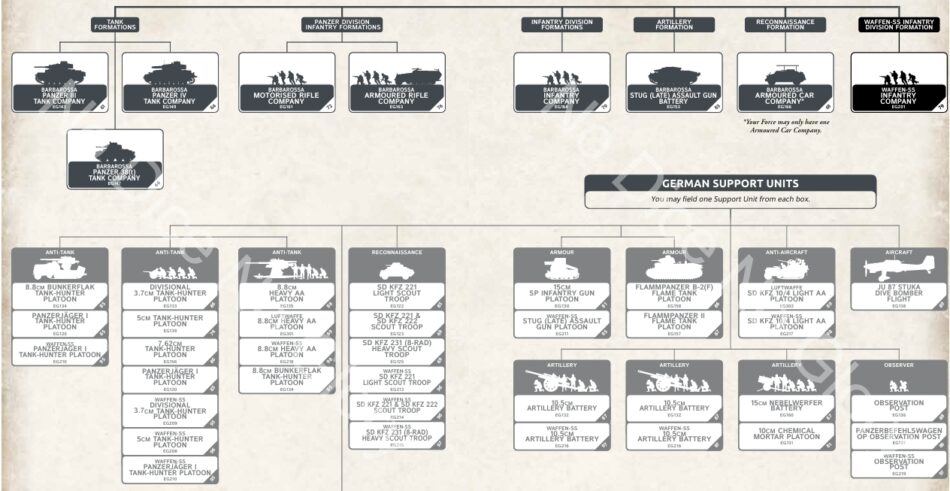
Let’s start with the tanks. The very light tank formations are gone, replaced by two tank formations featuring Panzer III and Panzer IV. But that’s not all: the Panzer III formation hides the most interesting new feature, namely the option to upgrade the Panzer III’s 3.7cm gun (AT 6, FP 4+) to the 5cm gun (AT 8, FP 4+).
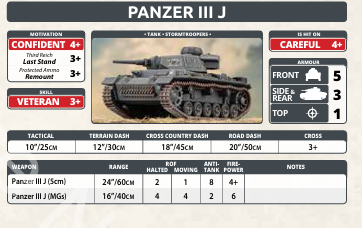
On top of that, you can further upgrade them to Panzer III J models, increasing their armour from 3/3/1 to 5/3/1. This effectively makes the Germans one of the very few Early War armies (at least so far) capable of fielding medium tanks with an AT rating higher than 7. Of course, there’s a rather hefty price tag attached. Three Panzer III J tanks cost a whopping 50 points – practically half your army in a standard 100-point game.
In my opinion, they’re even better than the Panzer IVs. Even when upgraded, the latter have a very respectable 7.5cm gun with AT 7 and FP 3+, which can also conduct artillery bombardments. They share the same 5/3/1 armour rating, but three Panzer IV F tanks still cost 47 points.
Another new addition is the Panzer 38(t) Late, which now has a 4/2/1 armour rating instead of the 2/2/1 found in Blitzkrieg. However, three Panzer 38(t) Late tanks go up from 15 to 19 points. The upgrade is definitely worth it, and I wouldn’t be surprised to see plenty of them in upcoming Early War tournaments.
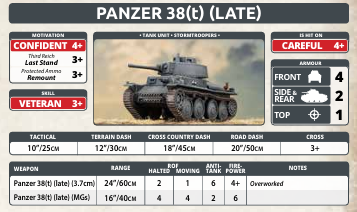
Their formation allows you to field four platoons, one of which can be equipped with Panzer II or Panzer IV tanks – but no Panzer IIIs.
The infantry options are broadly similar to those in Blitzkrieg. One interesting addition is that the Motorised Rifle Formation can now include an Sd.Kfz. transport platoon (still extremely expensive at 19 points) and a three-gun anti-tank platoon with AT 9, costing 13 points. These guns are particularly useful for mobile operations or defensive setups.
The Armoured Formation can also upgrade one Sd.Kfz. in each platoon with a 3.7cm gun, which is always handy in Early War, with its AT 6 and FP 4+.
We also get the late-model StuGs. The formation is similar to the one in Blitzkrieg, with a two-tank HQ and two platoons of two tanks each. However, it now costs 28 points instead of the already expensive 21 points in the Western Front book.
The reason is the improved armour, now 5/3/1 instead of 4/3/1, plus three MGs per vehicle. They’re still very expensive units, and particularly vulnerable to breaking formation, considering that the platoons consist of just two tanks. Among the support options, we find some familiar faces, such as the Bunkerflak and Panzerjäger I, which are identical to their Blitzkrieg counterparts.
But there are also flamethrower tanks, which are definitely worth considering given the amount of infantry likely to be roaming around Early War battlefields.
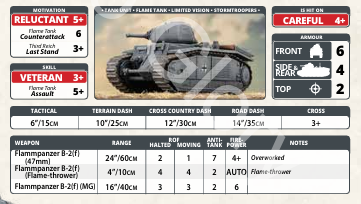
The Flammpanzer B2(f) is a modified version of the French Char B, equipped not only with its 47mm gun (AT 7, FP 4+), but also with a ROF 4 flamethrower. Its armour is an impressive 6/4/2, and it has a Cross rating of 4+. You can field platoons of either two or three tanks, costing 22 and 33 points respectively. As with its French counterpart, when it Breaks Off from an assault, it retreats at Dash speed. Otherwise, with its miserable 6-inch Tactical movement, it would be destroyed far too easily. Effective, but tremendously expensive.
The Flammpanzer II is a much more affordable proposition. Platoons range from two to four tanks, costing between 6 and 12 points. They have a ROF 3 flamethrower, no main gun (although they retain the usual three MGs), and 3/1/1 armour, which offers some protection against lighter weapons. Perhaps a more sensible investment for an attacking force, especially considering their 10-inch Tactical movement. The Germans also get the Nebelwerfer. Its stats are similar to the Late War version: it fires a Salvo template at a range of 64 inches, with AT 2 and FP 4+.
It’s almost useless against tanks, but rather nasty against open-topped vehicles with Top Armour 0. More importantly, it’s particularly devastating against infantry-heavy defensive armies and their gun teams. In many Attack-Defence missions, its template can cover half the enemy force! A three-launcher unit costs 10 points, while six launchers will set you back 20 points. And, as the name suggests (Nebelwerfer literally means “smoke launcher”), it can also conduct Smoke Bombardments.
We also find the familiar 88s and the Stuka, which gets a Command Card (as in Blitzkrieg) allowing it to arrive on a 3+ every turn.
Finally, we get the SS Division and its support options. The Barbarossa SS are Careful (Hit On 4+) and have both Skill and Motivation at 3+. They aren’t even that much more expensive than regular Wehrmacht troops. For example, a nine-base platoon with a mortar costs 12 points, compared to 11 points for its Wehrmacht equivalent.
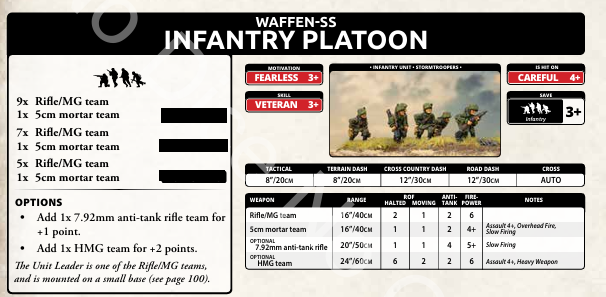
Support options include Panzerjäger, late-model StuGs, 3.7cm guns and Scouts, all with improved Motivation and slightly higher costs.
One particularly interesting detail concerns the 88mm platoon: it consists of just two guns and costs 10 points. As the book’s background text explains, relations between the SS and the Luftwaffe weren’t exactly friendly.
Among the German Command Cards, besides the already mentioned Stuka card (which makes the aircraft arrive on a 3+ and can be devastating), there’s the Captured Panhards card. For 10 points, you get three Panhard Scout vehicles with Spearhead, Hit On 4+ and the Storm Trooper rule.
If minefields are a concern – and with the new missions they can even appear in Meeting Engagements – you can field Pioneer platoons or formations. There’s also the Panzer I Demolition Platoon: three to five Panzer Is (13 to 19 points) equipped with demolition charges. These allow them to assault infantry in buildings for a single turn, but also to clear minefields. There’s also a Panzer II version, with identical rules but a slightly higher cost (14 to 21 points).
Need more AT? The K18 battery offers two to four guns with AT 15 and Firepower 2+, costing 7 or 14 points respectively. These guns will make any enemy tank commander nervous, no matter how heavily armoured their vehicles are.
As we know from Mid and Late War, the German army remains the go-to elite choice for competitive players. Quality comes at a price, and especially in Early War, German players need to play their cards very carefully, as they simply cannot afford to make mistakes.
The Barbarossa German force can be played in all stances, but I think it is particularly well suited to Manoeuvre and Attack, thanks to its Pioneers, who can easily clear minefields, and its very flexible selection of excellent tanks, ranging from light to medium. It also has an unrivalled variety of anti-tank weapons to deal with enemy heavy armour, including the 88s, Bunkerflak and K18 guns. On top of that, it has two different types of flame-throwing tanks.
In short, it has everything you could possibly want, but it comes at a pretty hefty points cost.
Soviet Union People Army
“Quantity has a quality all of its own”, as the Russians used to say. Let’s not beat around the bush: the Soviet Army is undoubtedly one of the most competitive and interesting forces in the book. It has both some of the best light tanks available and some of the most fearsome heavy tanks. But let’s take things in order.
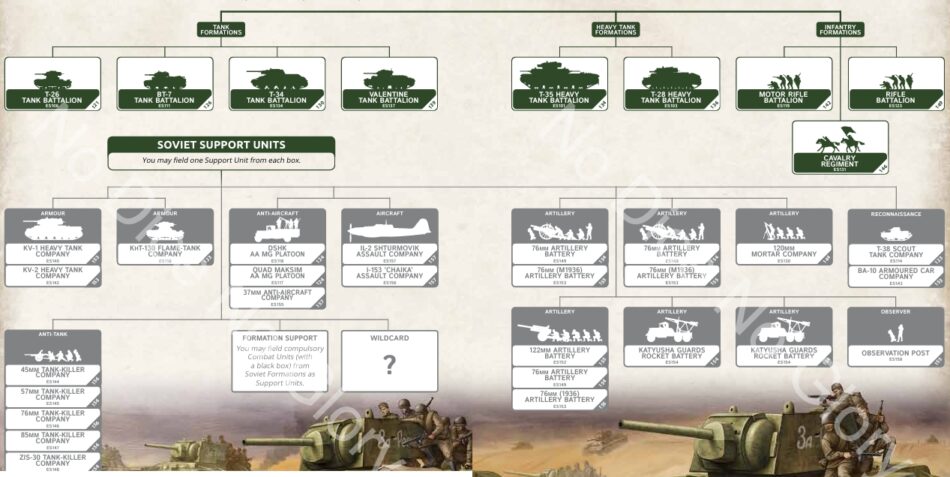
Let’s start with the tanks. There are plenty of options here. All Soviet tanks are Hit On 2+, have Skill 5+ (making effective assaults rather difficult) and Motivation 3+. However, their Remount rating is a dreadful 5+, reflecting inexperienced crews and Stalin’s purges of the officer corps. In short, they’re easy to hit, difficult to get back into action after being Bailed Out, and not particularly good at assaulting. But there are lots of them! Their poor stats translate into very affordable points costs.
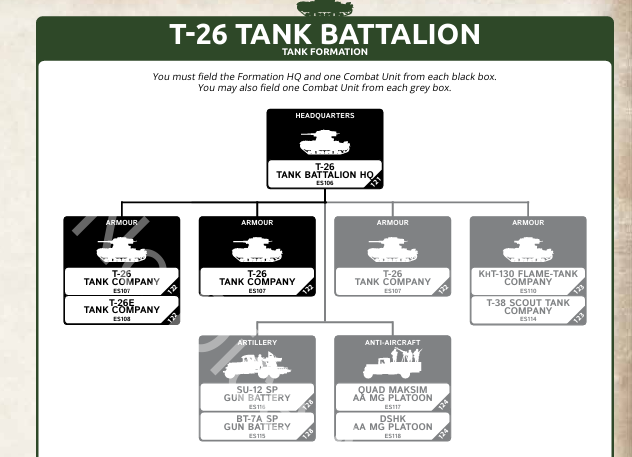
First up are the T-26s. These are very light tanks with 1/1/1 armour, but a surprisingly respectable 45mm gun with AT 7 and FP 4+ (although Overworked). Each tank costs roughly two points, and platoons range from five to a whopping sixteen tanks (12 and 37 points respectively). You can downgrade them to Early models (no main gun, but four MGs), saving one point for every two tanks. Alternatively, one platoon can be upgraded to T-26E models with 3/2/1 armour – in this case, five tanks cost 15 points, while sixteen cost 45. This means you can field a formation with three platoons of fourteen tanks each, plus the HQ – and still have room for a Lucky Command Card!
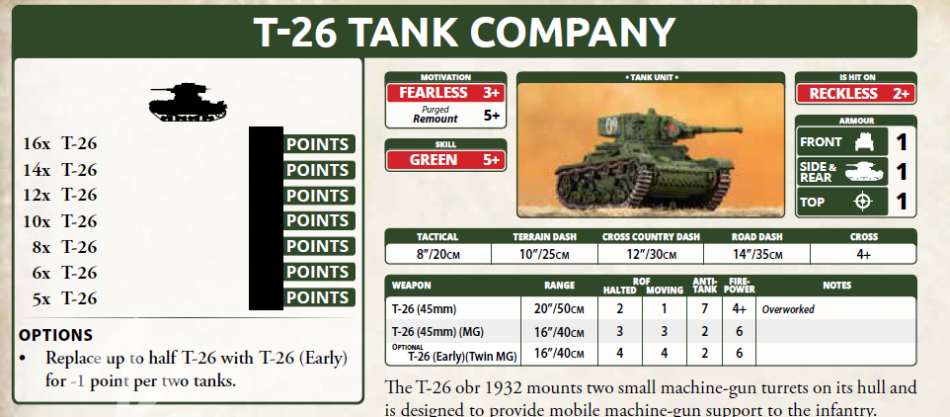
Probably one of the few ways to play Flames of War with 43 tanks on the table!
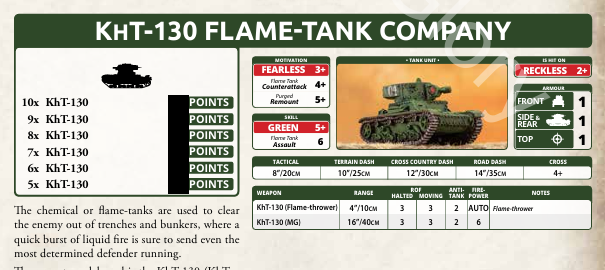
The formation can be completed with a T-38 Scout/Spearhead platoon (armed with MGs only), or, for something much more effective, a KHT-130 Flame Tank platoon. Here again, the Russians like to think big: you can field between five and ten flame tanks in a single platoon. They still have 1/1/1 armour, but their flamethrowers have ROF 3. Ten tanks cost just 18 points. It’s difficult to stop them all, although they’re not particularly fast: 8 inches Tactical, 10 inches Terrain Dash and 14 inches Cross Country Dash.
There are also some gun batteries and Maksim AA guns, but since they’re mounted on trucks and have fixed saves, they’re not particularly attractive options in an army that’s already Hit On 2+.
The exception is the BT-7A battery: three vehicles for 8 points, providing a respectable 64-inch Artillery Bombardment with AT 2 and FP 4+. As with all Soviet artillery, there’s no Smoke Bombardment. Their 2/1/1 armour at least offers some protection against MG fire.
The BT-7 formation follows a similar concept: masses of light tanks with the same AT 7, FP 4+ Overworked gun. The difference is that they have 2/1/1 armour, but are considerably faster: 10 inches Tactical, 14 inches Terrain Dash and an impressive 20 inches Cross Country Dash. They still suffer from the dreadful 5+ Cross rating, and have access to the same support options. But, as we will note later, there is a cheap useful Command Card for this. Once again, platoons range from five tanks (13 points) to fifteen (40 points), making them perfect for anyone who loves overwhelming the enemy with sheer numbers.
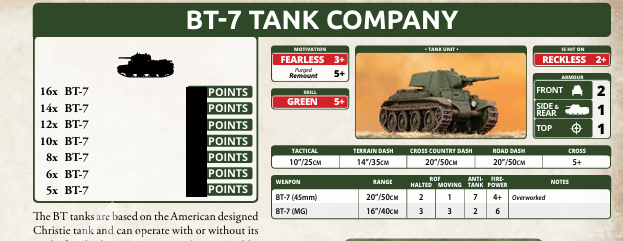
There’s also an option to downgrade them to BT-5s, losing one point of Front Armour in exchange for a discount of one point for every eight tanks. Not worth it, in my opinion.
Now let’s move on to the Soviet tanks’ big surprise: the T-34. We already know this vehicle from Mid and Late War battles, but here it’s the king of Early War tank engagements. It boasts an impressive (for Early war) 6/5/1 armour rating and an AT 8, FP 3+ gun (Overworked), which can be upgraded to AT 9, FP 3+ (still Overworked) to make short work of lighter tanks. It’s also very fast: 12 inches Tactical, 14 inches Terrain Dash and 20 inches Cross Country Dash, with an excellent Cross rating of 3+. Unfortunately, it comes at a hefty price. The basic version with the short 76mm gun costs 28 points for two T-34s, going all the way up to 111 points for eight tanks.
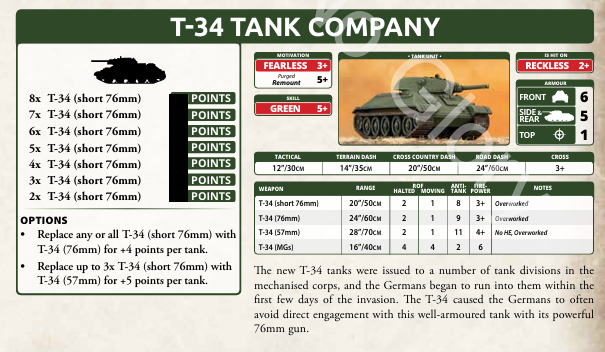
The T-34 formation allows you to field one T-34 platoon, plus two additional platoons chosen from combinations of T-26, BT-7, T-60 and T-28 tanks. This gives you plenty of flexibility to create your preferred mix of Soviet armour. And, of course, the usual support options are available.
Completing the Soviet tank roster are the gigantic T-35 and T-28 formations. The T-35 is a Land Battleship, with some special rules similar to those found on Mid War Japanese tanks. It can conduct Defensive Fire and fight in assaults even when Bailed Out, although it remains immobilised. It comes with no fewer than three guns: one ROF 2 weapon with AT 7 and FP 3+, plus two ROF 2 guns with AT 7 and FP 4+, firing in a symmetrical arrangement. In theory, when stationary, each vehicle can fire six shots, including four using its Secondary Weapons (just like the American Lee). On top of that, it has six MGs, making it a nightmare for any infantry trying to assault it.
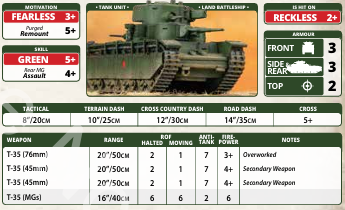
Unfortunately, despite its intimidating appearance, its armour is only 3/3/2. That’s excellent against infantry, but Early War tanks can still penetrate it without too much trouble. It does have a special rule, though: even when it fails an armour save against an otherwise impossible shot (including an 88mm gun with AT 14), a roll of 6 will still save the tank. They’re not cheap: three T-35s cost 27 points, and a platoon can contain up to ten tanks, for a staggering 91 points.
The T-28 is its smaller brother. Two guns with AT 7 and FP 3+ (both Overworked), 3/2/2 armour and five MGs make it an excellent anti-infantry tank. The rear-mounted MG also means it assaults on a 4+ rather than the usual 5+. Additionally, the T-28E version adds one point of Front Armour. Four standard T-28s cost 17 points, which is quite affordable. Upgrading to T-28E costs an additional point per tank. As usual, a platoon can contain up to ten tanks, for a total of 41 points.
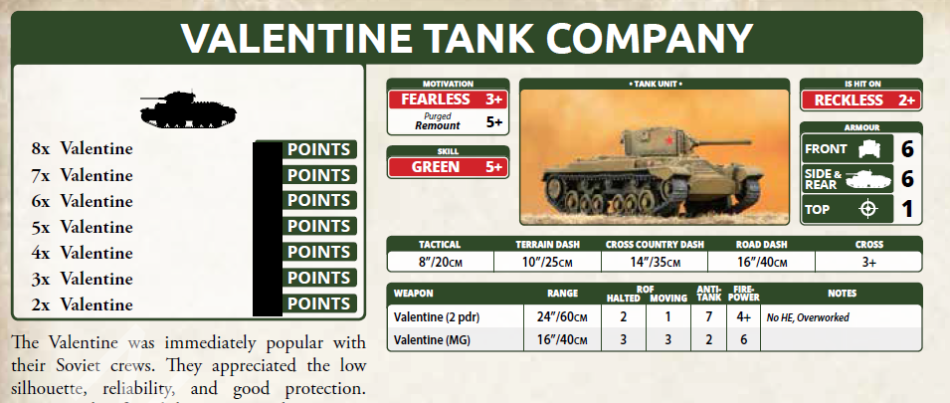
The Russians get the Valentine before the British, in FOW Early War! Alongside Soviet-built tanks, we also find the first Lend-Lease vehicles: the Valentine and the Matilda. The Valentine formation can be mixed with T-34s or other Soviet tanks, and even Matildas, allowing you to create your preferred combination. The Valentine is an excellent tank, with 6/6/1 armour and an AT 7, FP 4+ gun, although it is both Overworked and No HE. A two-tank platoon costs 22 points, and you can field up to eight Valentines for a prohibitive 87 points.
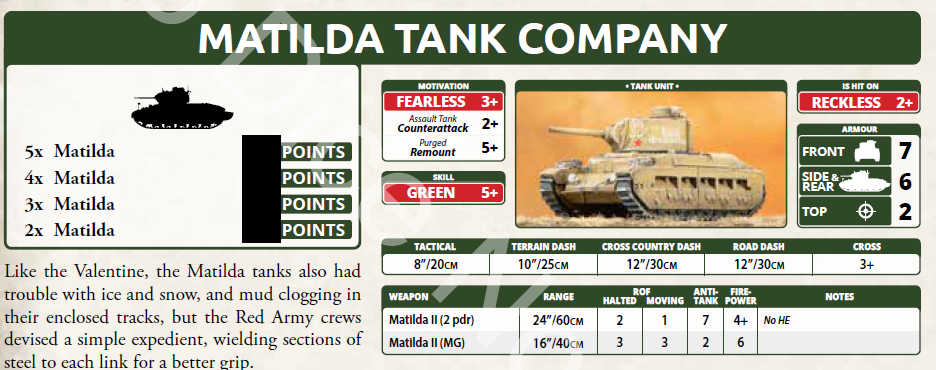
The Matilda II is even more expensive. With its impressive 7/6/2 armour and an AT 7, FP 4+ gun (No HE), two Matildas cost 28 points. You can field up to five, but that will set you back a massive 70 points.
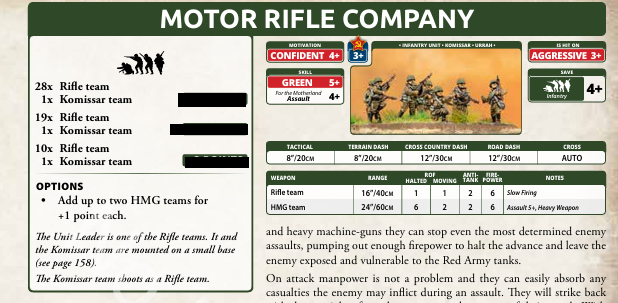
Let’s move on to infantry. There’s nothing particularly original here for anyone already playing Mid War Soviets. There are no Hero formations, and both Motor Rifle and Rifle infantry save on a 4+ rather than the usual 3+.
The Cavalry Formation doesn’t have the Polish Lancers’ special assault bonus (in fact, it hits on a 4+ in assaults), and even its HMGs are mounted on carts with an Unarmoured 5+ save. Perhaps not the most competitive choice, but certainly a colourful one!
Now for the support options. The Soviets can field KV-1 and KV-2 tanks, with excellent armour ratings of 7/7/2 and 8/7/2 respectively, making them virtually invulnerable in many assault situations. They’re expensive, but perfectly in keeping with the Soviet approach to armoured warfare: brutalism on tracks.
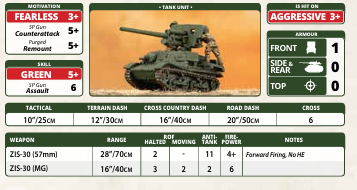
The ZIS-30s are much more interesting. They have very little armour (1/1/0) and no ROF when moving, but come with an excellent ROF 2 gun, AT 11, FP 4+ and a range of 28 inches. They’re an excellent alternative to conventional anti-tank guns. Platoons range from two vehicles for 6 points to six for 18 points – an absolute bargain.
The Katyushas are also excellent, with their Salvo template and Skill 4+, a rarity among Soviet units. They’re perfect for pinning down and pounding infantry and gun teams in defensive positions, with a respectable Firepower rating of 4+. Among the artillery options, the 76mm guns deserve a mention. They have AT 11 and FP 4+, and can also be used for artillery bombardments. That said, the Soviets have an embarrassment of riches when it comes to anti-tank weapons: from 45mm to 76mm guns, there’s something for every situation.
Among the more interesting Command Cards, we find Unditching Logs. For just one point, it allows a unit to re-roll Cross checks for one turn. Extremely useful when your little Soviet tanks are assaulting infantry in a wood or behind a wall, since the bonus lasts for the entire turn. There’s also a discount card for the KHT-26 Flame Tanks, reducing their cost by one point per tank, although their flamethrowers have ROF 2.
Early War Soviet forces are a strange beast. On the one hand, they have the usual embarrassing abundance of light tanks, as we’ve already seen in Mid and Late War. On the other, the decision to make them Reckless and give them a Remount 5+ adds a vulnerability that isn’t present in the other periods. You can field almost 50 tanks for 100 points, but you run the risk of seeing half of them Bailed Out for the entire game.
The alternative is to invest your points in medium and heavy tanks, but I don’t think this is a winning tournament strategy. All it takes is to come up against a German force equipped with 88s or Bunkerflak, and with those guns hitting on a 2+, your KV and T-34 tanks risk being blown to pieces by turn three.
Infantry with a 3+ Skill and 4+ Save makes the choice of stance fairly obvious: defending with tanks and infantry this vulnerable is almost impossible, especially in a period when we can expect to face plenty of artillery batteries.
The Soviets have to attack, rush towards the enemy and simply ignore whatever is shooting at them. They have no Smoke Bombardment to rely on, so they just have to hope for the best – which, historically speaking, is pretty much what happened!
Finnish Army
The Finnish Army is primarily an infantry force, with no fewer than three infantry formations and one T-26 tank formation.
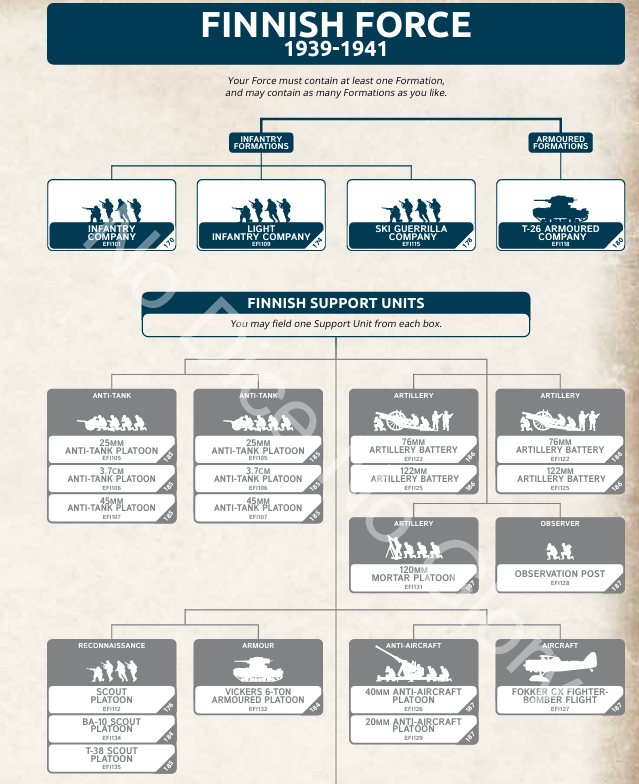
The Rifle Company is a solid and reliable formation, with Motivation and Skill 4+, and a Hit On rating of 4+. It comes with the usual mortars, MGs and anti-tank guns. Things get more interesting with the Light Infantry Company, which has Motivation 3+ and Tactics 3+. Considering that a nine-base Rifle Platoon costs seven points, while a nine-base Light Infantry Platoon costs eight, we have a clear winner – especially since the latter formation can also field an SMG Platoon (Assault 3+) and a Scout Platoon with Spearhead.
But the real game-changer is the Sissi Guerrilla Formation.
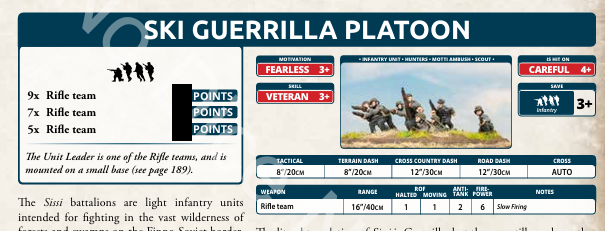
A nine-base platoon (which, unlike the other two infantry types, cannot add anti-tank rifles or HMGs) costs just one point more than Light Infantry, while enjoying both Motivation and Skill 3+. And that’s not all. Thanks to the Finnish special rule Motti Ambush, you can place up to two Ski Guerrilla Sissi Platoons in Reserve while treating them as Ambush units. Every turn you roll for Reserves, you also roll a separate die for each Sissi Platoon. On a 5+, the platoon can appear anywhere on the battlefield as an Ambush – including inside the enemy deployment zone! The only restriction is that it must be placed more than eight inches away from an enemy objective. During the turn it arrives, the Sissi Platoon cannot move, but it can still shoot. They will be a constant Damocle’s Sword on the opponent Objectives and weak units – try to leave some artillery behind! This makes the Finns a particularly tough opponent in the Meeting Engagement missions featured in the new book.
The T-26 Formation completes the available options. These are light, Aggressive tanks with 1/1/1 armour and a fairly respectable AT 7, FP 4+ Overworked gun. Five T-26s cost 16 points. There’s also the T-28 option, which is slightly better armoured (3/2/2), but still rather expensive and available only in two-tank platoons. The formation also includes a single T-34 captured from the Soviets, which is actually a rather interesting option at 24 points. On its own, it can assault or defend an objective, if it’s hidden from heavy guns.
Among the support options, we find the expected artillery platoons, a 120mm mortar capable of conducting Smoke Bombardments, and a couple of anti-tank options. Unfortunately, the latter have relatively low AT ratings (6 and 7) and are available only in two-gun platoons. The Fokker is a nice addition: for 7 points, it provides an AT 3, FP 3+ air bombardment with Skill 3+.
Among the Finnish Command Cards, Simo Häyhä deserves a special mention. For 5 points, this exceptionally effective sniper comes with FP 4+, Pins down any unit it hits, and ignores the Mistaken Target rule. The Christie Detachment Escort is another interesting option. It allows you to attach an SMG Platoon to a BT tank unit and transport the infantry around the battlefield. When the tanks launch an assault, the infantry dismounts and joins the attack, like the British Late War Kangaroos. All this for just two points!
Since I’ve never painted a Finnish army before, I think this will be my painting project for the winter, as well as an opportunity to study a part of WWII that I know less about than others: the heroic resistance of the Finnish people against Russian aggression. I also think painting an army with snow camouflage will be a lot of fun!
From a competitive standpoint, Early War Finns are difficult to assess. On paper, they look like an excellent army for Defence or Manoeuvre, two stances in which the special Ski Guerrilla rule can be extremely effective. Just imagine facing a Finnish army in Breakthrough or King of the Hill, with one or two platoons of infantry able to pop up practically anywhere on the table!
Of course, tanks are in short supply. From this perspective, however, it probably makes more sense to consider taking two German allied units to provide some armour. A few Panzer 38(t)s and Panzer IIIs seem like the perfect complement to such an excellent infantry-based army.
Hungarian and Romanian
Last but not least, Hungary and Romania will also join the fight. They are not included in the physical pages of the Barbarossa book, but the usual digital code at the end of the volume will allow players to download their PDF army lists and access all their formations on Forces.
We haven’t had a chance to take a look at these two armies yet, so stay tuned for more!