Choosing a Team Yankee list for your IDF force and paint it – part one: the tanks
By Paolo Paglianti
After having completed my British BAOR force and an antagonist URSS army, I wanted to move to a different theatre of Cold War. For a while, I was lingering on Fate of Nations setting, but the Oil War book gave me exactly what I was looking for: a new scenery for a brand fresh force, literally thousands of miles away from the ubiquitous NATO green.
As usual, I am going to create a core force of around 100 points for the two sides: at our club in Milan we like to have two opposing forces for every ruleset, so we can demo players wanting to get into the games we like. For Oil Wars, the first force I selected was IDF, and later this year I plan to complete the theatre with an Iranian/Syrian force.
Choose the list
Surely, the leading role of my IDF army would be the Merkava 2 Company. I really like the look of this tank, and for a single point more I’d definitively go for the upgraded Merkava 2 – even one point of frontal armor could do the difference between a surviving tank and a burning wreck. I got a five tank platoon box and a Kahalani’s Warriors box with three tanks and two helos, so the total 8 Merkavas are perfect for the 2-tank HQ (always get two of them, if possible!) and two 3-tanks platoons.
Next step, I need some infantry: IDF foot is so good we can’t miss, and a platoon is almost mandatory in Team Yankee to defend an objective or to take houses and factories since vehicles can’t simply charge into buildings. A good tactic I often use in FOW or TY is to hold “my” objective with an infantry platoon and assault the enemy one with tanks.
Considering Team Yankee V2 rules introduced much stronger artillery vs infantry, for now I’ll have a single infantry platoon, with four M113s attached.
Speaking of new rules, I bet we will see many flying objects in our future Team Yankee battles since it’s now very hard to kill them and they never test morale for being alone. Another 4 M113 VADS will be my AA units, but I also want some M48 Chaparrals to protect my ground units. The VADS will be good also against moving infantry and lightly armored vehicles.
I really want to have at least one recce unit, so I’ll have some M113s morphing into the scout option, as we will see later.
For the support, I will take some 109s (for the moment, I’ll use my British ones, even if they are painted in green and black – we’ll assume IDF bought them from the Crown and didn’t have time to repaint them before hostilities broke out).
Obviously, every wise IDF player will choose the Pereh platoon, the only unit in the whole game able to target and shoot to enemy teams out of sight. I’d buy 20 of them, but we are allowed only three of them, sadly. I feel I needed some more high AP punch, so I’ll get the jeep TOW platoons. They are really vulnerable, but since they come in units of 4 jeeps, I’ll try to sneak out if the enemy kills two of them. And they are so cheap!
I already have two Cobras from the Kahalani’s Warriors box, so I bought two more helicopters. To add some color, I chose two Apaches from Revell in 1/144. If I’ll meet some player asking for strict adherence to the models, I have already some more Cobras bought for my still-to-be-finished US army. Finally, considering the very low cost, I’ll have a couple of Skyhawk fighters. I don’t like to have two-vehicles platoons, but considering the planes never test morale for being alone, I’d paint two of them and will use them for games where I deploy the 4 Cobras/Apaches for combined air assaults.
Assembling the units
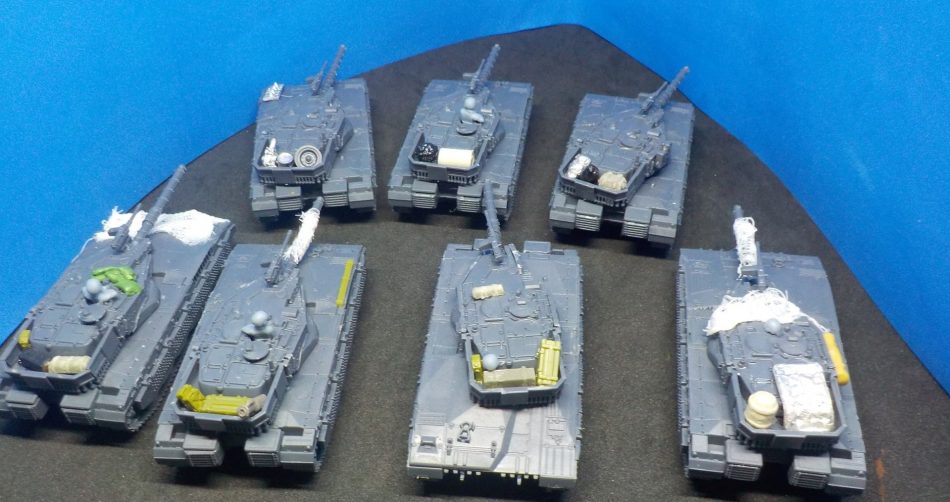
I started from the Merkavas. These tanks have a unique turret with plenty of space for any kind of stuff. I just Googled “Merkava” on the Internet and I found lots of photos to be used as a reference, and I noticed how IDF crew have any kind of stuff on their tank turrets.
 The idea is to have 8 tanks with totally different layouts: more diversity and you can tell during a game “I shoot with the tank with the mattress to your T64”.
I planned to have 8 tanks with totally different outfits. My special “bits” box came into real use, and I tried to have very different layouts.
- the mattress and the gas canister came from
- the amphora, the fruit chest and various boxes from
- the helmets came from unused M113 crews, just cut out the helmet from the head
- the .50 gun is from a US FOW set
- the tank wheel comes from a Chieftain sprue
- sandbags are sculpted with
 Nets are very good to diversify a bit the palette of your tanks: a small spot of green on a sand-grey avalanche. You can also add some sandbags around the hatches. I also removed a section of the side armors: Battlefront models are so good you can un-hide some details!
I also added a frontal plough from my T64 sprue – I know it’s not totally “historically” accurate, but I really like the WH40K look. Assembling the Merkava model is not difficult: one piece of advice is to place a small toothpick between the upper track and the wheels, to support the flank armor you’re going to mount on your Merkava. Without this support, these side armors will keep breaking off from the position. This is even more important on the Pereh.
 A part of toothpick will help to keep those side armors in place, even if some Russian will shoot you on your flanks with their RPGs!
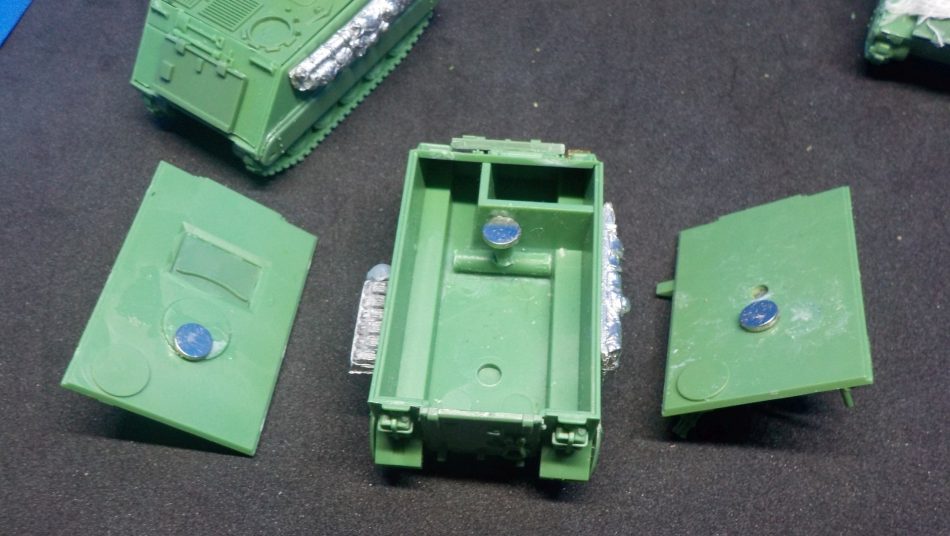
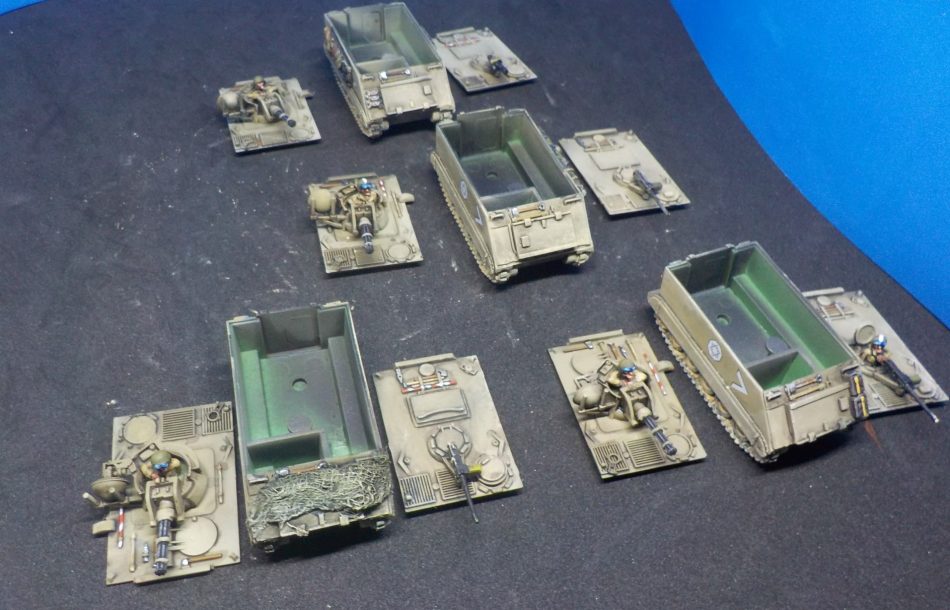
For the M113s, I wanted to have a similar “all different” vehicles look. However, I also wanted to convert four of them to be able to deploy them as ordinary M113s or as AA VADS. As you see in the following photo, it’s really easy: you just need to cut a “T” shaped part of sprue, and glue on its top a 5 or 4 mm round magnet.
Now, you need to glue a magnet of the opposing polarity under the upper M113 panel, matching the position of the lower magnet, and the game is done. Repeat with the M113 VADS upper panel, and you can swap transport/scout M113s to AA VADS in a click.
Two pieces of advice: make sure you use the same polarity on all models, so you don’t have to bother to choose the “right” M113 upper panel for a given lower M113 hull. Also, if you are going to have a magnet under the VADS turret, you need to have the same polarity sequence, otherwise, the turret will be repulsed by the lower magnets. If the turret “attaches” to the hull’s magnet, you are doing right.
 Pay attention to the polarity! You need to have all the top parts with the same polarity (and the hulls, also) so you can freely swap them.
I also added some nets around: you can place the camo nets on the sides of the vehicles, on the gun barrel, on the turret or the frontal shield of the M113. It’s very easy: just take some net patch from a medical store, cut to the appropriate size, and fix to the vehicle with a mixture of 50% PVA glue and 50% water. If you don’t add enough water or use the PVA glue without watering it down, the result will be “spongy” and unrealistic.
 With this simple trick, you can save the money of a full box of M113s and buy some more Merkavas!
Painting the IDF
The first step is to primer all your vehicles in black. After the first passage is dry, you need to check between the wheels and the tracks, since you want to be sure there is bare plastic or metal in these spots usually difficult to reach with only one primer passage.
The IDF colors changed during the various Cold War conflicts they took part in. We are going to have a 1985-circa army, so the color is greyish sand. The only right out of the box color pot I found is from the Italian LifeColor line (UA 901 and UA 902). A very similar result is from Vallejo IDF Sand Grey (61-73 is the code for the Surface primer).
However, I really prefer Tamaya colors when I use my airbrush. Since there is no exact match color for IDF in the Tamaya range, we’d need to create our mixture. A very good result, as you may see in the photos in this page, is mixing Tamaya XF 49 Khaki (60%) and XF 20 Medium Grey (40%). You can just use this color on all your IDF vehicles as a base.
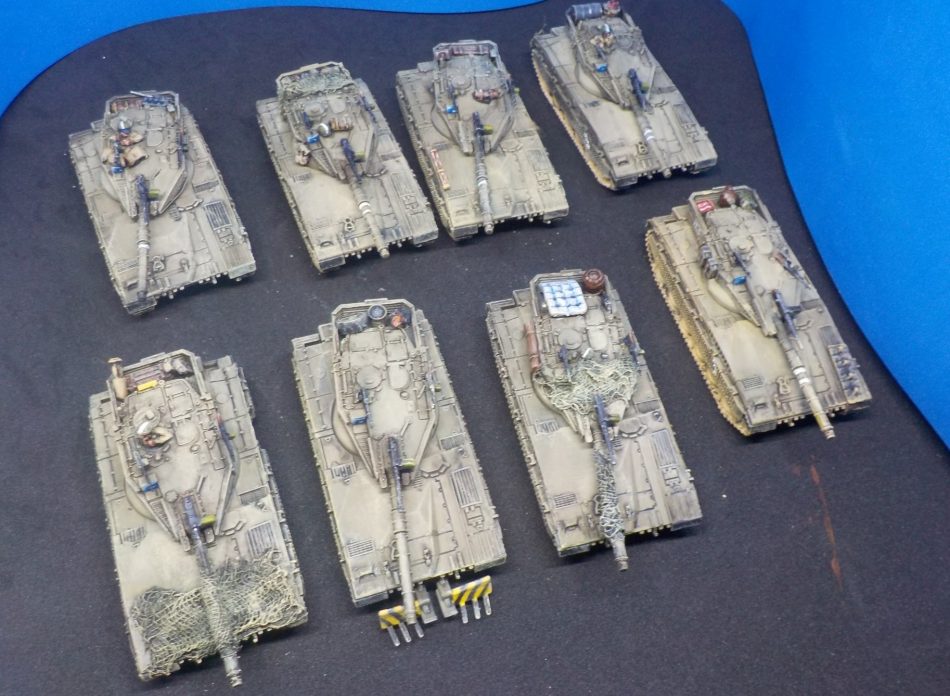
 The finished Merkavas 2: they have the same camo and colours, but each one is “unique”.
After that, you can do build some highlights. Add a 30% white to the mixture you already did of Khaki and Medium Grey, and give some gently touches on the sides of the turrets, on the upper part of the M113 sides and frontal armors and the central parts of the tank plates.
Now, time to give some depth to the miniatures: use the Dark Brown AK Interactive wash (AK045), spreading it in every recess. You want this wash to “simulate” the shadows near every raised surface, like slots and gaps in the armors, hatches, and so. Let the wash dry for at least 15-20 minutes, then use the odorless White Spirit from AK with a soft tissue or cotton bud to remove the wash from where you don’t want to see it, like the flat surfaces (the same where you previously had highlights).
 The Perehs, ready to hunt for enemy artillery or AA units out of sight. On these flat surfaces on the turrets, the AK Interactive wash is very effective.
Next step, details: you need to paint all the stuff you placed on your tanks and vehicles. Just remember your units will “strike” on the battlefield if they will have some different colors on them from the IDF grey base. So you’ll want to paint brown boxes (I use Mournfang Brown from Games Workshop, highlighting it with light brown like Iraqui Sand). Metal jerry cans are very good in Olive Brown (Vallejo 899), while you can paint some boxes in red and white mimicking the Coca Cola logo (or the colors of your favorite beverage!). M113s have a lot of tools around, so you can paint them in metallic and wood: I did some red and white rods, they are very easy and have a good effect.

The finished M113s, with the “swapping” tops: you can now choose to deploy them as scouts/transports, or as AA VADs.
 The Chaparrals: I used a different green for the SAM missiles, to add a different color to their scheme. The missile tops and the small wings are also in brilliant red and yellow.
Add the decals: you can find some references on IDF tank markings here, and also remember to paint the gun barrels with white rings to mark platoons.
To do some weathering on the tracks, I used the Vallejo Pigment Light Yellow (73.102): you just place the powder on the tracks, and then you “fix” it with the Pigment Fixer (I used the Green Stuff World 1754). After a few hours, it will give a very good look of “muddy” desert sand between the wheels.
To finish the model, just do a very gentle drybrush on the whole tank/M113/artillery. This passage will enhance every angle and corner of the vehicles, and give uniformity to the model. Remember to give a final passage of matt varnish – you’re going to play with these models, so it’s better to protect them from fingers and small collisions.

A selection of the finished army, ready to be deployed on some Tuesday evenings at our local club in Milan: will be a tough nut to crack for any Russian!
Next time, we will talk about the infantry, their bases and the Flying units!

Damn you can paint
ehehe thanks 🙂
Impressive Paolo!
Been playing IDF for a bit now and unless it is blue on blue it is a great training army. Your painting is wonderful. My hope is to get my last bits finished up in the current downtime.