Kampfgruppes in FOW – Part 3: How to make ‘Desperate Panzers’
By Ed Sales
If it’s one thing I love about painting and making these models, it’s that I have a range of creativity at my disposal. You can really add a lot of character to your tanks. I like to make each of my tanks different from the others, even if they are the same model.
When Desperate Measures came out, this added a whole new dimension of how I looked at modeling tanks. When I modeled my tanks, prior to that release, I might have the stowage a little different on each tank.
Now I can take a StuG Platoon, and paint each tank with a different camo scheme and say that the platoon was thrown together last minute. Maybe one of the Stugs left the factory in primer red because they were running low on dunkelgelb. I could do up a Tiger, and paint the running gear a different color, saying a T34 hit it to track it. You could really go all out and really have fun with it.
My ‘Desperate Panzers’ always get a lot of attention when I take them to tournaments (both with onlookers and in AT shots). I figured I would work on this guide to help those who are looking to do something different or maybe inspire you to work on something that’s been sitting on your table waiting to be painted (or multiple tables like me).
I am by no means an expert painter, but I like to think my stuff is good. While I do this for Flames of War, you can do this for Bolt Action, Battlegroup, or whatever WW2 system you prefer.
Without further ado, here are some different things you can try.
Straight off the Factory Floor
If you’ve ever been bored and searched Google for German WW2 Tanks, you’ve encountered a few of them that appear to be just primer red. Whatever the story, it has intrigued me that some of these tanks were driven right off the factory floor to be sent into combat.
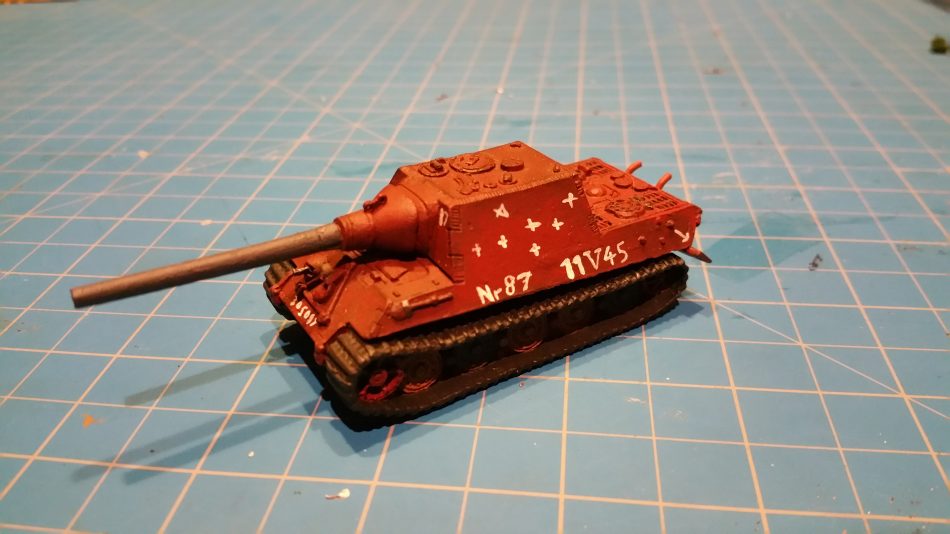
I painted my Jagdtiger as a reflection of that. I gave it the backstory of it being the last Jagdtiger to leave the factory as the Allies were getting close. It engaged in combat right outside the factory.
To achieve this look, I painted the Jagdtiger Vallejo Calvary Brown. This gave it a dark red color but wasn’t dark enough for me, so I dabbed my paintbrush into Tamiya Flat Brown, and then dunked it into water, making sure any excess paint gets knocked off, and then washing the Jagdtiger with this mixture.
I’ll go back and touch up areas with the Calvary Brown in spots I thought it got too dark. I usually have a second go with my brown wash to darken up the Calvary Brown again.
I also removed equipment, like shovels and hammers with my hobby knife, as if it was rushed out of the factory, these tools would be the least of anyone’s concerns. I also painted on some markings, as seen in this photo above. The Barrel is painted flat black. Various factory markings are brushed on by hand with flat white.
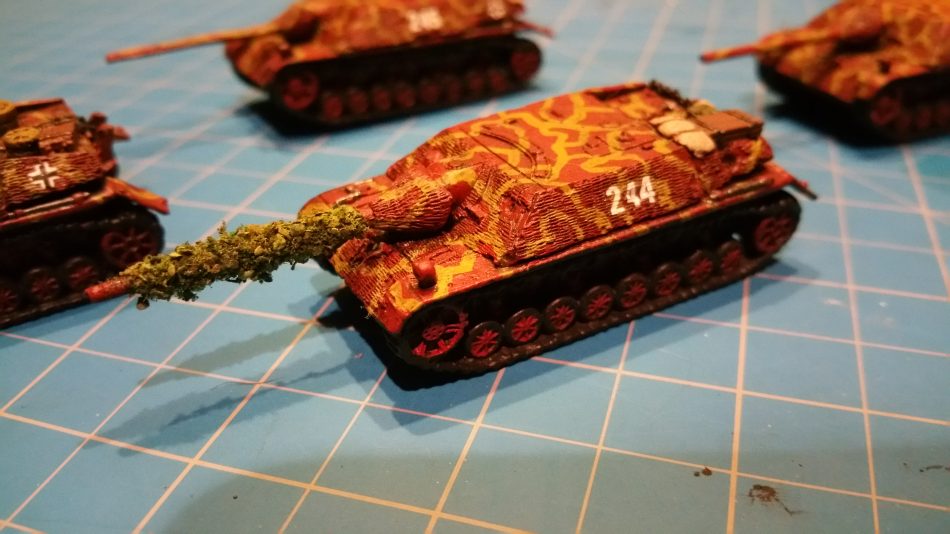 Another good example would be my Panzer IV L/70s. I painted them the same way as my factory Jagdtiger. I gave them, however, some dark yellow Stripes. The idea for them would be that they were running low on dunkelgelb paint, but added the dark yellow stripes in order to help trick the eye.
The same scheme is used on the Jagdtigers as the Panzer IV L/70s. Once I get the appearance of only primer paint on the tank applied, I use Vallejo Middlestone to paint the stripes on, using a 5/0 spotter brush and just free handing it. I then go over it with Testors Dark Detail Wash. This makes the zimmerit (anti-magnetic mine coating) pop where the Middlestone was painted on.
Field Modifications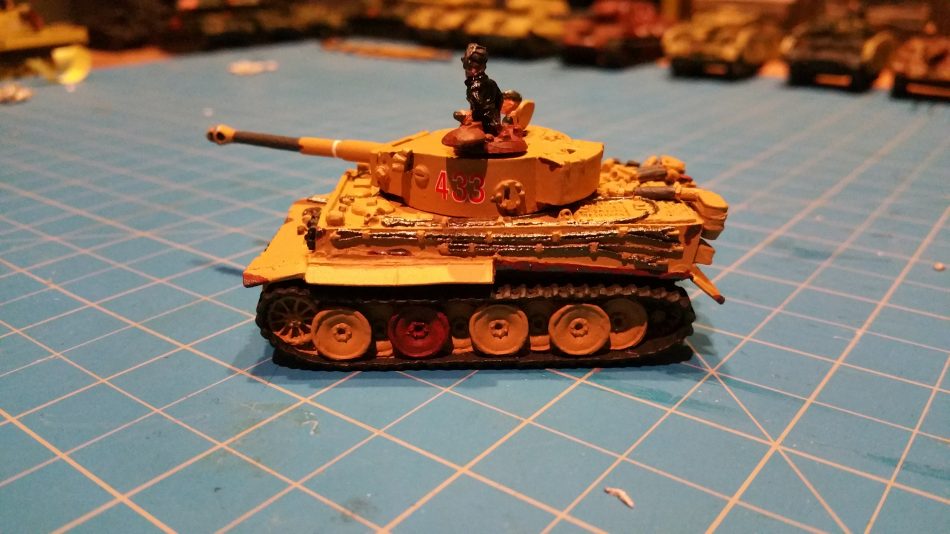
When the Tiger I E was first introduced, it had a copula that was pretty tall. If you’ve ever seen a picture of the early verison of the copula on the Tiger, you know what I mean. It really sticks out. In the book Tigers in the Mud that Otto Carius wrote, it was one of the first things he complained about, as he thought it would be an easy target for the Soviets. He got his wish for a new copula, though he got it on his Tiger when a lucky shot hit the Copula at the welds to the turret and blew it off. Otto had just ducked down, and survived with minor injuries.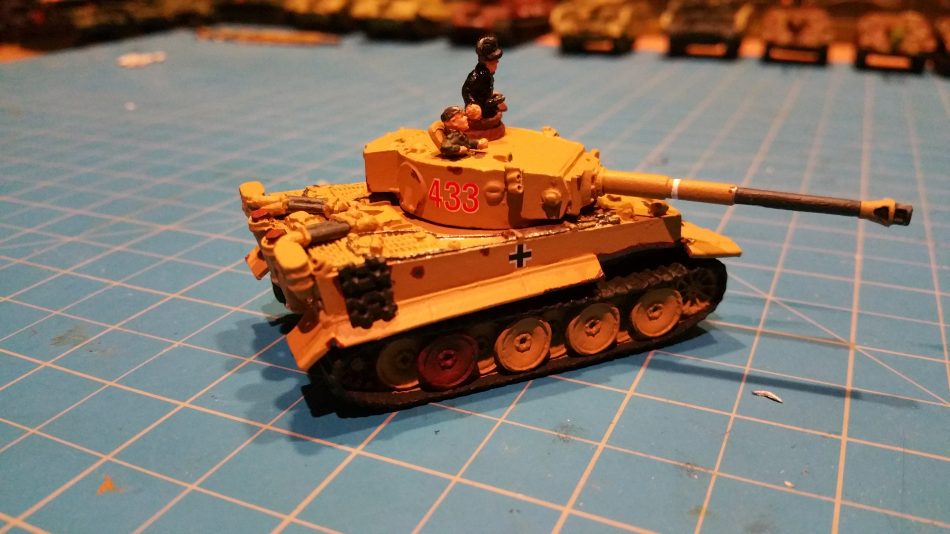
In the Tiger I E that I painted, I used the early version, that has the exhaust running on the top of the Tiger in the back. This was the first Tiger I E that I had done, and I wanted to model it as if it had been in Tunisia, damaged and kicked back to Germany for repairs.
I replaced the copula with one from a Panther A. I left it the standard primer red. I had added an AA MG to it, but it was lost when I tragically dropped the turret on the kitchen tile.
You’ll see some purposefully applied damaged areas on the Tiger. I envision these are where the Tiger has been “damaged” by running into something. You can remove sections on side skirts, but I went a step further and decided that maybe some of the paint had rubbed off as well. To simulate this, I painted Vallejo Calvary Brown on an edge where maybe the Tiger brushed up against a building or another tank. On the very edge, I then painted Tamiya Gun Metal.
As before, I used a Tamiya Flat Brown Wash I made to darken it up and went back over with the Gun Metal to highlight the damage. Some of the road wheels have been painted Primer Red, as if they were replaced in haste.
This Tiger I E really is my favorite model I have painted.
Back From The Dead
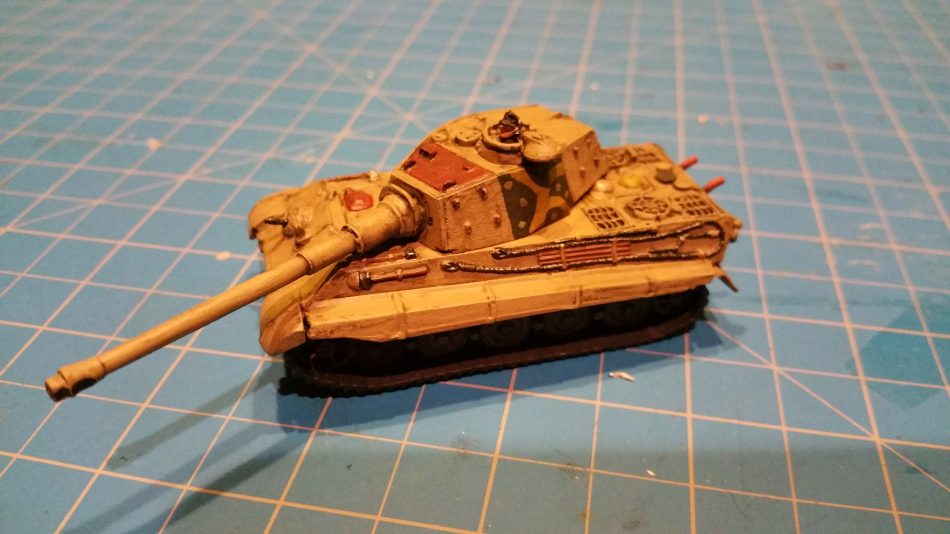 Sometimes tanks can be brought back from the dead. The King Tiger to the left, for example, is one of those examples. The front top section of the turret is painted Primer Red, to indicate that it had been replaced at some point.
The story in my mind is that either a shell or bomb penetrated the top of the turret. But in a rare bit of luck, the round came out the side instead of exploding in the tank. To illustrate this I painted one of the side turret panels completely different color from the rest of the tank. This gives a look as though the damaged section was cut out and a new piece of armor welded on. Although I regret the camo scheme I used for the replacement panel.)
I also painted the co-drivers hatch as if had been blown out from the hit. It’s hard to see but the running gear had been painted primer red, as if it had been destroyed by an Allied/Soviet Tank in an attempt to immobilize it.
 Another example is this Panzer IV. The thought process was that the Panzer IV was removed from service before the order to repaint all tanks Dunkelgelb was sent out. We’ll say the Panzer IV was used in training or was out for long term repair. All of the sudden, there is Soviet Breakthrough or an Allied Invasion that forces the Germans to round up anything and everything to stem the tide of advancing foes. Our Dark Grey Panzer IV get fitted with Schurtezen that is already painted with Dunkelgelb, and then sent off to battle.
Panzers in the Night
These Panzer IV’s were the first tanks I had painted for Flames of War, back around 2012. Being a relative noob on WW2 History, I wanted to paint my Panzer IV’s dark grey as I saw in the 70s Hollywood movies, and have them be Normandy themed. After a forum post on the FOW Forums, and being quickly flamed for wanting to do a Hollywood style paint scheme instead of a historical one. So, I changed my approach.
I ended up painting two of my 12 Panzer IVs dark grey. I painted the schurzen with the ambush color scheme. The thought behind this is that the Panzer IV was either in a training unit or long term repair. During the Normandy Invasion, schurzen was quickly added and they were pressed into battle.
I hope you enjoyed this article. I’d love to see your desperate panzers. Either leave me a photo of your models in the comments below, on our or hit me up on the .
Great tanks,well done.
Not a bad idea to have some out of the usual
painted tanks.
The Tiger tank early,those pipes on air deck
are part of ar cleaning system.Not exhaust.
Really it inspiration to make my own camouflage on some German tanks
Than you/Keep them coming