Firestorm Gazala – British Turn 1 Analysis and Turn 2 Commander’s Intent
By Tom Burgess
Turn One of the Firestorm Campaign was a complete success…maybe not so much for the British effort per say but overall we had 21 games from around the globe reported in. Additionally, Battlefront has risen to the occasion and is now offering two boxed sets each turn as awards for those who submit the most/best written Battle AARs.
So the campaign, as joint Breakthrough Assault and No Dice No Glory effort, is doing exactly what we had hoped it would do, generate themed Flames of War games. Though Mark, allowed any mid-war forces be used for games in this campaign, the AARs I have seen all have used proper Mid-war Desert British, German, and Italian miniatures on nice desert boards. Huzzah to you all in the field!
So how did Turn One’s 21 battles turn out from the British Perspective?
Well…the good news is that the British won more battles than I expected. But the bad news is that we lost the battles that really mattered. The Axis continued to push around the British southern flank streaming deep east and then north toward Tobruk. Though the Indian Motor Brigade’s stand at Point 171 and the South African push into Area A-2 were impressive, they were made largely irrelevant by other events.
Battle 1 C2 to C4 was an Axis 7-2 win. Plunged the Axis deeper behind the southern flank.
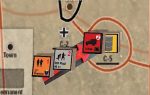
Battle 2 C2 to C6 was an Axis 7-2 win. Opened up a route for supplies that allowed two more Turn Two Axis attacks to be supplied.
Battle 3 A3 to A2 was an Allied 6-3 win. Really this battle was just to use an initiative up and now it is unlikely that the British can push deeper.
Battle 4 C2 to C6 was an Axis 7-2 win. Plunged the Axis deeper behind the southern flank.
Battle 5 C2 to C5 was an Allied 6-3 win. Awesome stand, but the French continuing to hold Bir Hachem makes this less crucial.
As I am impressed as I am with the British wins we had, in turn, one, we need our field commander to really step up in Turn Two to win fights in some key battles or our position overall may become unrecoverable.
Turn 2 General British Guidance
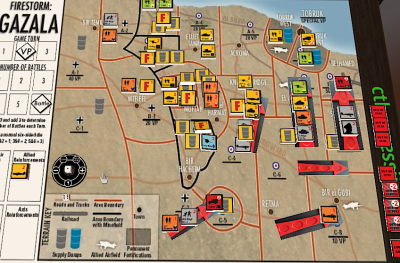
You can see the specific battles we have laid our for you all to fight in Turn Two here on main page.

Battle 1 will be a right proper tank slugfest. This is a very important battle, the second most important battle in this turn. B6 not only is worth 30 Victory Points, but it is also on the direct path to Tobruk. We desperately need our best commanders to step up here. We cannot count on having the initiative in Turn Three (we had none in Turn Two) to counterattack should B6 Fall.
Consider maneuver battles. In turn, one British armor did poorly on the defensive. So maybe choose Battle Plan stances like Attack to try to get a “Fair Fight.” Remember even a 3-3 Draw is a British victory here so long as B6 holds.
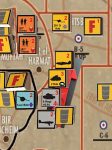
Battle 2 is less crucial it is fortified, and leaving the Guards Brigade on standby here, means that we cannot lose Knightsbridge (B5) completely this turn. Nonetheless, destruction of German Firestorm Troops here will deprive Rommel err… Mark from being able to commit those lost forces to the key Tobruk area forces next turn.
Here we have minefields and wire obstacles. So commanders select a defensive stance for your battle plans to get the maximum use of these. Set up your AT ambushes wisely. You must bring the Panzers down. Take the SAS Raid Card to delay the Stukas and target Marders and Schelppers with your own Hurricanes.
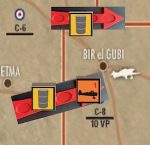
Battle 3 is not terribly consequential. Bir el Gubi is worth 10 Victory Points but it may have little impact on the rest of the game. Here I recommend an attack stance to get a “Fair Fight.” Here a 3-3 Draw would be sufficient to hold Bir el Gubi. Employ the SAS Raid card to cut down on the Italian Firestorm unit advantage a bit.
Technically the British forces here should be out of supply. I think Mark and I missed that during our online orders sessions. Still, a win here is totally doable. If we can hang on here in Turn Two, the Axis may not have the supplies and initiate the option to attack it again in Turn Three.
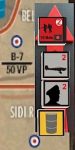
Battle 4 is an absolute win at all cost battle. Belhmed(B7) is worth a whopping 50 Victory points and it is our last land link to the east. We definitely need our commanders to play at their best here. This might the single most pivotal battle of the campaign. WE need a win here in Turn two so we can reinforce it in Turn 3 as it surely will be attacked again then if not taken now. Ans as with Battle 1, we cannot count on having the initiative to stage a counter-attack in Turn Three before Rommel is knocking on the door eastern Tobruk.
Take the SAS Raid Command Card to reduce the Stuka harassment. Keep the Indian Rifles near objectives where their counterattack special rule can be used to drive the enemy off and away from objectives. Again, a 3-3 draw here is as good as a win but I will leave it up to the commanders to decide what is the best way to get there or even better a win.
Rommel is present in this battle, with a good British win he could be knocked out of the game and greatly aid the British getting some initiative in Turn 3. All the more reason why the 8th Army HQ needs maximum effort in Belhmed (B7)
 Battle 5 thanks to the heroic stand of the Indian Motor Brigade in Turn One, the Axis had little other option but to attack Point 171 again in Turn Two. It is important for the gallant Indian Motor Brigade to hold again. Being cut off, they have nowhere to fall back to if they lose and they will be captured adding 10 Victory Points to the Axis tally. Even better, if they win the Axis may have to allocate a precious attack initiative here again. Can the Indian Motor Brigade hold on to Point 171 again? We could be talking epic glory her if they do.
So there you have it British Field Commanders. Get those games and get those results to Mark at breakthrough.assault.blog@gmail.com. Above all else, remember that Battlefront is sponsoring each turn with two boxed set awards. Mark is deciding who gets awarded those prizes based on two things, the quantity of AARs you submit for Turn Two and the quality of them. So play a lot of games and do a lot of good AARs. We’ll post some here and on Breakthrough Assault.
Most importantly have fun and get in some good games.
Out of curiosity, how would being out of supply in this campaign affect a battle?
OUT OF SUPPLY TABLE
Die Roll Effect
1 Morale reduced – All units out of supply are now at a penalty for Motivation. Give every Motivation roll a -1 penalty. This includes special Motivation skills like Bulldog/Counterattack. Example: A British Rifle Platoon is Confident 4+ for motivation. When it rolls for Motivation give the die -1, so in effect it is as they are 5+ for Motivation.
2 or 3 Short of fuel. Each time a tank or vehicle moves or takes part in an Assault in a turn roll one die. On a roll of “1” that vehicle runs out of fuel and become immobile. It cannot move for the reminder of the battle but can still fire and defends if it is assaulted but at a -2 penalty to the attack dice. Place a marker to show that they are out of fuel. Only vehicles or tanks that move or assault need take this test.
4 or 5 Low on ammo. Each time a unit fires roll a die. On a “1” then the unit becomes seriously low on ammo. From then on, the unit can only fire at its moving ROF regardless if it moved or not. Artillery can no longer fire bombardments. Place a marker to show that they are low on ammo.
6 Fight to the Death – For the duration of the battle all units out of supply fight with brave desperation and receive a +1 bonus to all their motivation rolls.
It shall be done.