Firestorm Gazala – British Turn 2 Analysis and Turn 3 Commander’s Intent
By Tom Burgess
The No Nice No Glory and Breakthrough Assault’s online Firestorm Gazala Campaign is now rolling into it’s third and final phase. The campaign has been driven so far by the 47 games played around the world from Turn 1 and Turn 2. The battle still hangs very much in the balance and either side could claim victory based on how the next four battles in Turn 3 go.
Turn 2 Analysis
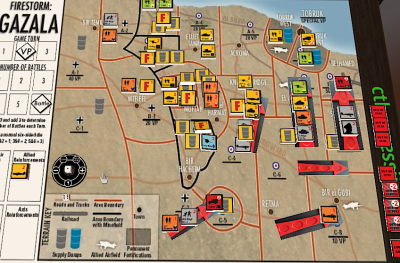
The five battles in Turn 2 went three to the German/Italian forces and two to the Commonwealth forces. Most importantly, British players in Turn 2 won some of the battles that mattered. The British line held to the south of Gazala at Knightsbridge (B5) and southwest of Gazala at El Adem (B6). However, to the southeast of Gazala at Belhamed (B7), Rommel did turn the flank and is now on the outskirts of Tobruk.
The Indian Motor Brigade at Point 171 (C5) finally fell, but only just barely and Bir El Gubi was easily taken by the Axis forces. Though only winning two out of five battles is not great, the important thing here is that Rommel had to use much of their fuel in will now be fighting out of supply in half of the battles in Turn 3. Most importantly, the two British wins from Turn 2 kept the British forces in a position where they can still turn the tide on Rommel’s offensive.
Huzzah to the British commanders from Turn 2. Your efforts have given the 8th Army a fighting chance to stop the German/Italian offensive and to prepare to counterattack to push them back to Libya.
Turn 3 Commander’s Intent
In turn four we have four final battles to resolve. See Breakthrough Assaults’ battle descriptions Because we held key potions and reoriented our flank in Turn 2, we now find the Germans and Italians cut off from supplies in half of the upcoming battles. 8th Army HQ offers the following guidance for our final battles of this campaign.
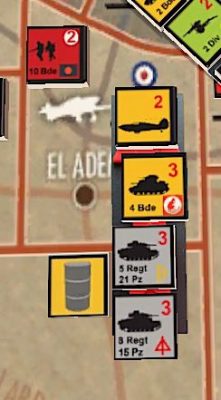 Battle 1 – El Edem (B6)
“The main event.” Rommel has gone all in at El Adam massing both the 21st and 15th Panzer Firestorm Troops here and allocated them some of the limited Axis limited supplies. To counter these forces I have committed the Desert Rats Firestorm Grant unit. The main threat concern the Grants have are Marders, so I have also allocated Firestorm Hurricane support to snipe at these.
This battle should probably be a big brazen tank battle as a fitting capstone to this campaign. British commanders should not be afraid to take an Attack stance to try to force a mobile battle. Grants can form a solid firing line while Honey Stuarts or Crusaders maneuver to the flanks of the Panzers.
This is probably the most critical battle of this campaign, if either El Edem or Bir Hachem hold, the lack of a supply line will force Rommel to fall back to his original lines.
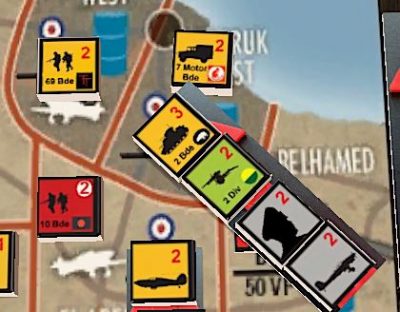 Battle 2 – East Tobruk
Here we see Rommel himself again entering the fray with only limited forces in the form of a Firestorm Stuka sortie. We have committed the Firestorm Grants of the 1st Armoured Division and a South African Firestorm 25pdr battery.
In addition to these, the limited fortifications from Tobruk will provide for two free minefields. A good solid Defense stance with a Rifle Co backed up by tank reserves ought to do very well here. be sure to take the SAS Raid command card to make sure the Stuka miss their first call. Consider taking a full 40mm Bofors unit as well as they can fight fairly well against ground targets but will also make the Stuka options much more limited.
This battle may not have much effect on the Victory Point level in this campaign, but its a point of honor for the Commonwealth to see Rommel personally defeated in battle.
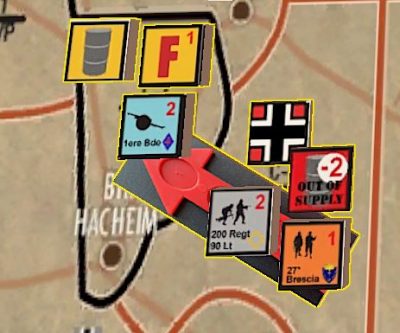 Battle 3 – Bir Hachem (C3)
Here we find our Free French Forces surrounded but they have already fought off an initial assault using up critical axis supplies. Desperate to clear the road junction and restore supply routes, the Axis have committed the 200th Regiment of the 90th Light Division and the Italian 27th Brescia Division.
The Free French, though outnumbered, have two advantages in these battles. They have fortifications and are defending across the minefields. This means that in a Defensive Battle, they would have six minefields and four-wire emplacements in addition to the bonus 25pdr Battery. The Axis forces will be out of supply but be aware, this could drive them to fanatical desperation.
Advice to British..errr…French commanders at Bir Hachem is to try to take a Defensive posture to maximize the fortifications you will have. Use these to drive the enemy in kill zones where you can concentrate your fire effects.
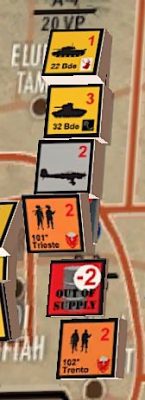 Battle 4 – Bir El Harmat (B3)
This is a battle that I am perhaps most excited about. We finally had a chance to take the initiative and attack into an area that mattered. Bir El Harmat is key because taking it will shut off the slow trickle of supplies that the Italians have been push east through the mine belts.
 Rommel, needing the supplies elsewhere, has left the Italian 101st Division out of supply. Though the Germans have allocated a Firestorm Stuka sortie which will not be affected by supplies.
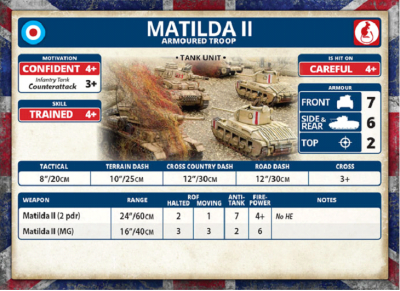
Most exciting about this battle to me is that we are finally able to use Matilda tanks. These come in a troop of three tanks and use the special unit card to the right. Expect the defenders to take 8.8cm Flak guns or Lancia 90mm guns to deal with these Matildas.
Commanders should take tank forces and choose an attack stance in this battle. But make sure to also take artillery to bombard the 8.8cm Flak guns or Lancia 90mm guns. Also, don’t forget the SAS Raid command card to ensure the Stukas fail to show up at least once.
Final Thoughts
So there you have it. We have four great battles to play in Turn 3 of the NDNG and BA Firestorm Gazala Campaign. Play as many of these battles as many times as you can and get the results in to Mark at Breakthrough Assault using this email: breakthrough.assault.blog@gmail.com Also, don’t forget that Battlefront is sponsoring this campaign with two awards going each turn to the two players who submit the most/best AARs for the battles from Turn 3.
This campaign has been great fun and a good distraction from an otherwise very unpleasant year for most of us. Let’s see if we can top 80 battles played as part of this campaign. Most importantly, let’s have fun!
So what happened? Who won?