Mass for the Masses: building cheap Spanish church terrain
By Tyler Stone
The crew over at just unveiled their ‘Ports of Plunder’ range of scenery. These affordable MDF kits are the result of a collaboration with , and have all of the quality the community has come to expect from 4Ground’s scenery. As I type this, my fellow TotS podcaster Glenn van Meter is working on assembling and reviewing a few of these excellent kits.
This is really beautiful terrain, but see if you can spot what’s missing (or just read the next paragraph where I tell you)
There is one building missing from the ‘Ports of Plunder’ lineup though; the stereotypical Spanish church. While you can certainly buy other MDF churches or even splurge for 3d resin buildings that cost $100 or more, I’m here to show you that when you don’t have store-bought, homemade is fine. Better still, you can assemble this church for about $5 in materials. So let’s download the templates that I’ve upload , and then go through assembling this house of the holy.
Like gluing macaroni to paper plates, kiddosMaterials
You’re gonna need to gather some pretty common craft supplies, and not very many.
- An X-acto knife with a fresh blade
- A standard pencil with a point. It doesn’t need to be very sharp
- Glue. I use hot glue and tacky glue because I’m impatient, but white glue (PVA) works fine
- Foam poster board. I get mine from , but anywhere will work as long as it is 3/16 inch thick.
- Corrugated Cardboard. Any shipping box will do.
- Mod-Podge. Again, you can use watered PVA for this. I use “hard coat, for furniture”, but you don’t have to.
- A sacrificial paintbrush
Some terrain veterans are probably saying that we could use Pink Foam and a wire cutter here. If you have those materials, that’s great. However, poster foam has some advantages to the eponymous insulation foam.
First, it’s a lot cheaper to buy an 18×24″ sheet of poster board than to buy a 48″ square sheet of pink foam. Second, poster board is a lot thinner, and you don’t have to cut it into sheets with a foam cutter. Lastly, you can use special techniques (which I’ll show later) to detail poster foam very easily.
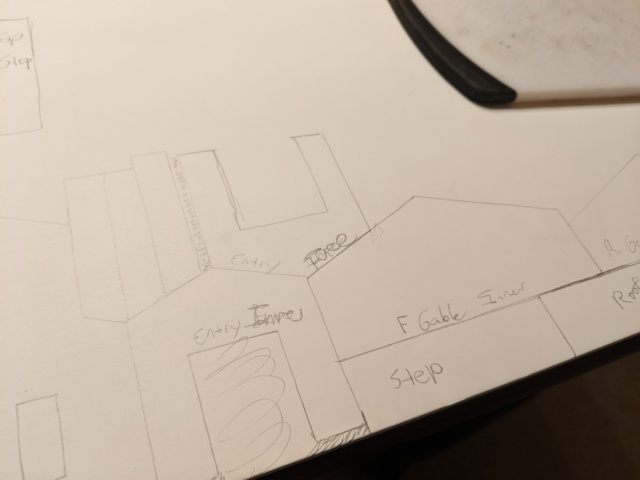
Cutting and Tracing Templates
Print out your templates. You can use printer-paper, but I used card-stock to make tracing easier.
NOTE – Make sure that your printer has scaled the images correctly! Sometimes, printers will try to scale the image down to fit within margins. The part of your church labeled “front” should measure exactly 6″ across the widest point.
Cut out your templates along the black lines. You can use the X-Acto, but scissors work just as well here. When you’re tracing, make sure to pay attention to how many copies of each shape you will need to trace.
NOTE – to save ink and paper, the ‘Front,’ the ‘Entry Way’ and the ‘Steps’ are going to be used to cut two different sized pieces. The first time you trace them onto your foam, trace the outline and any of the solid black lines that aren’t dashed. Then, cut out the hatched areas of the template, and trace it onto the foam a second time.
Cut out the bell tower and top window first. After tracing, enlarge the top window and cut out the alcoves, and trace againYour poster board will have a nice paper cover on it, making tracing the templates a snap. There’s no need to keep this paper clean, as we’ll be removing it later – I label all of my parts as I trace them, so that I know what I’m looking at.
Cutting The Foam
Now that you’ve got your templates traced, it’s time to grab the X-Acto and start cutting. You’ll still have the paper covering on your poster board. Take your time with this, and use a sharp blade. A dull blade will snag and cause pilling, and rather than a flat cut, you’ll get a ragged, torn look. Unfortunately, I was stuck using a duller blade than I’d like for this project.
I make two passes for each cut. The first, I cut through the paper and into the foam. The second cut, I go all the way through and separate the piece. Stack your pieces together when they’re cut.
Detailing the Surfaces
Technically, you could start gluing your building together right now and leave it with the paper cover. This would give you a smooth finish like MDF. One of the advantages of foam though is that you can carve texture into very easily. I recommend playing with a bit of extra foam and trying out the techniques that I’m going to show you in the next few photos, just to learn how the foam moves around.
The first step to this is peeling off that paper cover. Do this carefully, as you can snap your pieces – especially the buttresses. I find that the poster board usually has a direction that the paper wants to be peeled, so if you find it difficult in one direction, rotate the piece 90 degrees and try again. Peel both sides of the paper.
If you like bubble-wrap, you’re gonna love this step. Trust me.Now that you’ve got your foam peeled, you can start carving in some details. The easiest detail to add is to cut in a brick or cobble pattern. I did this on the front steps of my church. Do this with your pencil, and just apply a little pressure to draw in the outlines of the stones. I round the corners of mine, and use an irregular pattern rather than a grid, as it makes it look more believable that these stones were found and cut to size.
I’ve built a mortared stone wall. This is easier.The reason that you can etch stones into your foam is because the poster foam has very tiny, air-filled cells. When you press these with your pencil, they collapse and stay there. Insulation foam is more dense, and has a tendency to spring back to shape after you dent it like this.
This cell construction also lets you compress entire areas of the foam at once, to create a fake layered look. I did this on the front buttresses of my church, to make it look like they are slightly recessed from the face of the building. Lay your pencil sideways and use the shaved wooden part to crush down the foam.
A profile shot showing the result of my crushing, you could still go slightly thinner
When you want a sharp edge, you can lightly score the foam with your X-Acto before crushing it. Be careful not to go all the way through your foam! I did this on all of the top pieces, to create a raised strip around the whole building. I did this so that the seam between the raised strip and the rest of the wall would help to hide the seam between the top and bottom wall sections since our church will have a removable top.
With a little foresight, you can combine these techniques. For instance, on the front of the church, I wanted to have a raised brick surround for the bell tower opening, and a prominent sill below the top window and each alcove.
I started by outlining the areas that I wanted to leave raised Then, I crushed down all the foam around the raised areas, before going back and detailing the bricks around the bellAnother good example of just how much layering you can do is in making the church doors. These were crushed down in multiple layers. To set to the location of the door, I put the entry alcoves on the stairs and then traced where the doors would be. For those who prefer to measure, your doors are located 3/8″ from the bottom of the front piece, are 1.5″ tall, and 1.25″ wide in total.
I worked “from front to back” on the detail. The first thing that I did was crush the entire surface of the door slightly. Then, I drew in a cross on each door and crushed the door further around each of these. The next step was to etch in the line that separated the double doors. Finally, I really crushed the foam – almost through – to create the rounded tops of the doors inside the square frame.

You can use these etching and crushing techniques to add details like this all over the church. I like to look for dents and imperfections in my foam and work them into these details, adding cracks, exposed bricks beneath the crumbling stucco, and other details to give the church some character.
Buttcracks: This buttress is crumbling around the bottom, and is cracked along some edgesAssembly
Assembly of these pieces should be pretty self-explanatory, but there are still pitfalls, so I recommend reading all the way through this section before you start building your own church. Firstly, let’s talk glue.
I use hot-glue because it’s fast, and it does a really good job of filling into any imperfections in the foam and giving a good bond. Be aware though, that if the glue gets too hot (or you touch the hot metal tip to the foam) you can melt your foam with this stuff. Plastic model cement has the same problem – it will melt straight through your foam. The other option is to use PVA glues like Elmers and generic white school glue. I use tacky glue whenever I’m gluing to pieces flat together. Tack glue dries pretty quickly, but unlike hot glue, it dries perfectly flat so that I don’t have any gaps.
We start our assembly from the top. Glue the ‘Rear Gable Inner,’ ‘Front Gable Inner‘, and the ‘Roof Side Inner’ pieces together along the corners, so that they sit flush and create a box Pay attention! The side pieces are glued to the insides of the gables. If you put them on the outsides, the next step will not work and your church will not fit together!
Important! Notice how the edge of the Wall Inner is glued to the inside of the gable. Square everything up nicely and glue.If you’re using PVA glue that dries more slowly, you can pin your pieces with sewing pins while the glue dries. The next step is to glue the ‘Roof Side Face’ pieces onto your box. Line these up so that the top of the Face-piece is flush to the top of the Inner-piece. The edges of the Face will cover the edges of the Inner Gables as well. This should form a small lip below the Face. Then, glue the ‘Rear Gable Face‘ to the ‘Rear Gable Inner’. Just like the sides, make sure that the top angles are flush, and a lip is left below.
Notice the lip, and also the multi-stepped windowNow, we need to work on the front of the building. Glue the stairs together so that they are flush along one side and create a two-tiered step.
They’re stairs, people. This step is pretty self-explanatoryNext, glue the entry way pieces, and the front pieces together. Remember the Rear Gables – the front works the same way. The smaller openings form the base layers, and the larger openings create the stepped detail. The bottom should be flush. Glue the stairs to the front of the building below the doors, glue the entry way over them, and you’re finished up.
I forgot to detail the entryway for this pic, but you can see how it all fits togetherNow that the front is glued up, it’s time to work on the walls and the back. Start by gluing your buttresses to the walls while everything can still lay flat. This lets you line up the spacing so that even if you’re not dead-center, everything is still symmetrical when viewed from the top down.
Line up your buttresses. Mine aren’t glued down just yetNow, glue your walls to the Rear Wall. Just like when you made the Rear Gable and Roof Sides, the edge of the sides get glued to the flat of the rear.
Next, place your roof piece on top to hold the walls straight, and run a bead of glue along the front edge of the lower walls. Glue them to the church front. Remember to remove to the roof before any stray glue has a chance to stick it to the front of the church!
Tile Roofs on the Cheap
The trick to making Spanish style tile roofs is to use corrugated cardboard. There are several methods for getting a tile roof, including buying sheets of ready-made tile from hobby shops, but no method is as easy or as cheap as ripping up a cardboard box.
You’re going to need two 6×3.25″ rectangles of corrugated cardboard. Try to find one that hasn’t been too badly crushed, because you need the corrugation inside to be in good shape.
I ordered this box from Firelock Games, and it came with several free miniaturesThis doesn’t look like a tiled roof, so we need to start peeling more paper. Peel off one layer of your cardboard, to expose the corrugation below. Instant tile pattern. You can leave your roof like this if you want, and it would be perfectly serviceable. This is the same method that people use to make corrugated sheet metal for modern and futuristic wargaming, by the way.

For a more authentic look though, you can grab a 6×3.25″ sheet of thinner cardboard (like a cereal box) and cut your corrugate into strips. This is where hot-glue not drying flat is actually helpful. Starting at the bottom of the roof, lay a bead of hot glue down and stick your tiles on. Then, lay another bead of glue right above it and use that to stick down the next row of tiles. Continue your way up the roof.
You can see the bead of glue for the next row of tiles, and raised lower edge of the second rowWhen you finally have the whole 6×3.25″ area covered, you can glue each of these to the tops of your roof so that they meet at the peak. Once more, you can leave the roof like this, or you can cut a strip to cover the uneven peak. To make this strip, peel both sides of the corrugate, and then trim a single length of the wave. Clip it into short sections and glue these along the peak with a slight overlap between each. This is a great time to use hot-glue, as it
will give a nice rounded bead for the tiles to stick to, and also fill in the gaps between the tiles.
You may need several of these narrow strips, but that’s fine since we’ll be sectioning themThe covered peak of the roof. With much effort and burning of fingers, you can also cover the top of the bell tower and entrance with these individual strips
Final Steps
With everything glued together, you can now move on to finishing the piece. Foam is soft, and cardboard is flimsy, so we need to stiffen the whole piece. We also need to provide a protective layer for spray paint, since the propellant can sometimes eat the foam if you’re not careful about how you spray. And finally, we need to get a coating of something between the thirsty foam, and our paint – otherwise you’ll need a LOT of paint to cover this thing.
Grab a sacrificial brush and some Mod-Podge, and brush over the entire piece, inside and out. Make sure to get a very solid coat around the lip that joins the two pieces together. Let them dry separately, or you’ll never get the top of your building open again. You can use watered down PVA glue for this, but I don’t recommend it; especially on the cardboard roof tiles. Watered PVA runs a very serious risk of warping your foam, and will almost certainly warp the cardboard. I believe that this is because water and PVA aren’t miscible, which means that the water will sink into the cardboard and leave the denser glue behind.
Once the Mod-Podge is dry, you should have a slightly shiny finish to your foam. It should also be quite a bit firmer, although not as solid or brittle as plastic or resinPaint
To finish off the building, paint it just as you would any other piece of terrain. I use cheap, Dollar Store acrylic paints when I do terrain, because I don’t need the technical specs of a more expensive paint, and I am going to use lots of paint to cover everything.
I started my church with a layer of medium brown over everything, and then picked out the stonework in grey. Then I hit the whole building with a drybrush of cream, and then white. The texture left behind from my pencil work during construction means that there are lots of ripples and seams for the paint to catch in, and give a nice stucco effect.
I was able to find many examples of Spanish churches with small alcoves like this. Devotionals and sculptures would be placed in these alcoves, but I don’t have that kind of skill. SorryWith the stucco finished, I applied a black wash to all of the stonework and picked out the wooden pieces with brown. I finished off the structure with some ink washes in select places, giving a dirty look to the stucco and adding more definition to the cracks and chips modeled into the walls.
Finally, the roof was painted in a brick-red for that authentic tiled look, and the piece was ready to hit the gaming table.
If you followed directions, the roof should come off and have a snug fit – just like the pros. You may want to base piece the same way you do your other buildings, or leave it bare. A base would reinforce the butts.The backside of the building is plain and mostly featureless, which is a great time to get creative with your weathering and etching techniques
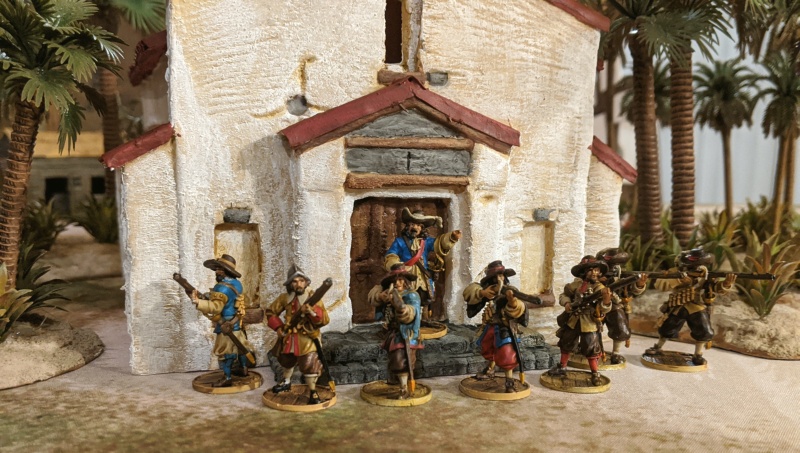
And there you go – a fresh bit of good looking terrain for your tabletop. The techniques that you used here can be used to build all sorts of buildings. Every building on my tabletop was built this way and all from a single purchase of foam. Even if you don’t have the computer drafting program that I used to make these templates, a pencil, ruler, and a little patience can make something equally as serviceable. Go, comrades, and let the cheap terrain revolution begin!