Bringing Docks to the 4Ground
By Glenn Van Meter
I’ve been avidly playing Firelock’s Blood & Plunder for over a year now, and in that time I have constantly been on the lookout for more and better terrain options, especially as I intend to host some tournaments once COVID-19 risks are a bit more relaxed.
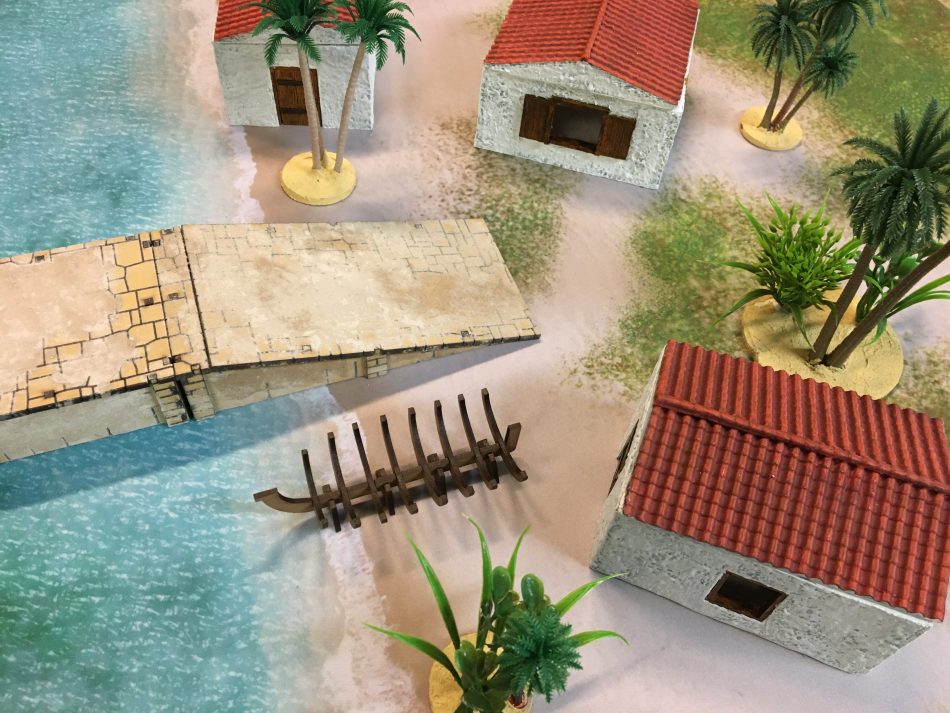
To that end, I have purchased terrain from Firelock’s own range, made some cardboard Spanish-style houses, purchased a few 3D printed options, and even bought a couple of Laketown sets from Games Workshop in the hopes of using the docks and older (albeit slightly fantasy) style houses in the future. So when Firelock Games announced a partnership with 4Ground to produce the “Ports of Plunder” range, I ordered a variety of kits to try out, including several of their dock pieces.
I had only ever purchased one 4Ground piece before, which was a log cabin type house, the kit for which was complicated-looking enough to keep me from ever even trying to assemble it. However, I decided that for the price of the Ports of Plunder kits it would be worth the try to get them assembled and on my board to add variety to what I already have.
I decided to start my new port construction project (after attaining all of the proper permits, naturally) by ordering some dock ramps, a few small straight sections, a large platform section, and a straight with stairs at the end. At about $7 for short sections and $10 for large sections or those with stairs, the sets seemed like a steal – even more so for some of the bundles on offer. When the kits arrived they were in a mix of plastic bags for the simpler and smaller ones, while the large platform and the dock with stairs came in thin boxes, presumably for better protection.

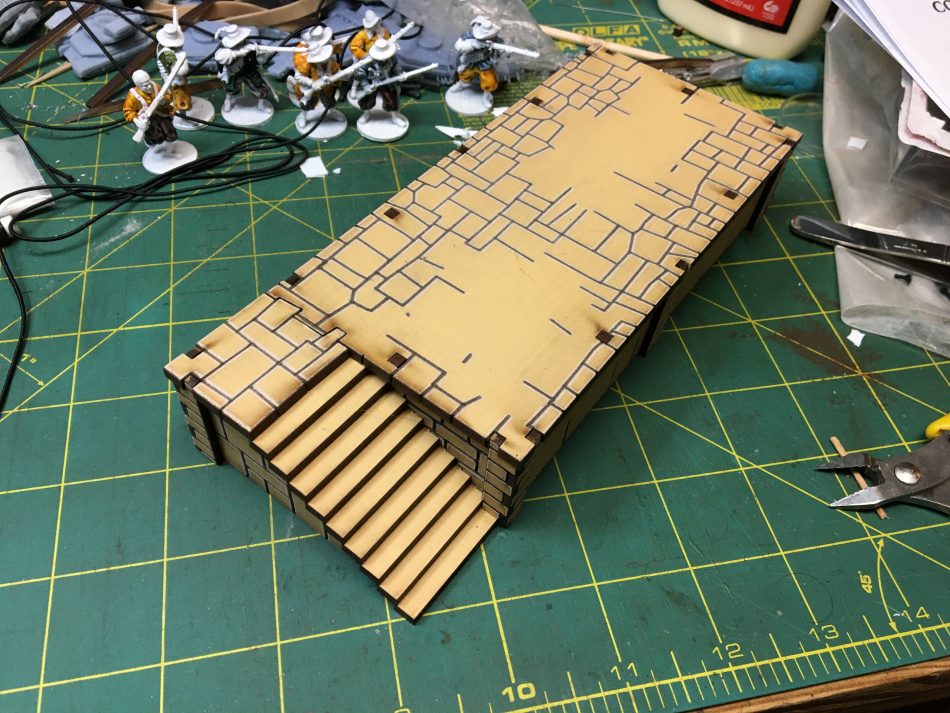
As I had previously balked at the complication of a 4Ground kit I decided to start with a straight section, rationalizing that the dock with stairs would likely be fairly complicated and thus last. Upon opening the first bag containing a small straight I stared in surprise that it had all of about 15 pieces, plus a bag full of stucco powder mix.
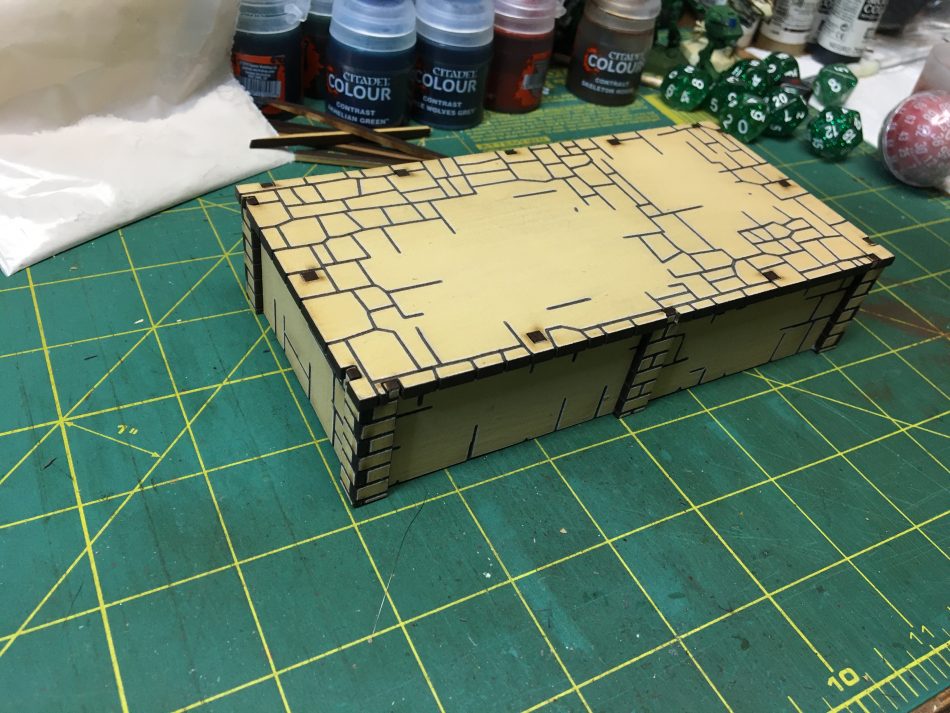
The quality of the cuts was excellent, with all of the pieces very cleanly cut with less than a millimeter at a couple of attachments. Each section of wood was clearly painted a sandy tan color and also etched with designs to resemble stonework on most areas of the dock. The instructions were very simple and easy to read, laying out each piece as it is needed, and exactly how it needs to be assembled.
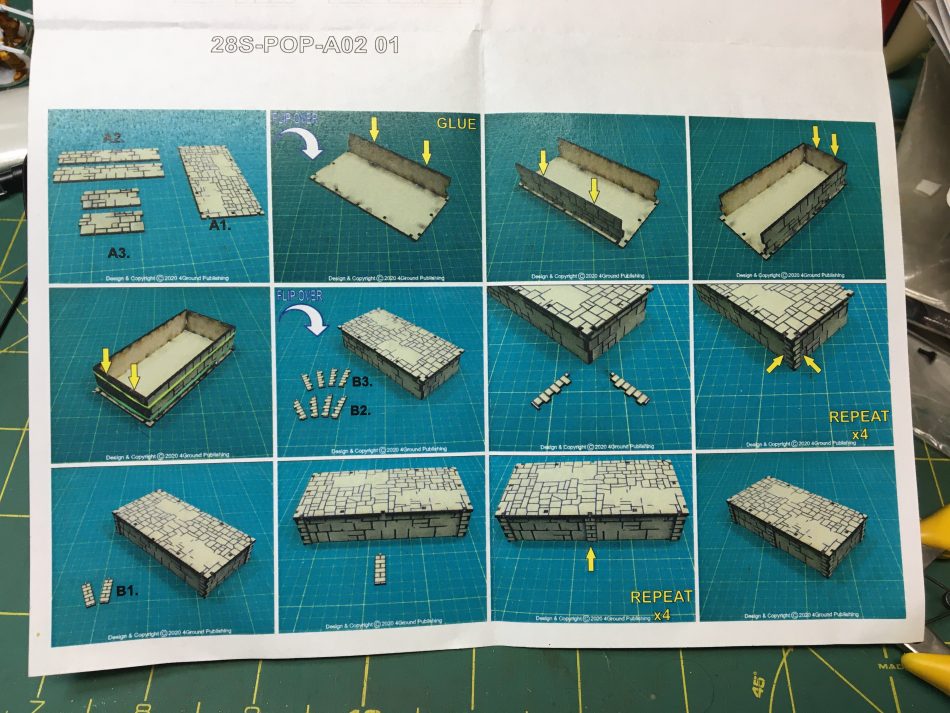 Short dock instructions start to finish – this is my kind of 12-step program.The small straight section was a simple assembly, attaching the four sides with a small amount of wood glue to the platform of the dock, rubber-banding them, and then righting everything to stack heavy books on top to eliminate a very slight warp to the top piece. Once this was dry, I cut out the 10 little pieces that form the support columns at each corner and on either long side and quickly attached them with wood glue as well. Once they were dry, the first dock was complete!
Each section, when completed, is approximately 6-¼” long x 3-?” wide and approximately 1-?” in height – more than enough that 28mm infantry on either side of the dock cannot see each other, but various ships next to the docks don’t look out of place either.
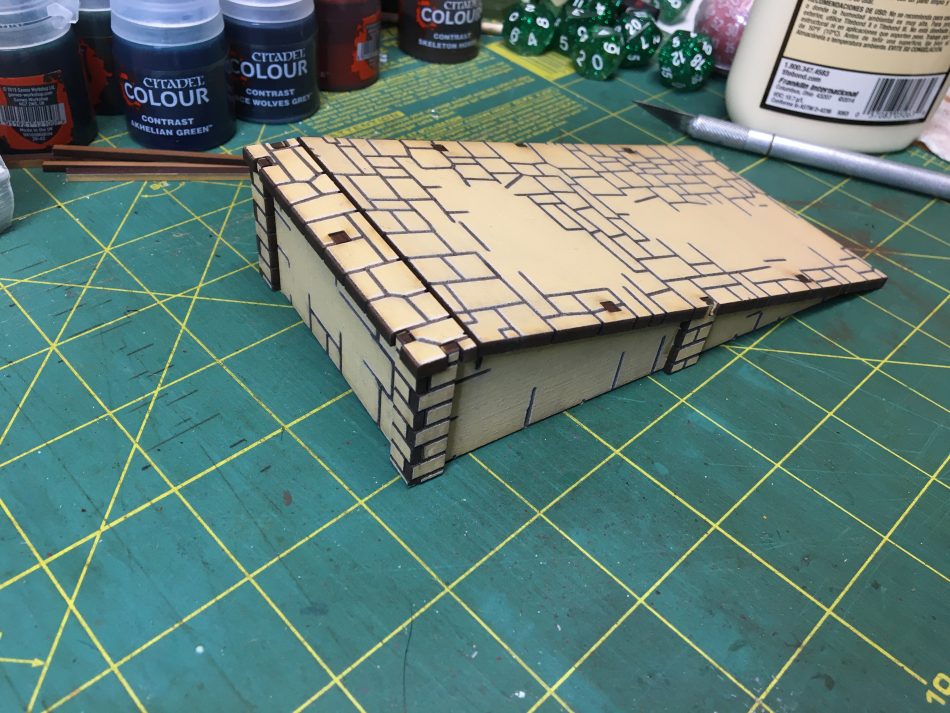
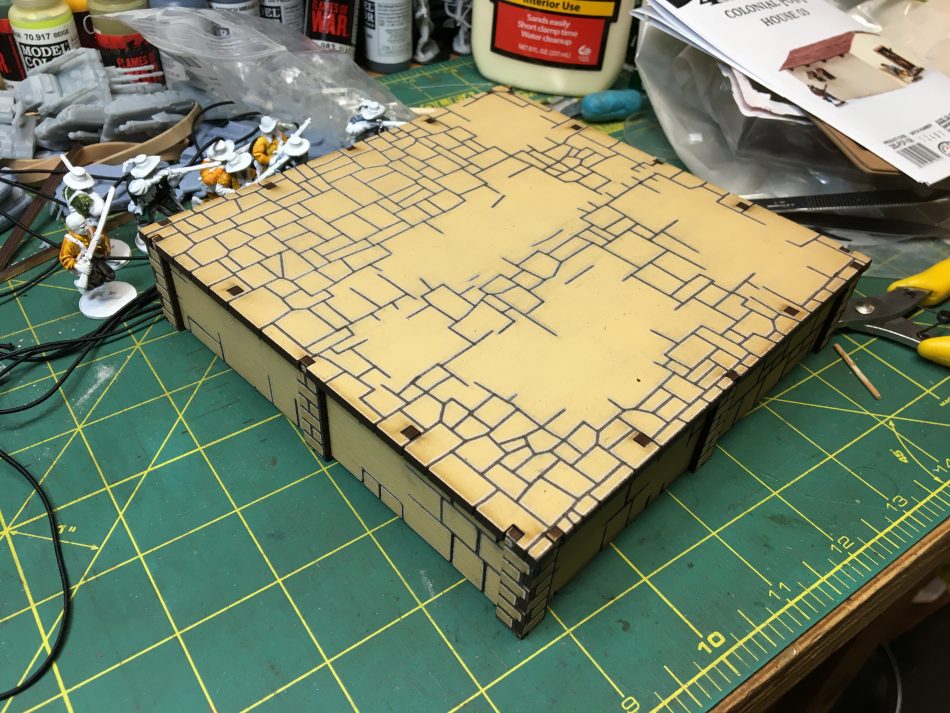
From here, moving on to the construction of each dock piece was fairly similar. The next piece to get built was the ramp, which had some interesting rubber-banding issues due to the angles, but they were worked out. A big plus to the ramp is that since it rises only about 1-¼” over its length, the slope is easily shallow enough for models to stand on without sliding down to the bottom, or requiring other aids to stand in place. The large platform was also quite easy, essentially just being a larger, square version of the small straight section. The large platform is just a 6-¼” square, and so two small straight sections next to each other can perform the same duty in a pinch.
But now on to the dreaded stairs section. Each stair section is essentially a small straight section with a staircase either at one end or the middle of the side, with options for left or right descending on either one (mine is an end-stair). This is going to be a pain, I was thinking. I didn’t want to assemble a staircase with fiddly little risers between each step, trying not to get wood glue everywhere while I curse at the inevitably uneven, sloppy job that I knew it would end up being.
However, when I opened the kit up I realized they had an excellent, simple way of handling this which I hadn’t thought of. In 28mm scale, the thickness of the MDF – about 3 mm – is approximately equal to the height of a stair, and so the stair is just a bunch of flat pieces stacked on each other, each off-center from the next! This elegant solution blew my mind.
I constructed the frame of the straight section as before, carefully noting where the slightly different pieces went. Once dry, the end stair was assembled, which was as easy as sticking all the flats into their respective peg-holes on the side of the dock with a dab of glue on each, and then fitting them to the under-stair anchor. I was done quickly, and it looked clean and even. Win!
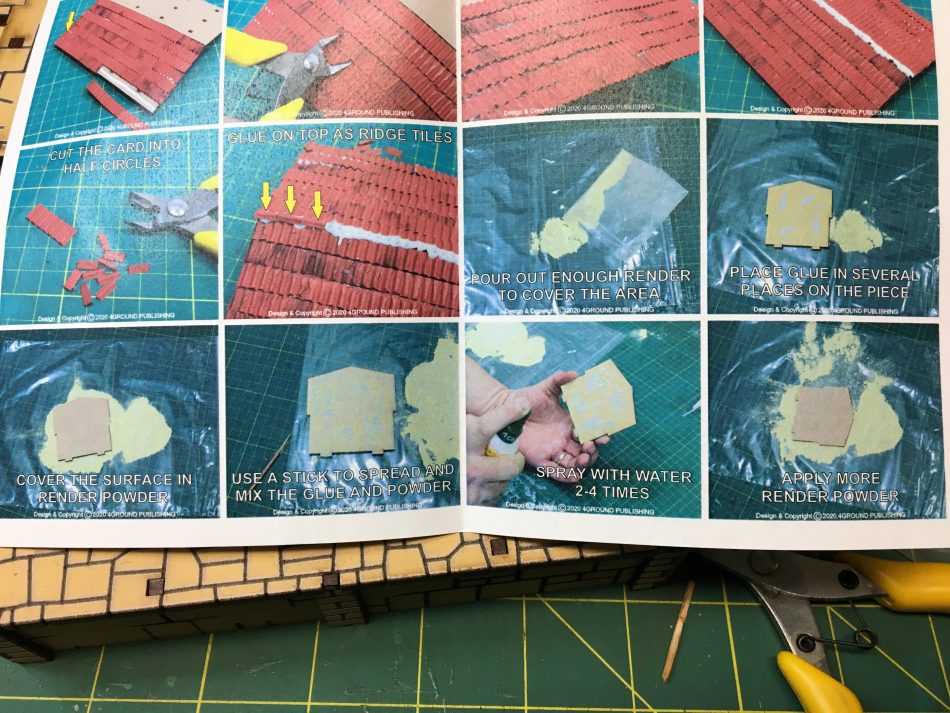
Unfortunately, the instructions do not mention the stucco mix at all, but I knew from looking at descriptions that it must be the stucco-plaster effect to be applied at the end of the build. I opened the instructions of all of the dock sets at this point to try to find how to apply the powder, and it wasn’t until I got to one of the house kits that I found the guide. I would say that is the most glaring issue I have with these dock kits – no stucco instructions.
I tried two methods of application of the stucco powder. In the first, I tried to follow the instructions from one of the house kits (instructions included below for those who also need them) and was not exactly happy with how the result turned out.
The second method was one I learned from Mike Tunez himself when he was assembling a couple of buildings during one of our Tales of the Sail community “No Paint Beyond the Lines” evenings (which I highly encourage people to join us for – lots of excellent discussions, including painting/modeling advice, list discussion, and even occasional spoilers). I’ll probably reiterate this in the article about the buildings, but again – Mike built two of them start to finish in less than 2 hours!
That’s some seriously easy kit assembly. Back to the stucco – I just mixed some white glue and a tiny amount of water into a pile of the stucco powder until I had a paste and then used a toothpick as an applicator to simply slather it onto the side of the dock where I wanted it, purposefully leaving sections of the underlying “stonework” exposed.

In summary, I’m very happy with the 4Ground “Ports of Plunder” range of docks. They’re a quick build and allowed me to get a very substantial port facility up and running for relatively cheap. They’re not nearly as fiddly as building wooden piers from scratch, and they’re quite sturdy, so no worries about them becoming damaged in storage or when being transported. Considering the lack of instructions on how to do the stucco that’s included with every kit, I’m rating them an 8 out of 10 gun salute.
Speaking of the instructions, here they are:

Great story. Thanks for sharing. The docks look really good.