ETC 2022, 5 games to remember (and one to learn from)!
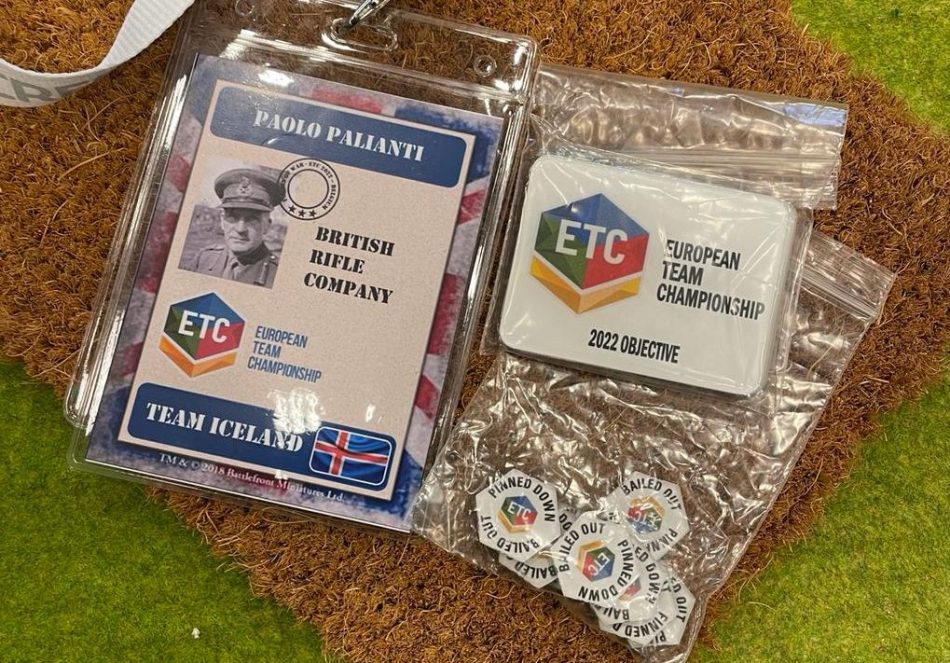 By Paolo Paglianti
ETC is probably the biggest and most important Flames of War tournament in the World – I already reported about it here. It was an amazing experience, and I hope to come back in following years. After the above article about the tournament, time to talk about my games with a full report of my six battles with the Iceland Team.
Playing ETC is deeply different than playing a normal, single-player FOW tournament. You are part of a team of six players, and the Captains of the two opposing teams try to find the best pairing for their players. For example, if the opposing team has a US Tank destroyer army, the opposing Captain will try to counter it with Recce Company full of nimble scouts relying on being hidden and to hit the weak side armor of the M10s. The Captains also need to choose which of their players will attack, maneuver, and defend, as they have two “cards” for each stance – ie, you can’t attack with all six players. A lot of strategy even before the game starts!
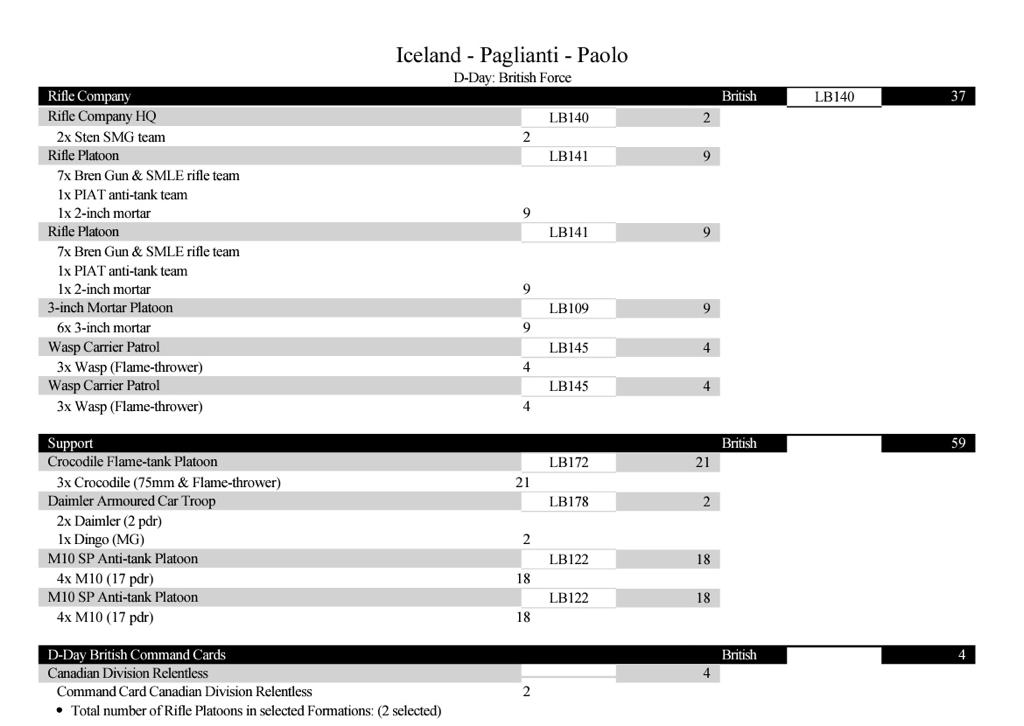
You can see all ETC 2022 lists here – it has been a Late War tournament, and we used also the recently published Bulge German book. The Iceland Team captain, my friend Soren Petersen, asked me to join their ranks and I was delighted to take part in this amazing competition with my preferred army – the British Rifle. By the way, let me thank again Soren and the Iceland team for how they have welcomed me – they also nicknamed me “Viking Paolo” and I will keep this for future tournaments!
How I made my list. I designed the list to have two strong infantries to attack and assault. FOW is a game where often you can win (or lose) with a successful, well-timed assault. D-Day British infantry is very good in assaulting with 3+ and counterassault 3+, but they have a very bad Rally status, being “worn”. I decided to add the Canadian card, to improve the Rally to 3+. Something expensive, but worthwhile in my opinion and experience.
I also added two WASP units: flamers are very good to kill dug-in infantry and guns, especially if you find those nasty bunkers with 88s. If you flame infantry or gun, they are forced to repeat the successful save, and they are auto destroyed if they fail one of them. For the same reason, I added the Crocodile full platoon – a Churchill version with a powerful flamer. Also, the Crocodile are the toughest British tank, with a front armor of 11 and a decent 75 gun with AT10. It’s more armored than the Tiger, and it is a terror for every infantry, especially if they are hit on 3+ like Russians or SS. However, both WASPs and Crococodile can’t hold an objective, so you need some other unit behind them to consolidate and win the games.
The British army can field two M10s Achilles platoons, and I got both of them. They are really expensive – 18 points each – but they provide me probably the best AT 14 coverage of the game. They can’t sustain a duel with German tanks – their ridiculous front armor of 5 is good to protect them from .50 cal at best, so I need to remember they are fragile killers – handle with care and don’t let anybody shoot them back!
Finally, I got a scout platoon – a Daimler troop, with a couple of AT7 guns – and a mortar full platoon.
I have only one artillery in this list, and I wanted them to hit their targets, so getting 6 bases allows me to reroll misses. My army works if I attack: in the event, I would find an opponent also attacking me, I would put the two M10s and one WASP in reserve, keeping the infantries on the table to protect my objective until the big calibers arrive. At least, this was the plan.
Here is my list, let me know what you think about it!
First game, Vincente Arroyo from Team USA
The first team we meet was USA – not a lucky draw, as we know they are very, very good – indeed, they will eventually win the tournament! My first game is with Vincente Arroyo and his Ardennes Germany. He ordered “attack” as I did, so we ended up with Dust Up mission.
Here is Vincente’s list. I think it’s one of the best compositions for German: he didn’t waste 30 or so points in a couple of King Tigers who would shoot four hits at best each turn, but has every tool – very good assault infantry, heavy tanks, flamers, mortars and lots of AA / AT guns.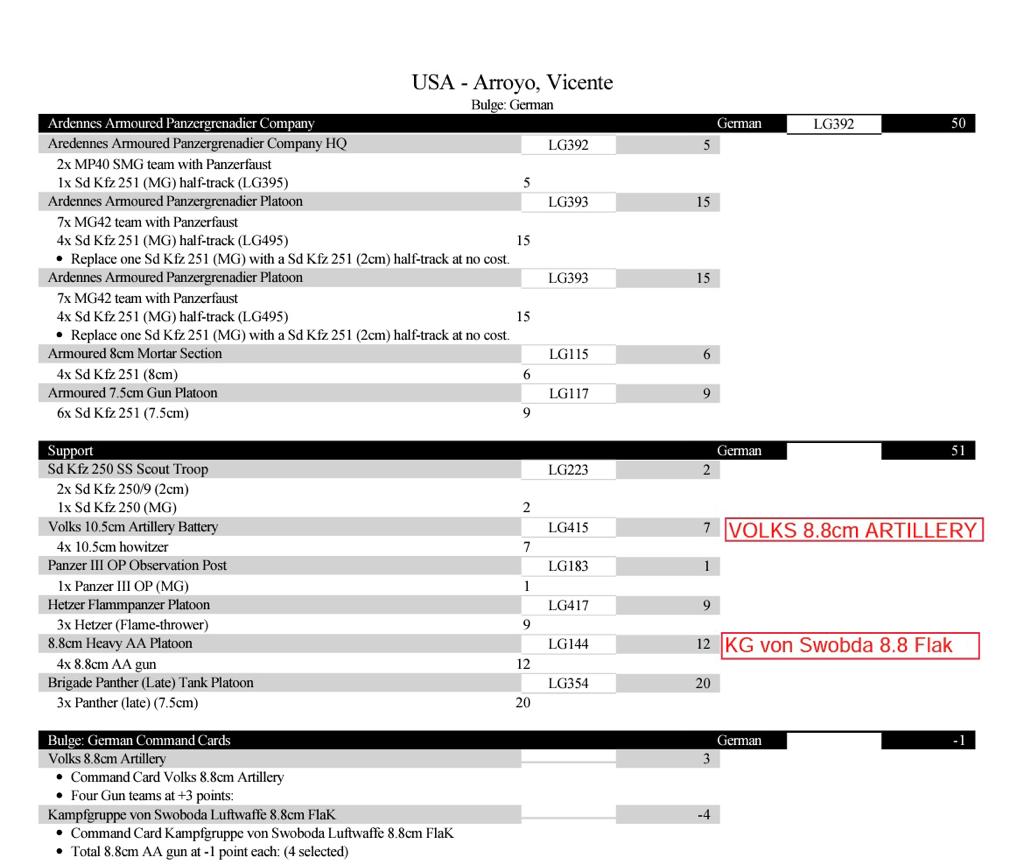
This was the table.
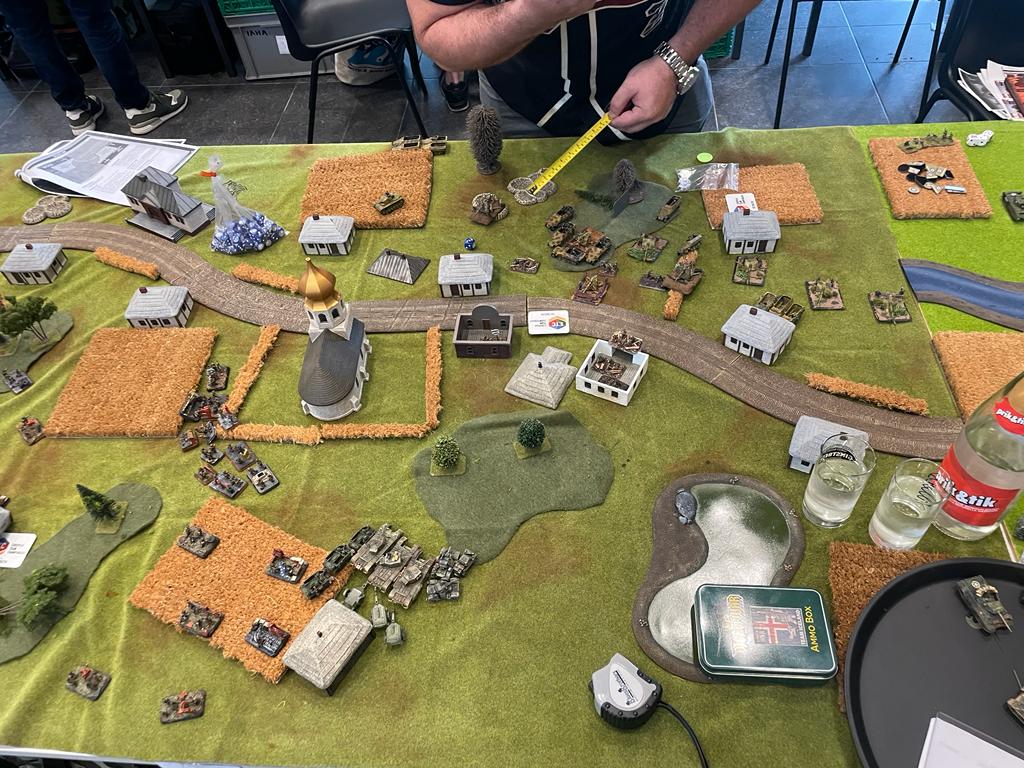
The table of the first game. Vincente chose the upper right corner, with more houses to protect his infantry. I was happy with the central wood, that I could use to advance “hidden”.
I deployed a single infantry platoon to defend the left-most objective, concentrating everything else to attack the closer objectives in the opponent’s quarter. We both had to put 40% in reserve: Vincente put the flamers and the Panthers, so I selected the two M10s and a Wasp, that could help later to counter his heavy tanks and his own flamers.

The deployment: I focused on the attack, while Vincente was a bit more on the defensive, using only an infantry platoon to threaten my Objectives.
I spearheaded during deployment with my scout to get closer to the central objective, and I put at 16” my Crocodiles, the WASP platoon, and one infantry with the HQ close. Vincente mirrored with infantry on the central objective with HQ, deploying the other infantry mounted on SD KFZ close to his half table – no doubt, this was his attack wing. He also put the two 88s platoons on the middle table line, to shoot anything approaching. The SD KFZ mortar platoon was in the wood near the objective.
I hastily attacked the Objective in the center, but I didn’t clear the 88s AT17 on the right. I managed to clear the Objective, but having lost the Croccos, I had to wait for the arrival of my reserves. This gave time for Vincente to assault the infantry on the right and win the game.
I attacked the fastest as I could, covering the advance with smoke from the mortars. This worked pretty well, and when my Crocodiles and WASPs emerged from the smoke curtain, they flamed almost all the infantry defending the objective and killed also two close 88s (the third one would resist the morale checks for being the lone survivor until the end of the game!). The turn after, Vincente began to shoot at my flamers with the remaining 88s, and also assaulted the Churchills with the remaining of the infantry.
He managed to kill the Churchills in a couple of turns – my British have a single “smoke” barrage per game, but I was inside the houses near the Objective and I was trying to find the best way to kill the few infantry near it. However, Vincente didn’t stay on the defensive: he moved the infantry mounted on the SD KFZ close to my left objective, then started the turn inside the 10” from the objective and moved on the open flank of the infantry, charging it with the vehicles (they have a special rule, so they have a deadly assault). I lost some base, but even more significantly I failed the counter assault (at 3+) and I had to move away. However, I deployed my infantry on the objective, so I remained close enough to hold the objective: I was not able to rally them (despite they are Canadians!) and shot the SD KFZ, destroying a couple of them but Vincente saved all the infantry. The next bound, he assaulted again and I failed the counterassault (again), and this time Vincente won the game 8-1.
I could easily blame the luck, as losing two counter assaults and a rally in a row at 3+ is something unusual, statistically. However, I did two big errors, and they are the real cause of this bitter defeat. First of all, I didn’t protect the objective well enough. The British infantry is always a good opponent, but with only one PIAT can’t resist a vehicle assault. If I just put the Scout platoon behind the infantry in the rough terrain, it would be almost impossible to hit (being gone to ground) and would have covered the infantry with four AT 7 shoots.
My second big mistake: I rushed to attack with flamers, killing the closer AA 88s (AT 14). I would have moved them in front of the more dangerous 88s on the far side (AT 17) as any of their shoots would easily pierce anything including my precious Crocodiles. When Vincente killed the Croccos, he stopped my attack “momentum” and even if I’m pretty sure I would have killed the few German troops still defending the objective (with 8 M10s coming sooner or later with another WASP platoon), this gave Vincente time to mount his winning assault. Kudos to Vincente! (BTW, in Italian “Vincente” means “the Winner”, so it was a good omen for him!).
Second game, Joost Kemper from Team Netherlands.
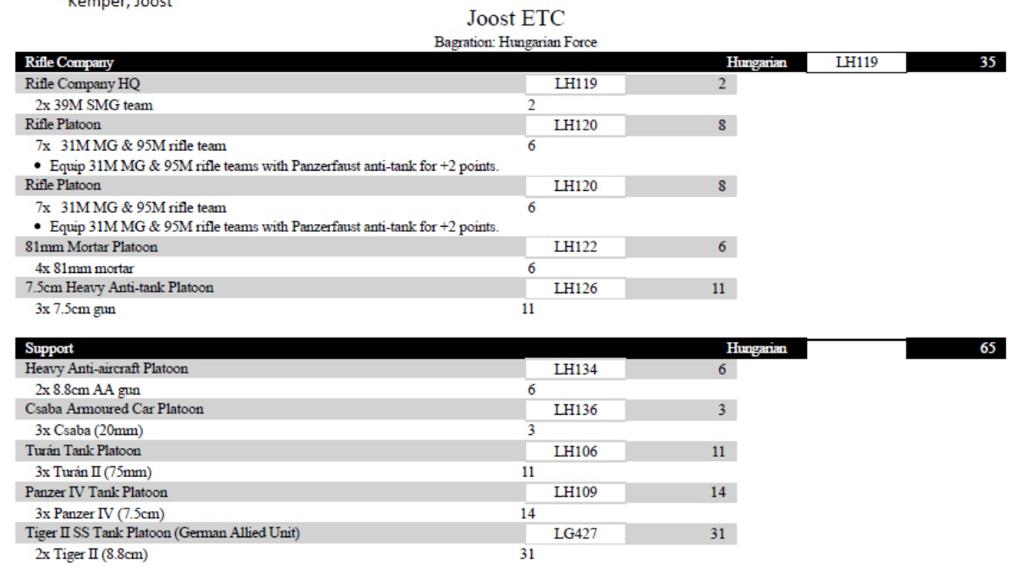
No time to mourn, as we had the first lunch (half a chicken, a true Viking meal!) and we were ready for the next game. This time, Iceland Team met the Netherlands, and I ended up with Joost Kemper and his Hungarian Force. Here is his list.
It has a core of good infantry, with two support King Tigers and some Turàn and Panzer IV. The table was a mess, as there was a river on my right and two impassable terrains in the center and on the right. He defended and I attacked so we ended with Fighting Withdrawal – a mission we don’t use in our Italian tournaments as it’s very difficult to finish in the two hours we have per game. However, at ETC they have a special rule: if you select this mission, you can play indefinitely until the Defender starts turn 8, so he can win.
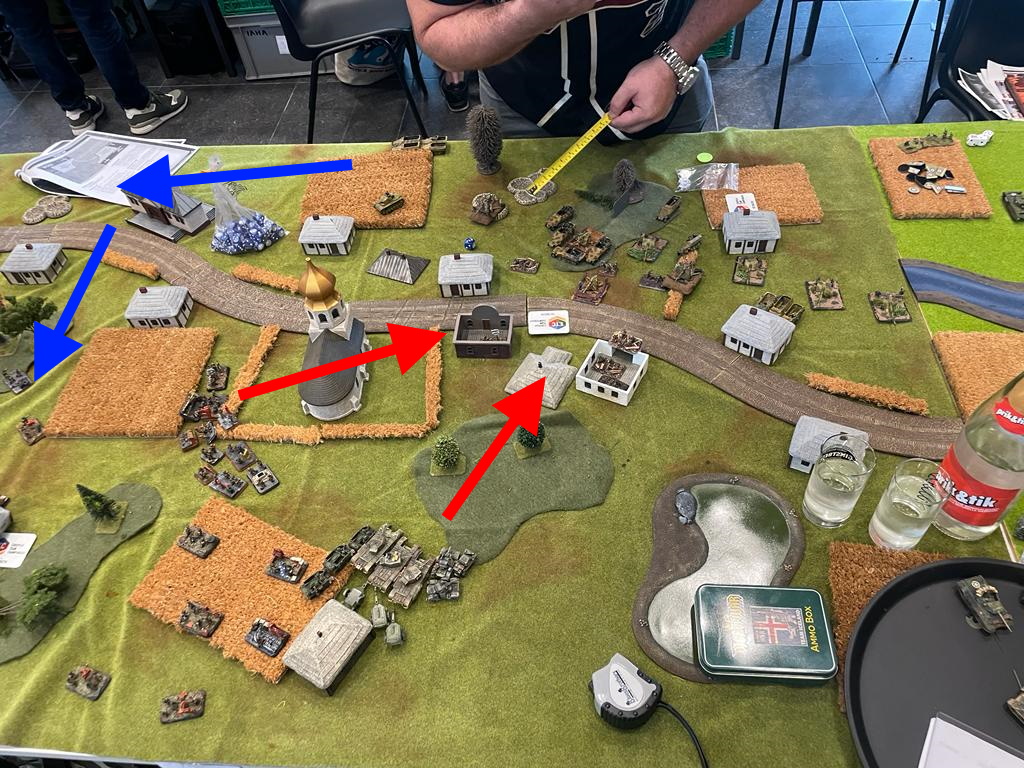
The crowded table: I missed catching the lake on the left (you can see a small corner), and it was impassable as the rocky ground in the center-left. With the river, this table has two “tunnels” the attacker has to use and the defender can concentrate the shoots.
I noticed immediately two problems. The first one, Joost could field all his troops immediately, and this means I would face the two King Tigers from the start, while the plan when meeting a German with these kittens was to rush toward the objective while they were still in reserve. The second problem is the table: as you can see in the above photo, the river on the right and the two impassable terrains in the center and on the left created two “crossings” where I should attack and be an easy target for all his guns.
He also has four minefields, that he placed in the gaps between the impassable features. He then deployed the Tigers on the bridge of the river, guarding the objective near it, and the infantry to cover the other objective, with 88s and Turàn tanks. The choice was: go for the King Tigers, or go for the minefield, the infantry, the 88s, and the Turàn?
The deployment: I chose to concentrate on the left, avoiding the “right” tunnel with the King Tigers in front of it. I just left a M10 platoon on the right, so I could shoot in the King Tigers’ rear if they moved towards my main attack wing.
I decided the latter: I put almost all my army in 30 cm on the left in front of the ruined building with the objective, deploying on the right side of the table only a single M10 platoon. The idea was to push hard on the left, keeping the M10s on the right flank in case Joost would move the Tigers towards the other side of the table when he would soon discover my plan, hopefully exposing their (relatively) weak rears.
In the first bound, I advanced and shoot the smoke barrage. I also managed to send some infantry inside the minefields, to clear them in the next bound. Joost revealed his Panzer IV ambush – to my surprise, it put it on the right-most corner, to counter my M10s, and indeed they killed one of them. He also began to move the King Tigers towards the center of the table, since he understood the objective they were guarding had nothing to fear.
In the second bound, the infantry cleared two minefields and the Crocodiles / WASPs moved the faster they could and began to flame the 88s and some infantry. My first infantry with HQ was just behind them, while the other did the long trip around the small impassable lake to assault the objective building from the far left. My surviving M10s on the right exchanged some shoots with the Panzer IVs, killing one of them, and they “shoot and scooted” in the woods. Their role was to worry the rear of the King Tigers, not kill the Panzers.
The game: I attacked the fastest I could on the left, moving also some infantry around the (unphotographed) lake. My opponent faced two infantries attacking together and flamers everywhere around his defending infantries.
Joost moved the King Tigers toward my attack wing and managed to shoot twice on the Crocodiles, but he didn’t hit – they were at long range and hidden behind some tank wrecks. His Turàn tried to shoot on the WASP, but again didn’t succeed. The next bound, I flamed the remaining infantry and charged with the left-most Rifle platoon, conquering the objective. 7-2 to me, as Joost managed to kill a couple of platoons.
The table was very bad, but I think concentrating all the army in front of an objective was a winning move. Joost didn’t have simply enough guns to stop my advance, and the flamers proved really good on infantry and guns. Joost only mistake was to reveal the Panzer IV ambush on the far right to counter the M10s. They could have done much better if put on the left, to stop my flanking infantry.
Third game, Wasilios Kloukas from Team Germany
After a lucullan dinner and a good sleep, the Saturday morning Team Iceland met the Germans. I ended up playing with Wasilios Kloukas with his Bagration Soviet. In Milan, we don’t have many “Russian” players, so I didn’t face this army too often during my training sessions or the Italian Championship. Wasilios army is focused on Sappers, and they are fantastic infantry both to attack and to defend. Here is his list.
He maneuvered and I, again, attacked so we ended up with the Spearpoint mission. This is a nasty scenario: the defender holds the central half with one objective, which normally is the better defended one, and both attacker and defender need to run to get the other one. This is a problem both for me and for Kloukas, as moving infantry in the field is a perfect target for everything armed with machine guns – for the Russians, this means 36 SMG teams that could shoot me on the go. When the opponent can roll almost one hundred dice at your infantry and you are not in holes, you can easily be wiped out and you can’t blame the dice.

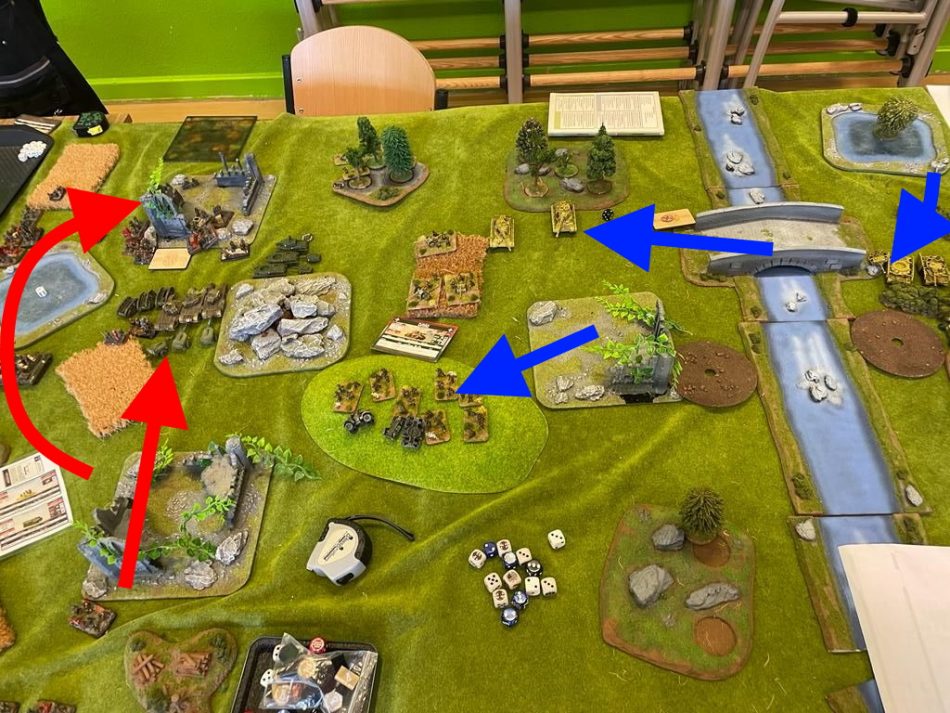
The table: the far right Objective is tempting, but considering the Russian lists (lots of infantries, but in very few units) I decided the best route could be attacking the closer Objective in the top center.
However, Wasilios faced a problem, too: with only 5 units, he had to put the ISU and one infantry in reserve, and had to cover the table with two infantries and the ambushed Decoy Tank platoon (two captured Panthers and one Stug). So I decided to change my plan before deployment: I put my full wing of infantry and flamers near his own central objective, to attack the closer objective with the cover of the two woods on the left. I just put my Daimlers on the other side, to rush towards the other, undefended objective, to force him to send someone over there to avoid losing the game for some ridiculous scouts.
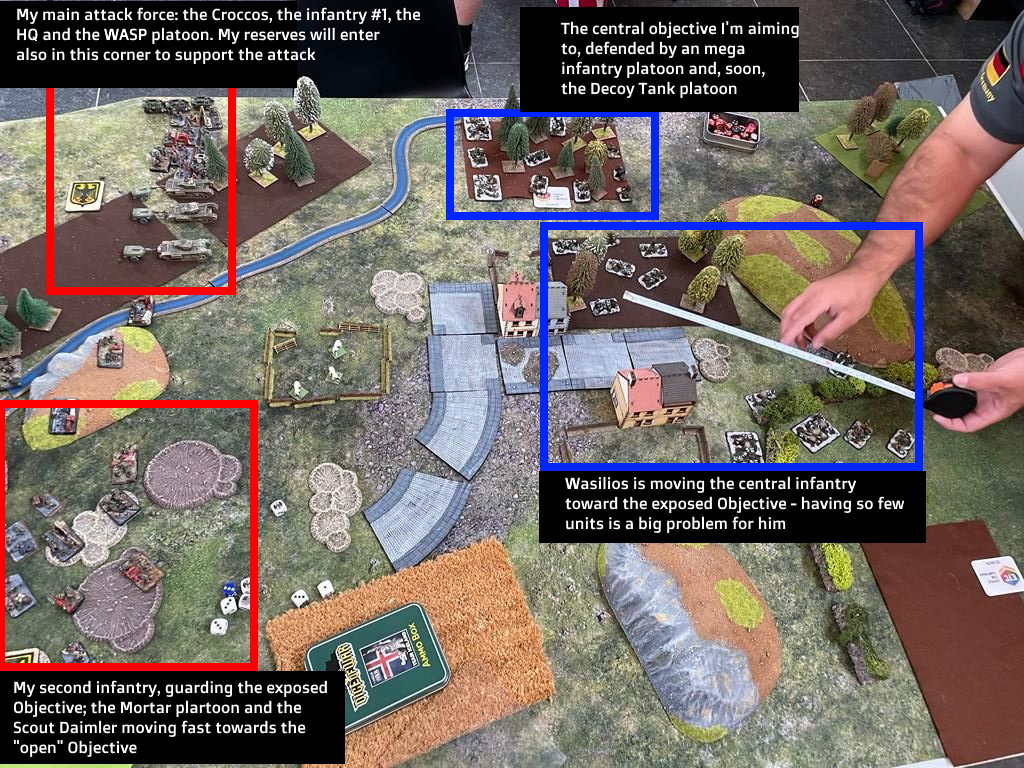
The deployment: I put almost all my available units in the top left corner to mount a direct attack on Kloukas central Objective, keeping only an Infantry to defend my exposed Objective. The scouts are in the bottom, ready to be sent the fastest they could drive towards the right-bottom corner Objective.
The plan worked pretty well. Kloukas deployed the Decoy Tank platoon in the city near his wood, full of Russian infantry with flamers and SMGs, to try to shoot out his worst opponent, the Crocodiles. However, he didn’t manage to hit any of them, and when the M10s emerged from reserved shoot to pieces the Panthers from the distance.
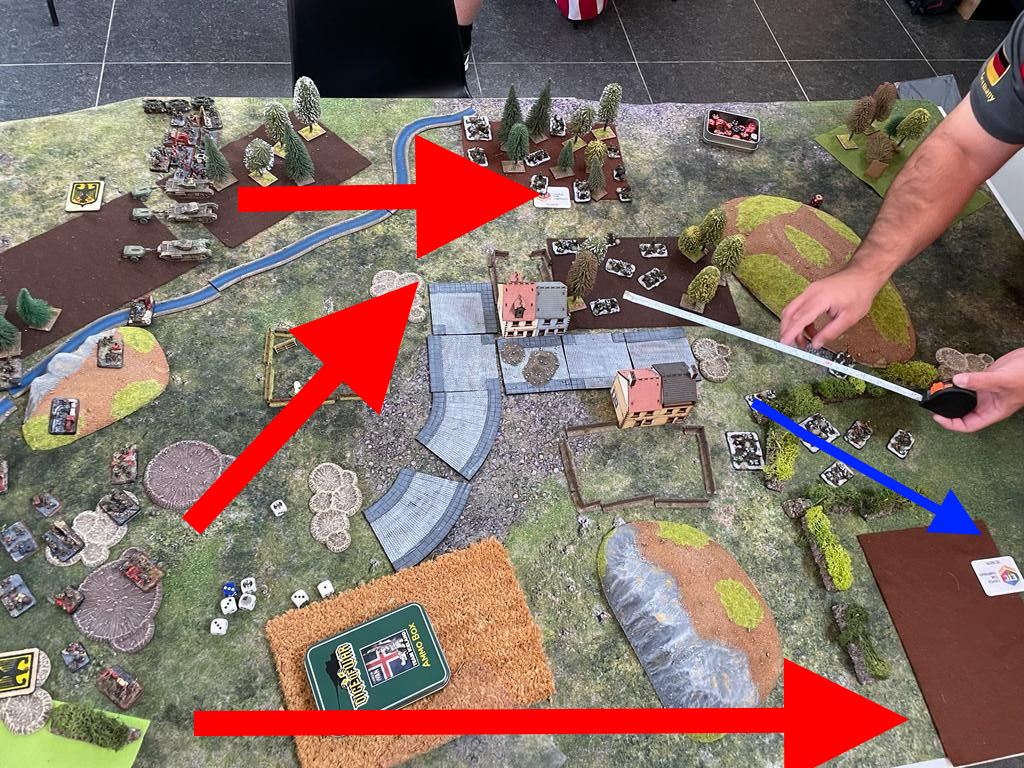
Russian infantry (Sappers above them all) is probably the only infantry I fear fighting in hand-to-hand combat with my Canadians. Indeed, they valiantly resisted my assaults and were close to cutting my Canadians to pieces. However, I had the best tool to deal with the Comrades – WASPs and Crocodiles.
Without any heavy cover, Kloukas infantry defending the objective in the wood was almost alone and unsupported, and my Crocodiles with WASP cleared the wood easily. The ISU arrived in Scattered reserves near the far objective (you won’t see anything faster in FOW than my Daimlers fleeing from four giant ISUs!) while the other infantry arrived on target near the central objective. We had a furious fight with all Russian infantries trying to defend the objective, but in the end, the flamers and Canadian charge proved too strong. 8-1 with, I have to admit, a good share of luck!
Fourth game, Hans Vannoppen from Team Belgium
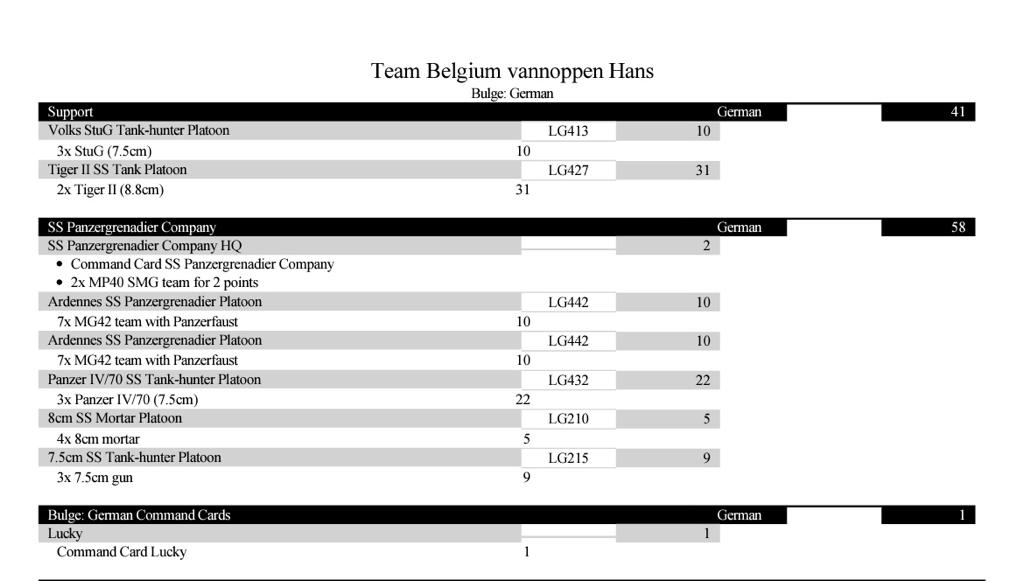
Three games played, three to go. The fourth match sees Team Iceland meeting the hosts of the tournament, Team Belgium, with me facing Hans Vannoppen’ SS Bulge German. Here is the list.
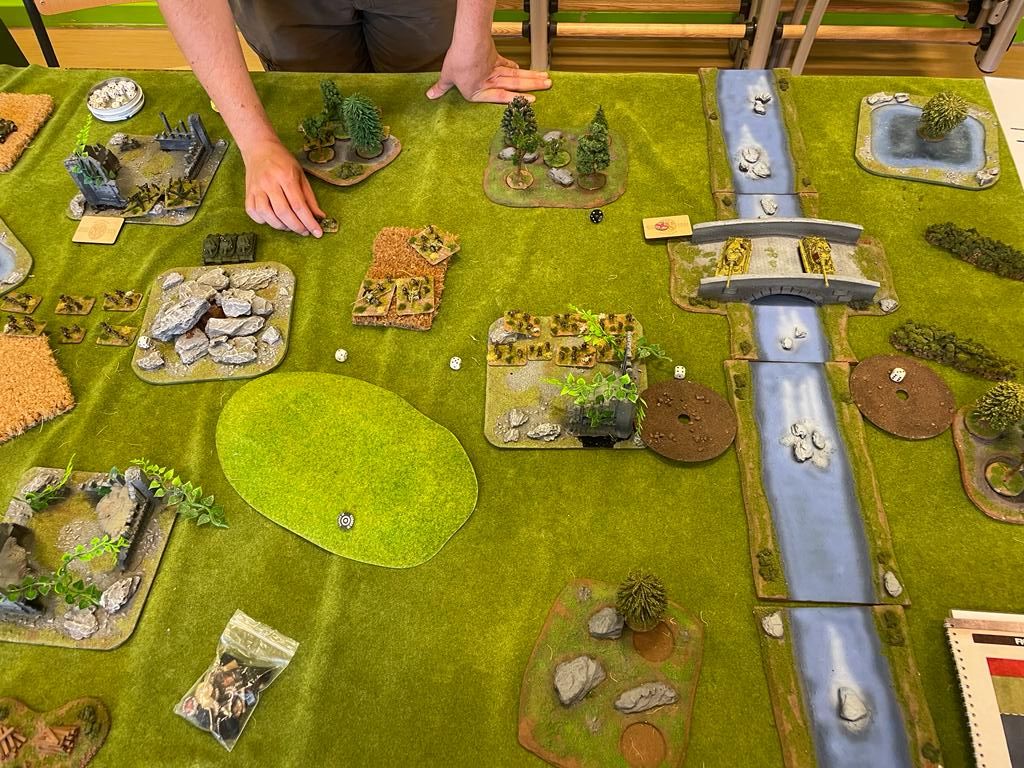
And this is the table, the same one I played in battle #2.
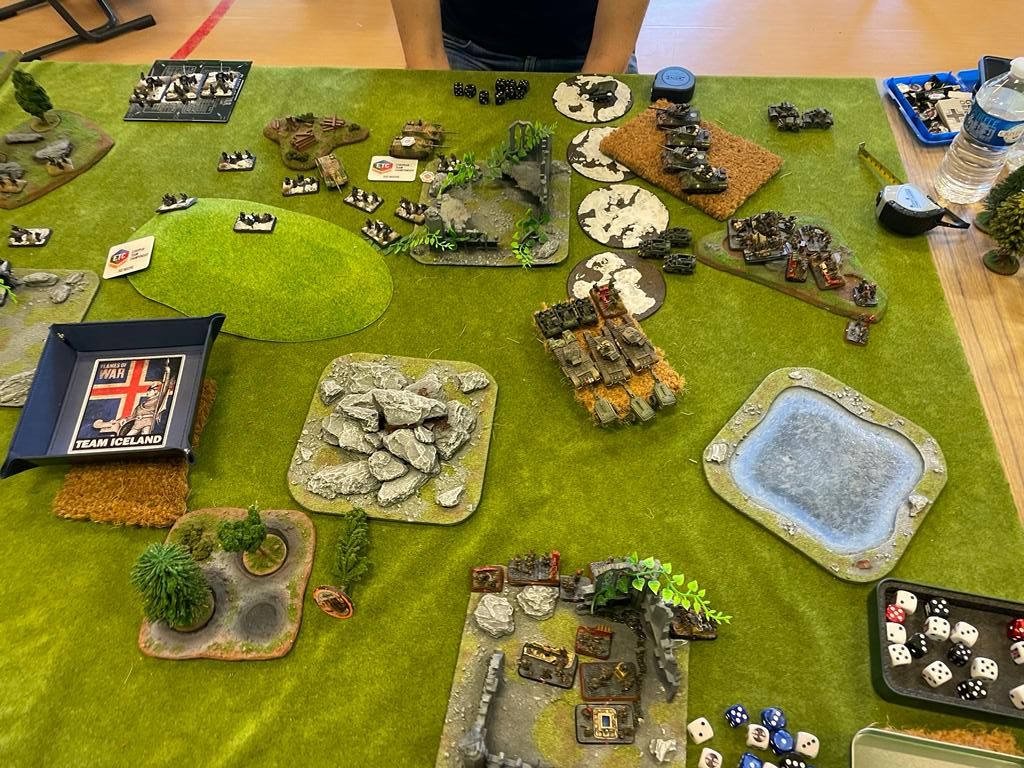
The table – this time I managed to capture also the lake on my (now) right! Same problems as in battle #2: two impassable terrains and a huge river create the perfect tunnels to set up a very warm welcome to the attacker.
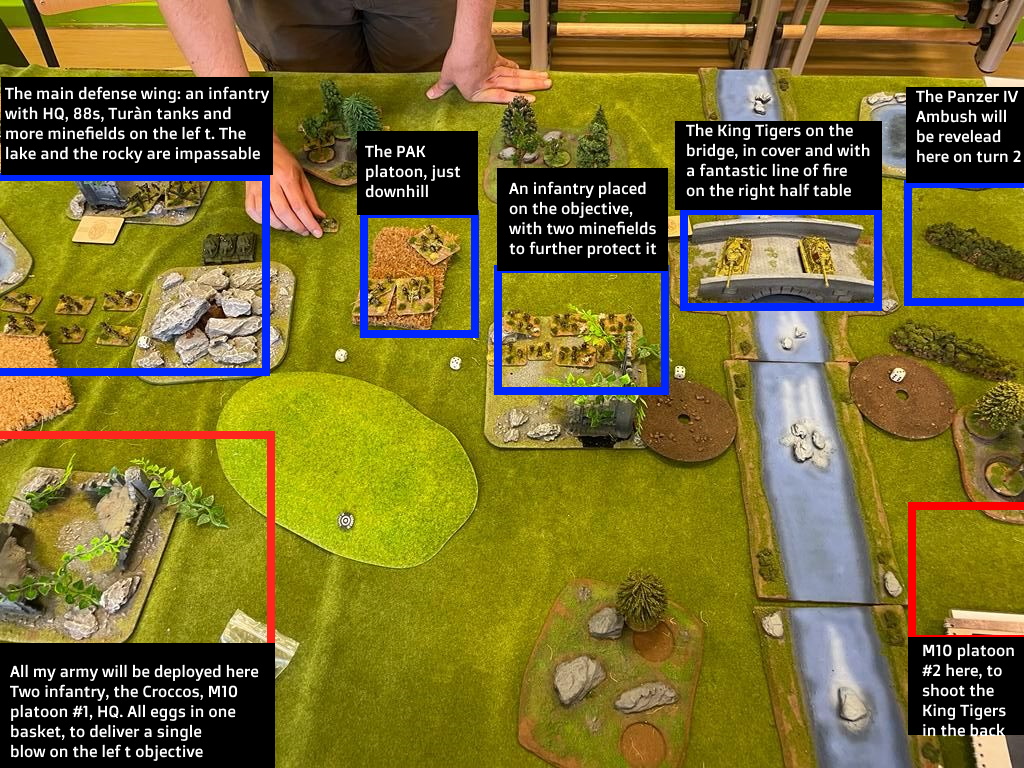
The battleground is the same table of battle #2, but playing on the other side. Hans is defending with me attacking, so we end up with mission Bridgehead. Here is the deployment.
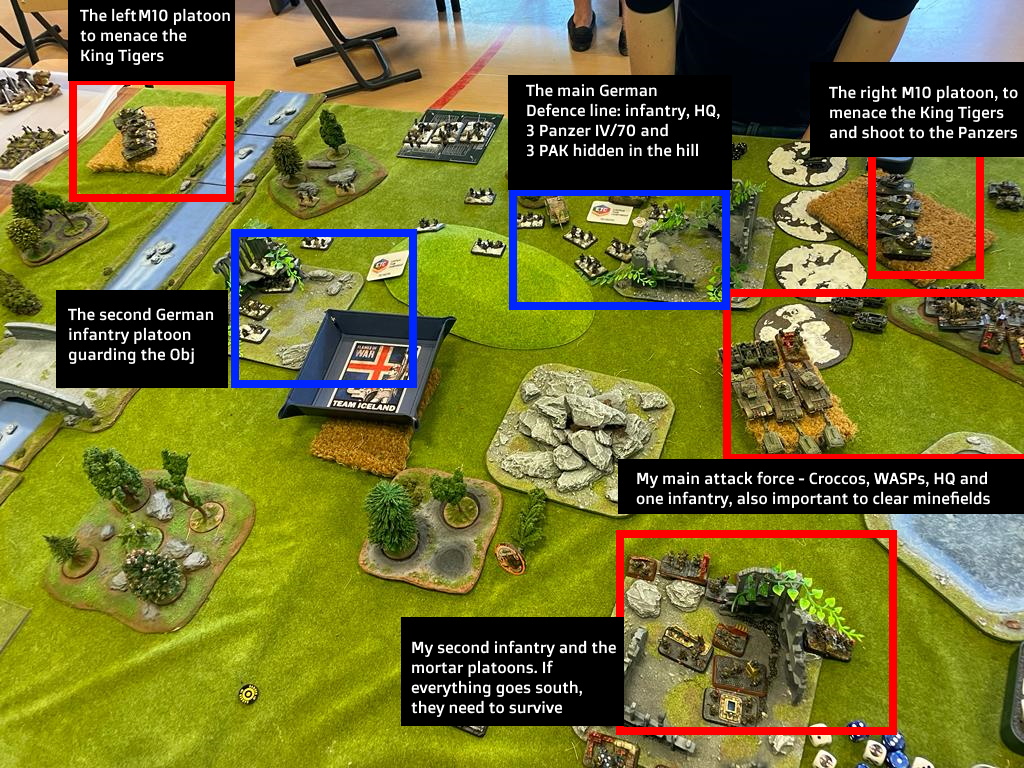
The deployment: I used a “pinch” tactic to put on turn #2 one M10 platoon on the top right corner and the other M10 on the left top corner: when Hans’ King Tigers will emerge from reserve in the central area, they will have the rear-facing one of the M10 platoons. (I took the photo on turn 2 or 3).
The battle has the same problems as the second match: a river on my (now) left), and two impassable in the center and right. However, this time I can deploy on the side bands at mid-table, and use on one side of my single scout unit to prolong the deployment with the Spearhead ability. The plan is to attack the right objective in ruins – ruins and houses are my Canadian infantry best friends – using all I can put like a single hammer blow.
However, Hans has an ace: he put in reserve his Stugs and the most feared couple of the tournament, the two King Tigers, proud of their front invulnerability. My counter plan for the Tigers is the ”pinch” maneuver: I deployed four M10s on the far right, thanks to the Spearhead “bubble” of my scouts, and the other four on the far left side. When the Tigers will enter, they will be forced to expose a flank to one of the M10 platoons.
Hans deploys the two infantries one on each objective, the Pak guns in ambush, and three Panzer IV/70s behind a small difficult hill. He also placed some minefields on the right, easily identifying my preferred objective – the one on the other side is too well protected by the river.
The game starts with Canadians rushing towards the objective, and pushing to reach the minefield to clear them. Despite some unlucky dice for entering them, the Canadian first infantry with the HQ successfully opens the road for the flamers to reach the SS infantry defending the house. Hans, fearing the flamers, tries to move them away, but this will help the flamers in the end – having moved the infantry hit on 3+, they are hit on 4+ since they are only hidden and not “gone to ground”, and I could hit the majority of them in the next bounds with flamers.
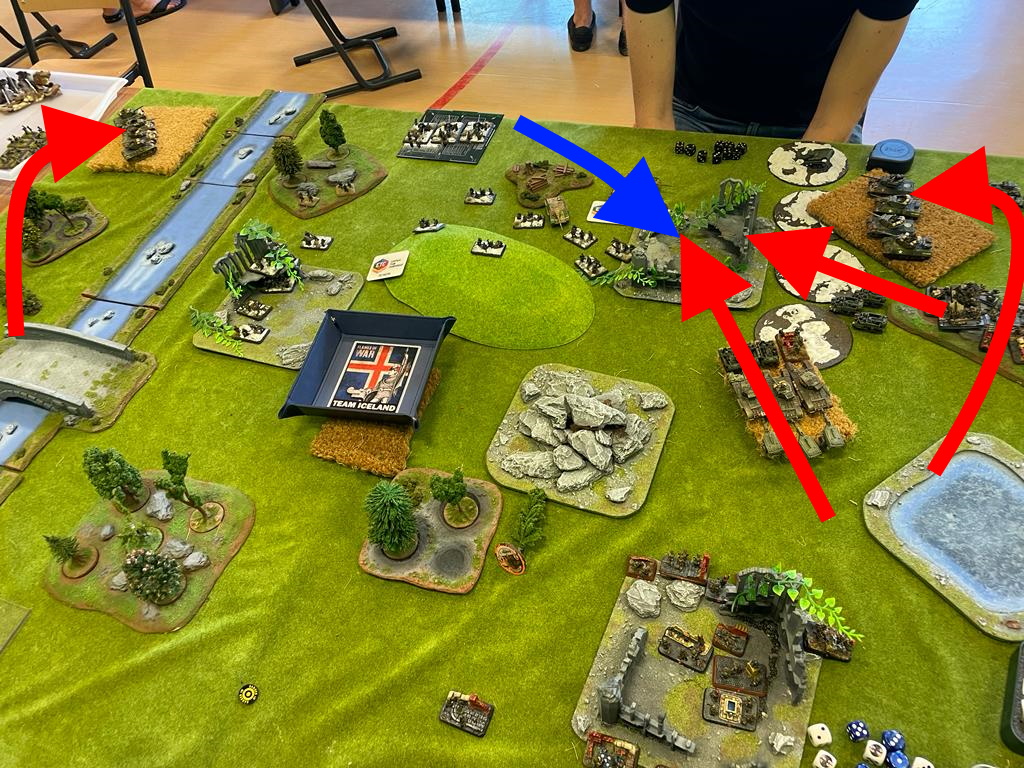
My main attack is towards the building on the right: I could enter the minefields and clear them easily, as no relevant enemy units could shoot at my infantry. The Crocodiles stayed in the rough terrain to improve their survivability against the Panzer IV/70s and the (incoming) Tigers, while the hard job was mainly on WASPs’ shoulders.
The Pak ambush manages to kill some Wasps, while the Panzer IV/70s knock out an M10, and vice versa. Then, the feared King Tigers arrive in the center of deployment, and shoot their two “moving” shots, missing the targets (the Crococodiles, I moved them into rough terrain to keep them “hidden”). Following the plan, the four M10s on the far east move in position and shot four hits on the King Tigers’ unprotected rear, and two of them kill the just arrived kittens. With the Tigers reduced to smoking wrecks, the rest of the game turns out to be very easy for me: the flamers destroy all they can reach (mortars, PAKs, HQ) while the Canadian infantry clear the building and conquer the ruins. 8-1 to me, as Hans was so unlucky to kill only one platoon.
This is the ideal situation to remember what Col. John “Hannibal” Smith from A-Team words: “I love when a plan comes together”. After German Bulge book hit the shelves, I played a number of games with my Italian friends like Claudio Tiso (one of the best Italian players from Turin), Giorgio Bendotti (one of the best Milanese players) and Stefano Regazzoni (second in the Italian FOW championship and Captain of Swiss team at ETC 2022) to understand how to face effectively the King Tigers.
I also played on the “bad” side with Germans to study their weakness, and I realized two facts. First, they are ineffective, especially if you defend. They only have four shoots per turn, and you need to put them invariably in Reserve for their astronomical cost. Second, they are vulnerable if you attack them on two flanks. If you run towards them with two M10 platoons or two Sherman platoons, they won’t be able to kill all of them and you’ll get on their flanks. If you aid with some smoke, the kittens are in deep trouble. For this game, I used the “pinch” tactics and it worked perfectly. Well, I also rolled two 5s when scoring four hits at long distance, but it worked!
Fifth game with Dave Madigan of Team New Zealand.
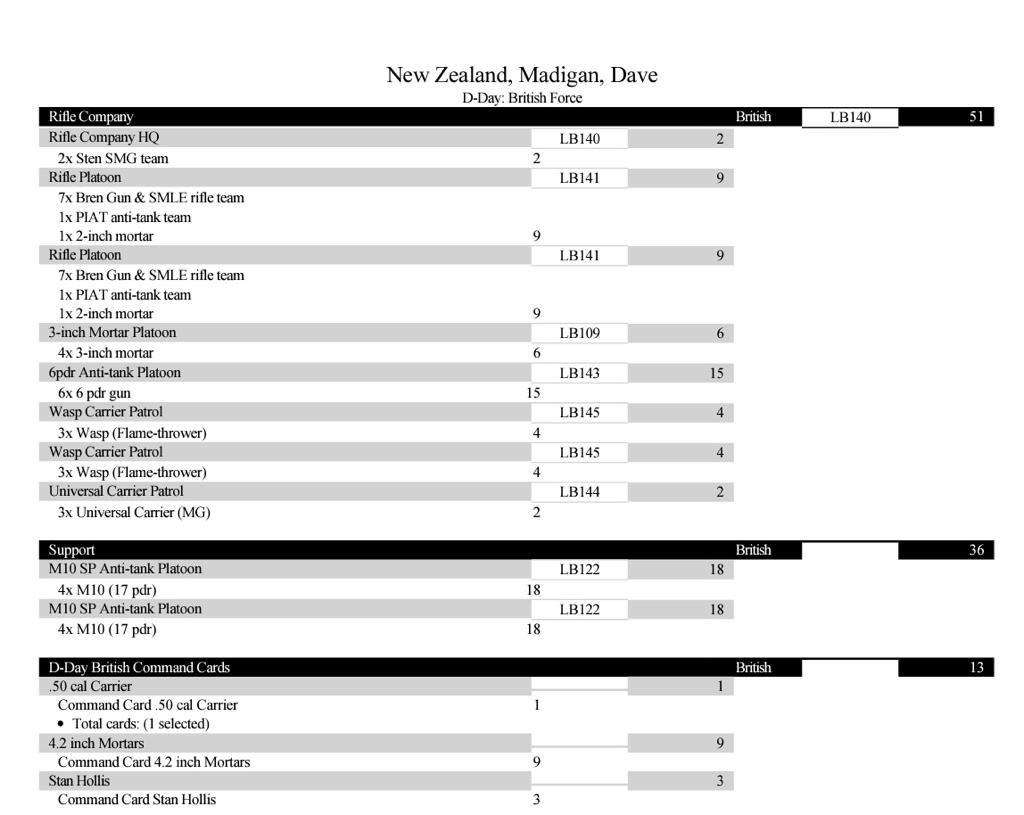
After another resting sleep, favored by a fair amount of food and Belgian beer, Team Iceland is now facing New Zealand, and I end up playing with my old friend Dave Madigan. We met years ago during the glorious time of DBM in the 90s, and I know that Dave is both a fantastic fellow to play with and a formidable opponent. He was also playing with a British Rifle very similar to mine, and when you play with a very good player with your same army, it’s always big trouble! Here is his list: fewer flamers, more guns.
As I suspected, Dave was going to Defend, while I was attacking as usual. The mission is Dogfight, on this table, with Dave defending on the right.
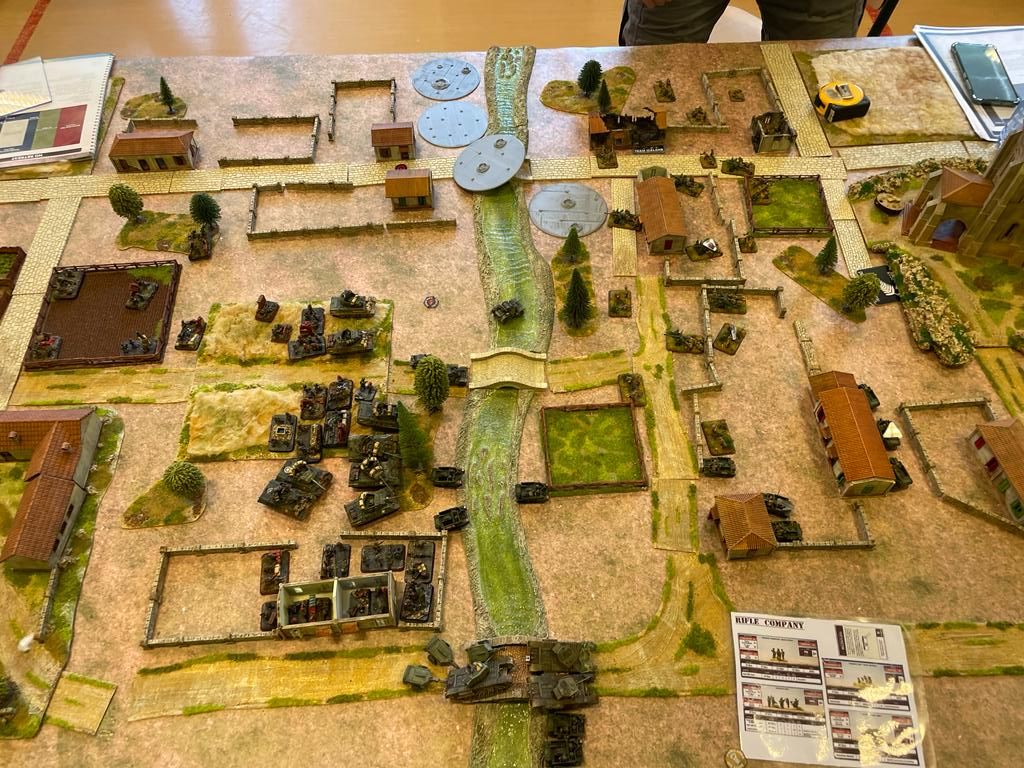
This is the table: the perpendicular river is a formidable obstacle, and Dave immediately understood the benefit to deploy on the right. However, I could use the roads!
This table has a big obstacle for me: a river perpendicular to my assault, and even worse I would need to cross exactly when I will want to go the faster I can, in front of Dave’s line of defense with lots of guns. Dave put an objective in the center of his deployment (smart move) and I put “mine” objective on the front on the top. Dave deployed one Infantry with HQ, and two 6 PDR gun platoons near the objective closer to the central line, leaving some mortars and WASP to defend the other one. His reserves, including another mortar platoon, an M10 troop and another infantry would emerge relatively quickly on his short table side. To further improve the defense of the most exposed objective, Dave put his four minefields in front of it.
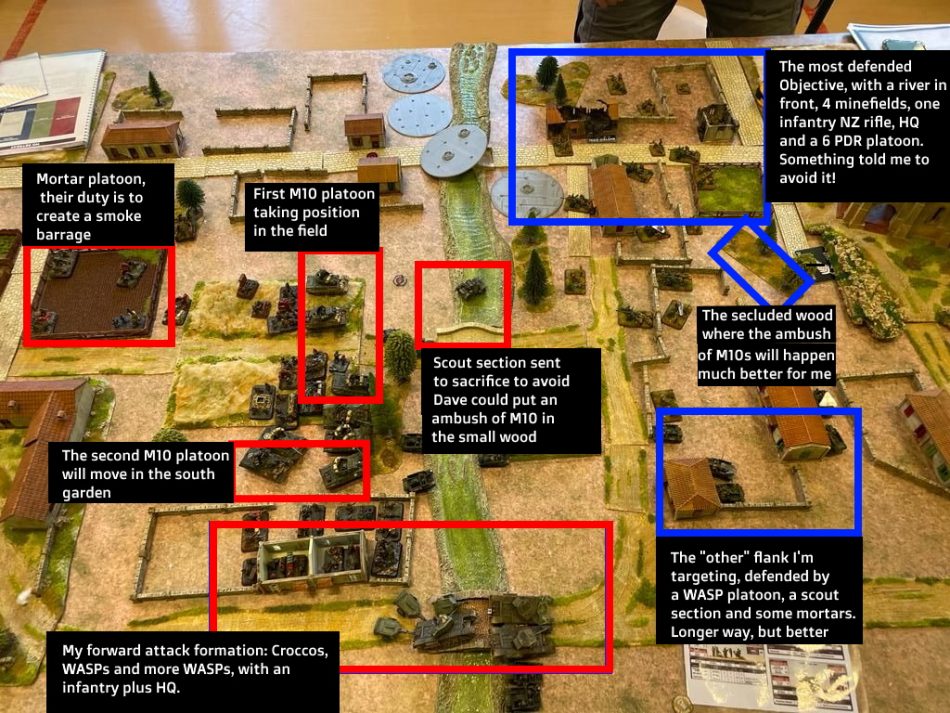
The deployment: the top central Objective is a hard nut, so I went for the mid one. Longer way, but far fewer obstacles and minefields and troops. All is in the hands of destiny: will Dave’s reserves arrive in time? (Again, photo taken after a turn of movement).
I could go for the shortest route towards the most exposed objective, but I would have to face the New Zealand infantry dug in into houses, behind the river, and behind four minefields. That would be the classical plan. I decided to take the risky route and attack on the other, farther but less defended side. I had one advantage: roads parallel to my attack vector, which helped me to move very fast the Crocodiles and the M10s in position. In the first round, I throw the smoke curtain, and Dave was able to kill only an M10 I stupidly let visible.
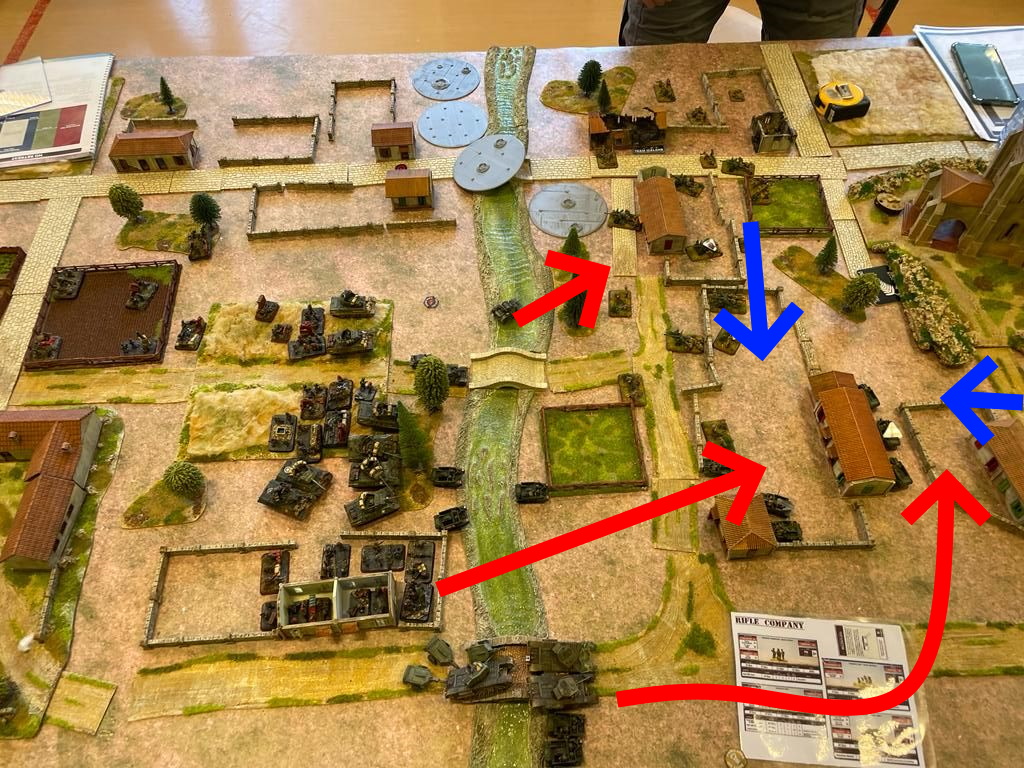
The game: I rushed to attack on the lower right corner, and this forced Dave to react to my strategy. The 6 PDRs were in a bad position to counter this flank attack, and I got the exposed mortar platoon, unable to defend itself from tanks and infantry. Also, the long houses on the right-bottom corner would help my infantry advance in bulletproof protection.
On the next bound, I rushed forward with my WASPs and Crocodiles, while the M10s took position in a walled garden and a rough terrain. Their role was to counter Dave’s M10s once they emerged from ambush or reserve. Meanwhile, I sent to utterly sacrifice my scouts in the central small wood: their duty was to prevent Dave to put his M10 in ambush too close to my line – I wanted that central small wood to be an obstacle for his line of sight and not a good place to deploy ambushed AT 14 M10s. In FOW you can place an ambush 10cm from the enemy if you are hidden, so I needed a scout on the limit of the wood the sooner I can.
My flamers engaged a battle with Dave’s one, while the Crocodiles entered the house garden in the center of New Zealand’s army deployment, and began to flame 6” PDR and mortars. Dave, realizing I was getting closer to the objective, moved his infantry deployed on the other objective, but I ranged in my mortars on the running infantry, inflicting casualties and pinning them down. One of the Achille’s heels of the British army is the low morale when it comes to rally, and they had to stay still in the open under my bombardment for a couple of bounds.
Meanwhile, a couple of Dave’s reserves arrived: a mortar platoon, and the other infantry that Dave deployed to attack my right flank. A smart move, but again I tried to pin them down with flamers: again, New Zealand’s 4+ Rally failed, and they stayed in the crop field in front of my surviving WASPs and decimated. Dave also deployed the ambushed M10s in the wood near the objective: they managed to kill a Crococodile and another M10, but my 6 remaining M10s destroyed them in return.
With them gone, the NZ infantry mauled by mortars and flamers, HQ killed in the same attack, I just had to kill a Kiwi mortar crew in assault to clear the objective. 8-1, as Dave was able to kill a single full platoon, despite inflicting dispersed but numerous losses. I think this was a really interesting game: I won because my plan was unexpected, and also because I know very well the strength and the weakness of the British army since I play often with it. Dave was also very unlucky with the Rally rolls, which cost him the game as the new, almost untouched infantry from the reserve was stopped by a couple of WASPs from reaching the objective I was going to clear.
Sixth game with Gunter Zehetner from Team Austria
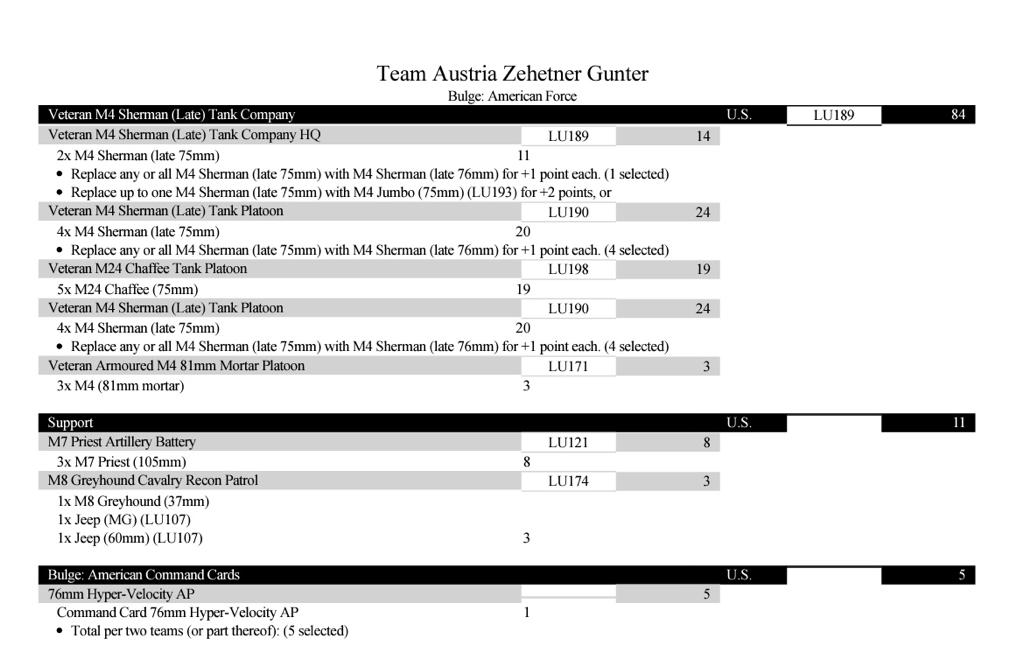
After a fantastic BBQ, Team Iceland met the last opponent of the ETC, Team Austria. I ended up playing with Gunter Zehetner and his US boys. Before the tournament, our Captain Soren asked us to mark, for each opposing team the worst army of the six we could meet, the one we won’t meet at any cost. For Austria, I selected Gunter’s one, and I was going to play against him! He has no infantry, so my flamers are basically useless, and he has the artillery with “Mike on target”, that could destroy my infantries in a couple of bounds. Also, he has a lot of AT 12+ tanks, that can literally rip thru my M10s like tin tuna boxes, and they are all veterans. Here is his list, so you can understand my worries.
And this was the table:
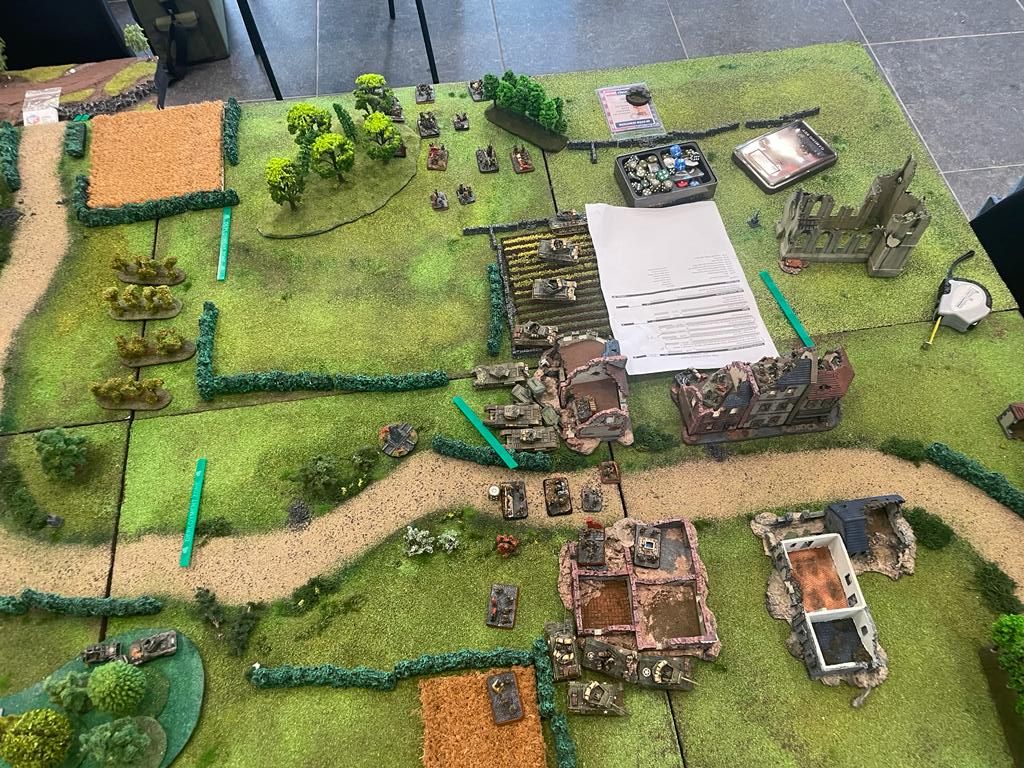
The table: as we did for every game, Gunther and I declared the elements of the table, and we decided to use the “bushes” as normal low obstacles, not as “hard” bocage. So basically every unit is “hidden” but my infantries don’t enjoy the bulletproof.
I attacked and Gunther maneuvered, so we ended up with Escape mission. This is a scenario with issues, for me: I need to rush to attack with my army, but I would face a steel wall in front and another one in the back, a feeling similar to Han Solo and friends in the dump of Death Star in Episode IV, with crushing moving walls.
The mission has issues both for attacker and defender – the first is crushed between enemies, the latter can’t rely on instant Reserves emerging on the Objectives. However, with AT13 and moving ROF 2, the US list is in a very good advantage in this scenario.
Gunther’s army was a formidable opponent to mine, but he had few platoons. He put artillery in the back, the scouts just inside the bottom wood in his half to direct their barrages, and a Sherman 76 full platoon just behind them. The HQ was in ambush. (I think we did a mistake, here, as Deep Reserves rule would have forced Gunther to place only one platoon of tanks on the table).
I decided to deploy the two infantries on the top and the bottom sections: the table had woods on both of them, and woods are the next best friends of infantry after the buildings. They hid the moving soldiers, and you can’t shoot them if they are more than 15 cm away. I deployed the M10s in the central rough terrain and near the ruins at the bottom: their role was to sacrifice and stop the advancing steel walls of the US reserves that were going to emerge behind my back. Crocodiles, with their 11 front armor, would support in the center the infantries and hopefully attract some AT13+ guns. I prefer to face 76 guns with hypervelocity card with my Crocodiles, ratheer than five MGs per tank with my infantries out of their holes.
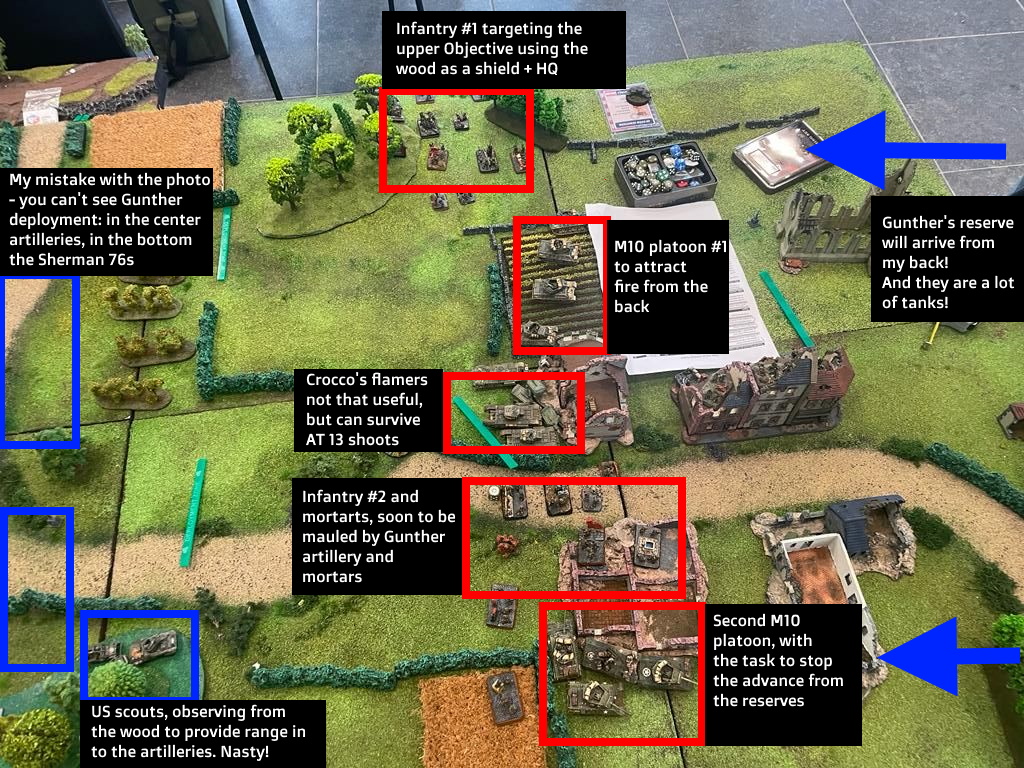
My opponent Gunther focused the reserve shoots on the M10s: this was a good tactic, but also let my infantry in the top move undisturbed towards the Objective. I think the only mistake my opponent did was to deploy the two Shermans HQ in ambush in the lower left, to counter the WASPs (that could do relatively little damage against a tank army). If he placed the same HQ on the top left corner, he would have stopped my infantry assault enough to let the Sherman tanks coming from the top right corner as reserves join in.
The first bounds were simply ruinous for my Canadians. Gunther had the first turn, and managed to enter with the fast Chaffees and kill a couple of the M10s in the bottom; he ranged in with Mike on Target on my central infantry and killed four of them. Next bound, he entered with another Sherman platoon in the top right corner and killed some M10s hidden in the rough central terrain. I could only hope for the best and move the faster I could with my other infantry since the first one was mauled by artillery and unable to recover from the pinned status.
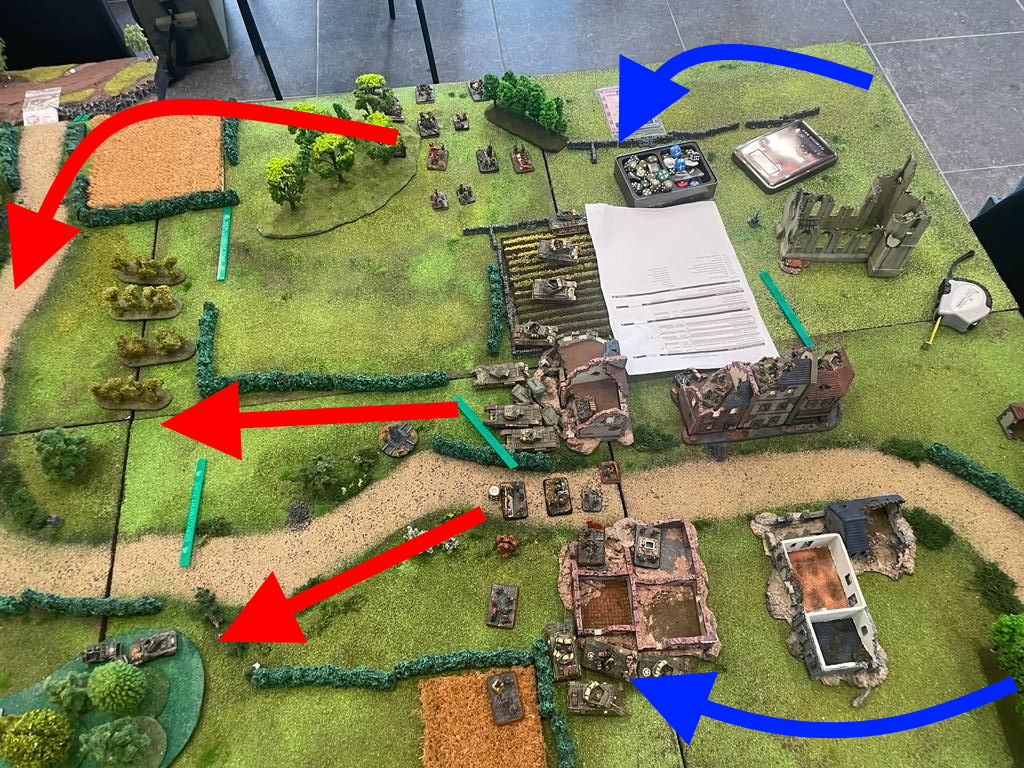
With my WASPs I advanced to shoot at the American scouts in the wood – actually, I did that just to score some point, since it seemed very difficult to win the game at all. Gunther however did the only error of his game: he deployed the ambushed HQ near the WASPs to kill them and save his scout. This left the top objective with no heavy tank support. I jumped on it: I killed the artillery and the M4 mortars he moved to defend it pretty easily with my scouts, PIAT, and surviving Crocodiles.
If Gunther had deployed the HQ in the woods near this objective, he would have stopped my infantry advance enough to let the Shermans and the Chaffee in the back clear out the M10s completely and reach the rear of my infantry. This error, I think, cost him the game and I won 8-1
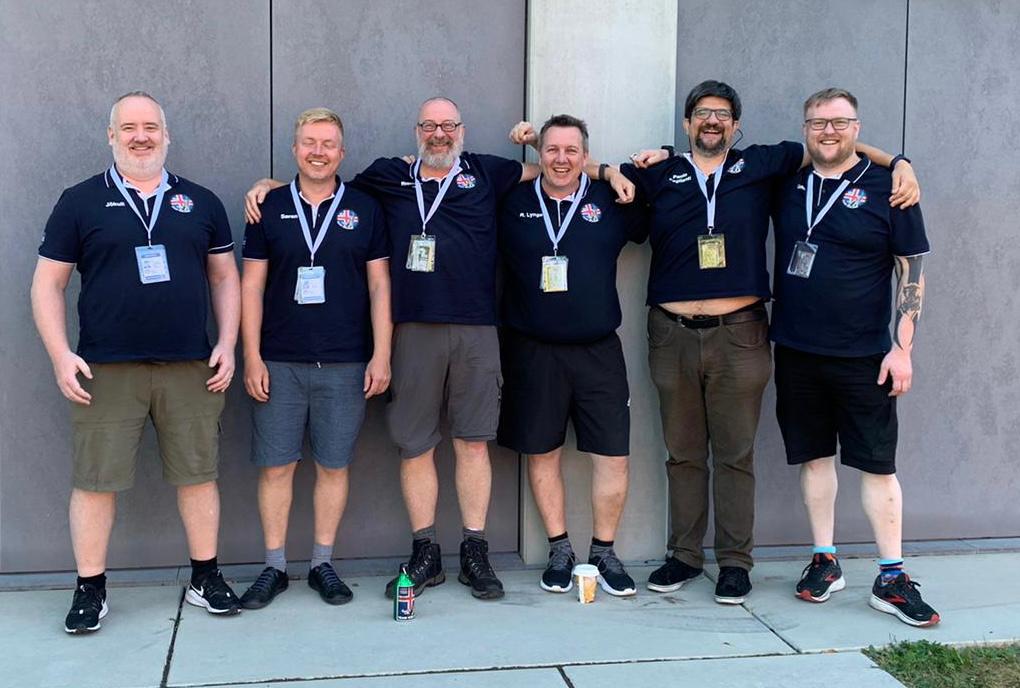
Team Iceland, placed 14th at the first ETC expeditions and won the Most Sporting team prize. From the left: Gísli Jökull Gíslason, Soren Petersen (the Captain), Richard Hardy (Scottish mercenary), Rasmus Grejsen Lynge, Viking Paolo (myself), and Gunnar Andri Hlíðdal Kristinsson. We few, we happy few!
I’m pretty satisfied with my British army and with this composition. I already won the Italian championship 2021-22 playing with British, using both a tank formation and this Canadian list. At this ETC 2022, I ended up as the second player of 120 in the overall player ladder – something I’m really proud of, even if it’s less important than the team results, as ETC is a team competition.
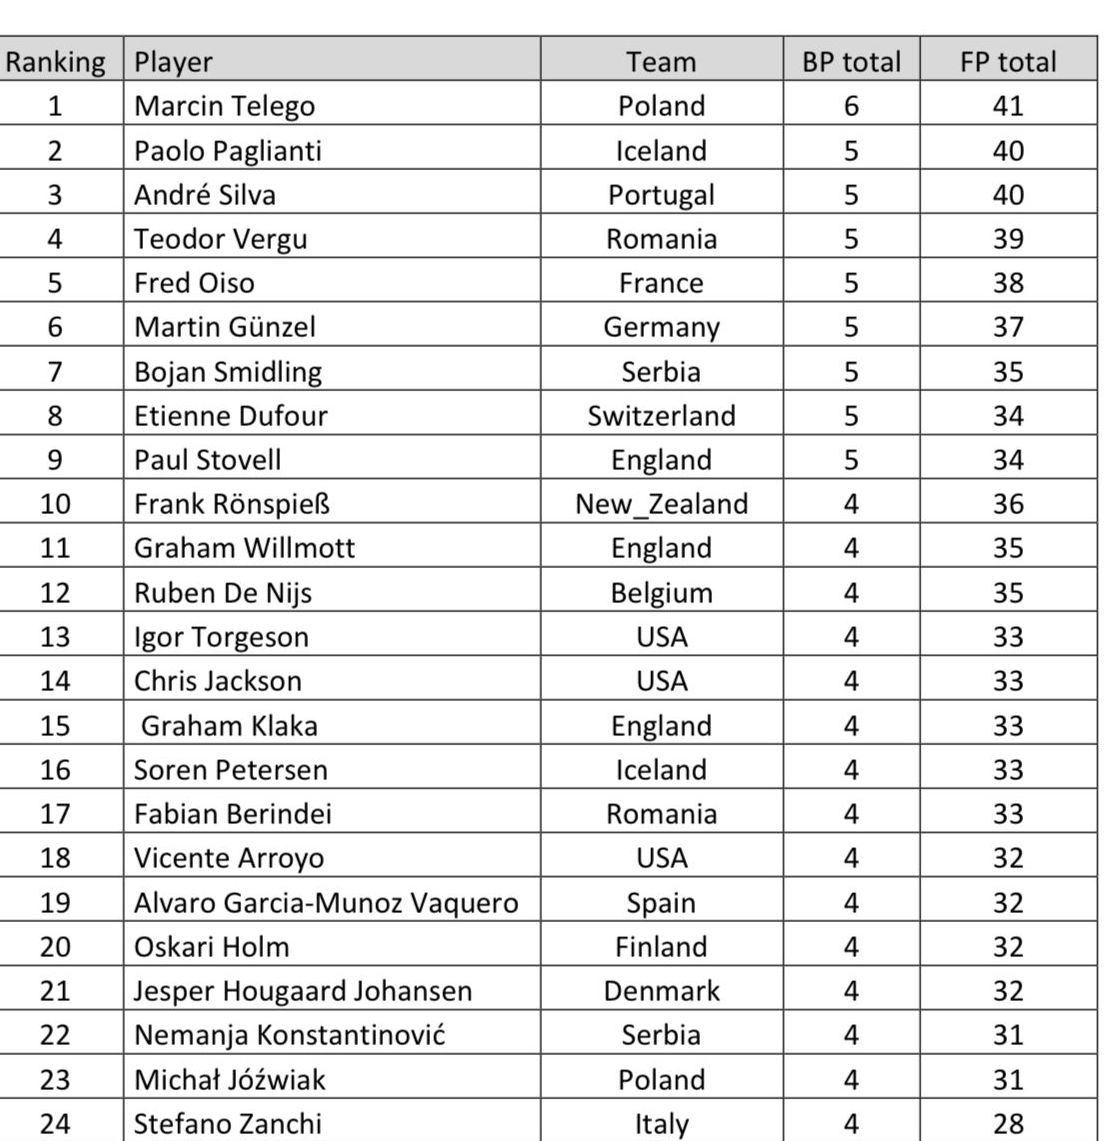
The second player in 120, with five victories and one lost game – not bad! My Canadians earned their pay and extra whiskey for everybody!
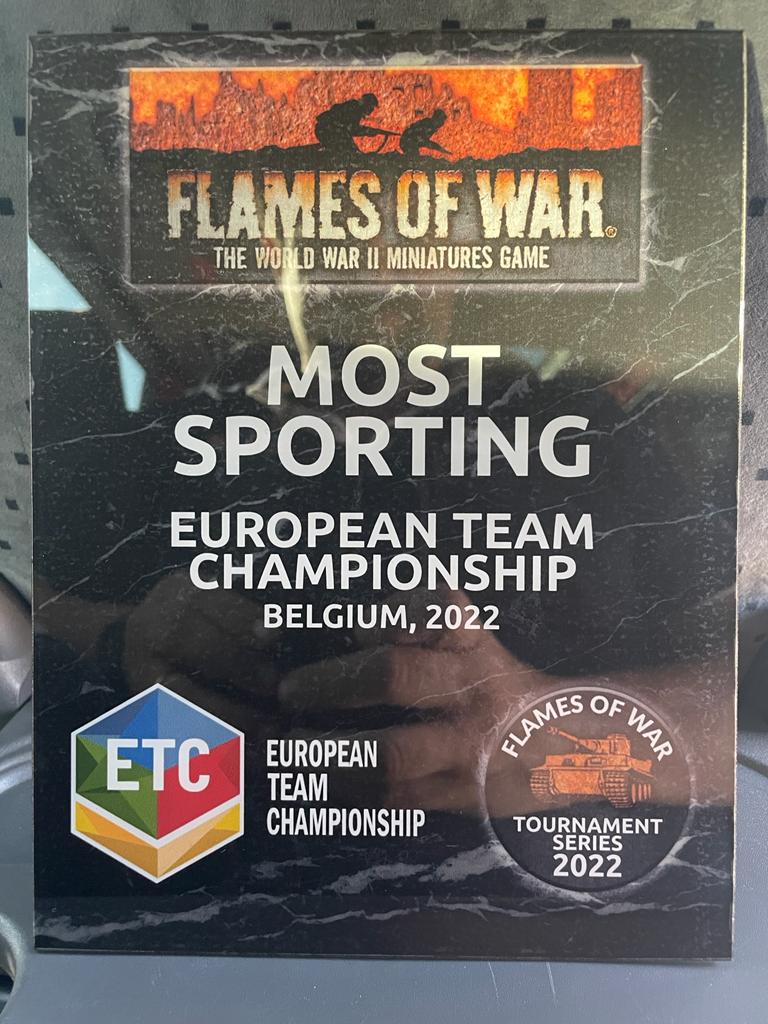
Team Iceland (my team) also won the Most Sporting prize – and I have to again thank the opponents I met in this tournament, as they probably all voted for us!
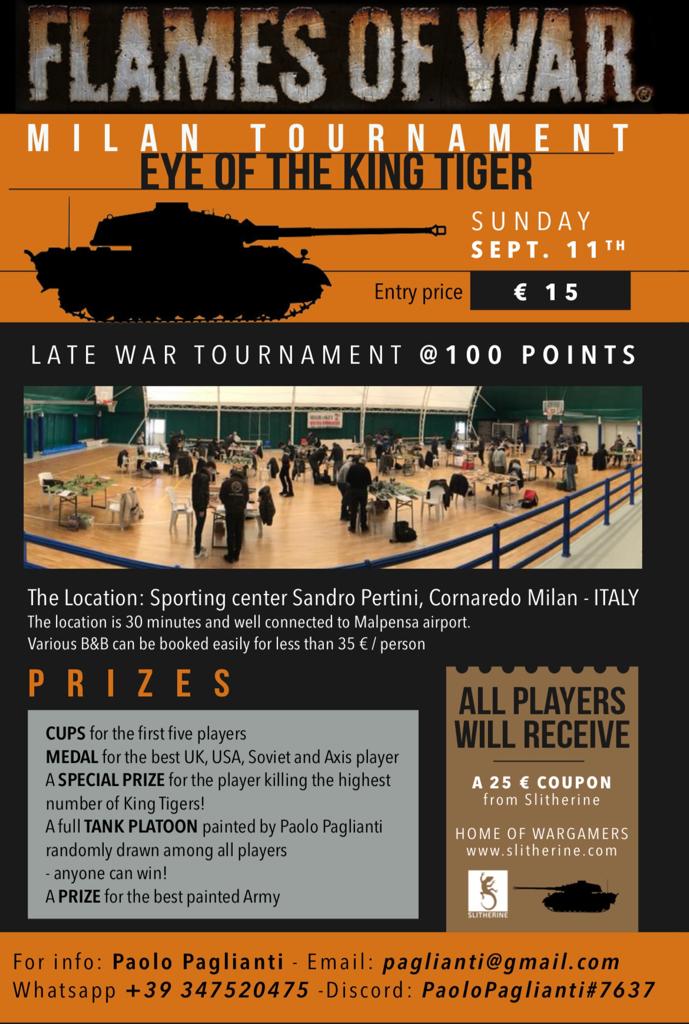
After ETC, where I met engaging and difficult players, I think I will change a bit the composition: I’ll probably pull out one M10 platoon and add some 6 PDR guns and a Lucky card – these would have saved my first game. I’ll try the new army list at the first Italian tournament of the new FOW Championship: the Milan tournament Late War I’m organizing for September 11th – if you enjoy FOW, and fancy a trip to Milan, you are all invited – there is also a special prize for the players killing the highest number of King Tigers!
The Milan FOW Tournament – Late War – September 11th
Excellent commentary and pictures! Well done.
Nice write up – I prefer to think of myself as an ally rather than a mercenary 🙂
Interesting Richard, the comparison of Allies and Mercenaries. As we in the Netherlands/Republic of the 7 United Provinces celebrate our 450 years of independance. Did you check your family name in conjunction to service in the Netherlands?
Outstanding article. I especially like your use of photos with graphics to highlight the action you are describing. Very well done sir!
Cheers,
Jon Holland
Awesome Paoli, you bring me in an altogether different offensive mindset. What an instructive AARs ?. No wonder you ended 2nd individual overall