PANZER! Tanks in Advanced Squad Leader (Part 2)

By David Garvin
In my previous article, I discussed how the designers of Advanced Squad Leader (ASL) took the characteristics of real-world tanks and then incorporated them into the game. The tanks of ASL all have the same three characteristics as their real-world inspirations: Firepower, Mobility, and Protection.
As promised, this article will tell you, the player, where to find the information to tell you what kind of Firepower your tank has, how mobile it is and what its protection is. The inspiration for these two articles came from a 5-minute conversation with a new ASL player and this was about a week or so ago. He was just learning how to play and he wasn’t sure where to look for information on the vehicles in a certain scenario. This article (and the previous) are the result of that conversation.
The first reference for any player about to play a match is the scenario card. In it, the player will find many vital pieces of information, and much is relevant to providing the player with what capabilities his tanks have. First off is the date as some equipment and ammunition availability vary by year.
The Environmental Conditions (EC) may specify adverse weather or other conditions that could affect visibility and/or mobility, such as mud or ground snow. But most importantly, in the order of battle, one will find which specific tanks and how many are available to the player’s side. Taking great care to get the proper tanks set out for the match, it is now that the player may very well win or lose the game. Failing to understand the characteristics and capabilities of your tanks – and those of your opponent – may very well cost you the game.
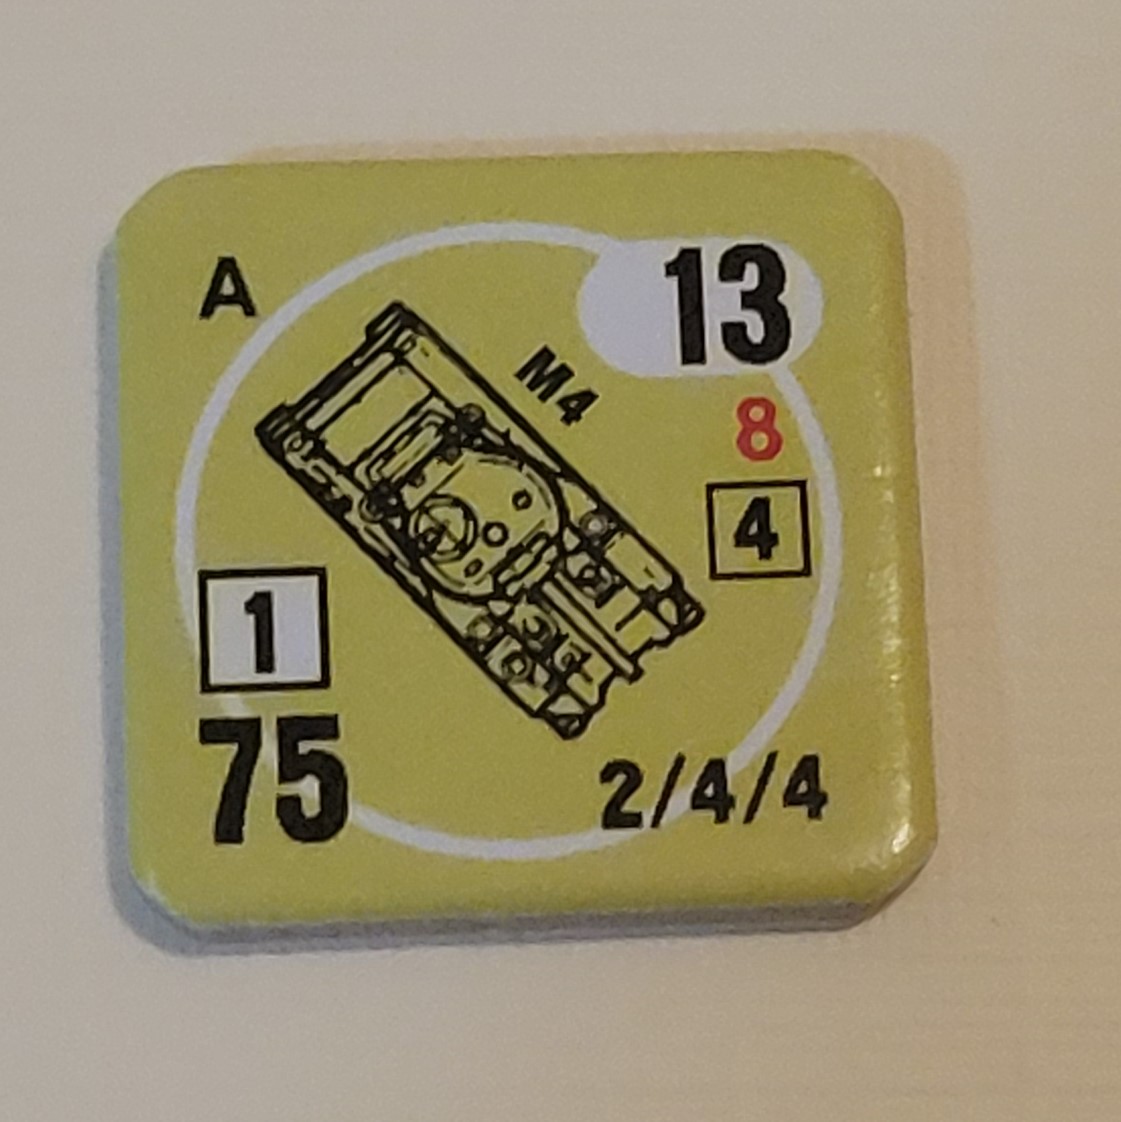
Looking at the obverse of this counter, one can easily be confounded by all the numbers, drawings, and depictions. But this being ASL, every piece of information on the obverse – and reverse – of every counter is important. The rules state what each piece of information means, and as a new player of ASL, it’s easy to miss something vital. In the example of the counter of the M4, the fact that the numeral 1 encased in a small box on the left of the counter has a white background could easily be missed by the novice player.
That same player, after rolling 2, 2 on his to hit Dice Roll (THDR), could very easily miss the fact that he has scored multiple hits and is entitled to 2 to kill Dice Rolls (TKDR). The thing is there is much more to see on this counter. A quick look tells me that this tank has normal Ground Pressure, is a large target, is fully tracked and its side and rear turret Armor Factor (AF) is 6. There is more, but I think I made the point that there is a lot of information on a counter.
The ASL Rule Book consists of many chapters. Chapter D, for example, is Vehicles and covers all the rules for tanks, except for their main armaments (MA), which are found in Chapter C, Ordnance and Offboard Artillery (OBA). This may sound counter-intuitive, but the mechanics of firing an Anti Tank Gun are the same as firing the MA of a tank. Chapters C and D will tell the player how various tanks move and shoot, but for the specifics of the tanks that you find in your order of battle, the player must consult Chapter H, Design your Own.
The first eight pages or so cover just that: how to design your own scenario. The rest of the chapter is a gold mine of information, however. Every single tank that saw combat in the Second World War and in Korea is listed here. Each tank gets a paragraph that gives a brief history of the tank, such as when it was available and in some cases how many served. There are also reference notes to the Multi-Applicable Vehicle Notes (MAVN). Any player who wishes to be successful in ASL will consult Chapter H and not only read the notes, but also consult the Vehicle Listing. Doing so will solve the mystery of what your tank can do.

The reverse of any tank counter will have information on it. The saddest part is the depiction of a wreck, which is what happens to your tanks when you’re not paying attention! But in the example above, of a B1-bis French tank, the novice could very easily be overwhelmed. The good point is that this mini-paragraph on this counter serves as a reminder.
The Vehicle Listing contains everything the player needs to know. Using the B1-bis as an example, one can find every relevant piece of information for this tank. For example, the player would discover that this is a heavy tank, is radioless, weighs 32 tons, is a large target, has a front AF of 8 in the hull but 6 in the turret, and that it has two MA, one is in a one-man Turret and the other is no turret. There is more, of course, but hopefully, the point is made that there is a wealth of information to be found in the Vehicle Listing.

Once the player has consulted Chapter H and the game is underway, a player’s knowledge of how to read the counters in his order of battle is key. I will use the Tiger counter here as an example. Looking at the counter, one can see the silhouette of the tank and its name, in this case “Pz VIE”. The barrel points down and to the right and this indicates its Vehicular Covered Arc (VCA). There is a thin white square around the silhouette, indicating that this tank has a slow-traverse turret. Looking to the top left, note the letter E.
That is the identity of this specific tank; the fact that there is neither a circle nor a square around it tells me that this tank has normal ground pressure. Moving clockwise, we come to a red numeral 12 superimposed on a white oval. The 12 indicates this vehicle’s Movement Point (MP) allowance. The fact that it is red indicates that it has a special movement penalty, and the white oval indicates that this tank is fully tracked. The two numerals below that, the red 11 (encased in a square) and the 8 are the tank’s AF. The 11 is the front hull AF and the 8 is the side and rear hull AF.
The square around the 11 indicates that the front turret has superior armor, which means the front turret AF is one level higher than the hull, in this case, 14. The red 11 indicates that this is a large target. The absence of a box on the 8 tells me that the side turret AF is the same as the side hull AF. The numerals 3/5 tell me that the bow machine gun (BMG) has a firepower of 3 and the coaxial machine gun (CMG) has a firepower of 5. The 88L is the Gun Size of the MA.
Finally, the numeral 1 above that encased in a square tells me that the MA has a rate of fire (ROF) of 1. As a reminder, this all comes second nature and it does so quickly. Think of the counter as a quick reference; both front and back of the counter. The back of this counter, as an aside, is where you will see that you have the Nahverteidigungswaffe, by the way.

This final example is the British Crocodile. Having read the previous paragraph, you can determine most of the information found on this counter. That said, I include this because the flamethrower tank is not only a fearsome tank, it is fun to play in ASL. It is painfully slow, but once it reaches a target, it can not only use machine guns or its MA, in this case, a 75mm gun, but it also has a Bow Flamethrower (BF), a much better option than the silly old BMG. One can also see that the BF malfunctions on a Dice Roll (DR) of 12, but also that its range is 3 hexes. I know this because the firepower factor of the BF is underlined.

So, there it is. The previous article talked about the three main characteristics of tanks in ASL. This article hopefully removed some of the mystery of where to find the specific information for your specific tanks in your order of battle. If you think of the counter as a quick reference and your copy of Chapter H as the main reference material, you will be able to determine the characteristics of not only your tanks but those of your opponent. It is up to you to put yourself in a position of advantage over your opponent, but if you don’t know what advantages you have over your opponent, or maybe what advantages he has over you, then you’ll find it quite difficult to emerge victorious. But this is just the beginning; it is up to you to further analyze the rules to know how to use all the tools that your tanks give you.
David Garvin is an avid ASL player living in Nova Scotia and is probably squinting, trying to read his Vehicle Notes.
Educational and informative. Real world versus game play. I enjoyed the read.
Thanks for the comment 🙂
Never too late to take on another cbt arm Dave! The estimate drawer is full of factors for consideration! Great blog post!
Thanks, Ray! I wonder if they’d let me into a Leo 2A6? LOL