TOS-UP PART II CALCULATING LETHALITY AND COMPARING WEAPONS
 By Jim Naughton
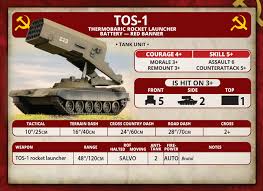
PART I gave an introduction to the subject and cataloged the seven weapon systems available to Soviet/PACT Team Yankee players. Today we’ll take a close look at the math that allows comparing weapons. Battlefront’s source books World War III Team Yankee Soviet and World War III Team Yankee Warsaw Pact are invaluable references.
Always remember, a Scientific Wild Ass Guess (SWAG) is a Wild Ass Guess (WAG) done with slide rules, calculators, and spreadsheets. Now for our SWAG:
Team Yankee uses D6 for combat resolution. In an artillery bombardment, you roll to range-in up to three times, and the number of range-in attempts adjusts the to-hit number for stands under the template. Then comes a save for each stand hit, and finally the artillery rolls a firepower test (if required) to kill the target. That’s a lot of die rolls, each with six possible outcomes. Up to three range-in attempts, then up to four more for each team under the template (to-hit, save, reroll save if brutal, firepower). 216 possible outcomes for the range-in procedure and 1,296 possible outcomes for each team.
Fortunately, we don’t have to do that dice-rolling experiment either physically or electronically. A statistics concept called Expected Value allows us to simplify the math. In our case, use the probability of an outcome times the value of the outcome to estimate the result. For example, if I range in on first attempt on a NATO infantry stand in the open, I get a to-hit number of 4+. Its save is 3+. The probability of a hit is .5 and the probability of a failed save is .33. So I’ll call the probability of a KILL by the symbol P(K). P(K) = P(HIT) * P(FAILED SAVE) = .167. If five similar stands were under the template, the Expected Value of the barrage is .833 killed stands.
Except for meeting engagements, every artillery battery in the game can place a range-in marker. And the players have that opportunity AFTER the objectives are placed. For the Soviets, who are frequently attackers, that is the most powerful bombardment they are likely to see. So we can further simplify the MATH by taking range-in out of the experiment. Range-in will adjust the EXPECTED VALUE of P(HIT), but it adjusts it the same way for all artillery batteries. I discuss the effects of range-in separately a little further on.
PACT artillery’s main benefit over Soviets is having a skill of 4+. This ability won’t affect the initial bombardments but will affect the lethality when ranging-in mid-game or during a meeting engagement. However, the DANA’s +1 to hit will increase its lethality about 34 percent (the product of its .67 hit probability and .5).
Finally, I’m assuming that the target is dug-in infantry (units in foxholes or other bullet-proof cover) or vehicles. This requires Firepower rolls. Assuming troops in the open as targets makes all artillery equal.
Thus the equation used to build the next table is: P(K) = P(HIT)*P(FAILED SAVE)*P(SUCCESSFUL FIREPOWER). Remember that infantry under a previously ranged in bombardment is required to reroll saves, so the probability of an infantry failed save is not .33, but instead .55.
Table 3: BASIC LETHALITY INDEX (vs NATO)

The columns represent five different target sets: dug-in infantry, unarmored vehicles which have only a ‘Tank Save’, and the three values for Top Armor (TA) in Team Yankee. The decimals are the probability of a dead team.
I call the table above ‘basic lethality index.’ I used NATO as they are the toughest target. The BLI is roughly 17% higher versus opponents who are 3+ To Hit.
The BLI tells us the probability of killing one team of the given type in a barrage. For example, a 2S1 will kill an infantry team 18% of the time. As predicted, vehicles with only a ‘tank save’ (e.g. your opponent’s BM-21) don’t care what shot them. There are few surprises here.
You can use this as a hip pocket estimate to determine if sustained bombardments will be useful. For example, with a 2S1 firing at an 8-team USA infantry platoon, roughly one stand will die for the first three turns.
This simple table accounts for me sticking with 2S1 (only) for years. Then I noticed the effects of ‘SALVO’ by experiencing it enough times to decide I was making a mistake.
And it’s only a partial answer. 2S3 Acacia is almost as lethal as TOS-1 to infantry because of a simple rule found at pg.16 of the basic rules – no double rerolls. Exploiting a range-in marker makes everyone brutal. Things will change when accounting for template size and ranging in.
There are two interesting (and valid) comparisons to made in this table. First, BM-21 and BM-27 come in the same slot on the FORCE CHART. You can’t take both. You pay 75 percent more AP for BM-27, but unless you are hunting vehicles, you don’t get a return on your investment. On the other hand, the SALVO template is almost three times larger than the ARTILLERY template, so the BM-27 equals the area denial effect of THREE 2S1 but costs less than half those three batteries.
Next up: SALVO templates
ADJUSTING FOR SALVO
TEAM YANKEE ARTILLERY TEMPLATE

The simple adjustment would be giving the SALVO template weapons increased lethality proportional to the increased area under the template. The SALVO Template is 10” square or 100 square inches, and the ARTILLERY Template is 6” square or 36 square inches. That would yield 100/36 = 2.8. Experience in the game has taught me that is false. Even on crowded tables, the enemy disperses his troops, particularly if he sets up an infantry unit under pre-ranged-in templates. The controlling feature is what is he defending/why is he there?
When a UK player pops his patented Airmobile MILAN Ambush the MILANS will be either in one long line, roughly 10” long, or staggered within in 2” of the edge of area cover. In either case a properly arranged SALVO template gets them all, but in the second case the ARTILLERY template gets them all too. Plus, if I use the diagonal of the ARTILLERY template to cover the line of MILAN teams I can easily get six…
Stymied by this difficulty, I applied techniques from my time in the Green Machine. We used templates of Soviet doctrinal deployments to evaluate weapon systems. Clearly what was needed was a doctrinal deployment. Most wargamers disdain rehearsed deployments, so I had to analyze the toughest situations I have faced in many games. The tough targets usually turn out to be Irish Guards Infantry and USMC Infantry with SMAWs. They always give me headaches.
The Irish Guards with both MILANS and the GPMG from headquarters attached have 11 infantry teams and 5 FV432s. The USMC rifle platoon weighs in at 14 infantry teams and 2 AAV7s. In both cases, 16 teams.
Defining a ‘doctrinal deployment’ was a bit of a headache, too. The unit ideally is mutually supporting for defensive fire. I.e. the front edge of the teams closest to the enemy are within 8” of the teams in the back. Any team eligible to move in a counterattack should be within 4” of the objective marker (if any; sometimes the fight is about getting the tanks into the enemy backfield in a hurry). And while the transport can deploy separately, they must be within 8” to contribute defensively. Many times my infantry have been stalled by Irish Guards FV432 lurking behind the objective.
Finally, the Irish Guards must be within 6” of their platoon commander, and the USMC within 8” of their platoon commander. After laying out stands and vehicles for a couple hours, I determined that the AVERAGE number of stands under the SALVO template was twice the number under the ARTILLERY Template. Leading to the ADJUSTED LETHALITY INDEX:
TABLE 4: ADJUSTED LETHALITY INDEX

A word of caution – the ALI is not useful for predicting how many stands die – it is only useful for comparing the relative effectiveness of weapons. On average, a SALVO template will produce twice the number of casualties as an ARTILLERY template, but not if the target is a West German FUCHS ZUG!
The table shows a couple interesting things. The TOS is twice as lethal as the BM-21 against infantry. The BM-21/RM-70 is better than the guns for mangling infantry, but even with potentially double the vehicles under the template, not as effective against armored vehicles.
So what you choose comes down to ‘how many points of artillery can I afford.’
Leading to the ‘Cost’ part of a ‘Cost and Operational Effectiveness Analysis.’
COST-EFFECTIVENESS
The models all cost the same coin, so if literally getting the most bang for your buck is your number one criteria for acquisition, it will come down to TOS-1 or BM-27, depending on how much of your game plan involves neutralizing enemy infantry versus mixed forces. Or DANA if playing Poles/Czechs.
But most players eventually acquire multiple batteries, and that’s where AP Cost comes in. This table calculates ADJUSTED LETHALITY per AP. It includes multiple entries for weapon systems shared by PACT forces because generally, the PACT batteries are +1 point for three tubes.
TABLE 5: ADJUSTED LETHALITY PER AP SPENT

The table gives the adjusted lethality gained by spending one point on the given system. The difference in AP cost for various nations is highlighted. Remember, this is just a comparison, to decide how many stands die from the barrage, refer back to Table 3.
Amazingly, the economy model (Soviet BM-21) wins in many categories. Low cost combines with average performance to win the day. If you care to send the very best, and the points limit allows it, BM-27 isn’t far off. TOS, despite surprising lethality, narrowly loses to BM-21 and only beats BM-27 by a nose against unarmored targets.
The extra points you spend for PACT skill have a small but noticeable degradation in lethality per point. An EG RM-70 is not as much of a bargain as the BM-21, and you must evaluate the increase in survivability versus the cost separately. A strafing pass by 2 Cobras will average two kills on BM-21s and only one kill and two bails versus RM-70. And we’ll discuss the uptick in lethality generated by the extra skill later.
In the gun duel, 2S3 narrowly leads 2S1, making the decision point style of play. The issue is direct fire. Using direct fire the 2S1 can kill tanks and score hits against ATGM teams that reveal themselves by firing. 2S3 must get closer, and struggles with anything but AMX-30 and Leopard 1s. I prefer 2S1 because it can be lethal on the first player turn of a meeting engagement after benefiting from Spearhead. DANA is only available if you choose a Polish or Czech main force, but the same argument applies – with the tiebreakers being ROF=zero on the move. Plus the autoloader makes no difference during direct fire.
Developing this table has led me to reconsider 2S1 for my first choice in a low points game. With the ability to deny comfort to the enemy over a large area, and the need to squeeze every bit of lethality out of all elements of a fifty-point force, BM-21 trumps 2S1.
Some readers are probably saying, wait a second, not every game starts with a ranged-in marker. Others are saying I’ll buy a double-size battery. Doesn’t that double my home-run production? Stay tuned for PART III, Other Considerations.
Very interesting article. We are new to TY and have just bought the T-80 and US army boxes, quite fancied the West Germans but the US are more flexible I think plus, can be expanded upon more cheaply simply by buying the 2 player starter which will bump up the T-80s too, and those 2A5s are still pricey. The US have the 109s in the box so initial artillery for them is sorted (at least until we are sure we will stick with the game) but the Soviet side needs to be ordered. The Hail, TOS and Carnation each clearly have their benefits but I think I’m still inclined towards the Carnation as the first unit.
Spoiler Alert! Coming soon is Part III and I discuss this. Stay tuned. If your group sticks with just tanks for a while, the 2S1 Carnation is a solid choice for the Soviets. It is a regimental asset, reflected in its presence in the ‘battalion’ force structure (save for the Afghanski paratroops) and thus plays a part in keeping a small force on table. It has a nasty direct fire capability, and smoke/smokescreen. Once your group starts playing infantry things change a lot, and points level plus scenario generation (die roll vs battle plans) all influence what artillery is ‘best value.’ Until infantry joins your table TOS isn’t very useful and BM-21 not a lot more (no direct fire, minimal capability against heavy armor). I once took out an entire Chieftain platoon with a bombardment from 2S1 (admittedly opponent’s bad dice helped), and until this past spring my go-to force (EG) couldn’t get 2S3 so my nine 2S1s got a workout. But defer big artillery acquisitions unit you read Part III.
That’s very helpful, thanks. Arty, aside from the initial Carnation purchase will be a way down the track. I decided to expand on the US and T-80 boxes immediately with a Complete Starter as it gives so much good value for the money (and I was able to get it at a great price), the Carnations I will pick up straight away as only the Soviet side is lacking some artillery. Looking forward to Part III 🙂