Historicon 2024 & Flames of War US Nationals report
 By Paolo Paglianti
Based in Lancaster, near Philadelphia, Historicon is one of the most important events for enthusiasts of modeling, painting, wargaming, miniatures, and, as the show’s name suggests, military history. It might be a bit smaller than Adepticon, since it involves visitors, players, and professionals focused on historical games rather than fantasy or sci-fi, but it is a concentration of everything our hobby represents.
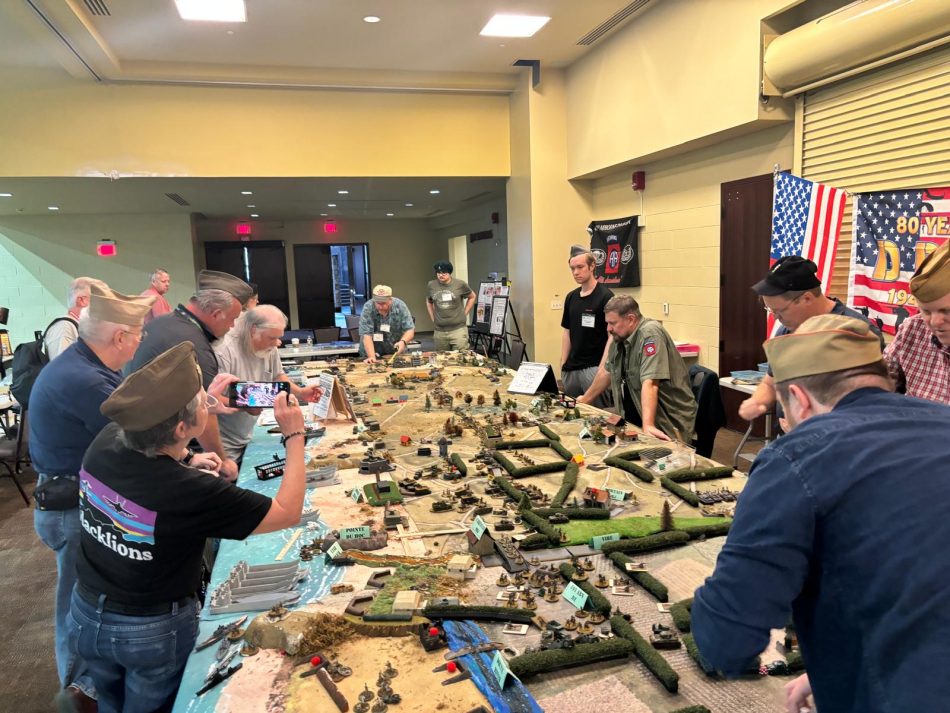
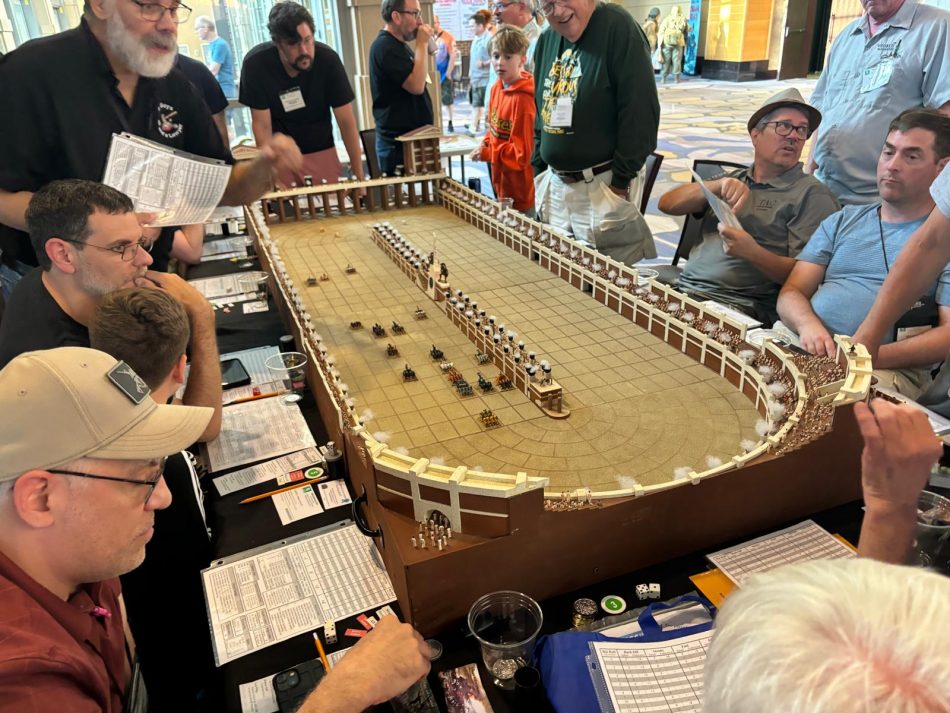
At Historicon, you can try dozens of games, from chariot racing scenarios to a 10-meter table recreating the D-Day landings in 28mm, or simply participate in one of the demos – this year we tried the excellent “Achtung Panzer” by Warlords presented in person by the author Roger Gerrish, but there was also “Wings of Glory,” demos of “Triumph” (Ancient in 15mm a-la DBA), and a splendid scenario of a clash in Indochina between French colonial and Chinese troops recreated with FOW V3.
I also managed to spend some time with my friend Mitch Reed, for the second time in 2024 and in a true American Sport Bar with baseball games on TV and huge hamburgers!
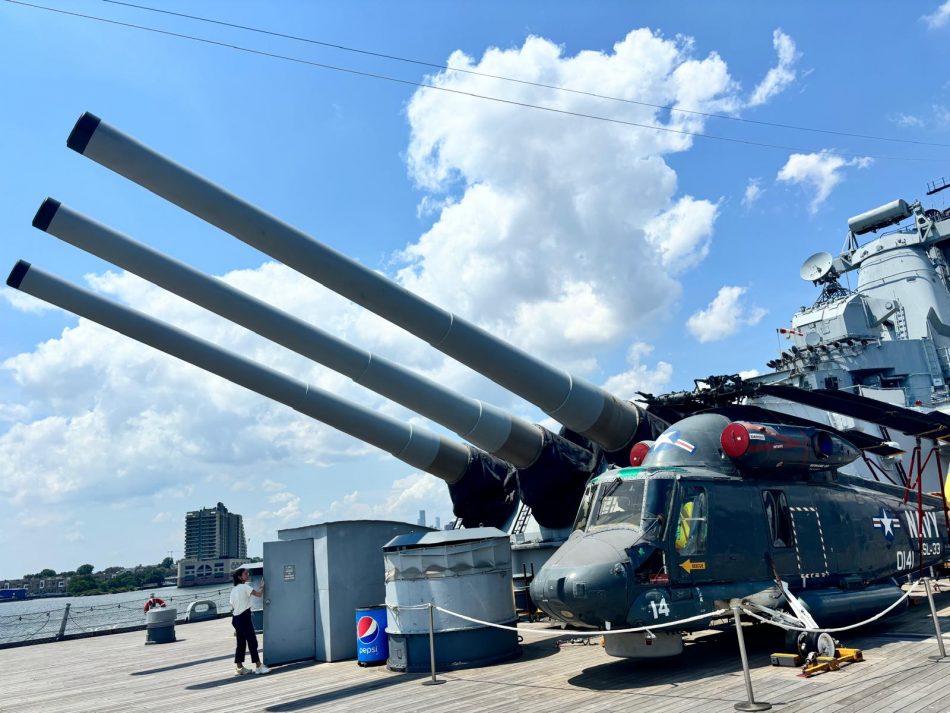
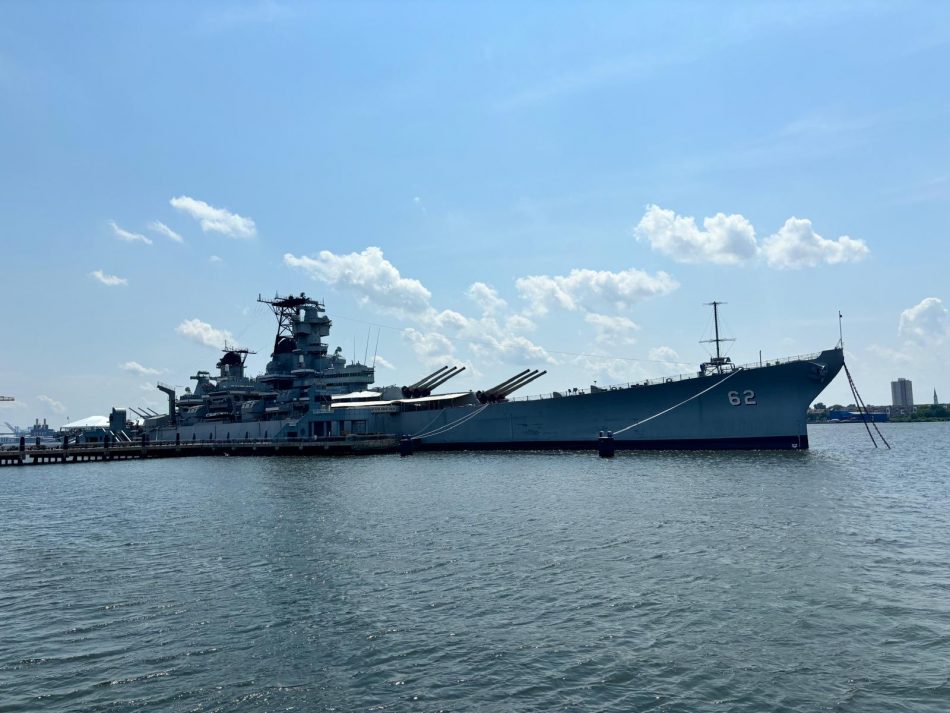
Historicon takes place in the town of Lancaster, Pennsylvania. If you find yourself in the area, I recommend visiting Philadelphia, where you’ll find not only various art enviable collections but also lots of museums related to the American Revolution – including the world famous cracked Liberty Bell. And on the river, there is also the massive Battleship New Jersey. Don’t miss the guided tour ($40, but well worth it) that will take you to the most interesting parts of the ship, including under the Tomahawk and Harpoon launch platforms and the fire control center.
I was fortunate enough to attend Historicon because, working for Slitherine, one of my tasks is to find ways to cooperate with major events in the wargaming world, as has already happened with Adepticon and Warfare in the UK. For months, I corresponded with the group of organizers, and the result was excellent. Slitherine supported Historicon with a sponsorship, had a booth right in the middle of the vendor hall, and every attendee received a $20 coupon for digital purchases on the Slitherine store.
Brenda and the entire Historicon team did an outstanding job with an unmatched organization that made us feel truly at home – and seeing every attendee, player, and exhibitor at Historicon wearing a badge with their name, surname, and the Slitherine sponsor logo was a real pleasure!
Among the various tournaments at Historicon, from Bolt Action to Art de La Guerre, there was also the American Nationals of Flames of War, organized by the new “tournament guy” at Battlefront, the very friendly Ben Bostedor. Could I possibly miss out on participating in the tournament since I was there? Here’s how it went.
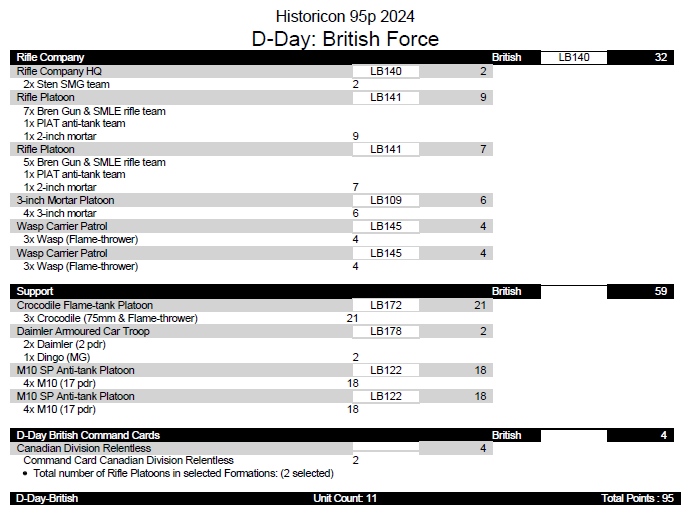
The Tournament and My List
The format is 95 points, Late War, with no major restrictions on formations, scouts, or stances to play. Since we are going to the ETC 2024 in Krakow, the World Team Championship for FOW, just two weeks after Historicon, I chose to bring a list as close as possible to the one I will use in Poland. I had to cut 10 points, so I removed some scouts and switched from the Bulge rifle formation with Kangaroos to the D-Day formation on foot, but still kept them Canadian because my infantry is always on the front line and can’t afford to be pinned down. I had tried a version with 2 platoons of Crocodiles and a Desert Rats platoon at the Nationals in Milan, which I organized with my city’s club, but it didn’t really excite me.
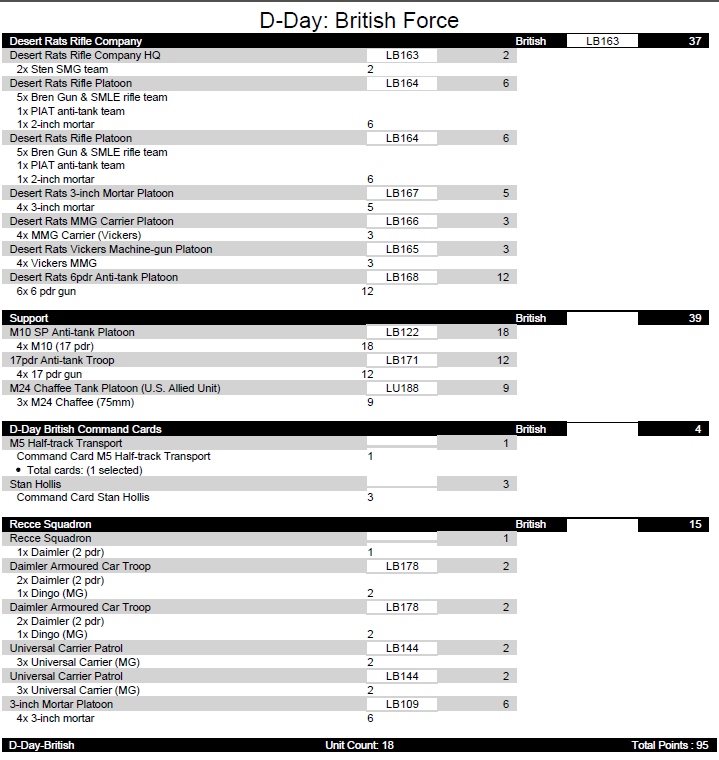
So, here’s my list.
And here you can find all lists of the tournament.
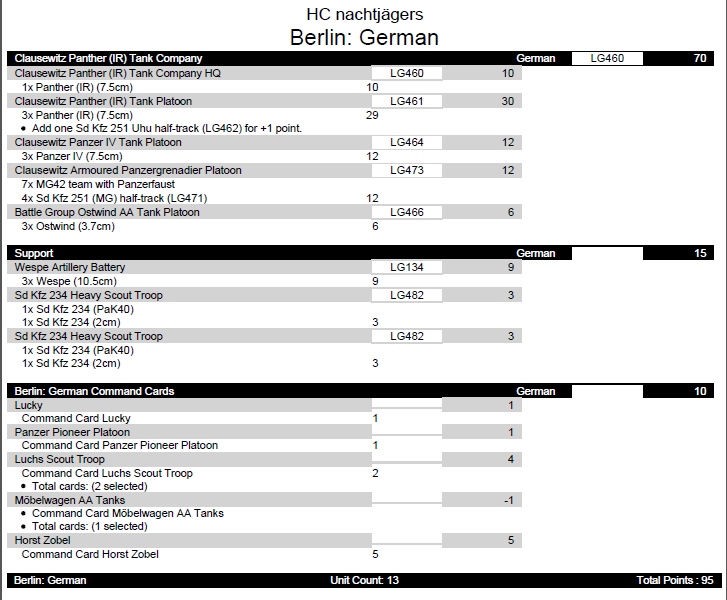
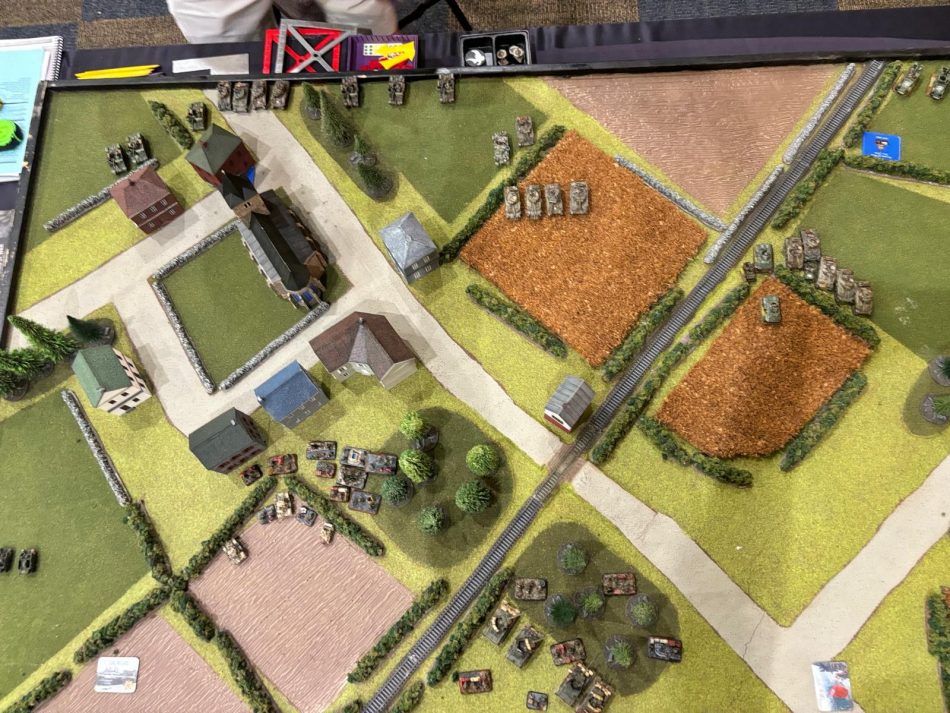
First Game, Chris Elmers with Berlin German
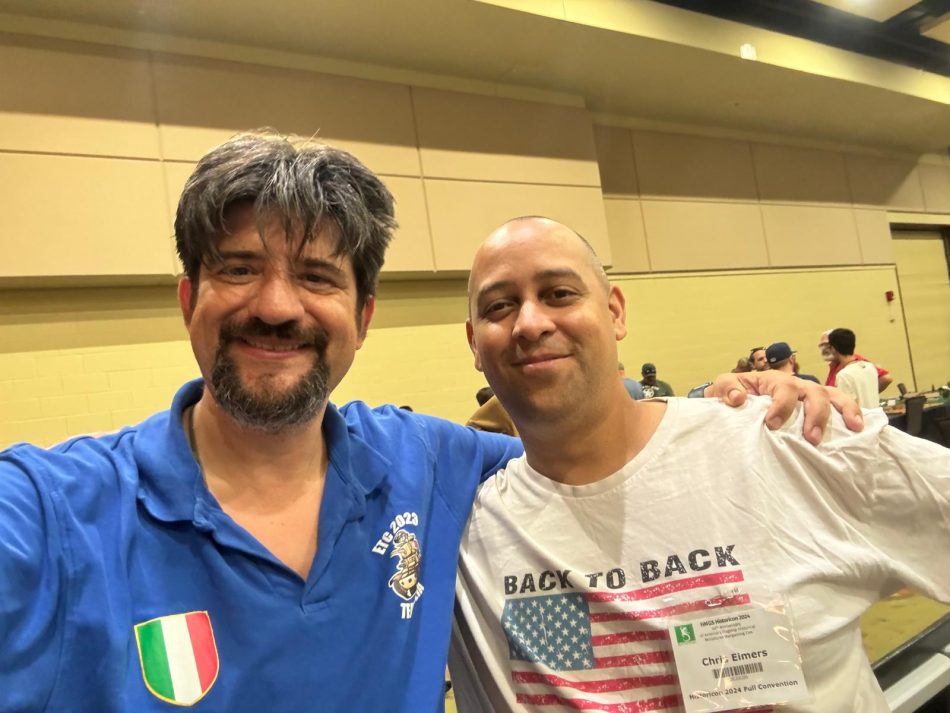
Chris’s list is a fairly classic German setup, with heavy tanks, infantry, and scouts. I definitely will use the M10s!
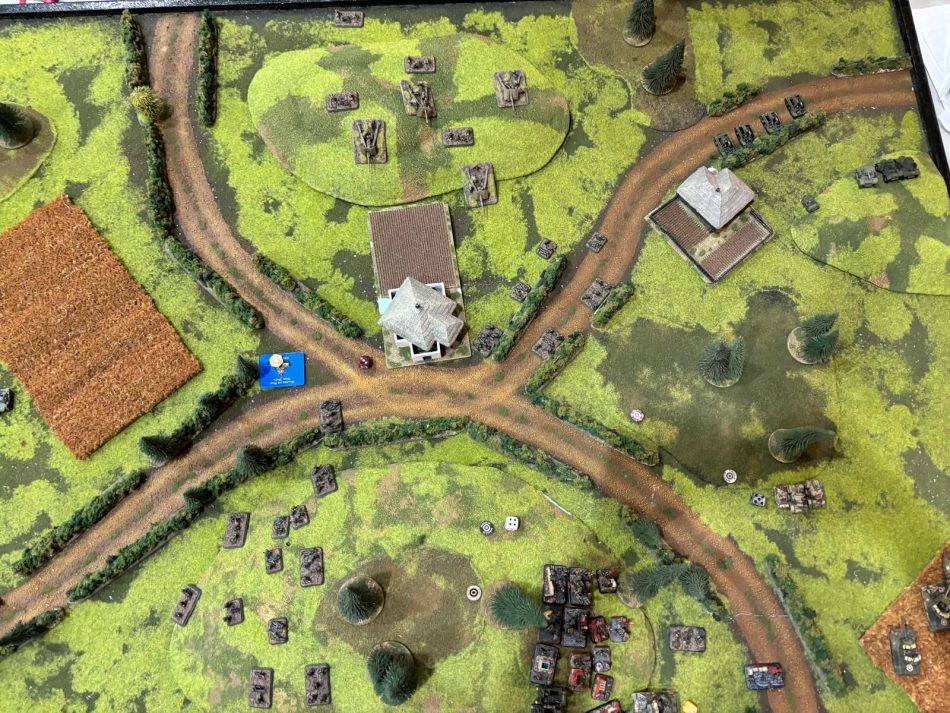
We both chose to attack, so we ended up with the Dust Up scenario. Here’s the photo; as always, I’ve cropped a part on the left where the objectives I had to defend are located; also, I forgot to take the photo at the beginning of the match, so this is the last turn.
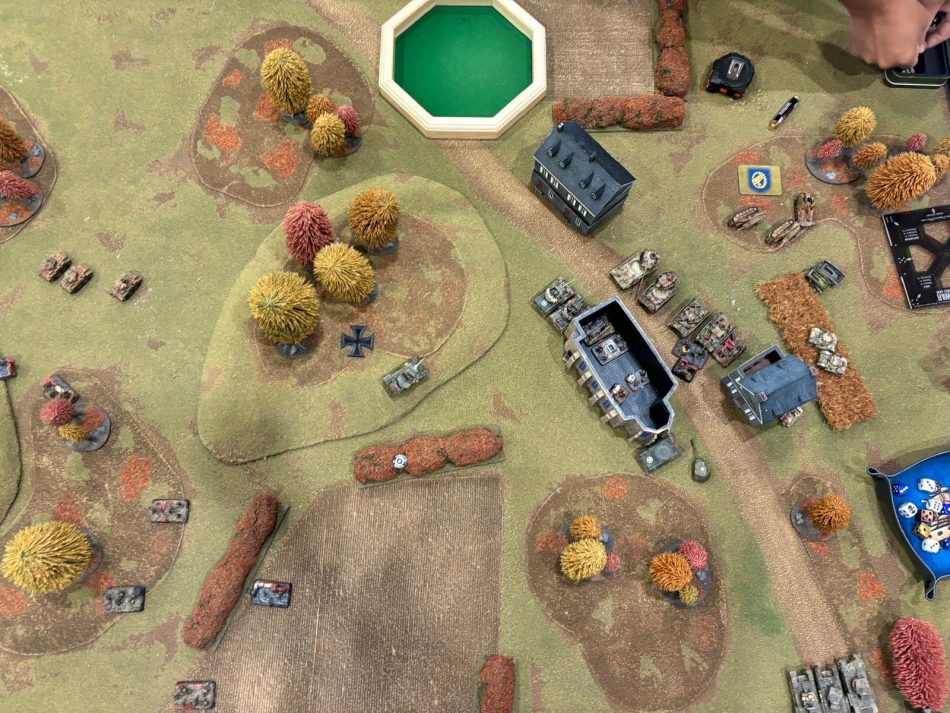
Since the best defense is a good offense, I placed the small infantry platoon, the mortars, and an M10 platoon to defend my objectives on the left. The M10s were hidden behind a forest to avoid the deadly attention of the Teutonic artillery, ready to spring out as soon as Chris’s reserves arrived from the long edge facing the objectives. However, during deployment, no Germans seemed interested in coming close to the Canadian objectives. They were all positioned to protect their objectives, in front of which I placed the 2 WASP platoons, the large infantry platoon with the inseparable HQ, and the Daimler scouts who, with a clever spearhead move, got within 16″ of the most exposed objective.
Chris had the first turn, but being a meeting engagement, there wasn’t much he could do. He moved the Panzer IVs to shoot at the WASP and scouts, but not much happened. On my first turn, I pushed the infantry forward as much as possible with a fortuitously successful follow me and masked the advance with the only smoke screen the British King had granted us. Meanwhile, I moved the scouts to the far right to prepare to target the artillery hidden in the woods. The artillery and flamers are my worst enemies!
Chris targeted my infantry in the building, and I lost a few bases, but once I was inside the church and on the objective, I was relatively safe. As soon as the M10s and Churchill Crocodiles arrived from reserves, I targeted the Panzer IVs and the commander’s Panther, then assaulted with the infantry what was left. With a bit of luck, I won the close combat and pushed the Germans over 10″ away from the objective. 8-1
Second Game, Carl Bellatti with Bulge American
All the players I met at Historicon were very kind and a joy to play with (as is the case with 99% of FOW players I’ve met worldwide), but Carl is particularly friendly and nice. Not surprisingly, he deservedly won the Sportsmanship award at the end of the tournament.
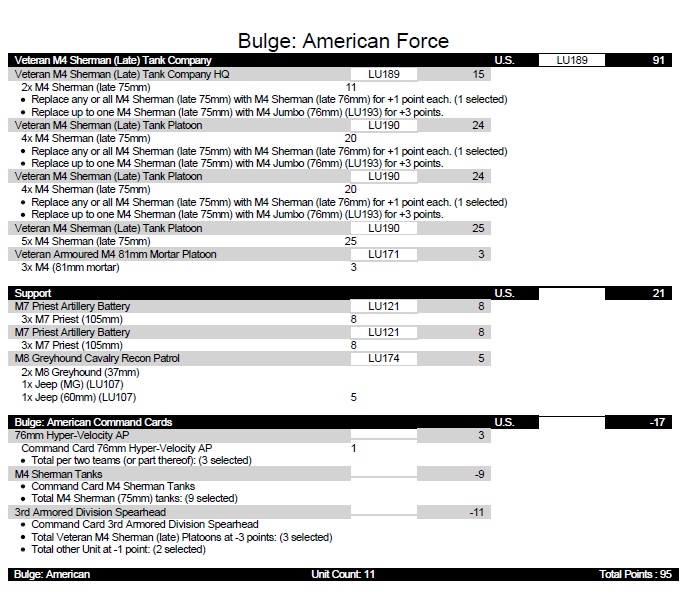
Carl played a very dangerous (for my Canadians) list of veteran Sherman tanks. He had about twice as many guns as I did and three artillery units, including two Priest units. If he got lucky with his range-in rolls, he could wipe out my infantry before they even reached combat. Here’s his list:
We both chose to attack, and we played Encounter on this table. Carl asked to consider the hedges as short terrain without cross checks, and I, being a guest, agreed easily. Here you can see the table, where I missed my range-in photo skill and cut off the Crococodiles and M10s on the right corner.
My problem was the Canadian objective on the right, which Carl naturally placed in a completely open area. If I put infantry to defend it, they would be blown sky-high in two turns. So, I decided to take the risk of placing the M10s and small infantry unit in the center of the table behind a forest, where the American observers couldn’t see them, and to protect the objective with Crocodiles and the other M10s to the right of the objective. The idea was to create a killing field where, if Carl advanced with his Shermans, they would come under crossfire from 3 Churchills and 8 M10s.
On the left, I decided I had a better chance of taking Carl’s objective. I placed the large infantry unit, a Wasp platoon, the scouts, and the HQ. As usual in these scenarios, the battle split into two almost independent clashes.
On the right, where Carl had a clear advantage, I sent the Wasp platoon around the forest at the edge of the table. Their only task was to bait Carl and buy time instead of him rushing towards the exposed objective. And indeed, Carl maneuvered the first Sherman platoon within 6” of the Wasp to fire at them, destroying one.
This allowed me to bring out the M10s and fire at them from the flank, and to move the nearly invulnerable Crocodiles to hit the exposed Shermans, destroying them. At that point, Carl had to commit his central reserve of HQ and the second Sherman platoon, which he moved to the center of the table, using them as a mobile fire platform to stop the M10s and Churchills, never getting closer than 24” to my objective. Plan succeeded on that side.
On the other side, the Canadians advanced with the Wasp and scouts, the little I could leave there. They entered the buildings near the objective and were targeted by the powerful artillery of Uncle Sam. Carl, however, had to pull back the only Sherman platoon left to protect this side of the table, to avoid a surprise “sneak on” attack from the building without response.
This allowed me to outflank his tanks and assault them from the side: aided by some good dice rolls with the flames of the Wasp that arrived in support of the Canadian assault, which bailed out the closest tank, I assaulted and drove the platoon back, capturing the objective. 8-1
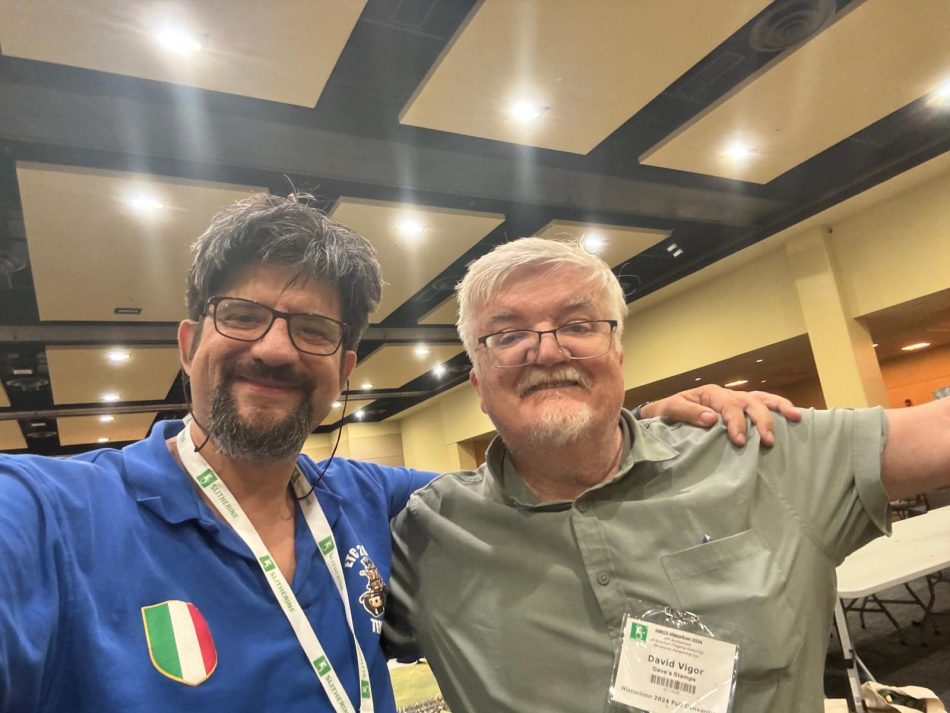
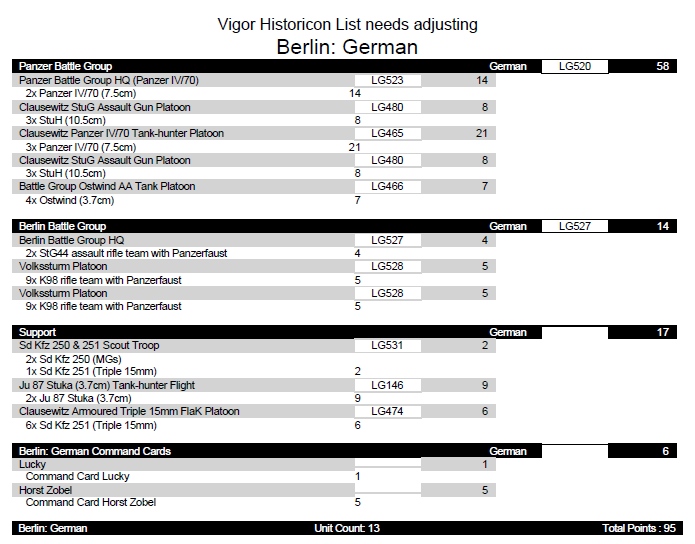
Third Game, David Vigor with Berlin German
David fielded a formidable German list with a bit of everything: artillery, triple 5cm guns, Volks infantry, and Panzer IV/70s, plus the Stuka. Here’s his army.
We both chose to attack, as usual. The scenario was Probe, with David as the attacker and me as the defender. A shame; I would have preferred to attack. Here’s the table.
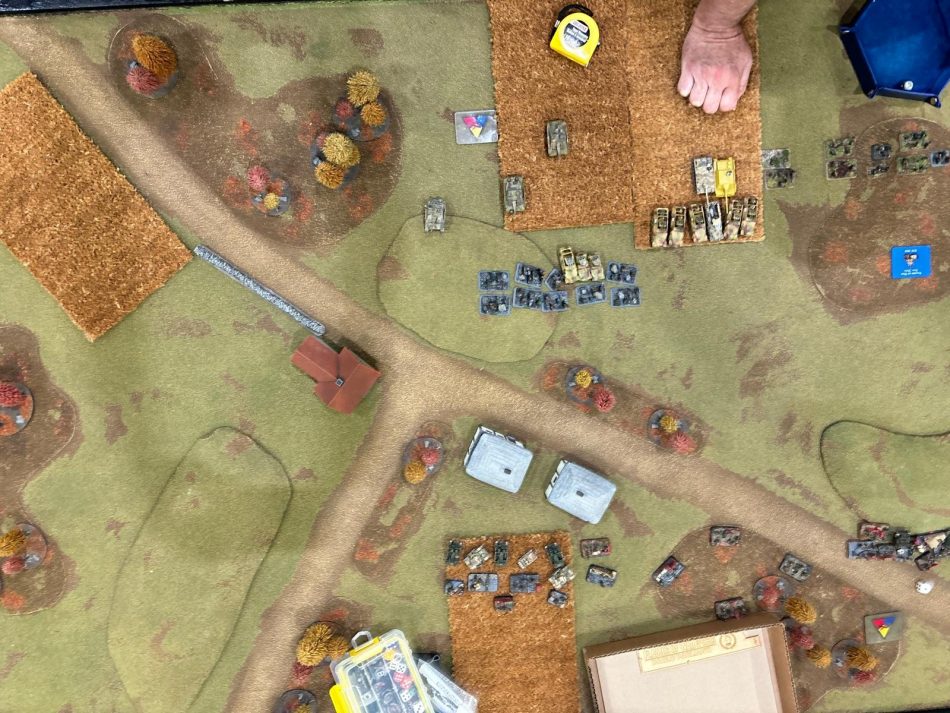
I had Delayed Reserves, but I had an ambush (the M10s), and importantly, David had an objective outside his deployment zone. I would have to make the most of these advantages and not count too much on the other M10 platoon and Crocodiles, which would likely arrive too late.
I deployed the usual small infantry unit on the objective I intended to defend, along with a Wasp platoon and the scouts. David had reluctant infantry that didn’t fight well, so I hoped the Canadians would manage to keep them at bay. On the right, I placed my larger infantry unit and HQ, and the mortars in the center. David positioned the Triple 5cm in front of the less protected central objective (deadly against entrenched infantry), the scouts, the Panzer 4/70s HQ, and an infantry unit, with a StuH platoon behind.
On the right, defending the exposed objective, was the other infantry and a second StuH platoon. David had the first turn, advancing menacingly towards the central objective and positioning the StuH on the right in front of the exposed objective, also moving the infantry. I responded by moving a few infantrymen into the houses in front of the objective: sacrificial victims, as they would take the concentrated fire of the Triple 5cm, but it was a step to buy time. David also tried to infiltrate with the scouts around the houses, but my Daimler scouts promptly took out the overzealous platoon.
In my second turn, I had to make an important decision. Should I place the ambushing M10s where I was risking to lose the game, to protect the small infantry against the Teutonic mass, or on the right to support the attack? I decided to be aggressive and placed the M10s on the crest of the hill. I advanced the infantry at full speed, created a smoke screen parallel to my advance to protect the side of the infantry from the units in the center, and opened fire on the StuH with the M10s, destroying one and bailing the other. The Canadian infantry charged the pinned Volks by the British fire and the bailed StuH, taking them out and pushing them beyond the objective.
In his turn, David disengaged the Triple 5cm from the center with a blitz and launched them beyond the smoke screen, opening fire on the Canadians and taking out a couple of bases. The OstWind AA reserve also arrived, which he positioned on the other flank, opening fire. They pinned down the Canadians but didn’t cause much damage.
He announced a charge by the Triple 5cm, but I reminded him that if they blitzed, they couldn’t charge. So he decided to desperately try with the OstWind, which predictably lost the melee and were destroyed by the PIAT and Canadian grenades. In the next turn, I assaulted the remnants of the Volks infantry and captured the objective. 8-1
Fourth Game, Christian Bach with Bulge USA
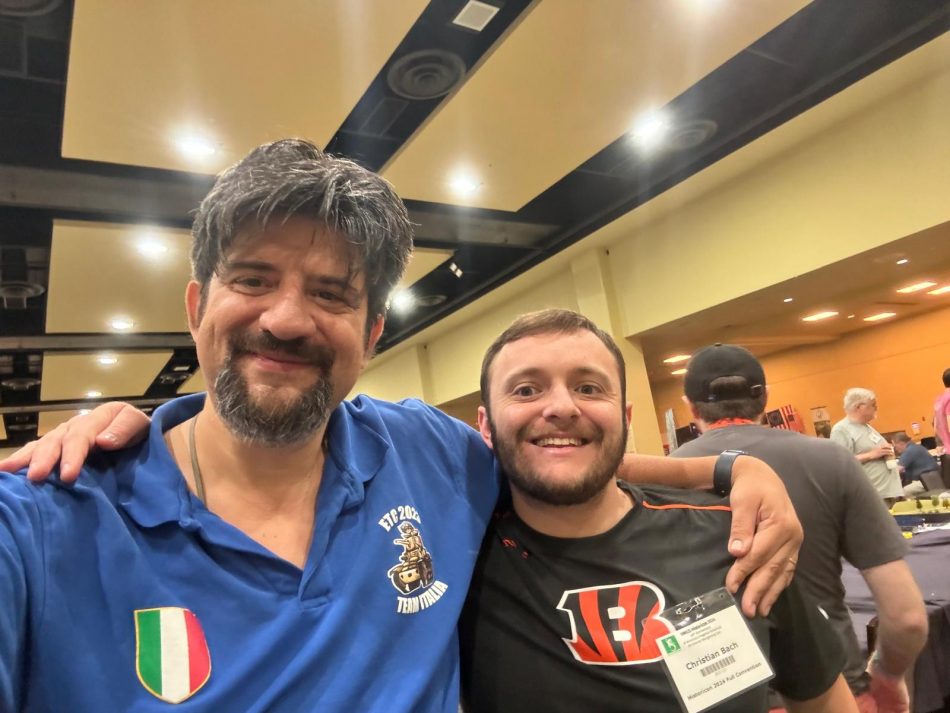
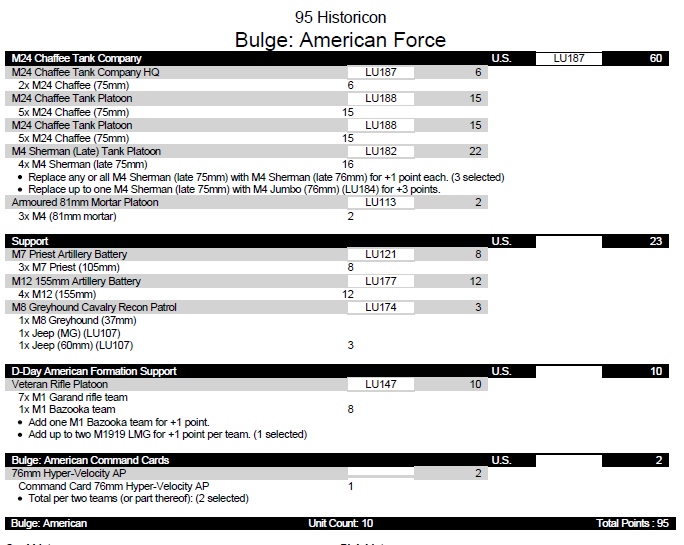
Another super nice new friend, Christian played with a spam of Chaffees with a 3+ save. He also had a D-Day infantry unit, which was solid, and two formidable artillery units—Priests and M12s—a real problem for my infantry. Here’s his list.
We both chose to attack, and we played the Dust-Up scenario. Here’s the table.
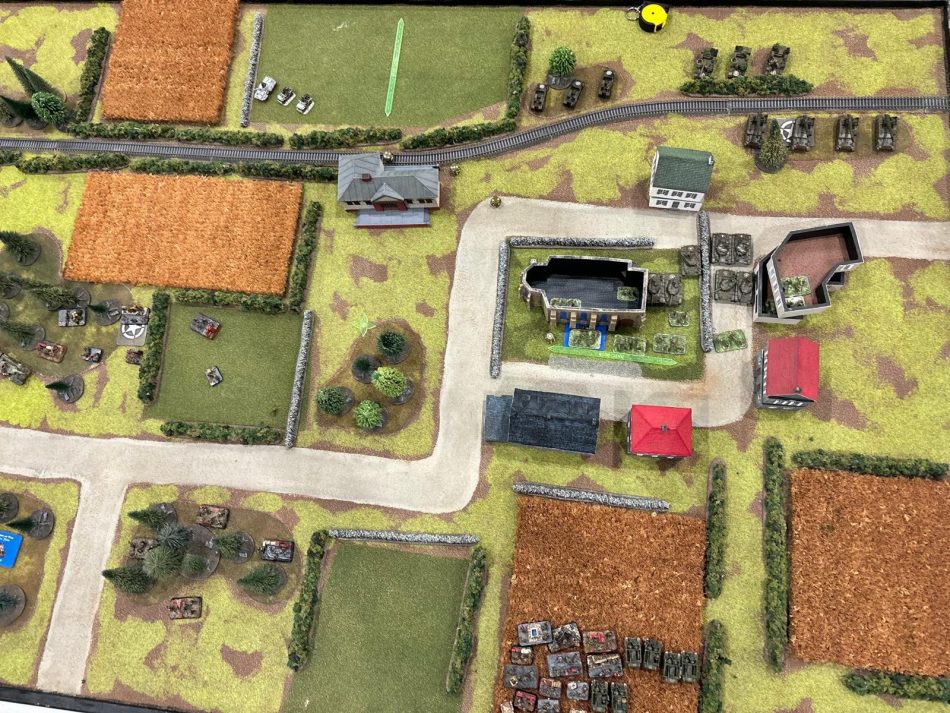
As with Carl, I decided to position the infantry to defend the left objective and the M10s behind a forest to avoid the deadly barrages from the two American artillery units. On the right, I advanced my scout with Spearhead and placed the large infantry unit, two Wasp platoons, and the HQ in front of Christian’s objective. Christian positioned practically his entire army to defend his most exposed objective, with the artillery batteries hidden almost at the edge of the table. A cautious and secure deployment.
He had the first turn, advancing with the HQ and the first Chaffee platoon to fire at my scouts and Wasp, destroying one. I advanced the infantry and managed to position myself in the buildings in front of the church with the objective. In the post-game analysis, we agreed that if Christian had positioned two infantry units in the buildings in the previous turn, he would have bought some time and made my attack less aggressive and quick. By letting me enter the buildings, he allowed me in the next turn to “sneak” attack his tanks without letting them respond and simultaneously assault the infantry inside the church with the objective.
The Canadians, with HQ support, managed to push back the Chaffees and take out half of the American infantry platoon, driving them out of the church. In the next turn, Christian focused everything he had on the infantry in the church and then assaulted me with the remaining infantry, but the Canadians had good aim and repelled the assault. With no American troops within 4” of the objective, the game ended 8-1.
Fifth Game, Chris Jackson with Desert Rats Rifle
Chris is one of the best FOW and Team Yankee players in the world and also the captain of Team USA at ETC. It was an honor and a real challenge to face him, especially on home turf! He chose (like I did) to “reduce” the list he will take to Poland, converting the D-Day Rifle into Desert Rats, which have slightly worse morale but are much cheaper. A very powerful defensive list, which you can see below.
Anticipating that Chris would defend, I chose Maneuver to avoid minefield scenarios, which could be a problem for me. The mission was Breakthrough, and this was the table.
Chris deployed the fearsome PDR 17s and the mortars on the hill near his side of the table, and the two Desert Rats Rifle platoons to protect the objectives. He sent the scouts to defend the rear objective to prevent my reserves (small infantry and a Wasp platoon) from getting close, and kept US Chafee and M10s in Reserve.
I decided to attack along the long side of the table, behind the wooded hill on my side, to protect myself from the PDR 17s and the bombardments—Chris had three of them (although one was in reserve). I moved the Crocodiles forward, which were virtually invulnerable to everything on the field, and sent ahead a Wasp platoon as bait. Chris deployed the ambush of 6 PDR 6s, which vaporized the Wasps.
At the same time, in the next turn, I returned the favor and BBQ’d 3 or 4 PDR 6s with the Crocodiles. Chris brought in the M10s from reserve and started hitting the Crocodiles, which luckily survived thanks to their superior British armour. I advanced with the first M10 platoon and fired everything I had at the M10s in the middle of the plain, only managing to destroy one. Chris returned fire and took out the first M10 platoon. The second platoon of my M10s arrived, but the result didn’t change.
By the end of the clash, Chris had two surviving M10s (he also lost the three allied USA Chaffees), and I had three Crocodiles and three M10s. Seeing things were going badly, I launched the Daimler scouts towards the central objective, aiming to get within 8” and at least not lose the game. Chris then assaulted the scouts with the Desert Rats, managing to destroy one. Miraculously, surely thanks to St. George’s intervention protecting us English, I was able to counterattack and take out a couple of bases, and Chris, equally miraculously (for me, that is), failed the Desert Rats’ counterattack despite the HQ’s proximity.
He was pushed back, and to protect the objective remained only a hidden Daimler and a base of infantry out of the foxhole, while my two surviving Daimlers moved within 4” of the objective with the consolidation move. I went all in and launched the remaining M10s and Churchills on the top of the hill, to shoot on the lone small Daimler. I easily took out the exposed infantry and then fired at the hidden Daimler: six shots, with one rolling a 6, hitting and detonating it (again, all thanks to St. George!). The game ended 6-3.
I’d like to say I deserved the win, but Chris definitely played better than me, especially in the first part of the game. He had some luck in the firefight exchanges, but I’m convinced I didn’t move my M10 platoons optimally.
Tournament Results
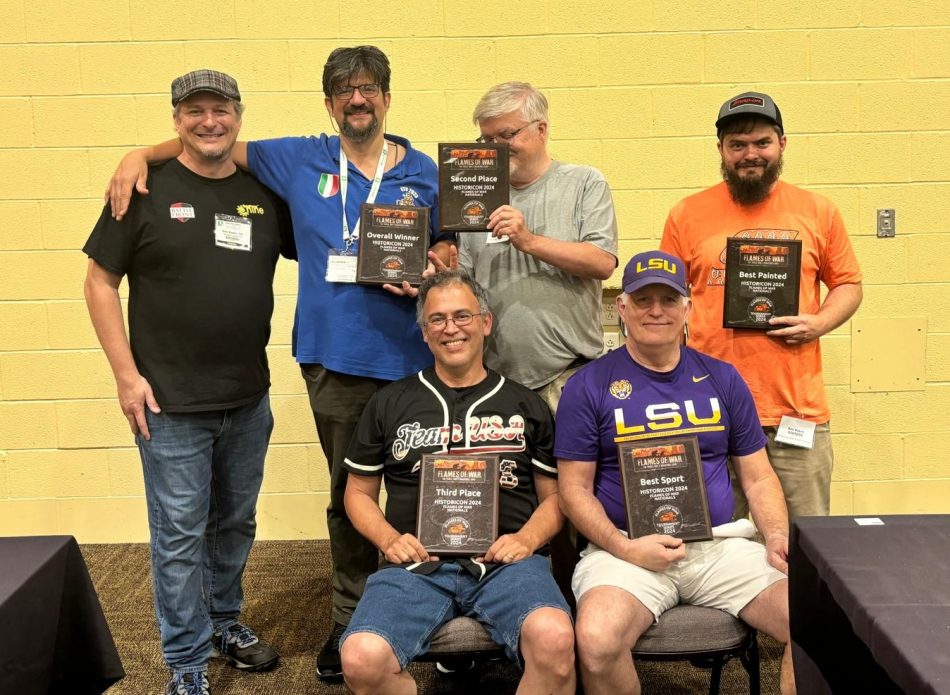
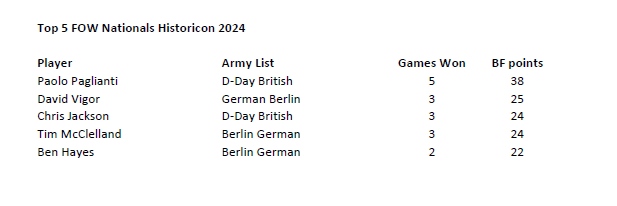
Here are the tournament standings (the top five positions I copied post-tournament). Chris came in third, David second, and Ben Hayes won the well-deserved painting award. As mentioned before, Carl won the equally deserved sportsmanship award, as he has an exceptional character. A huge thank you to Battlefront and especially to Ben Bostedor for the excellent organization!
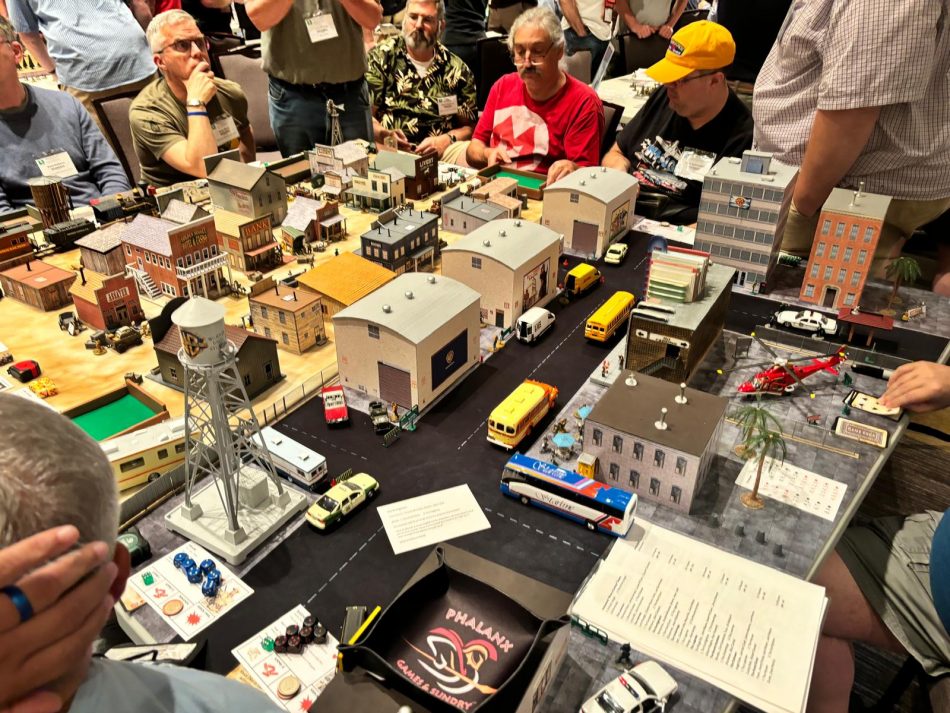
Some photos from Historicon 2024

Dammit! Keep writing like this and you’re going to make me dust off my FOW gear that’s been collecting dust since they went to V 4.
Congrats on the W and thanks for sharing!
that is a huge compliment, my friend! hope to see you again on V4 tables, then!
Nice report! I’m so bummed that I couldn’t attend.
Thanks for the game and the kind words! You were one of my favorite opponents of the weekend!