
Five Assembly Tips for Starcraft Miniatures
By Aaron Kamakawiwoole
Hey Reader!
With my first of three orders for Starcraft miniatures in a truck in St. Louis, MO (let’s gooooo), I got to thinking about a few decisions people should consider when assembling their Starcraft miniatures. We won’t be talking about the nuts and bolts of assembly (should you paint the base first, should you assemble the miniature and then paint, what glue should you use, etc.): instead we’re discussing five upgrade choices that may require some forethought before you start gluing models together, because sometimes small choices really matter.
Tip #1: Zergling Strains
The starter set and zergling box sets come with parts for making different strains of zerglings, the baseline unit for the Zerg. Each strain fills a different role, so depending on what your army needs, you might want to make different kinds of zerglings.
Your standard Zergling is a cheap offensive piece: they die in droves, but if they ever connect in close combat with the enemy they will tear all but the most durable enemies on the battlefield to shreds. If all you need is cheap firepower that can also draw attention away from soft, expensive units (like Hydralisks and Queens), this is a great budget option.
Raptor Zerglings have wings (and these come in transparent plastic, which is awesome!), and are able to leap over obstacles and up sheer cliffs to reach enemies at the top with greater ease. They are more expensive than your average zergling, but have greater mobility and allow for attacks from different angles where the opponent thought they were safe.
Swarmlings (which come with a cool dorsal crest assembly option) are actually the worst at fighting: they don’t hit as often, and they tend to die faster, but they have two bonuses. First, they can regrow lost models (reflecting the fact that they spawn near instantaneously, so remaxing an army in the field is easier to do), so removing them is harder to do.
Second, they get up to 18 models for only 1 Supply, so the sheer volume of models you can have out on the table at once is far higher than you can with other Zerglings. While standard Zerglings can field 36-96 models at the start of a game (depending on points level), Swarmlings boast a whopping 54-144 models for the same supply. And the ability to regrow lost models on top of that, making them great for just holding down enemies and keeping them somewhere for a very. Long. Time.
So each strain does something different: pure offense, maneuver offense, and crowd control. The big question is what your force needs, and thus how you’re going to model them, so take that into consideration when assembling miniatures.
Tip #2: Marine Rifles
The humble Terran Marine has probably the widest range of upgrades in the game: combat shields to improve their close combat defense, shoulder-mounted rocket launchers, slugthrower pistols for close-range danger, grenades for tearing through lightly armored targets – it’s a long list. But there are two that come with specific modeling questions, and they also can go together.
The first is whether you assemble any of them with an AGG-12 Rifle. This “rifle” is a grenade launcher, used for doing more reliable damage to armored targets (and potentially at longer ranges) than your everyday C-14 Rifle. But since it doesn’t benefit from your Stim Pack special rule, nor can it shoot at air targets, the first question you should ask is, “Do I want my squad to have access to an AGG-12?”
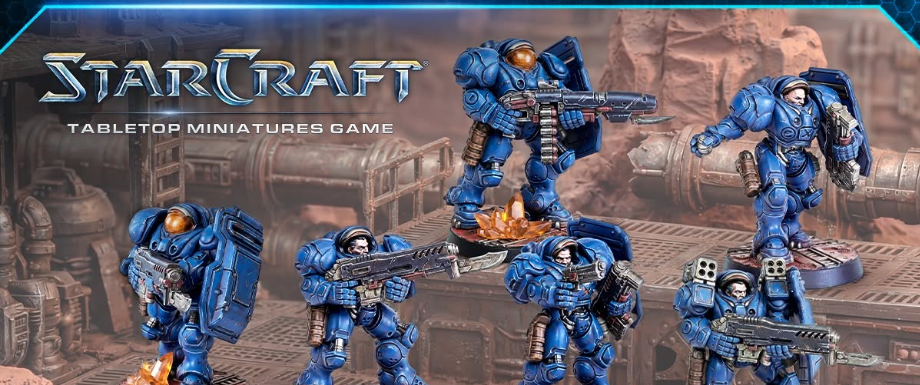
If you plan to accompany your marines with Marauders, Goliaths, or Jim Raynor with his Commando Rifle, you’re probably okay with skipping on the AGG-12: your anti-armor is probably fine, and you can lean into the marine’s ability to clear light targets. But if you’re planning on leaning heavily on Marines, having some ability to punch against tougher targets than you could be useful.
Consider your army composition for whether you want to make this assembly choice. Related to this…
Tip #3: Rocket Launchers
Any single Terran Marine in a squad can field a Rocket Launcher: a set of shoulder strapped launchers, allowing them to shoot fragmentation rockets designed to tear through light targets (see the marine at the bottom-right of the picture above). The big question is, since only one model in the squad can take this upgrade, who gets it?
There are two schools of thought: if you put it on the AGG-12 Marine, then the guy who can uniquely do more damage to armored targets also gets another 4 Attacks for the turn, which can be very nice. Related to that, if you start suffering casualties and you want to preserve your firepower against armored targets, he can be the last model you remove, and he’s also holding the most attacks (which is really nice).
On the other hand, you can give the bonus to a C-14 Marine, making your Stim Pack usage more effective because, if he’s your last model that you lose, you always have a C-14 available to benefit from Stim Pack. And if you’re worried about shredding light units, the C-14 is better for this anyway (as are the rocket launchers).
I think I’d prefer the C-14 Marine as my go-to guy for a rocket launcher, but both are good ideas; think this through when assembling them.
Tip #4: Protoss Shields
One of the unique elements of Protoss units is their shields: they have the ability to absorb a few hits before losing Hit Points. But if you’re like me, I don’t want to use too many tokens on the table to track things (Hit Points lost is fine, because both me and my opponent want to know that), so is there an effective way to model our Protoss units to show how many Shields they have, and how many they’ve lost?
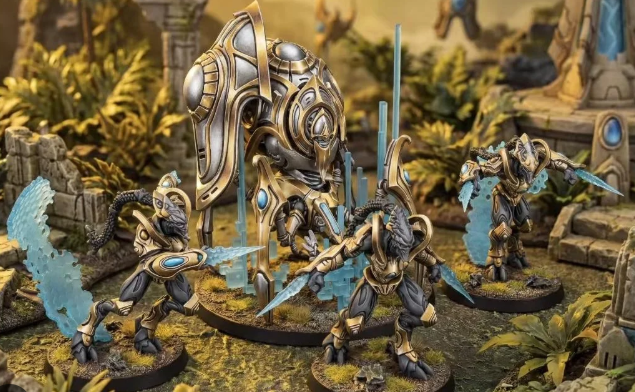
There is! Protoss units come with small shield effects, and if you were to magnetize these to the base, you could remove one shield effect for each Shield Point lost, thereby removing the need to keep track of a unit’s shields with a counter.
It’s a small thing, but less clutter on the table is good, and it’s a thematic, dynamic thing that both players can see, and that helps.
Tip #5: Bodies v. Upgrades
There is a temptation in a lot of games to add a bunch of helpful doodads to a unit, and before we give this tip, full disclosure: if you think something looks cool, by all means do it! No problems there.
But there are some times, in most games, where adding extra equipment isn’t actually as useful as adding a few more bodies. Take the rocket launchers we talked about earlier: +4 Attacks for only +40 pts is really nice! And it looks cool! So adding one to your marines is great!
But consider: for +50 pts more than a small (6-man) marine squad, you can take a large (9-man) marine squad, giving you, for 50 pts, +6 Attacks (as each marine gets 2 Attacks), +6 Hit Points (as each marine has 2 hit points), +1 Supply (which is a blessing for controlling objectives, and a curse for taking up more of your active Supply on-table), and these extra attacks all benefit from Stim Pack (which the rocket launchers do not benefit from).
So you might find there’s a lot of value in building a larger squad, rather than adding an extra equipment add-on. So carefully consider what you glue onto your models, as it may be wiser to just assemble more men.
Conclusion
Can’t wait for my first batch of minis to arrive! The first one due at my house is actually the box I’m splitting with my kids (as I have orders tied to testing in beta, but after my kids started asking questions about the game they really wanted their own miniatures to assemble and paint, so we bought another starter set), so you’ll probably be seeing some pink marines at some point soon! More details to follow next week,
Aaron Kamakawiwoole
YouTube (Starcraft): @CentaurGaming
YouTube (Bolt Action): @ZurnCentral