Tournament Report: Team Yankee at Creative Pursuit Games

By Mitch Reed, Photos by Bill White

It has been a while since I played in any type of live gaming event and even longer since I played one for . Here in Northern Virginia, n Leesburg has sponsored two events since the COVID restrictions loosened up. The first was for Flames of War which I missed because of a mix-up and the second was on 15 August and was a 120-point Team Yankee brawl. Dane and Kaitlin who run the store made sure that the event was conducted with safety foremost in mind and pulled off yet another great event.

Marder III Ausf. H, Sd.Kfz. 138 – A Plastic Soldier Company Review

By Tom Burgess

One of my major projects that I completed in 2019 was building an all-plastic German Mid-War East Front Panzer Grenadier force. And of course, what Mid-War German force can you have without Marders backing it up?

Unfortunately, Battlefront (BF) only offers the Marder III  in one version and in metal resin. Luckily the Plastic Soldier Company Panzer 38(t) kit has the option to build two Marder variants. So I ordered a box from my local game store, Hard Knox Games, to add to my force.

Overrun at Shellerten – A World War Three Team Yankee British Book Narrative Game

by Tom Burgess

My friend, Charles, and I continued on with our narrative gaming following the stories and scenarios from the World War Three Team Yankee British Book. In our last battle, A Squadron of the 2nd Dragoon Guards, the “Bays,” did little to thwart the Forward Detachment from the organic tank battalion of the 207th Motorized Rifle Division in a scenario we played a few weeks ago.

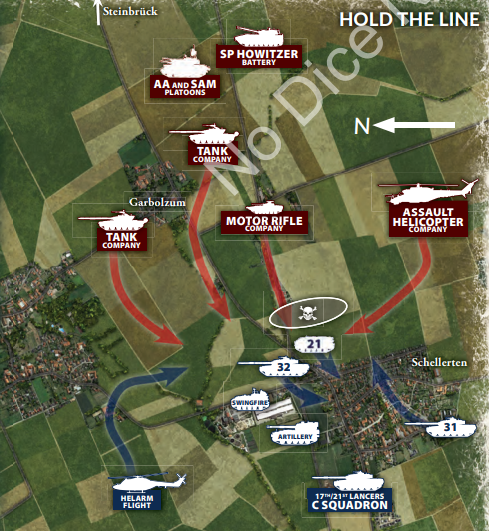
Following up on that success. the 207th Motorized Rifle Division has now committed the rest of its organic tank battalion against the mainline of the British 3rd Armoured Division.  This main attack is directed at the town of Shellerten defended by C Squadron of the 17th/21st Lancers, the “Death or Glory Boys.”

Like our last game. the forces were pretty much set. The scenario is effectively a modified Hold the Line mission. Charles would continue to play his British while I play the Soviets.

In this battle, the Soviets would have to advance across very open fields towards the north end of Shellerten. Just to the north of the town, there is a factory. This would provide the British and advanced position to try to break up the Soviet assault. Further back,  the main town would prove a mainline position.  To the east and the west of Shellerten, there was a small copse of woods that could serve as a good ambush position into the flanks of the Soviet advance.

The British would have some hastily emplaced minefields and a one platoon size ambush.  However, they would be hampered by Deep Reserves requiring most of their heavy hitters to stay have board initially.

Tournaments in Covid Times

Yesterday at D6 games in Rochester Mn we held what was now our second Flames of War tournament during the pandemic. Are we nuts?  Possibly.

The Rochester area is where the Mayo Clinic is located. The medical institution is one that pulls in quite a number of visitors from the outside world. The locals groan about it, yet the term “Destination Medical Center” is an apt label.

Rochester has had a mask mandate even before the state of Minnesota issued such orders. No matter where you stand on mask mandates, they are a fact of current life in our area and a critical piece in being allowed to run a tournament.

D-Day Waffen-SS Command Cards Review

by Tom Burgess


Mitch Reed has already provided an excellent of the D-Day Waffen SS Book for NDNG, so it falls on me to review the Command Cards for this new Flames of War Late War book.

This might be the best part, as it is with the command cards that one can really flavor a list. I’ll break the cards down into the following five groups; Standards, Same as D-Day Germans, New Formations, Special Formation Upgrades, and finally Heroes.

Standards

Softskin Transport and Lucky.  You knew these had to be here. I’m not sure I’ve ever seen anyone actually use the Softskin Card, but as with all Command  Card decks it is here.

The Germans Aren’t all Heer; Waffen-SS D-Day Book Spoiled

Can one get excited for a new book that has very little new models in it? Well if it is the new D-Day Waffen SS book from there is a lot to be excited about if you are a player who likes to play the SS. Do not let the lack of new models throw you off, this book adds so much flavor for the German D-Day forces you will never notice it.

After I built what I claimed was my only army for Flames of War almost a decade ago (Canadians) I soon found myself building an opposing force to play against them. I selected the Waffen SS because even decades after the war they hold an odd fascination for me as I try to wrap my head about how they existed as a separate force based on the Nazi party as opposed to the national army.

The SS also seemed to be everywhere during the war and one of the first lists I really loved to play was the SS Wiking Division that fought on the Eastern front. Now this force is available for Normandy as Battlefronts closes the Late War chapter for the invasion of France.

Firestorm Gazala – British Turn 2 Analysis and Turn 3 Commander’s Intent

Turn 2 Battles

By Tom Burgess

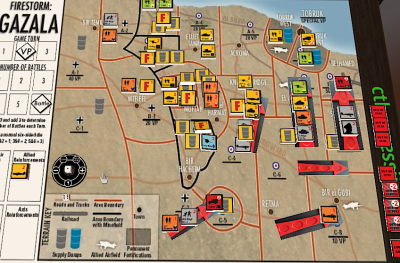
The No Nice No Glory and Breakthrough Assault’s online Firestorm Gazala Campaign is now rolling into it’s third and final phase. The campaign has been driven so far by the 47 games played around the world from Turn 1 and Turn 2. The battle still hangs very much in the balance and either side could claim victory based on how the next four battles in Turn 3 go.

Turn 2 Analysis

The five battles in Turn 2 went three to the German/Italian forces and two to the Commonwealth forces.  Most importantly, British players in Turn 2 won some of the battles that mattered. The British line held to the south of Gazala at Knightsbridge (B5) and southwest of Gazala at El Adem (B6). However, to the southeast of Gazala at Belhamed (B7), Rommel did turn the flank and is now on the outskirts of Tobruk.

Firestorm Gazala Turn 2 Battle 5 AAR – Steel Wall at Point 171

By Ed Hall and Tom Burgess,

In Turn 1 of the Campaign, Ed’s combined German/Italian forces attacked Point 171. defended by an Indian Motor Brigade. Ed chose Maneuver in that battle and we ended up playing Dust Up () which ended up as a German win.  For the next try at Point 171, he choose Attack and we ended up with No Retreat. So we slide the big hill, i.e. “Point 171” to the British side of the table and had them try to hold it from the combined German and Italian attacks.

Firestorm Galaza Turn 2 Battle AAR – Repulse at El Edem

By Tom Burgess,

My friend Charles and I recently met up to have another go at a Firestorm Gazala campaign. We had played a game, in Turn,One of the Campaign, where Charles’s Panzers managed to break up my British Motor Company and Crusader force. See that AAR . After breaking my reinforcing Crusaders and destroying all of my Anti-tank guns, his Panzers had free reign to take down my defending infantry.

Charles hoped to keep that momentum going for our next Turn Two battle.  This made a lot of sense since Charles was effectively just continuing the attack northward with the 5th Panzer Regiment. So he chose to play Battle One from Turn One at  El Edem (B6). This area was just to the south of Tobruk (see inset map).

Knowing I would be facing a mostly tank force, I based my defending force off of a British Rifle Company, with maxed out 6 pdrs. I also beefed up my Crusaders with a Grant Troop to assist the Firestorm Grant unit already provided from the campaign scenario.  I was very glad to have two Grant Troops as my Crusaders fared very poorly against Panzers in our last battle. Charles force was very similar to our last battle, but he did swap in a full unit of Panzer-IIINs to get some higher firepower.

Firestorm Gazala Turn 1 Battle 5 AAR – Dust Up at Hill 171

By Ed Hall and Tom Burgess

Continuing with the Breakthrough Assault and No Dice No Glory online Firestorm Gazala Campaign.  Ed wanted to play Battle 5 at area C5 “Hill 171.” Ed selected 80 points, before the addition of Firestorm Troops as the point level for this battle.

We both chose formations representative of the forces committed to this battle.  So for Tom that would be a Motor Co, backed up by a reinforcing Crusader Squadron. Ed wen with an Afrika Korps Shutzen Co. Tom chose a Defense stance to model the situation and Ed chose Maneuver.  Using the Battle Plans matrix this resulted in a Dust Up Mission.