Exciting New Soviet Team Yankee List Ideas

By Tom Gall

Christmas comes early for Soviet Team Yankee players in the form of the book with its impressive array of new units and new formation options. In this article, I’m going to share with you what I’m thinking about in terms of list building ideas, how I’m planning to supercharge my Soviet Team Yankee armies to dominate the battlefield.

No matter if you are a new or experienced Team Yankee player, you’re probably looking to do your best to win some games. With the new book, Battlefront is giving you additional tools towards that goal. I’m going to come at this from a few different angles. One is what if I was an entirely new player, what would I recommend you buy to put together a fun and competitive force?  As an experienced player, how will I modify my existing lists?  Last what older lists might I refresh and bring out again?

How to Paint a ‘NAM Local Forces Formation

By Howard West

Background – a group of us at Legions Games in Pittsburgh, PA have been playing Flames of War for many years and Team Yankee since it was released. Several of us wanted to start playing something different but not that far away for our passion for Flames and Team Yankee.

A smaller group of us had already started assembling NAM armies in the Winter of 2018/2019 and several of the Flames guys thought NAM would be a good 2nd game for them vs TY or Fate of the Nation. So now we are off to the races. As I was completing several of my units for my NAM force several of our folks asked me how did I paint the completed units.

FoW Bagration Soviet : Extra missions and mini-campaign

By Tom Gall

With the release of the Bagration Soviet book for Flames of War version 4, you might think this is a book that has no interest to you when you have no Soviet forces. There is some gold at the end of the book that might just change your mind.

The majority of the book is devoted to Late War Soviet forces, true. There are 50 pages of list material to consume.

After that there, several sections of extra material that I think will pique your interest. Remember a key feature of the D-Day series of books for version 4 has been extra missions and mini-campaigns. While I’m sure you’re familiar with the  the D-Day books and now Bagration added further missions for you to try your hand at.

A Survey of WWII Rulesets Part 1

By Tom Gall

There are a good number of quality WWII rulesets in existence, let’s explore some of these rules, point out what their strong/weak points are and compare what might draw you to one over the other.

The rulesets considered in this article are : by Battlefront, by Too Fat Lardies, by Warlord, by Plastic Soldier Company.

Each of these rules is generally company level actions with support, for the most part, feature individual models, and focus on the WWII era. All are D6 based. All have extra material that offer campaign experiences, lists, and flavor to feel like you’re been given command with a battle to win. All are either point costed and/or have a list building system which makes it easier to put together a game.

This week, we’ll look at two of the four: FOW and Battlegroup. The other two systems will follow in a later article.

Marder III Ausf. H, Sd.Kfz. 138 – A Plastic Soldier Company Review

By Tom Burgess

One of my major projects that I completed in 2019 was building an all-plastic German Mid-War East Front Panzer Grenadier force. And of course, what Mid-War German force can you have without Marders backing it up?

Unfortunately, Battlefront (BF) only offers the Marder III  in one version and in metal resin. Luckily the Plastic Soldier Company Panzer 38(t) kit has the option to build two Marder variants. So I ordered a box from my local game store, Hard Knox Games, to add to my force.

Overrun at Shellerten – A World War Three Team Yankee British Book Narrative Game

by Tom Burgess

My friend, Charles, and I continued on with our narrative gaming following the stories and scenarios from the World War Three Team Yankee British Book. In our last battle, A Squadron of the 2nd Dragoon Guards, the “Bays,” did little to thwart the Forward Detachment from the organic tank battalion of the 207th Motorized Rifle Division in a scenario we played a few weeks ago.

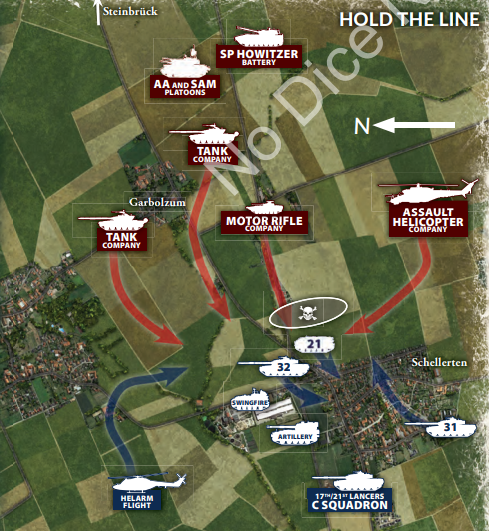
Following up on that success. the 207th Motorized Rifle Division has now committed the rest of its organic tank battalion against the mainline of the British 3rd Armoured Division.  This main attack is directed at the town of Shellerten defended by C Squadron of the 17th/21st Lancers, the “Death or Glory Boys.”

Like our last game. the forces were pretty much set. The scenario is effectively a modified Hold the Line mission. Charles would continue to play his British while I play the Soviets.

In this battle, the Soviets would have to advance across very open fields towards the north end of Shellerten. Just to the north of the town, there is a factory. This would provide the British and advanced position to try to break up the Soviet assault. Further back,  the main town would prove a mainline position.  To the east and the west of Shellerten, there was a small copse of woods that could serve as a good ambush position into the flanks of the Soviet advance.

The British would have some hastily emplaced minefields and a one platoon size ambush.  However, they would be hampered by Deep Reserves requiring most of their heavy hitters to stay have board initially.

PSC’s Roman and Goths armies unboxing and review

By Paolo Paglianti

For ages, 15mm soldiers have been in metal, as many plastic versions of the soldiers were too flexible, with fewer details and of the wrong scale (1:72). Just a few years ago we began to see 15mm miniatures in hard or soft plastic, specifically for WW2 setting from Battlefront and Plastic Soldier Company (PSC). Now, for “ancient-medieval” Simon Hall’s set of rules, Mortem et Gloriam.

(By the way, ).

The first armies available are Imperial Roman and Gothic barbarian hordes, together with Sassanid and Hunnic: quite a good start for the later Imperial age. Could we miss the opportunity to check them out? So, let’s open the “Pacto starter armies” to see how good they are.

D-Day Waffen-SS Command Cards Review

by Tom Burgess


Mitch Reed has already provided an excellent of the D-Day Waffen SS Book for NDNG, so it falls on me to review the Command Cards for this new Flames of War Late War book.

This might be the best part, as it is with the command cards that one can really flavor a list. I’ll break the cards down into the following five groups; Standards, Same as D-Day Germans, New Formations, Special Formation Upgrades, and finally Heroes.

Standards

Softskin Transport and Lucky.  You knew these had to be here. I’m not sure I’ve ever seen anyone actually use the Softskin Card, but as with all Command  Card decks it is here.

Firestorm Gazala – British Turn 2 Analysis and Turn 3 Commander’s Intent

Turn 2 Battles

By Tom Burgess

The No Nice No Glory and Breakthrough Assault’s online Firestorm Gazala Campaign is now rolling into it’s third and final phase. The campaign has been driven so far by the 47 games played around the world from Turn 1 and Turn 2. The battle still hangs very much in the balance and either side could claim victory based on how the next four battles in Turn 3 go.

Turn 2 Analysis

The five battles in Turn 2 went three to the German/Italian forces and two to the Commonwealth forces.  Most importantly, British players in Turn 2 won some of the battles that mattered. The British line held to the south of Gazala at Knightsbridge (B5) and southwest of Gazala at El Adem (B6). However, to the southeast of Gazala at Belhamed (B7), Rommel did turn the flank and is now on the outskirts of Tobruk.

Firestorm Gazala Turn 2 Battle 5 AAR – Steel Wall at Point 171

By Ed Hall and Tom Burgess,

In Turn 1 of the Campaign, Ed’s combined German/Italian forces attacked Point 171. defended by an Indian Motor Brigade. Ed chose Maneuver in that battle and we ended up playing Dust Up () which ended up as a German win.  For the next try at Point 171, he choose Attack and we ended up with No Retreat. So we slide the big hill, i.e. “Point 171” to the British side of the table and had them try to hold it from the combined German and Italian attacks.