Death or Glory: Reconfiguring the FOW Crusader Squadron Boxed Set

By Richard Steer

The Flames of War army boxes are a great value. They are big boxes packed full of plastic sprues and are the ideal way to either start a new army or reinforce an existing one, at a significant price discount. The new British Crusader Armoured Squadron boxed set for North Africa is no exception. Containing 21 sprues and retailing for US$110, it compares very well to the usual price for a normal unit box.

While the Crusader Armoured Squadron box contains a lot of plastic for your money and a wide variety of models, a closer look at its contents reveals that it is an awkward combination of units. The default army list that is provided with the box is a legal force totaling 93 points, but game-wise it is not a great list.

North Africa: Revisiting the British Lists for Mid-War Flames of War

By Richard Steer

The North African campaign has always been the theatre of World War II that I have been most interested in, and specifically the British perspective of the conflict. This interest carried over into , with British forces in the Mediterranean has been my primary focus in the game.

To be honest, I was pretty disappointed with the first releases for FOW V4. Desert Rats and felt very lightweight compared to the previous lists for the African Campaign that we had been playing with, being the original North Africa compilation from 2009. That’s not to say that the V4 lists were bad. On the contrary, with the exception of the 17/25pdr anti-tank gun, Desert Rats was a reasonably historical representation of the most common British armored formations in Egypt and Libya in the middle of 1942. The British lists from Desert Rats were later expanded and re-released as Armoured Fist, which filled in many of the gaps, but the fact remained that the army lists had taken a step backward in detail and completeness under V4.

Misadventures with Home-Printed Decals

By Richard Steer

I am in the process of for my Late-War British. The Kangaroos were created in August 1944 by converting 72 Priest self-propelled guns belonging to the 3rd Canadian Division into armored personnel carriers. The converted Priests retained the markings of their original units: the 12th, 13th, and 14th Field Regiments, Royal Canadian Artillery. The are focused on the armoured divisions, with nothing suitable for the artillery units of an infantry division. In order to provide markings for my Kangaroos, I decided to try printing my own using our home inkjet printer.

The specific decals that I wanted were the divisional insignia, the Arm of Service flash for the regiment, and the battery identification markings. I created the images I needed using PowerPoint, while the divisional insignia was downloaded from Wikipedia then scaled to the right size. The big issue was always going to be how to achieve the white lettering in the unit symbols with a printer does not use white ink.

Modeling the Priest Kangaroo for Flames of War

By Richard Steer

One of the features of the 4th Edition of Flames of War is that many of the missions require both the attacker and defender to take and hold Objectives. This is a challenge for infantry-based forces, as having your lead infantry platoons pinned down can easily cause your attack to stall. Fortunately for Late-War British Forces, the Canadians solved this problem in 1944 with the development of the Priest Kangaroo: the conversion of surplus self-propelled guns into armored personnel carriers. I won’t go into the history here, but a good summary can be found at MilArt.

FOW D-Day British Missions – Part 2 – Counterattack

By Tom “Chairborne” Mullane

This is Part 2 of my playthrough of the mini-campaign in the back of the British D-Day Release.

My trusty opponent Shane competed in the “Sieze and Hold” mission last time, and for round two, we are reversing our roles.

I will be taking the Germans and a grenadier company, and Shane will be playing a Cromwell recce company.

The British are counterattacking to try and reach the Paratroopers who landed and held points the night before. let’s see how they fare.

Overrun at Shellerten – A World War Three Team Yankee British Book Narrative Game

by Tom Burgess

My friend, Charles, and I continued on with our narrative gaming following the stories and scenarios from the World War Three Team Yankee British Book. In our last battle, A Squadron of the 2nd Dragoon Guards, the “Bays,” did little to thwart the Forward Detachment from the organic tank battalion of the 207th Motorized Rifle Division in a scenario we played a few weeks ago.

Following up on that success. the 207th Motorized Rifle Division has now committed the rest of its organic tank battalion against the mainline of the British 3rd Armoured Division.  This main attack is directed at the town of Shellerten defended by C Squadron of the 17th/21st Lancers, the “Death or Glory Boys.”

Like our last game. the forces were pretty much set. The scenario is effectively a modified Hold the Line mission. Charles would continue to play his British while I play the Soviets.

In this battle, the Soviets would have to advance across very open fields towards the north end of Shellerten. Just to the north of the town, there is a factory. This would provide the British and advanced position to try to break up the Soviet assault. Further back,  the main town would prove a mainline position.  To the east and the west of Shellerten, there was a small copse of woods that could serve as a good ambush position into the flanks of the Soviet advance.

The British would have some hastily emplaced minefields and a one platoon size ambush.  However, they would be hampered by Deep Reserves requiring most of their heavy hitters to stay have board initially.

Recon Report – Bolt Action: Campaign: D-Day: British and Canadian Sectors

By Kreighton Long

As the pandemic continues to dominate our news feeds and our minds I’ve been trying to focus on the future and how exciting it will be to attend club days and tournaments.

Warlord Games is doing its part to ramp up my excitement with the planned publication of their second D-Day Campaign Book with nearly two hundred pages focusing on the Anglo-Canadian Sectors from Gold, Sword, and Juno Beaches to the capture of Caen and the German defeat at the Falaise Pocket.

As you can expect from Warlord, this book contains new historical scenarios, units, and theater selectors.

Look for Bolt Action: Campaign: D-Day: British and Canadian Sectors to be released this coming Autumn. With the disruptions from the pandemic, Warlord has not put an official release date on it yet but indicate they hope to have it out potentially in October.

Firestorm Gazala – British Turn 2 Analysis and Turn 3 Commander’s Intent

Turn 2 Battles

By Tom Burgess

The No Nice No Glory and Breakthrough Assault’s online Firestorm Gazala Campaign is now rolling into it’s third and final phase. The campaign has been driven so far by the 47 games played around the world from Turn 1 and Turn 2. The battle still hangs very much in the balance and either side could claim victory based on how the next four battles in Turn 3 go.

Turn 2 Analysis

The five battles in Turn 2 went three to the German/Italian forces and two to the Commonwealth forces.  Most importantly, British players in Turn 2 won some of the battles that mattered. The British line held to the south of Gazala at Knightsbridge (B5) and southwest of Gazala at El Adem (B6). However, to the southeast of Gazala at Belhamed (B7), Rommel did turn the flank and is now on the outskirts of Tobruk.

Firestorm Gazala Turn 2 Battle 5 AAR – Steel Wall at Point 171

By Ed Hall and Tom Burgess,

In Turn 1 of the Campaign, Ed’s combined German/Italian forces attacked Point 171. defended by an Indian Motor Brigade. Ed chose Maneuver in that battle and we ended up playing Dust Up () which ended up as a German win.  For the next try at Point 171, he choose Attack and we ended up with No Retreat. So we slide the big hill, i.e. “Point 171” to the British side of the table and had them try to hold it from the combined German and Italian attacks.

Firestorm Galaza Turn 2 Battle AAR – Repulse at El Edem

By Tom Burgess,

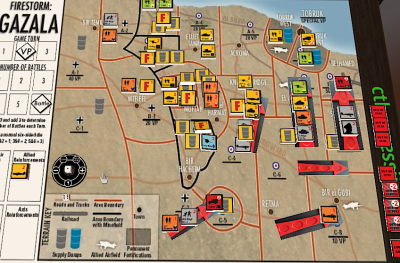
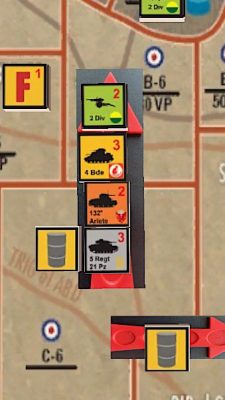
My friend Charles and I recently met up to have another go at a Firestorm Gazala campaign. We had played a game, in Turn,One of the Campaign, where Charles’s Panzers managed to break up my British Motor Company and Crusader force. See that AAR . After breaking my reinforcing Crusaders and destroying all of my Anti-tank guns, his Panzers had free reign to take down my defending infantry.

Charles hoped to keep that momentum going for our next Turn Two battle.  This made a lot of sense since Charles was effectively just continuing the attack northward with the 5th Panzer Regiment. So he chose to play Battle One from Turn One at  El Edem (B6). This area was just to the south of Tobruk (see inset map).

Knowing I would be facing a mostly tank force, I based my defending force off of a British Rifle Company, with maxed out 6 pdrs. I also beefed up my Crusaders with a Grant Troop to assist the Firestorm Grant unit already provided from the campaign scenario.  I was very glad to have two Grant Troops as my Crusaders fared very poorly against Panzers in our last battle. Charles force was very similar to our last battle, but he did swap in a full unit of Panzer-IIINs to get some higher firepower.