Painting Canadian M113, the proper way
By Robert Kelly
follow up to this article:
The Canadian M113s had a unique and distinctive camouflage pattern. I might not be the best painter out there, but I always have the correct paint colours, cam patterns, and markings. I will now share my recipe so that you can make your Canadian M113s as accurate as possible using my simple air-brushing method (whether you have a quality airbrush or not and I don’t).
If you don’t have an airbrush, you can do the hand painted version using Vallejo paints (887 Brown Violet – also for uniforms, 830 Field Grey, and Matt Black with a bit of grey mixed in). These colours are a close match and we only started to airbrush our vehicles in the mid-80s anyway.
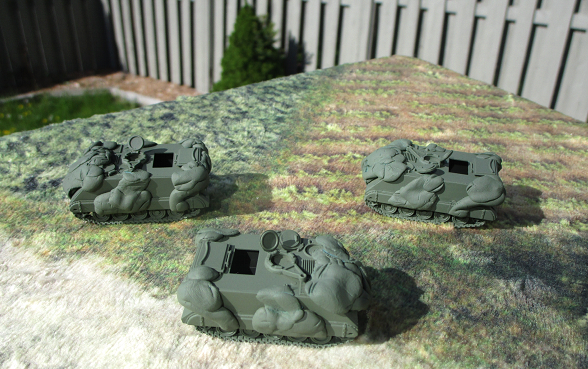
Canadian M113 Painting and Modelling
For airbrushing you will need these paints: Tamiya XF 69 NATO black, XF 65 Field Grey, and mix 50 % XF 62 Olive Drab with 50% XF 62 Desert Yellow until you get the right shade. I actually used too much Desert Yellow, but that’s ok. This doesn’t have to be perfect as with aging, both greens tended to blend together.
The first step is to take the assembled model (I glue the tracks on before painting, but it’s probably easier to paint without them on) and paint it Tamiya Nato Black all over.
Here is a link to the cam pattern.
Interestingly, though the pattern is the same for Canada based vehicles as it is for the Germany based ones, the greens are swapped. The pattern is the same for all M113s except for the ADATS which had its own unique, but simple pattern.
Start by Blu-Tacking the black areas in the pattern then give the entire model a spray of the Olive Drab/ Desert Yellow mix. Let dry:
Then cover over the areas that are supposed to be Olive Drab with Blu Tack. Make sure that you do not cover the wheels with it:
Give it a coating of the Field Grey. Let dry:
You now have a small blob of plastic covered in a lot of Blue Tack. Once you feel its dry, and it won’t take too long with Tamiya, pull off all of the Blu Tack and miraculously you will have the pattern. And it will have that freshly sprayed look. The colour should look something like this (even though it’s a Lynx):
Sheldon Clare photo.
That nice looking vehicle will look much different within a few minutes of being out in the field. Next up do the tracks in a rust colour (I use Games Workshop Mournfang Brown or whatever they call it now or then) and Matt Black on the rubber track pads. Paint the details like the pioneer tool, lights and episcopes and give it a light drybrushing of either GW Bleached Bone or Vallejo Iraqi Sand.
Markings.
Each vehicle will require a small Canadian flag on the front and rear as shown in the photos along with a tactical symbol (in black or white) and a license plate on the trim vane. A black maple leaf (no white outline) will be located on the front side. We don’t usually find bridging symbols on the M113s.These little details will really make the model pop and distinguish them from our Nato allies.
I use the standard decal regime of gloss varnish, decal, decal softener and matt varnish.
I used TL Modellbau decals out of Germany: They are designed for 1/87 vehicles but the large size makes it easier to see the call signs on the sides of the vehicles. Also note their Israeli, Dutch, Belgian and French Army ones in the link provided.
They are of high quality, but a bit on the pricey side, though they have every decal you will need. They also don’t give a lot of numbers and letters, so you will probably have to buy at least two sets and make sure you can get all the call signs you need. For example, each sheet comes with only three 7s, so a section of TOW will cost you two sheets. I have a lot of TOW and I have lots of spare decals.
I believe I can issue license plates to a brigade’s worth of M113s now. They also have the tactical symbols and black maple leafs for M113s and the black maple leafs with the white border for your Leopards. Be careful though, the maple leafs all look black, but the top two rows have the white outline that is only to be used on the Leopard family of vehicle. You will need the third row of black ones.
Now I’ll just give all the possible call sign markings for a Canadian M113 company including support platoons. They will be centred on the sides of the vehicles. You can also add call signs to the rear door if you have enough.
Infantry company commanders will be either 19, 29, 39 or 49. 9 (Niner) is the commander number in the Canadian army, the same as 6 in the US forces.
Infantry platoon commanders are 11, 12, 13, 21, 22, 23, 31 up to 43.
The sections in the platoons are 11A, 11B, 11C up to 43C. I think you get the idea.
TOW. The six sections of three launchers are 71, 71A, 71B, 72 A-B all the way up to 76 A-B.
Mortars. The Mortar Fire Controllers (MFCs) are 51A and 51B. The two four-tube groups are 52 to 52C and 53 to 53C.
FOOs. Would have the same number options as the Infantry platoon commanders but you would put G (for guns) in front of the call sign to distinguish it from the infantry vehicles. For e.g. G11 or G43.
The Blowpipe dets would be the same as the infantry call signs.
Pre- PSC, Armies Army had a nice looking set of Canadian decals with most every possible call sign, but I can’t find them on the PSC site, so I’m not sure they are available yet. The call signs are about the right size (and maybe smaller), but at this scale I prefer the larger 1/87 scale decals as the Armies Army ones are hard to read.
Now that I’ve seen the Battlefront decals sets you will still need the TL Modelbau decals for the license plates, tac signs and Canadian flags. It also looks like the call signs are in white, so you will need the TL black ones as well. They also sell letters and numbers separately in various colours. Order the 4mm ones to match the ones on the Canadian army sheet.
Stowage
Canada’s per capita spending on defence has always been near the bottom of Nato and our vehicles showed that. After being spray painted, touch-ups by the crews were frequent and obvious. So, if you want to add some hand brushed touch-ups go ahead. This is especially true for the call sign areas.
Feel free to paint on a green box and add the call sign over that to show the vehicle being re-rolled. What most all M113s had was a half a spare road wheel on the front of the trim vane. You can sacrifice a model to make them or make some out of green stuff as I did. The vehicles could also be found carrying a roll of concertina wire as well as extra shovels and cam nets (some in bags). I’m still trying to find 15mm scale shovels. Some units added “admin” boxes to the top of the vehicle along with extra jerry cans. See photos below.
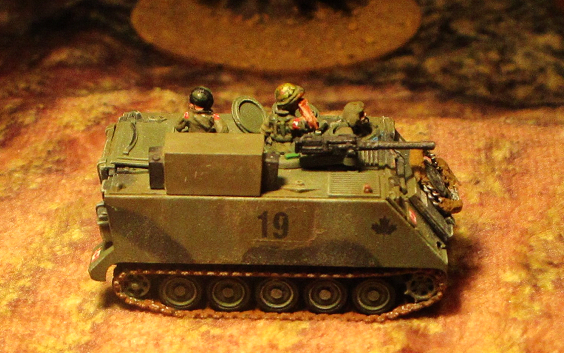
Above is an example (my company commander) using the concertina wire, the green stuff, weathering, spare wheel, an admin box and some spare jerry cans. I also made sure to have an extra guy in the family hatch and I foresee adding another guy or two eventually. I also took the mudguards off to distinguish it from the regular section vehicles. This is something I do with my FOO vehicle as well.
Crews
I prefer the German tank commander’s sprues. They look exactly like Canadian crew. Remember this was the day before safety regulations that required helmets to be worn in armoured vehicles at all times, so the troops just wore berets (armour for sure) or soft caps. The British tank commander sprue for FOW works as well as they wear berets. For guys sticking out of the family hatch, use some US Vietnam figures or if you can get them the set with the infantry guys riding on top of the vehicle (not on the website anymore). Even some West German infantry would work.
Paint them in Vallejo Brown Violet with a highlight of Russian uniform green. Don’t forget to add the handpainted flags to the shoulders. The flags make all the difference. For helmets paint the Vietnam pattern cover or woodland camo. The Vietnam camo covers were issued well into the 70s and early 80s, until stocks ran out and we started to get issued with the US woodland pattern covers. For webbing just use a slight different shade of the uniform colour and a bit of a wash to make it stand out.
Your infantry formation’s call signs might look like this, but maybe you have your own favourite lucky numbers:
Commander
19
Platoon
11, 11A, 11B, 11C
Platoon
12, 12A, 12B, 12C
TOW section
75, 75A, 75B
Tow Section
71, 71A, 71B
FOO or Mortar fire controller
G11 or 51B
Mortar group
52, 52A, 52B, 52C
There is a lot of latitude to customize your Canadian M113s. If you are a fan of stowage and worn out paint schemes then Canadians are for you. You can also paint some of your vehicles in Nato three-colour cam if you wish as we started to do that in the 90s until switching to monotone Nato Green for all of our vehicles. You can also start out nice and clean to get your army on the table and slowly, over time add troops to the family hatch, more stowage, paint patches and some heavy weathering.
Rob…Thanks for this. I’ve been musing about some of the inaccuracies on the Canadian effort in Germany that have been floating around and just read Dan Mclean’s article on call signs….of which, although a very good effort on his part, still has a couple of inaccuracies. As you so clearly point out there was no brown in the Canadian cam pattern at the time. It was later introduced in the early 90’s I believe. As you personally know, although now retired, I spent 39 years in the Canadian infantry with two tours in Germany. In my first tour I spent some time commanding Armoured Defence Platoon (now more contemporarily referred to as Anti- Armour Platoon) with 18 pedestal mounted TOW’s. What a great time to be a Canadian soldier !!!! I’m almost tempted to get involved in TY…..but as in know, FoW is my first passion.
Again, thanks Rob…see you at Canadian Nationals in early September.
C’mon Bob. You KNOW you want to paint the vehicles you used to run in decades ago! Maybe we can give you a tester game at Nationals.. I’ll let Rob’s Cdns beat up on some BMPs 😉
Dennis……I may be showing some signs of weakness….but I’m still hesitating in taking the leap to what I describe as a larger version of micro-armour….who knows…when I get bored enough I might very well make the jump. Until then, dust off your FoW and I’ll see you at Nationals. No doubt you’ll be bringing your Eye-Ties….Cheers.
It was Luggs’ stories of his beloved TOW platoon that got me to go out and buy 9 TOW tracks and a company of infantry to protect them.
Shouldn’t I get some kind of commission for that??? If its enough…I might launch into TY… 🙂
You’ll have to take that up with Battlefront. I expect some kind of commission for all the decals I’ve helped TL Modelbau sell.
I have a question regarding the spall lining of the canadian m113’s, what color would they be?
Cliff – If you’re referring to the inside of the vehicle (which I believe you are), its a very light green. try “googling” “Cooking Apple Green” and you’ll get the idea. Cheers