Timelapse of painting a tank army – WW2 Italians in the desert
With so many days at home in this pandemic, I painted a lot of “old lead” (and plastic) have in my reserve. One of the projects I was lingering is a WW2 desert Italian army for . The infantry was already done, so I focused on tanks, armored vehicles, trucks, wheeled guns, and some planes. The entire army in a single go: I started to paint it deployed on my table for each step, and I discovered it was a natural “timelapse”. Here are the photos, with some tricks on painting the WW2 tanks!
First step – assembling the army.
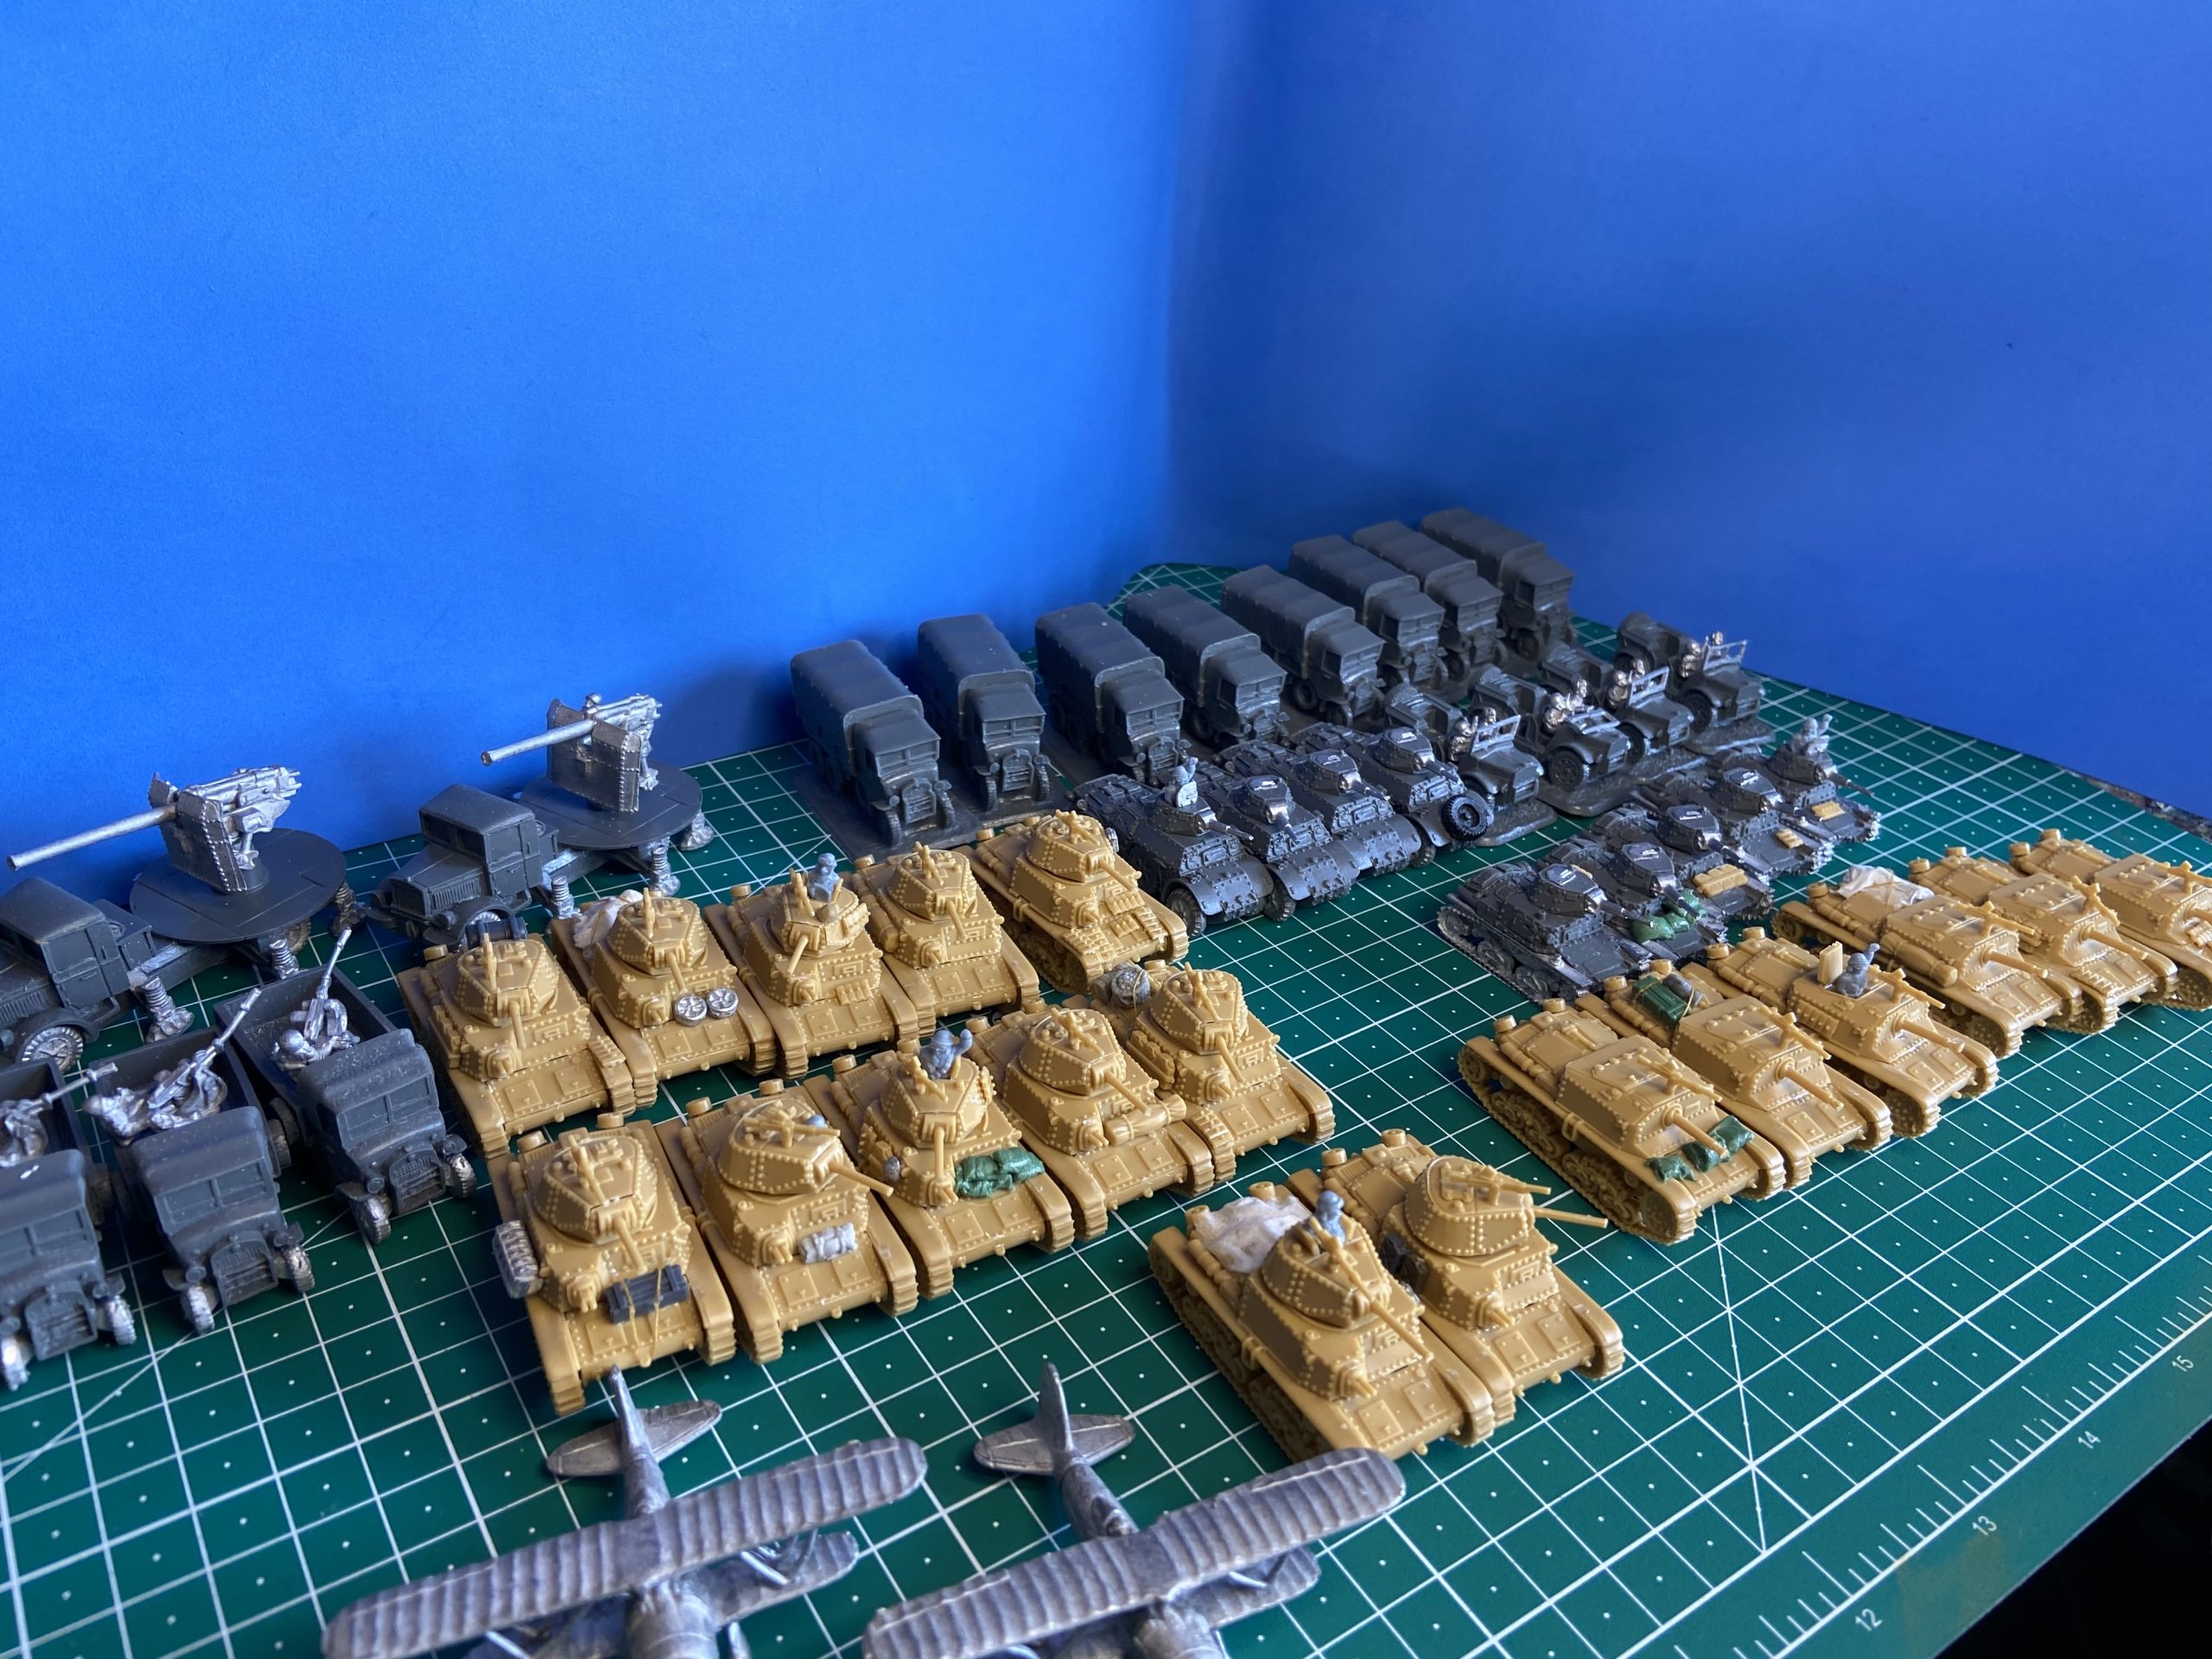
Painting a 15mm FOW army is way easier if you do all models at the same time. The first step is to assemble the entire army. At this stage, we are also adding small unique details to each tank and Semovente, the true stars of this army, using any kind of materials and spare parts we can recover from the bitz box or other sets. We are also adding magnets under turrets.
Second step – Base color.
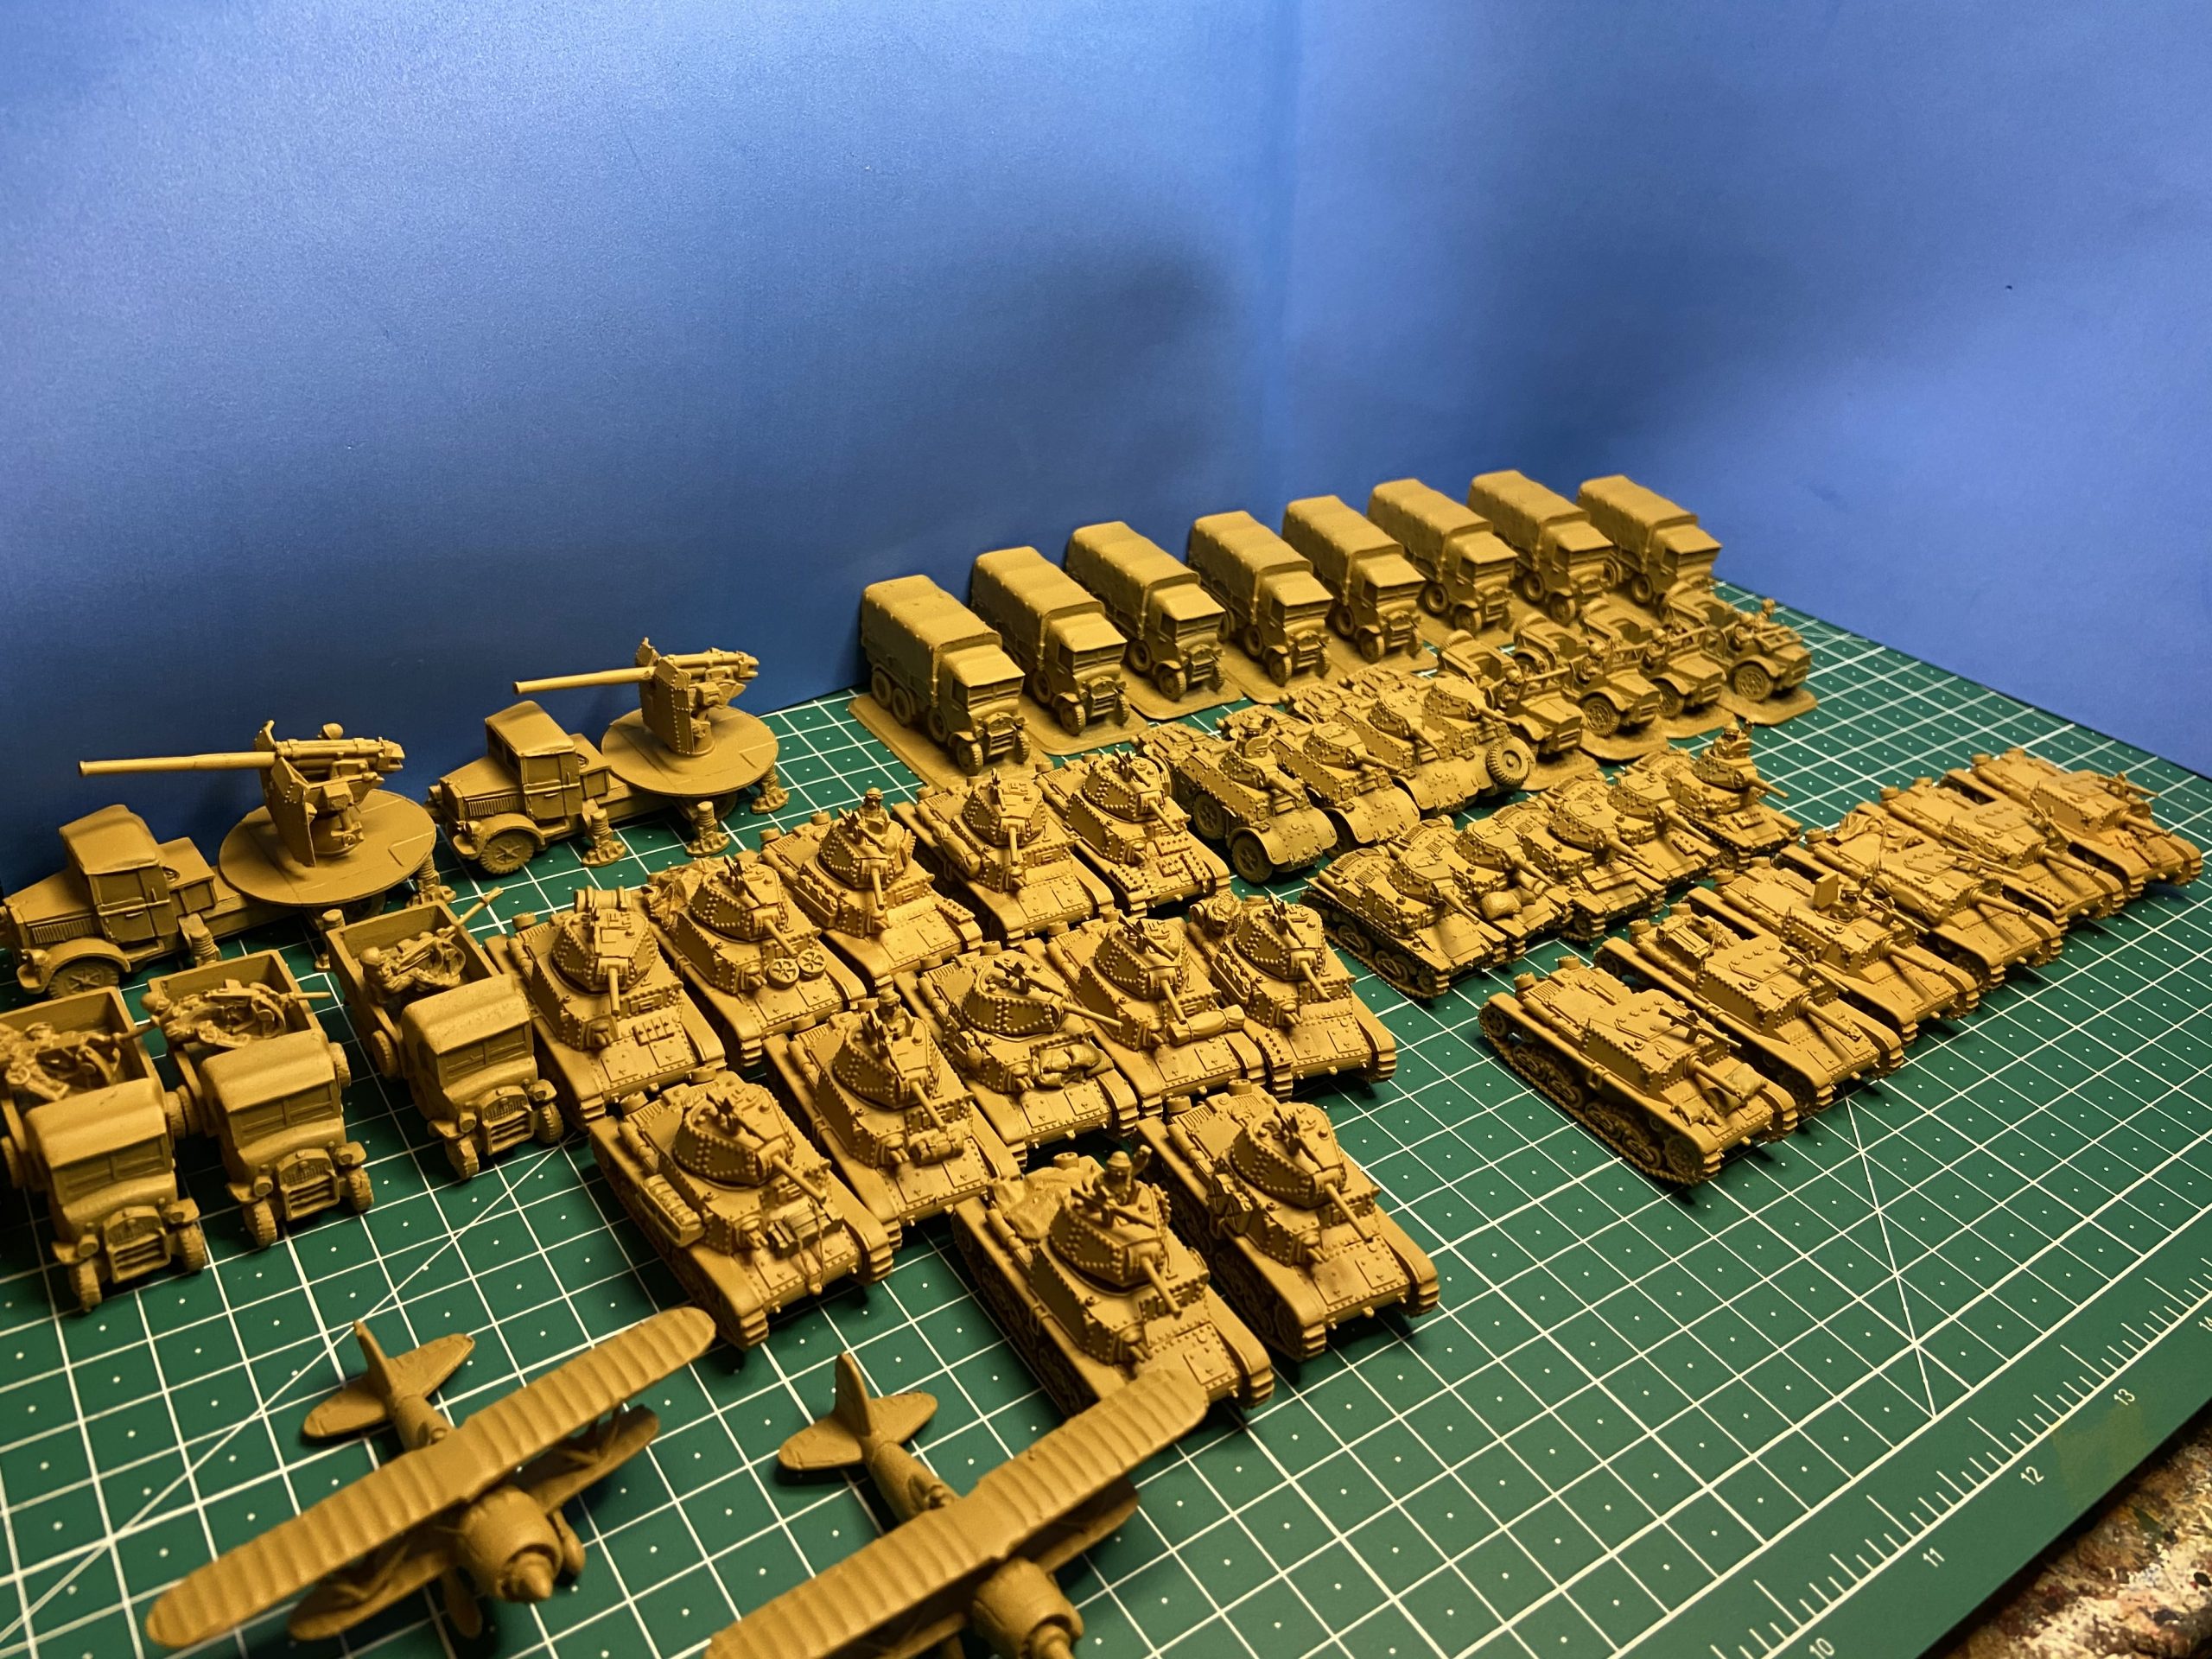
Very easy: we used the Vallejo 28.015 Desert Yellow for all models in the army. This tone is a bit lighter than the Panzer Yellow. Pay attention all model is covered: BF’s Italian tanks are already in a yellow-ish plastic, so be sure all surfaces are covered.
Third step – Airbrush action
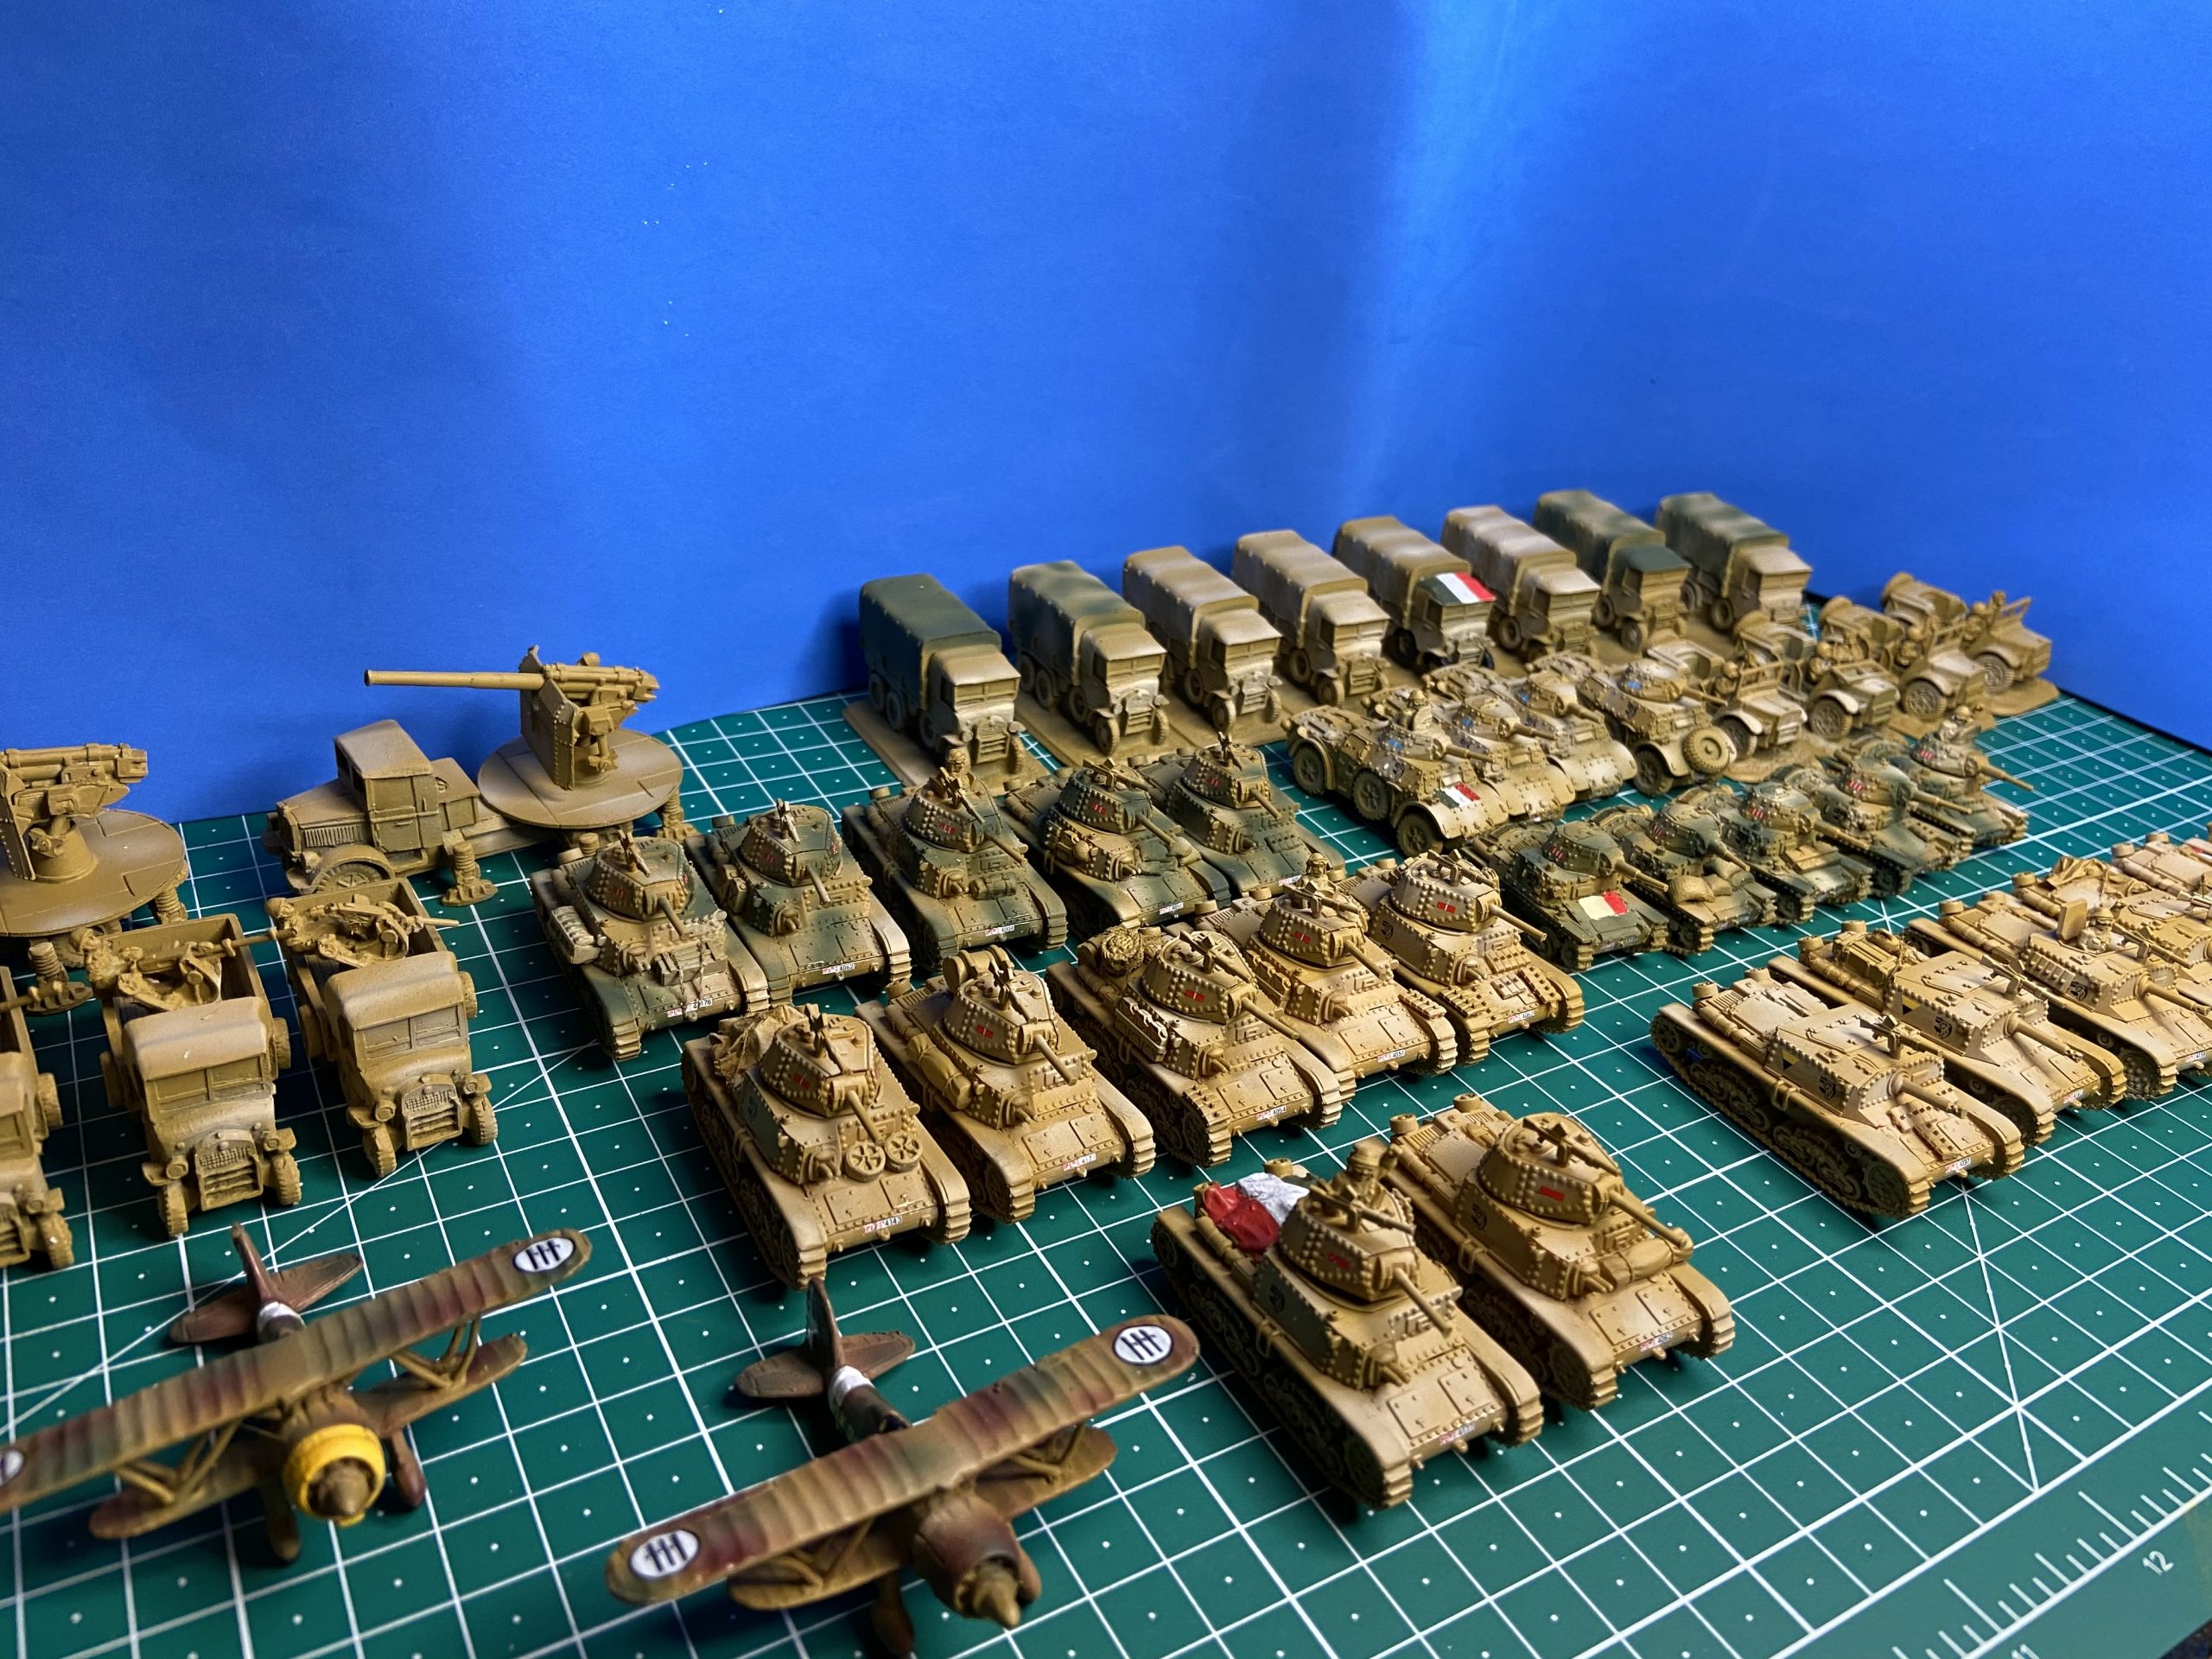
Time to do some highlights. I used Vallejo 71.075 Model Air Ivory, going on the flat panels of the tanks and the external sides. I also painted with the airbrush some brown and green spots on the two CR.42 Falco planes – I’m using a 2mm needle so I didn’t need masks.
Since I already had the green in the tank, I also painted some green stripes on the second M14/41 platoon, to be sure I will be able to distinguish them from the first platoon once in battle. Italian tanks in the desert usually were painted in plain sand colors, but sometimes they did some stripes so it’s good to have a platoon like this. I was satisfied by the final look, so I did the same on the L6/40 platoon – those guys really need to be hidden if they want to survive with their low armor!
At this stage, I also added the decals. I wanted a final “used” look, so I needed them before applying any weathering. Italians often painted flags on the top sides to be visible from the air (at least in the first stages of the desert war, when they had air support in numbers). I also wanted to have these flags to be weathered, so we need to paint them before the weathering.
Fourth step – Time for washes.

You can have a good looking final effect with two kinds of washes. I often use Games Workshop Agrax Earthshade Citadel Shade (S12), since it is truly matt. However, for these tanks, I used AK Interactive DAK vehicles wash (similar to Ammo Mig 1001 Africa Korps Wash). You need to spread it on the vehicles, let it dry for 20 minutes, and remove from the flat panels with white spirits (AK and Mig also sell the solvent). . After this step, it’s a good idea to have a general drybrush with Iraqi Sand (Vallejo 70.819) – except on planes.
Fifth step – The final details
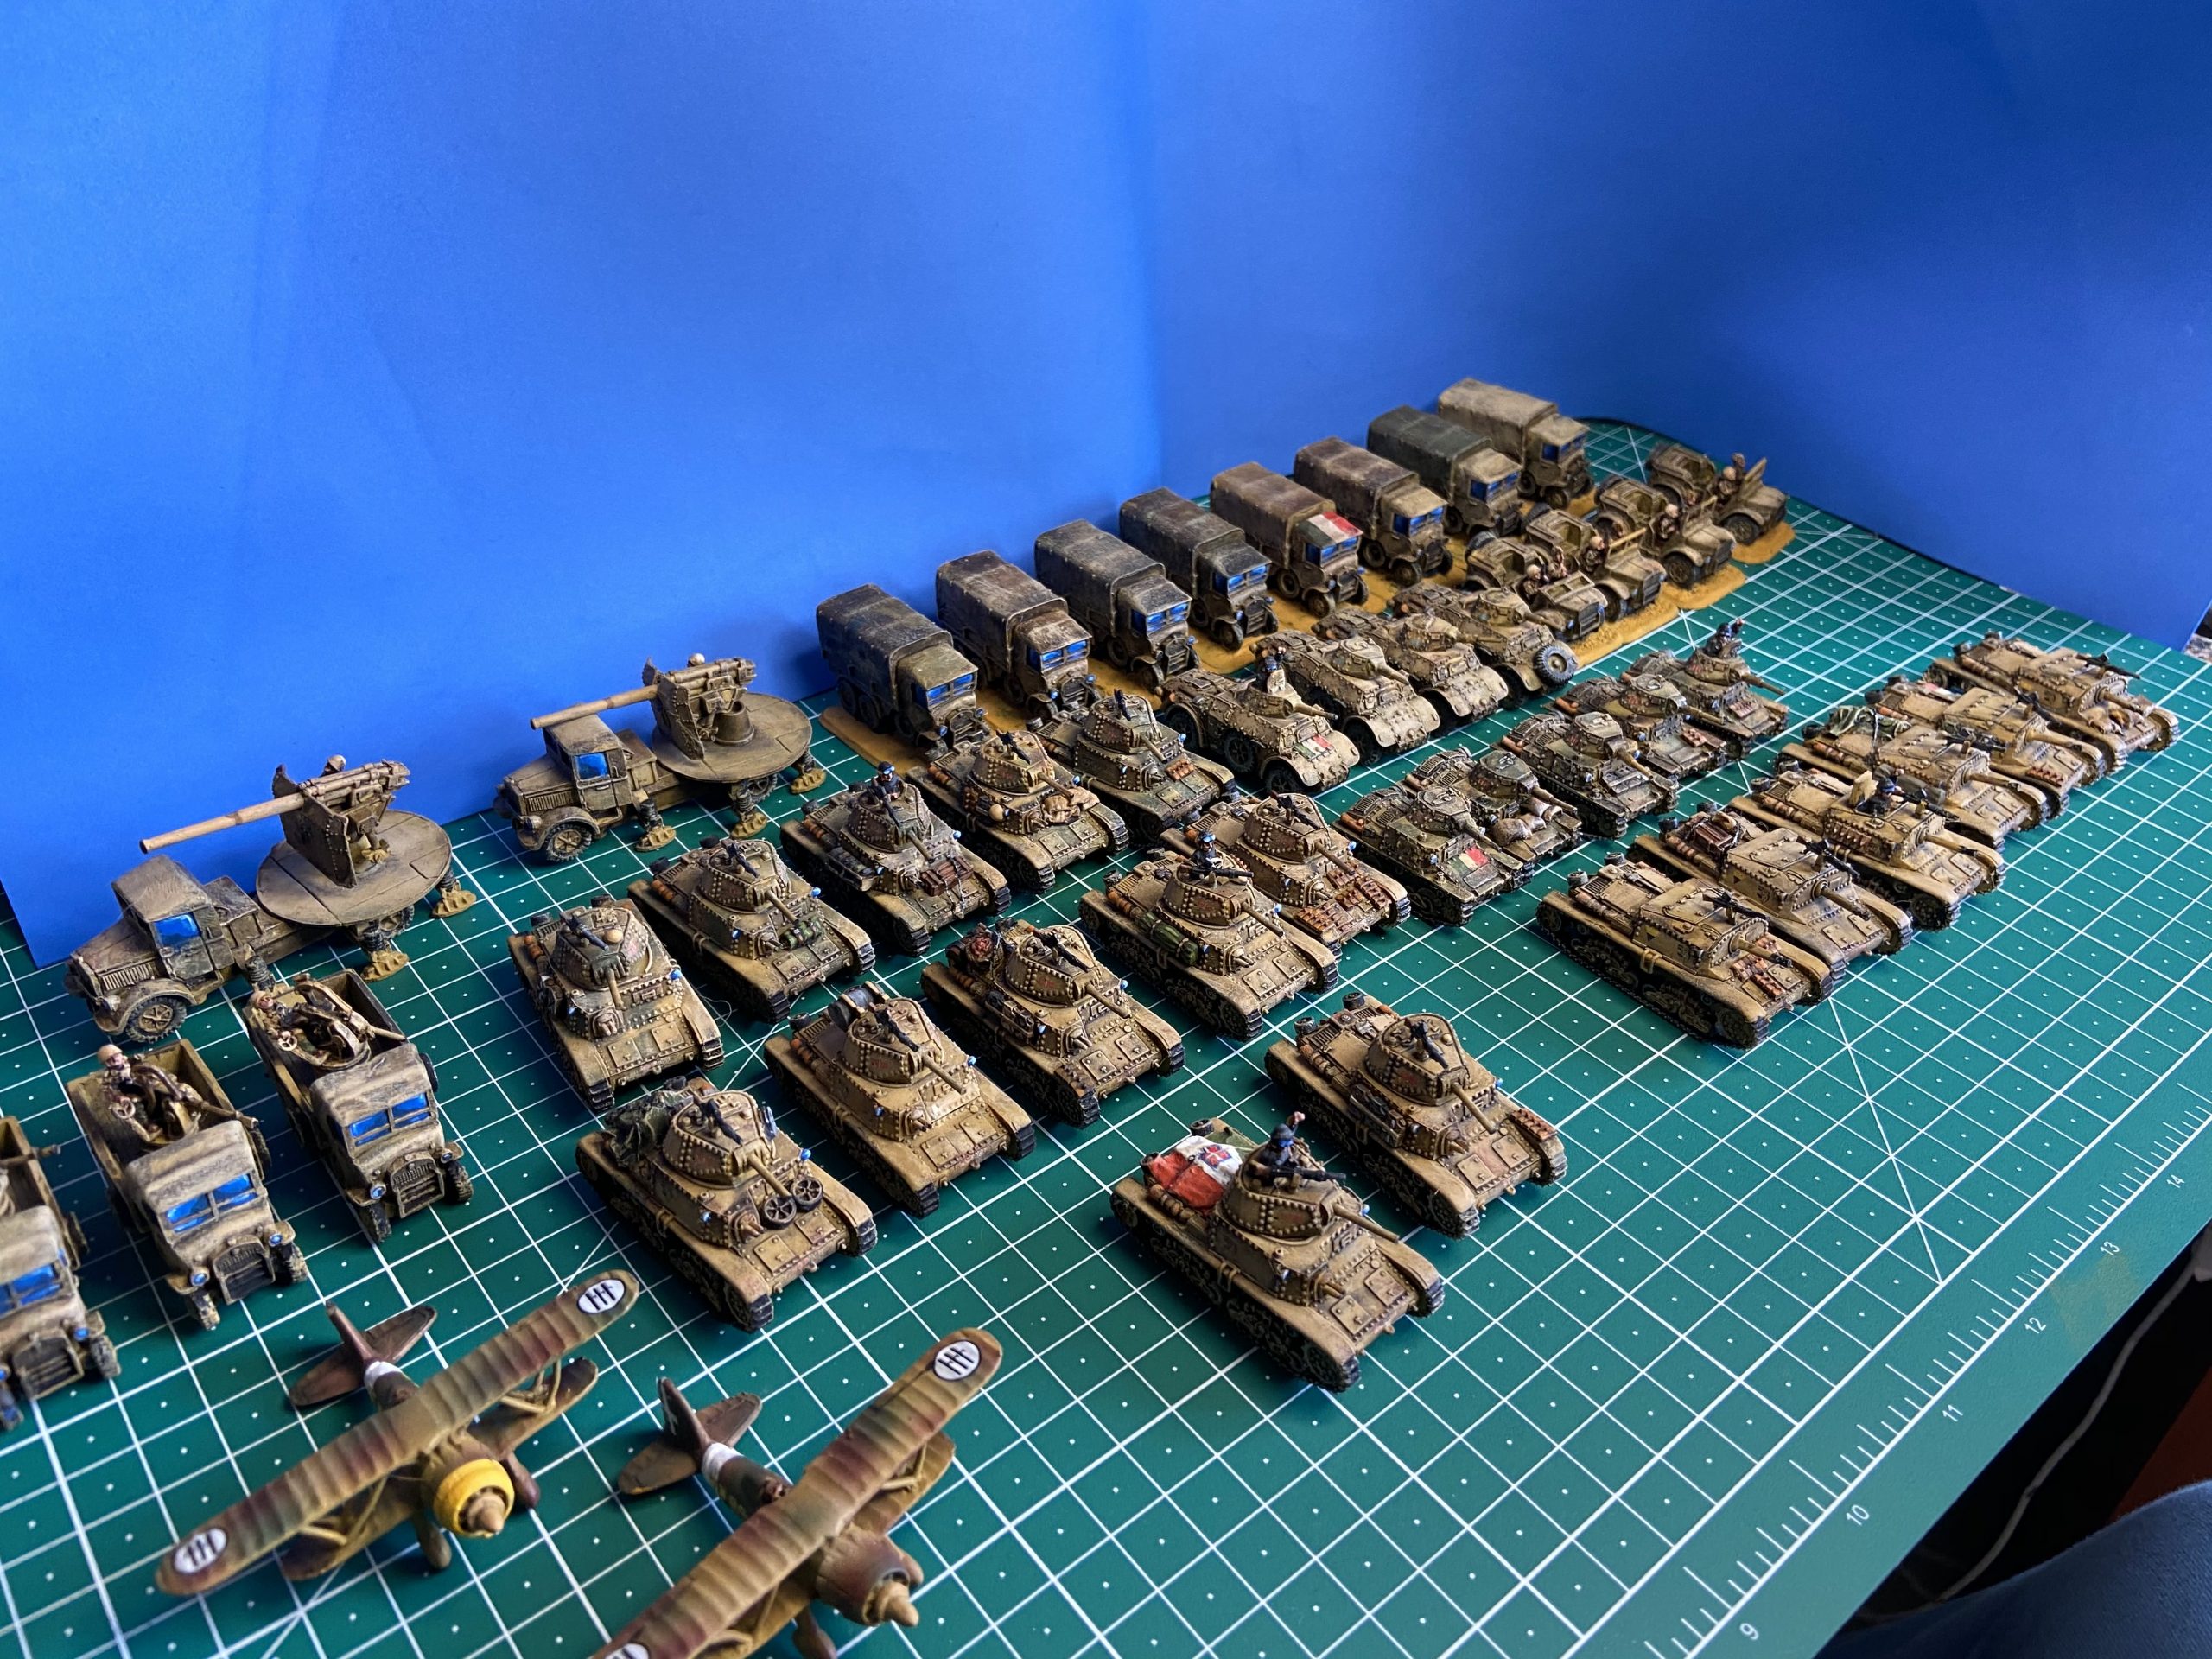
Now it’s time to paint all details. As a general rule, I try to paint extra stuff like flags, bags, fuel tanks in opposing colors to the main camo. Since we have a sand base, we’re going to paint them wood brown, green and grey, so the eyes will catch them more easily. We also paint the windows of the trucks with a deep blue base and three layers of lighter tones to the upper corners.
A close look to the tank platoons
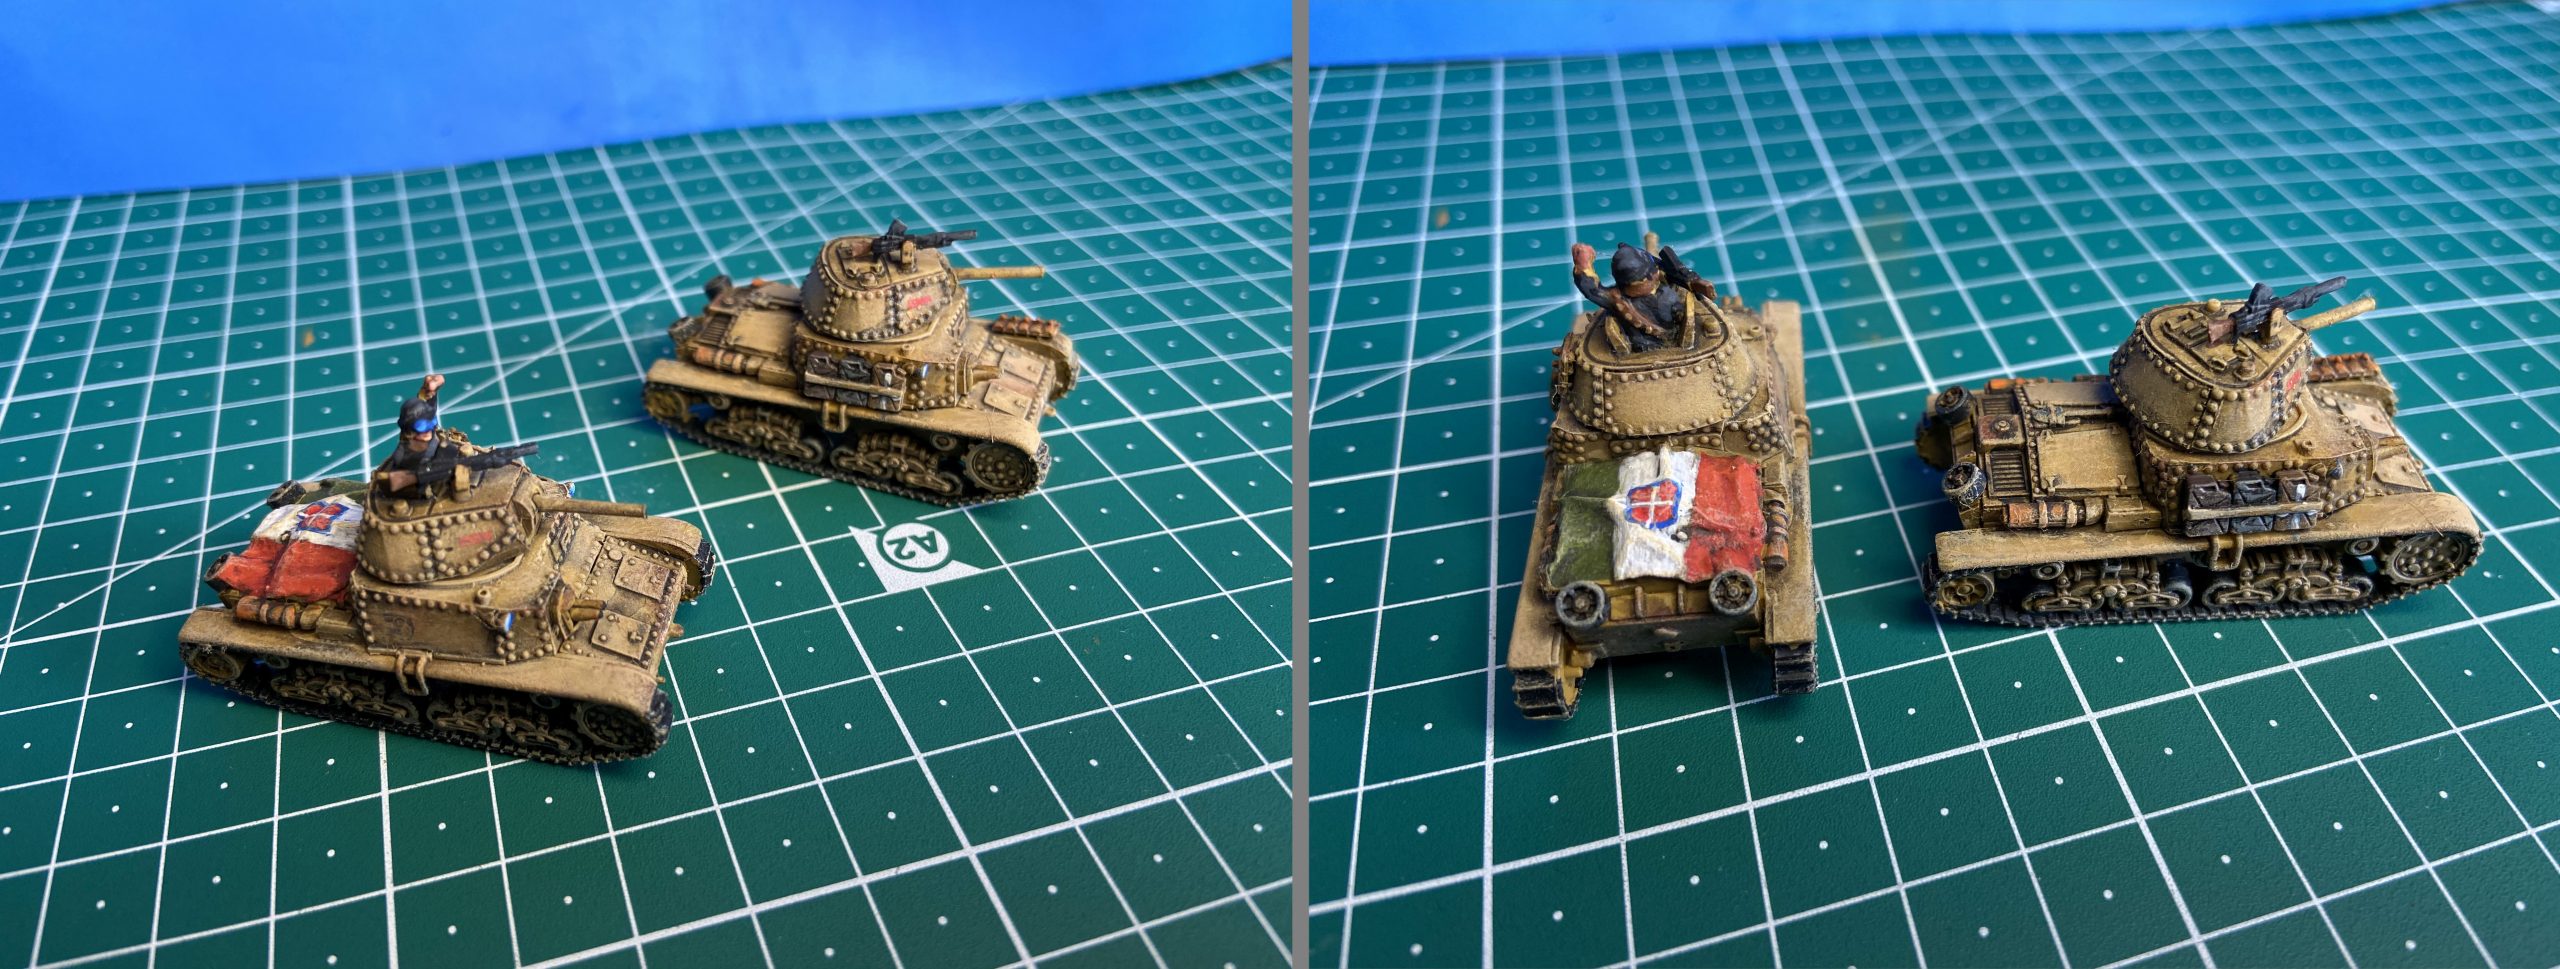 The boss leads the way! Italian tank crewmen had a black suit, some of them used the blue one from the mechanics. The Commander of the Squadron has a distinctive Italian Flag on the back: it is made with soft tissue paper and PVA glue. Just remember Italian flags of WW2 had the “royal” emblem in the center, removed after 1945.
A note on the decals: The platoon stripes are on the two sides of the turret, while the Centauri symbol is on the hull sides. All tanks have the frontal plate (white). My father told me thirty years ago he met a veteran during a modeler’s meeting, and he told him they usually stripped the plates to avoid detection on the front. In the desert, the dust would have covered them quickly, so I left them.

M14 Tank platoon #1. Every tank has a different layout with some extras. The first one has some wheels on the front, while the second has a supplementary water tank on the back of the turret. The third has some fruits, bags, and a spare Breda machine gun, while the fourth preferred to mask the carriage with a green cover. We did the steel cable with some cotton, glued to the corners, painted in black, and then in steel. The fifth was really worried by enemy shots and placed a lot of tracks on the front. We did these with a brown base and lighter tones mixing with orange, to give a “used and rusted” look. The same color is applied to all tanks on the back exhausts.
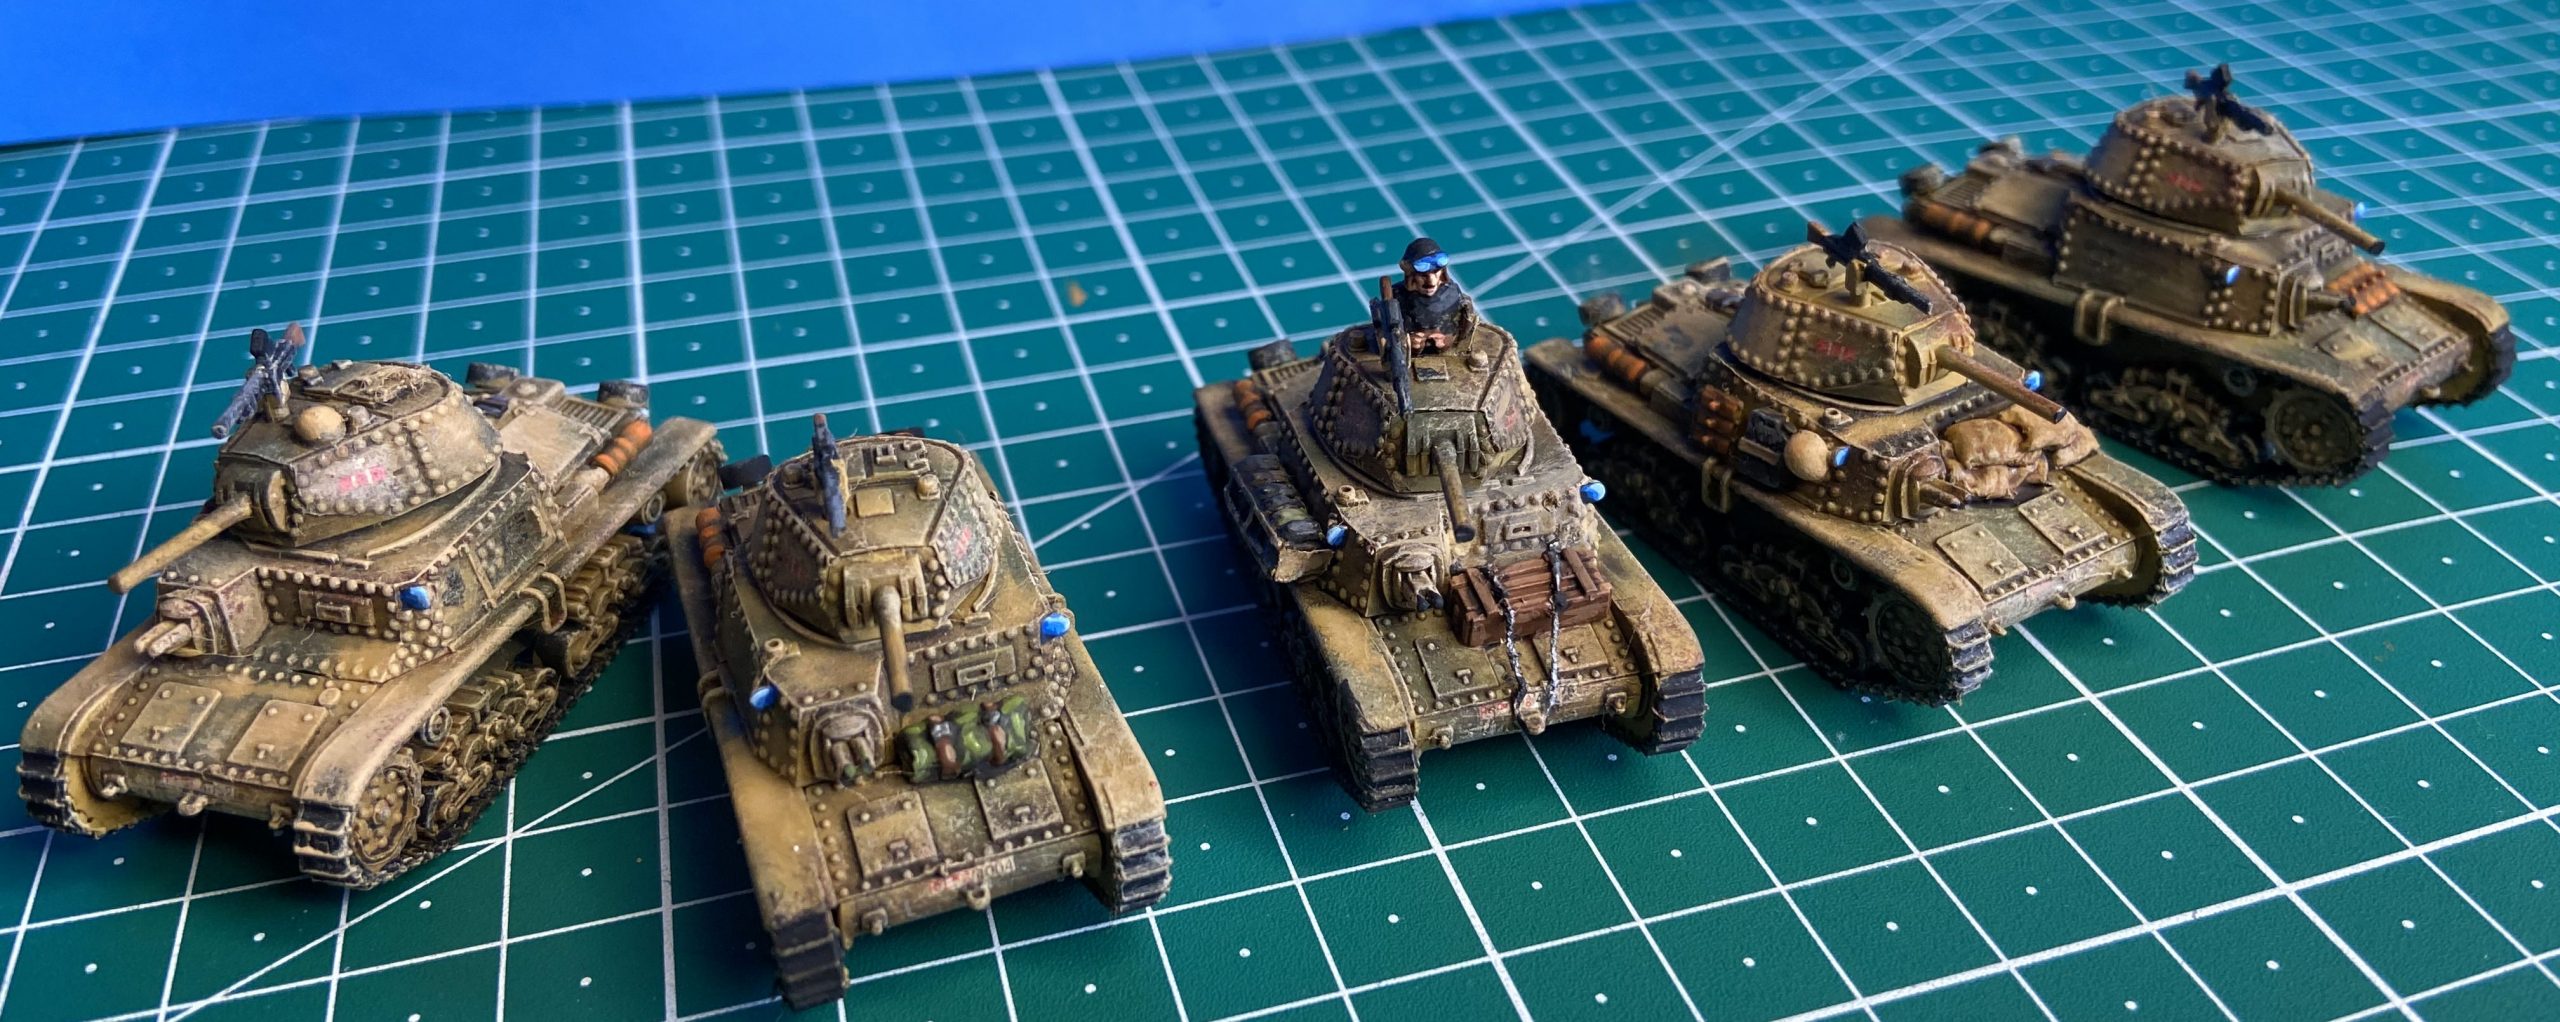
M14 Tank Platoon #2. The green stripes are barely visible after some months in desert warfare. Dust covers everything! However, the Platoon 2 is still different from the #1, with a darker tone and the green stripes visible under the dust. These M14s have lots of fuel and water tanks to face the desert, and one has some sandbags on the front to shield from direct hits. The sandbags are made in Greenstuff ().
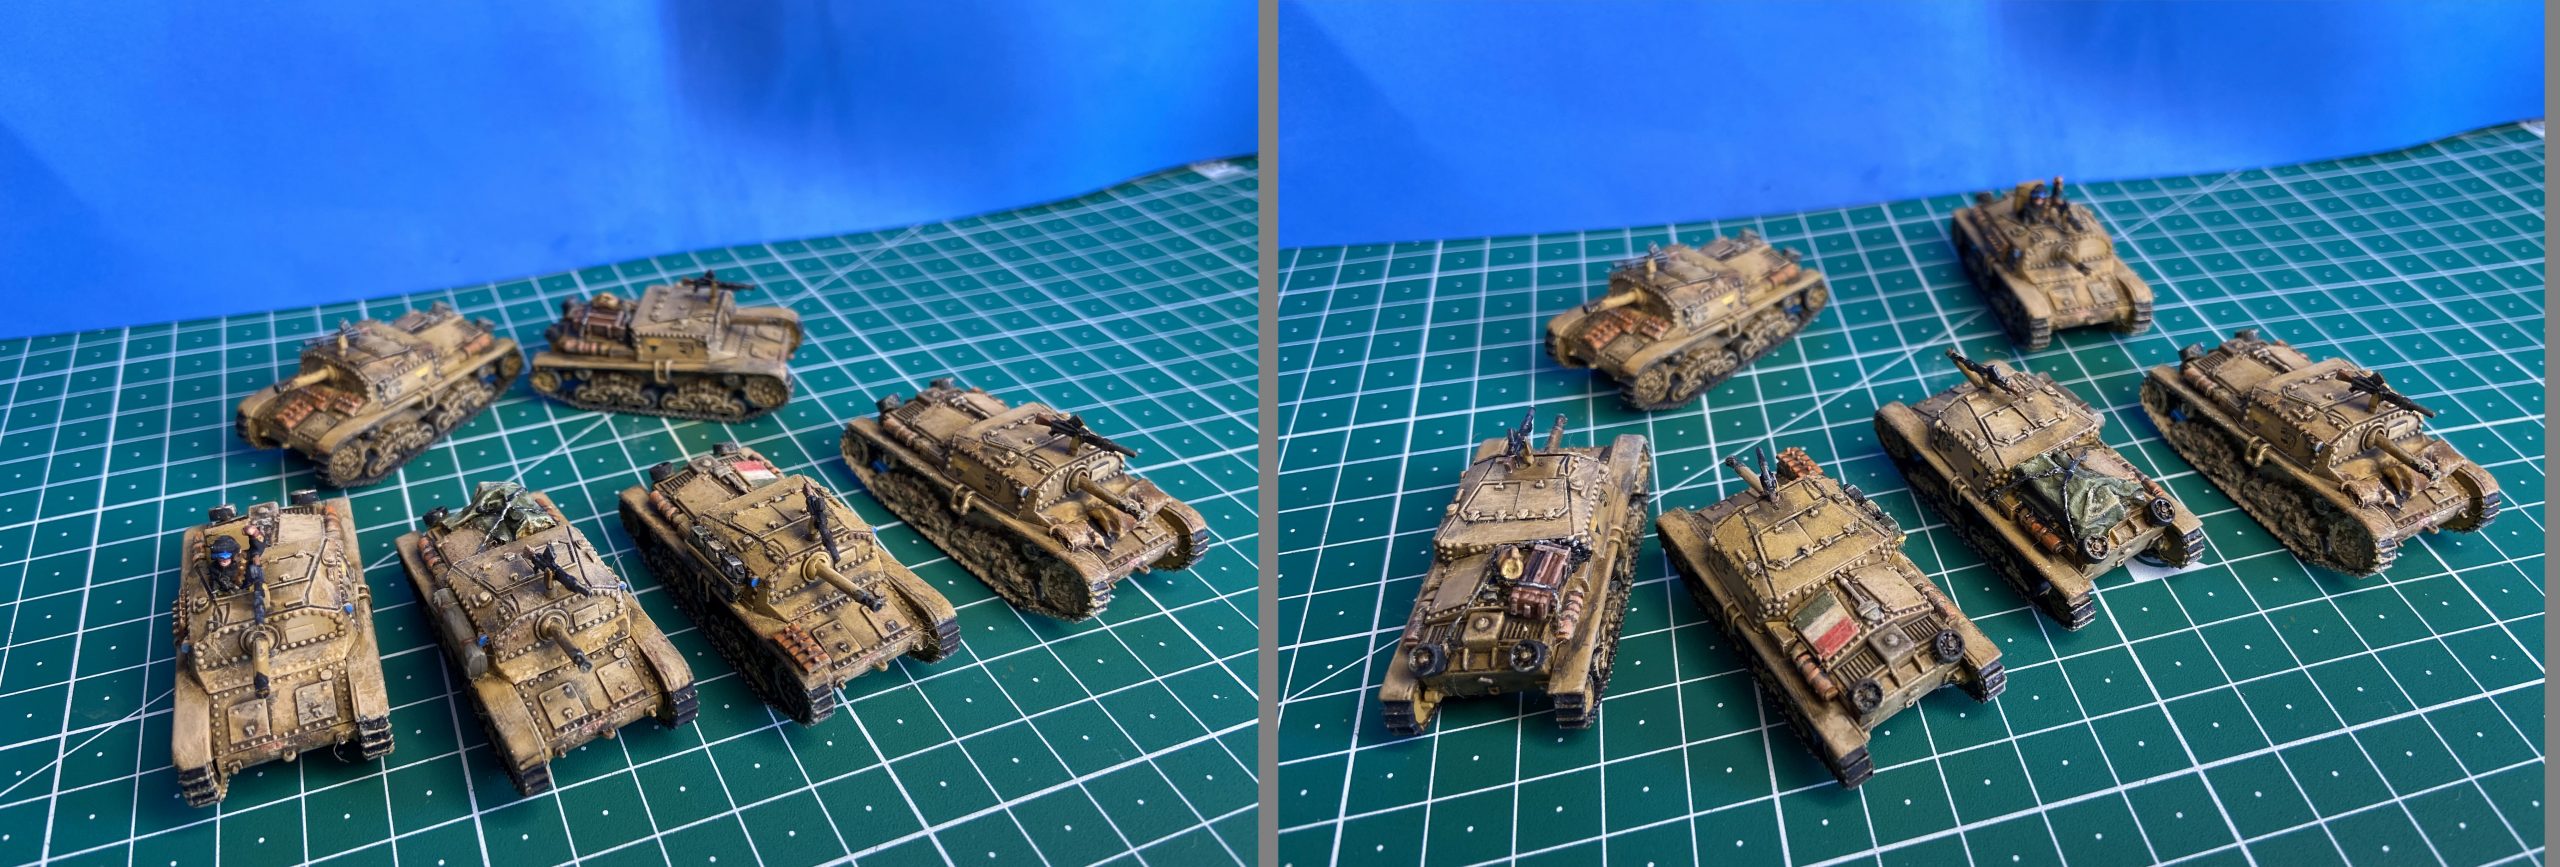 Semoventi platoon. You can’t go to war without it: it’s a very effective artillery-on-tracks, but also good for charging infantry and shooting directly. One of these guys painted an Italian flag on the back to avoid friendly fire, while another placed some war prey on the back (an amphora from Baueda). Another covered the stuff with a green dusted cover. One had the same idea of his colleagues from M14, using some used tracks to cover the front armor, while his friend did the same with some sandbags. The Centauri logo is on the flanks, just on the side of the platoon marking.

L6/40 Scout Platoon. Sneaky and fast, the L6 is a good addition to any Italian list, given their scout/spearhead skills. However, they can’t fight. Sandbags, tracks, and fuel tanks are placed on the frontal armor, even if their best option is being undetected at all. A proud Italian painted an Italian flag (I found a WW2 photo of that).

AB41 Cars. Another scout, but on wheels. I added a spare wheel on the front of one of the team, and another improvised Italian flag.
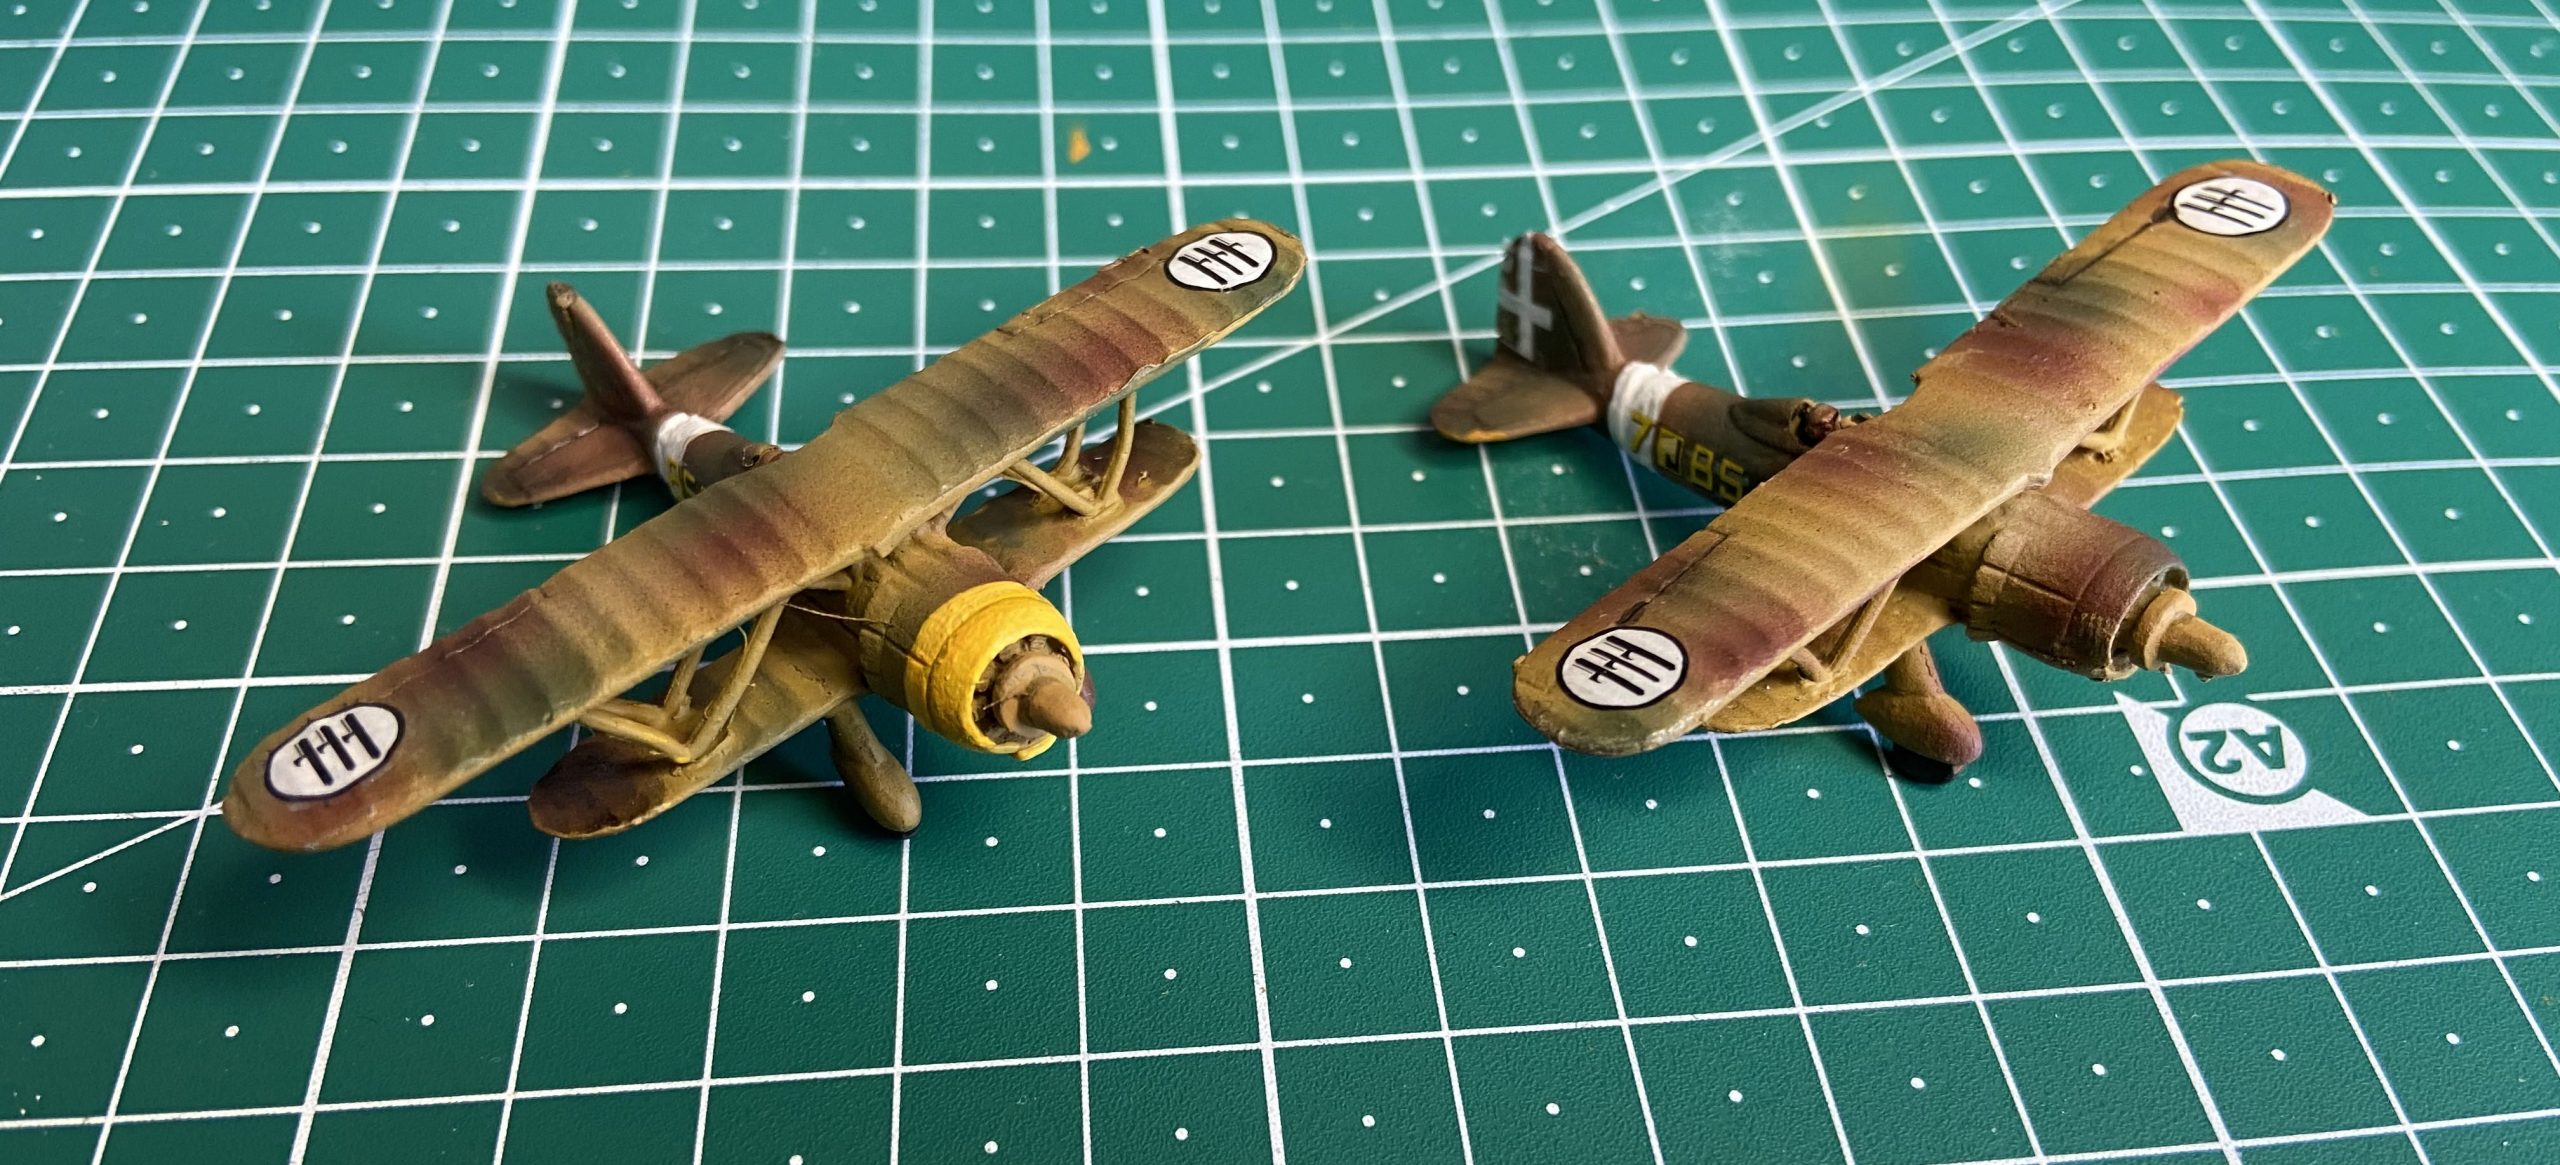
CR 42 Falco wing. I normally like to paint some shark jaws to identify the leader’s vehicle, but apparently Italians didn’t do that in the desert. I opted for the yellow nose: to paint such a clear and light color, you need to prepare the part you want in yellow with a base color – I used Desert Yellow (Vallejo 70.977).
Once dry, you need to do a second passage with a 50%-50% mix of Desert Yellow and the yellow you want to apply, and finally, do a passage of yellow only. If you leave the darker shade in the lines between the panels, the effect is nice. You can underline these lines on the wings with Panel Line Accent Color (Black) from Tamaya: it has a very small brush you can use to pinpoint these lines.
I painted the white stripes and applied the decals on them. Speaking of decals, to avoid the risk of “losing” them while you handle the models during your games, here is a trick. First of all, prepare the surface with a glossy transparent paint (I used Vallejo Gloss Medium, 07.470). Once dry, position the decal, and cover it with Vallejo Decal Fix, 73.213.
This will “lock” the decal in place and you can weather the model with no worry. Once finished the whole army, you should cover it with a protective spray, I used Vallejo Matt Varnish (28.531). This will cancel all those annoying “gloss” spots around the decals.
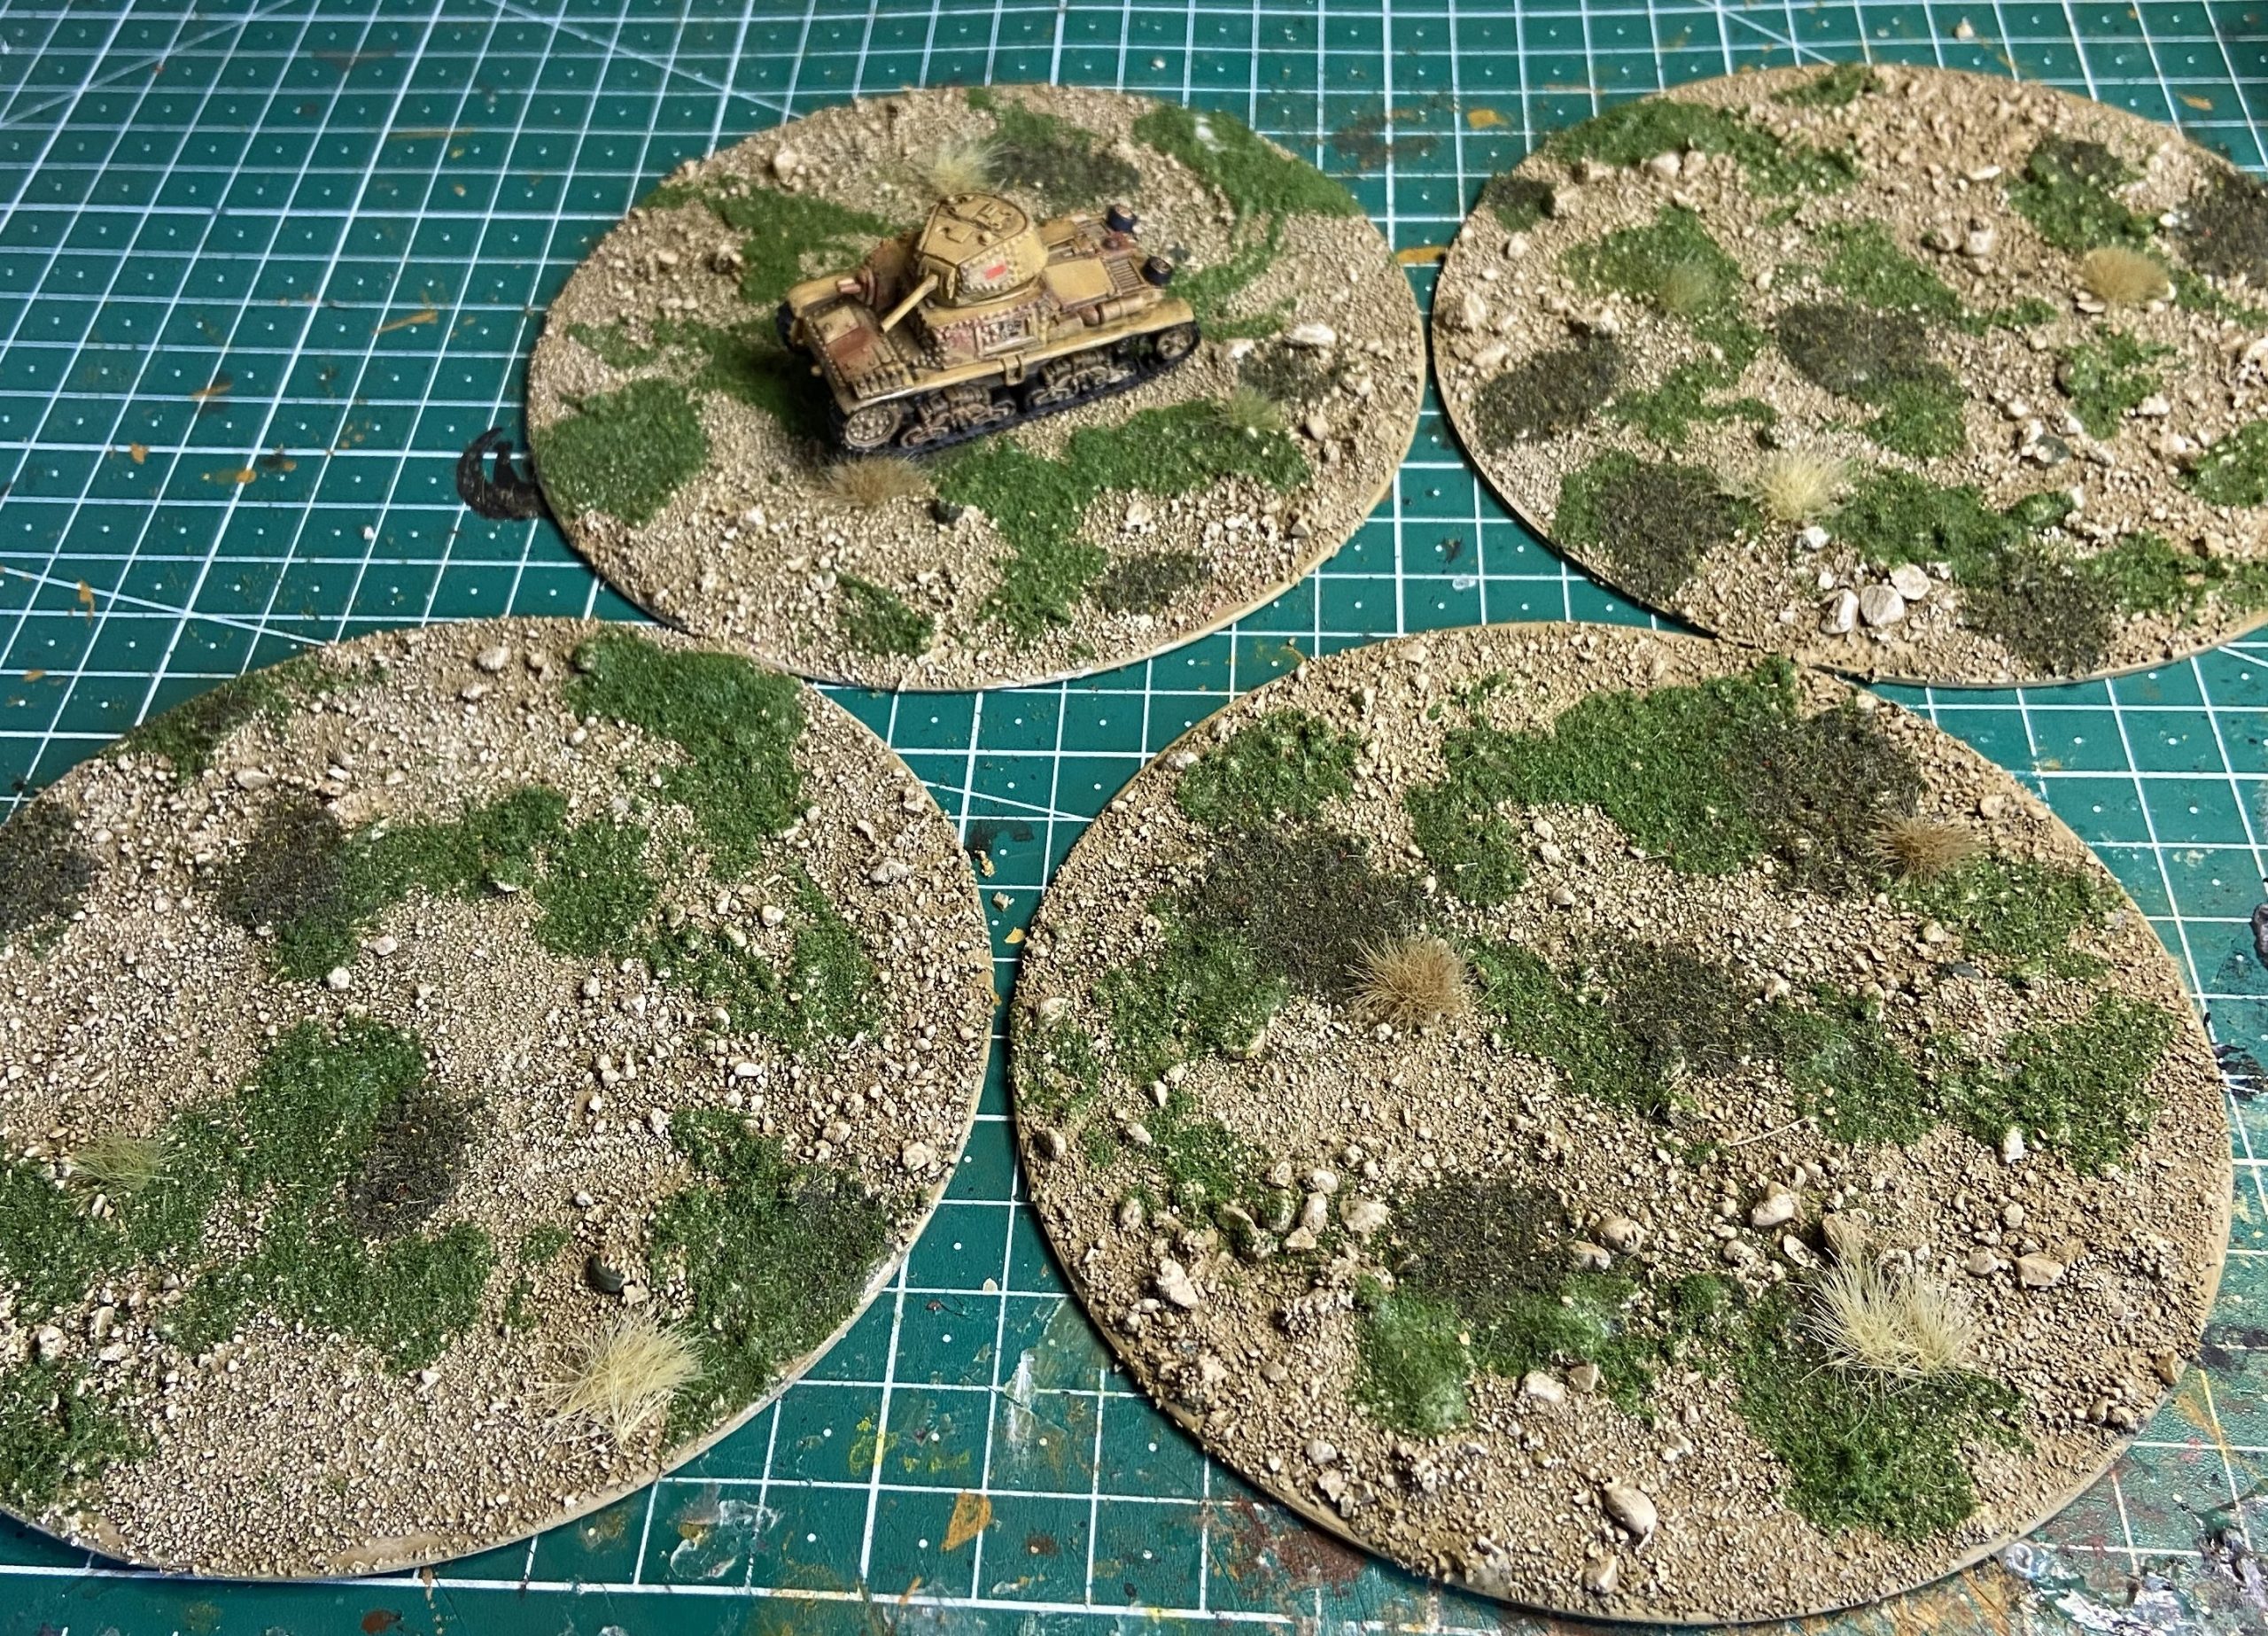
Some minefields. To finish the army, I did four minefields with a “desert” look and with just a few grass spots. It’s very easy: I used four old DVDs and covered the central hole with some hard paper and some packing tape. I primed both faces with black spray, and then I added sand on the upper one, mixed with vinyl glue. Once dry, you just need to base paint them in sand color and drybrush with lighter tones. I also added some “mine” popping out of the sand. On Battlefront’s sprues, you find those pins for the turrets: I don’t use them since I prefer the magnet, so I cut the head from some of them and used those heads as mines.
Great paint job! I really like the Italian flag on the back of the M13! The weathering also very well done!
thanks a lot 🙂
Molto belli i carri e le customizzazioni ; mi piacciono anche le basette, per le quali, però, avrei scelto un’erba meno verde, in ogni caso: 10 e lode. Qualche riserva sulla colorazione dei “falco” . In Africa i Fiat CR 42 erano verniciati color sabbia a macchie verdi, almeno per quanto ne so io.
Ciao Sergio, grazie dei complimenti!
Quando pitturo gli aerei generalmente faccio una ricerca soprattutto sulle scatole Esci, Tamaya e Italaerei, e ho trovato riferimenti abbondanti di schemi a tre colori – sabbia, marrone e verde.
Really great job mate, I have never really likes the 15mm scale because usually the painting on them Lions very slobby, but you made me totally change my mondo, this look amazing! Well fine!
Hi Raffaele,
thanks a lot 🙂