ETC 2023, Six games to remember
by Paolo Paglianti
We already had an article about ETC 2023 (you can read it here), probably the biggest and most important FOW tournament of the year. Now it’s time to talk about the six games I had during the tournament. I first attended the ETC in 2022 with Team Iceland – I was the “Italian Viking” mercenary invited to join the Nordic team by Soren Petersen and the rest of the squad. I was very happy and fortunate enough to secure the second overall position.
For my debut with the Team Italy at ETC 2023, I stuck with the British Army, my preferred list in FOW. However, this time I was up against a challenging opponent. While the British army in Late War is a highly respectable list, equipped with all the tools needed to face any adversary, its Desert War counterpart for Mid War is an entirely different story. The British in the desert lacks effective Anti-Tank capabilities with solid AT values. You can acquire some costly 17/25 pound guns, but they are rather immobile. Alternatively, you can opt for the even pricier M10s from our wealthier US counterparts, but they are easily hit (3+) and struggle to effectively counter the formidable armored units of the Russians or Germans.
After experimenting with various lists during Team Italy sessions led by our Captain Livio Tonazzo, I settled on the following roster:
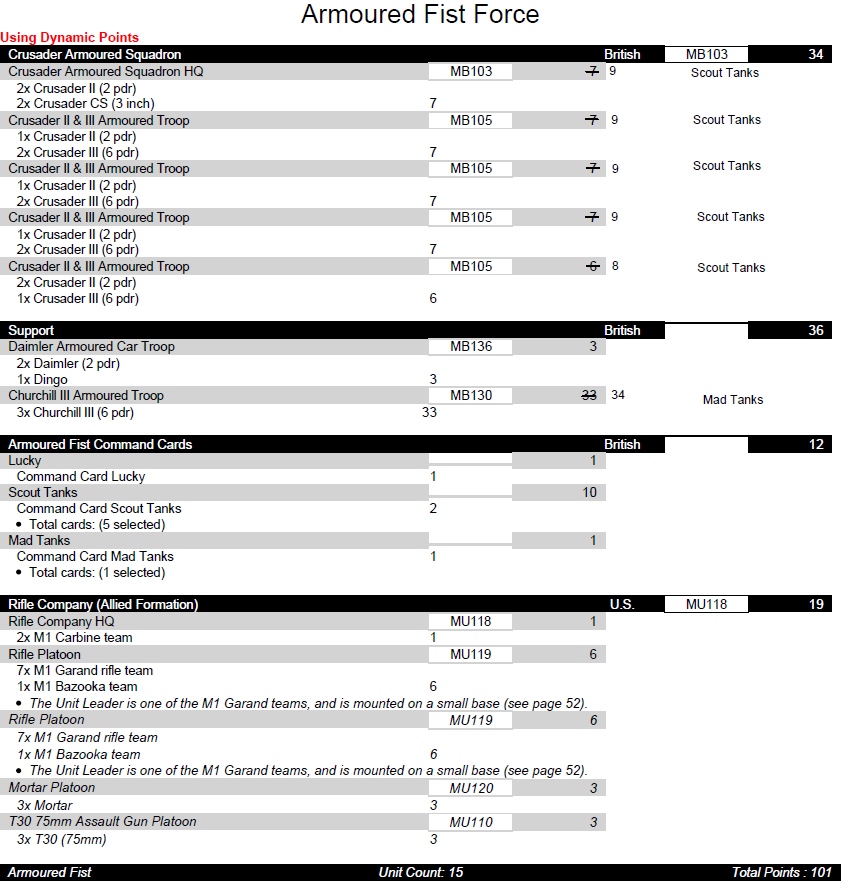
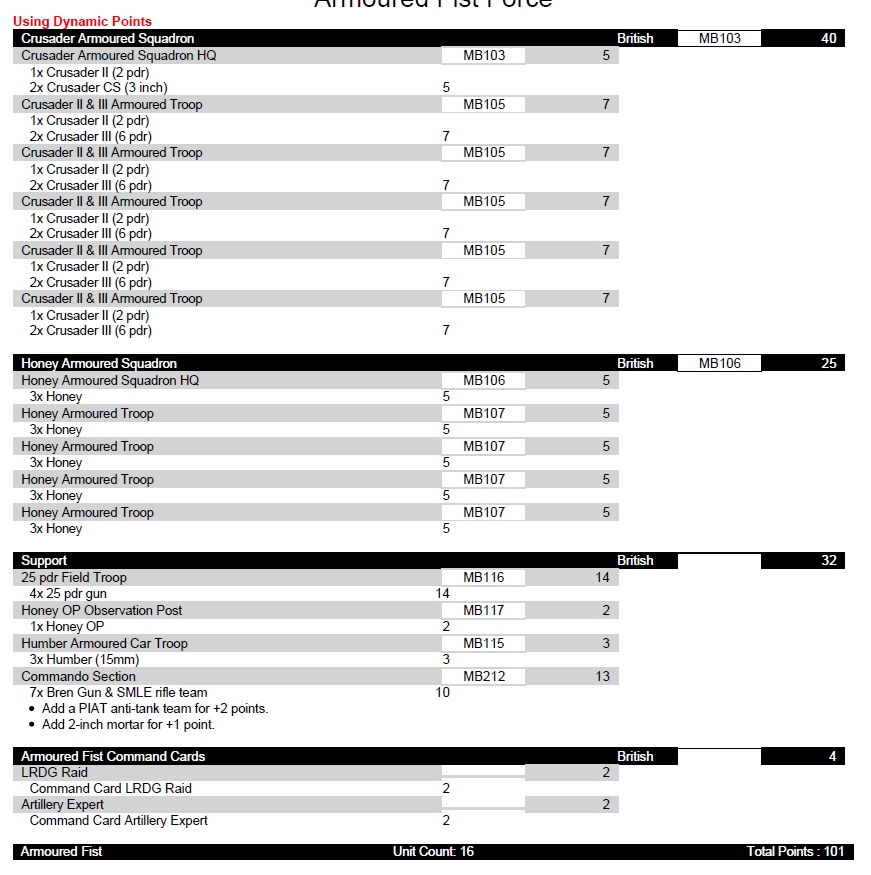
A Crusader list featuring five three-tank platoons, all equipped with the Scout card to transform them into a fast and stealthy force. With this card, they are hit on a 4+ instead of 3+, and get the “scout” trait, allowing them to move and, if hidden by terrain, are also considered ‘gone to ground’. If you can’t withstand a direct hit from anything larger than a .50 caliber, it’s better they don’t hit you at all.

My British army with some US-allied friends. The idea was to maneuver with the scout Crusaders, shoot the smoke with the US guys, and charge with the Churchills. And throw a lot of sixes.
The US ally formation consists of two average troops capable of holding their objectives and thwarting a tank assault thanks to their bazookas. Additionally, they feature two solid units for bombardment. Despite being green with Skill 5, they can reasonably provide two effective smoke screens per game – something I desperately need to conceal the Crusader advance and protect them from unwanted attention. The suggestion to include the US ally came from Livio, who also persuaded me against using M10s.
Finally, the army’s punch comes in the form of three Churchills. With their frontal armor of 9, they are as formidable as a Tiger, although they lack the same 88mm gun and instead are equipped with a humble 6 PDR AT 10. They are ideally kept in reserve and can obliterate any opponent with a well-timed charge. I also included the Mad Tanks card to ensure they could navigate through any major terrain feature and reach the objective as swiftly as possible (this was a clever idea from Claudio Tiso, a close friend from Turin and my favorite sparring partner). Ideally, the Churchills should advance with the HQ just behind them to assist with Last Stand and remount checks.
While this list may not fare well in an ordinary tournament where you might face Russian lists teeming with KVs, it could excel in a team tournament where the Captain will attempt to pair your list with Italian, German, and other British forces. At least, that was the plan. Let’s see how it actually turned out.
You can find, for reference, the Flames of War Mission book here, with all the missions we played.
And the ETC 2023 website and final results here.
First game, Jesper Graff from Team Denmark
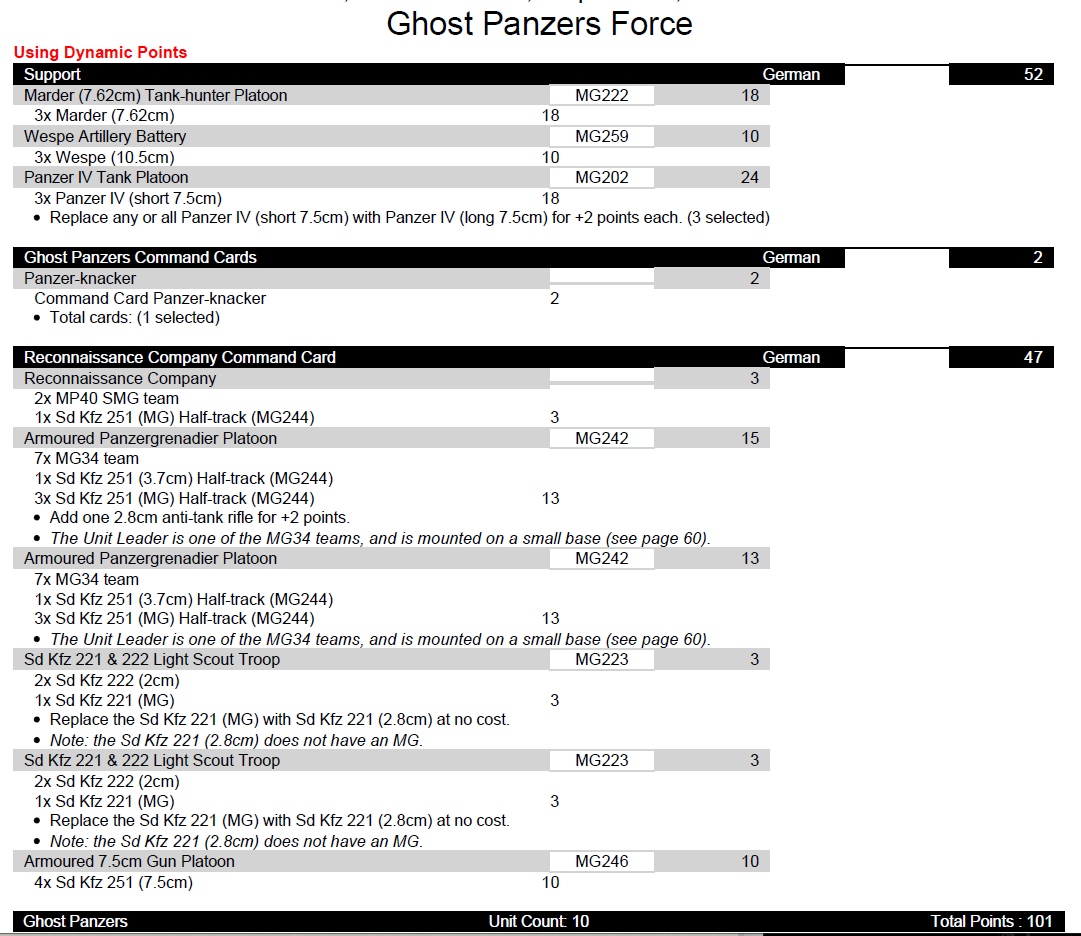
The first team we met was the strong Denmark team, and I got a good pairing with Jasper and his Ghost Panzer Force. This was his list.
I attacked’ while Jesper maneuvered, so we ended up with the Valley of Death scenario. This was the table and deployment.
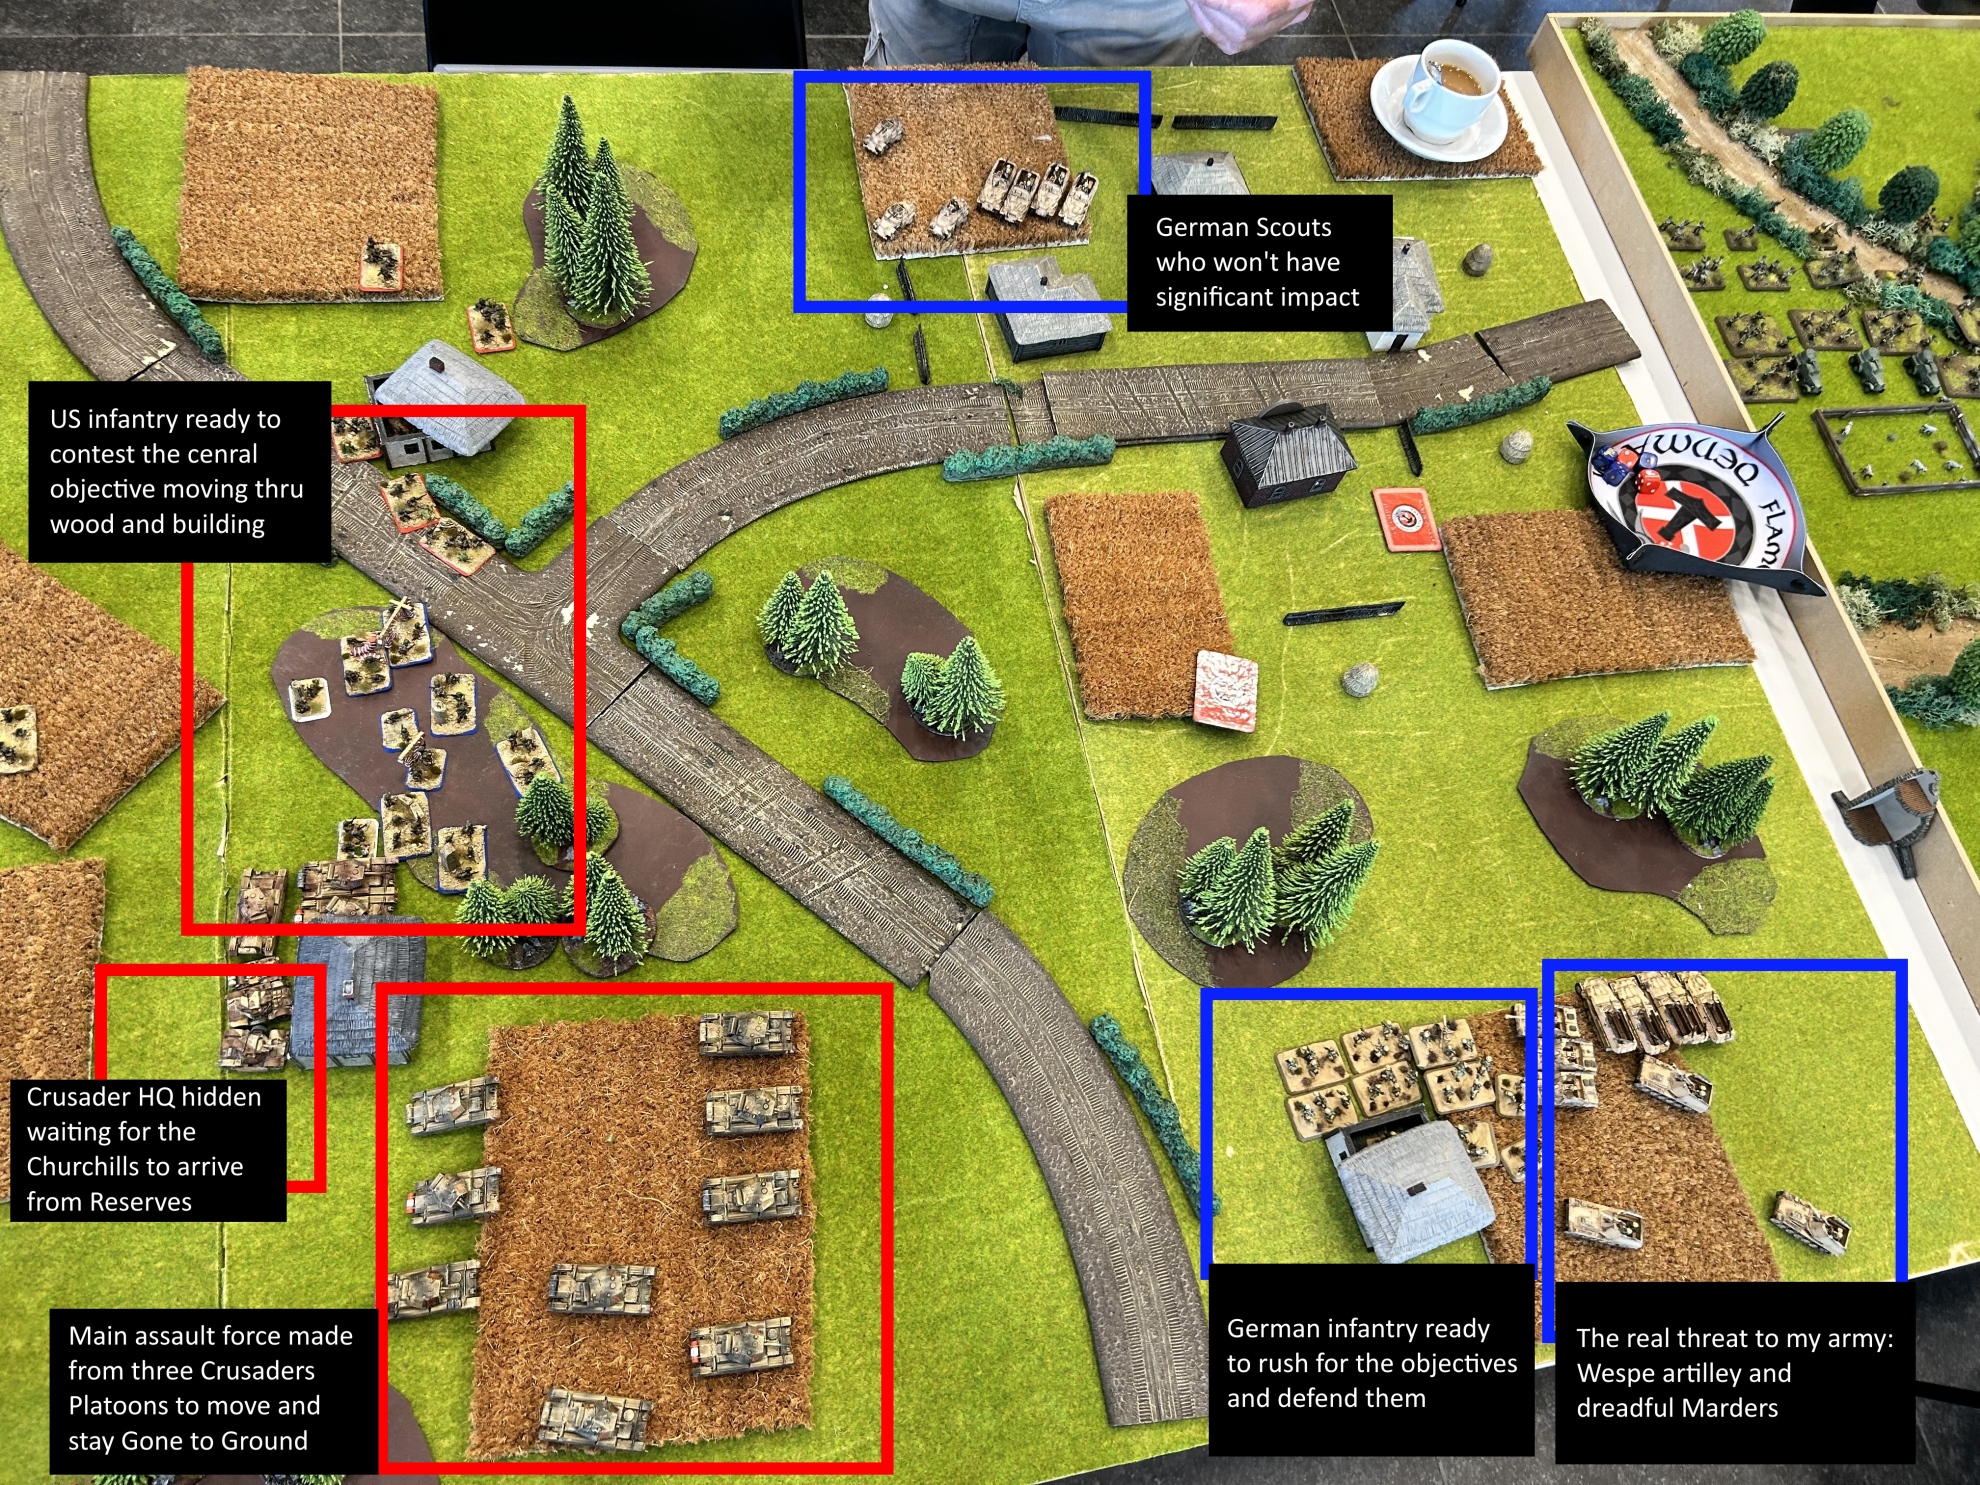
Table of the first game: the mission was Valley of Death and the objectives were in the right center. Defendant needs to reach them while I assault, both of us with 41 points in reserve. I put the Churchills and a Crusader platoon off the table.
This mission poses a challenge for the defender as they can’t simply dig in on objectives from the start. Instead, they need to move into the middle of the table to defend their objectives. The table had a mix of terrain: there were plenty of woods providing cover for my advance, but at the same time, it offered protection and hiding spots for the defender’s army. With Jesper’s reserves coming in from the sides, I had to be cautious about exposing my flanks during my advance.
Jasper deployed almost the entire army in the lower section. Infantry and SD KFZs were poised to rush for the objectives, while Wespe artillery and the Marders were ready to target my advancing tanks and infantries. Marders can take out Churchills and certainly overkill my Crusaders, making them my primary targets to obliterate as soon as possible.
I positioned three Crusader platoons in the lower segment (thanks to the Spearhead of my scout unit) and the HQ in the center, awaiting the Churchills to arrive from the Immediate reserves, and a single Crusader platoon. I kept the US artilleries on the table to provide the precious smoke barrages.
The battle in action. The three platoons of Crusaders in the lower half moved to the hedges and shot to pieces the Wespe. They then moved behind the house and took care of the Marders, that Jesper moved in the center to counter the advancing Churchills. With them reduced to wrecks, the Churchills could safely charge home on the objective and win the game.
In the initial turns, I moved my three Crusader platoons to the crop field near the lower long side of the table. I refrained from firing to “go to ground” and avoid being decimated by the Marders. The idea was to entice Jesper into engaging the Crusaders, losing some of them but in turn, eliminating the Marders and clearing the path for my Churchills. Jesper didn’t fall into the trap and withdrew the Marders behind the artillery while repositioning the infantry on the objective.
This allowed me to move the Churchills from one wood to another unopposed, as the Marders didn’t have any chance to even “see” them. Eventually, Jesper had to commit them to the center but had to fire while moving (ROF 1) and with the cover of the wood in front of the exposed objective. I cleared the flanks, eliminating some SD KFZs and the artillery, then, I charged with the Churchills against the infantry, securing the victory with a score of 8-1.
This scenario proved to be extremely challenging for Jesper and his list. I believe he gave it his all to try and stop me. Lists with numerous scouts like his are hard to demoralize, but they can be a bit too vulnerable to withstand a decisive, well-supported armored assault.
The rest of the team didn’t fare as well. We ended up with a 1-3 score, but we were aware that Denmark was a formidable opponent.
Second game, Sven Desmet from Team Belgium
Time to meet the hosting team, the Belgians! I ended up playing with Sven and his Russian Red Banner Force. Not the best pairing, but I can’t complain too much after the favorable pairing in the first game. Here is his list.
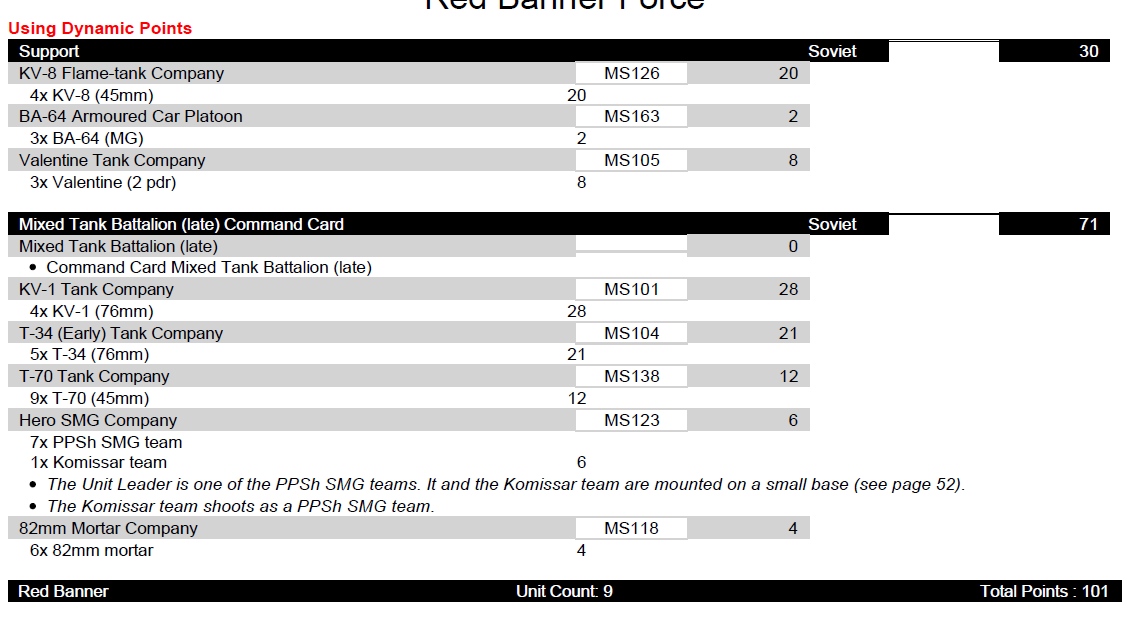
Well, a tough nut to crack for my British army. I can’t simply get through the KVs’ armor, and he has eight of them. Also, plenty of armored tanks with T-34s and Valentines. This was the deployment.
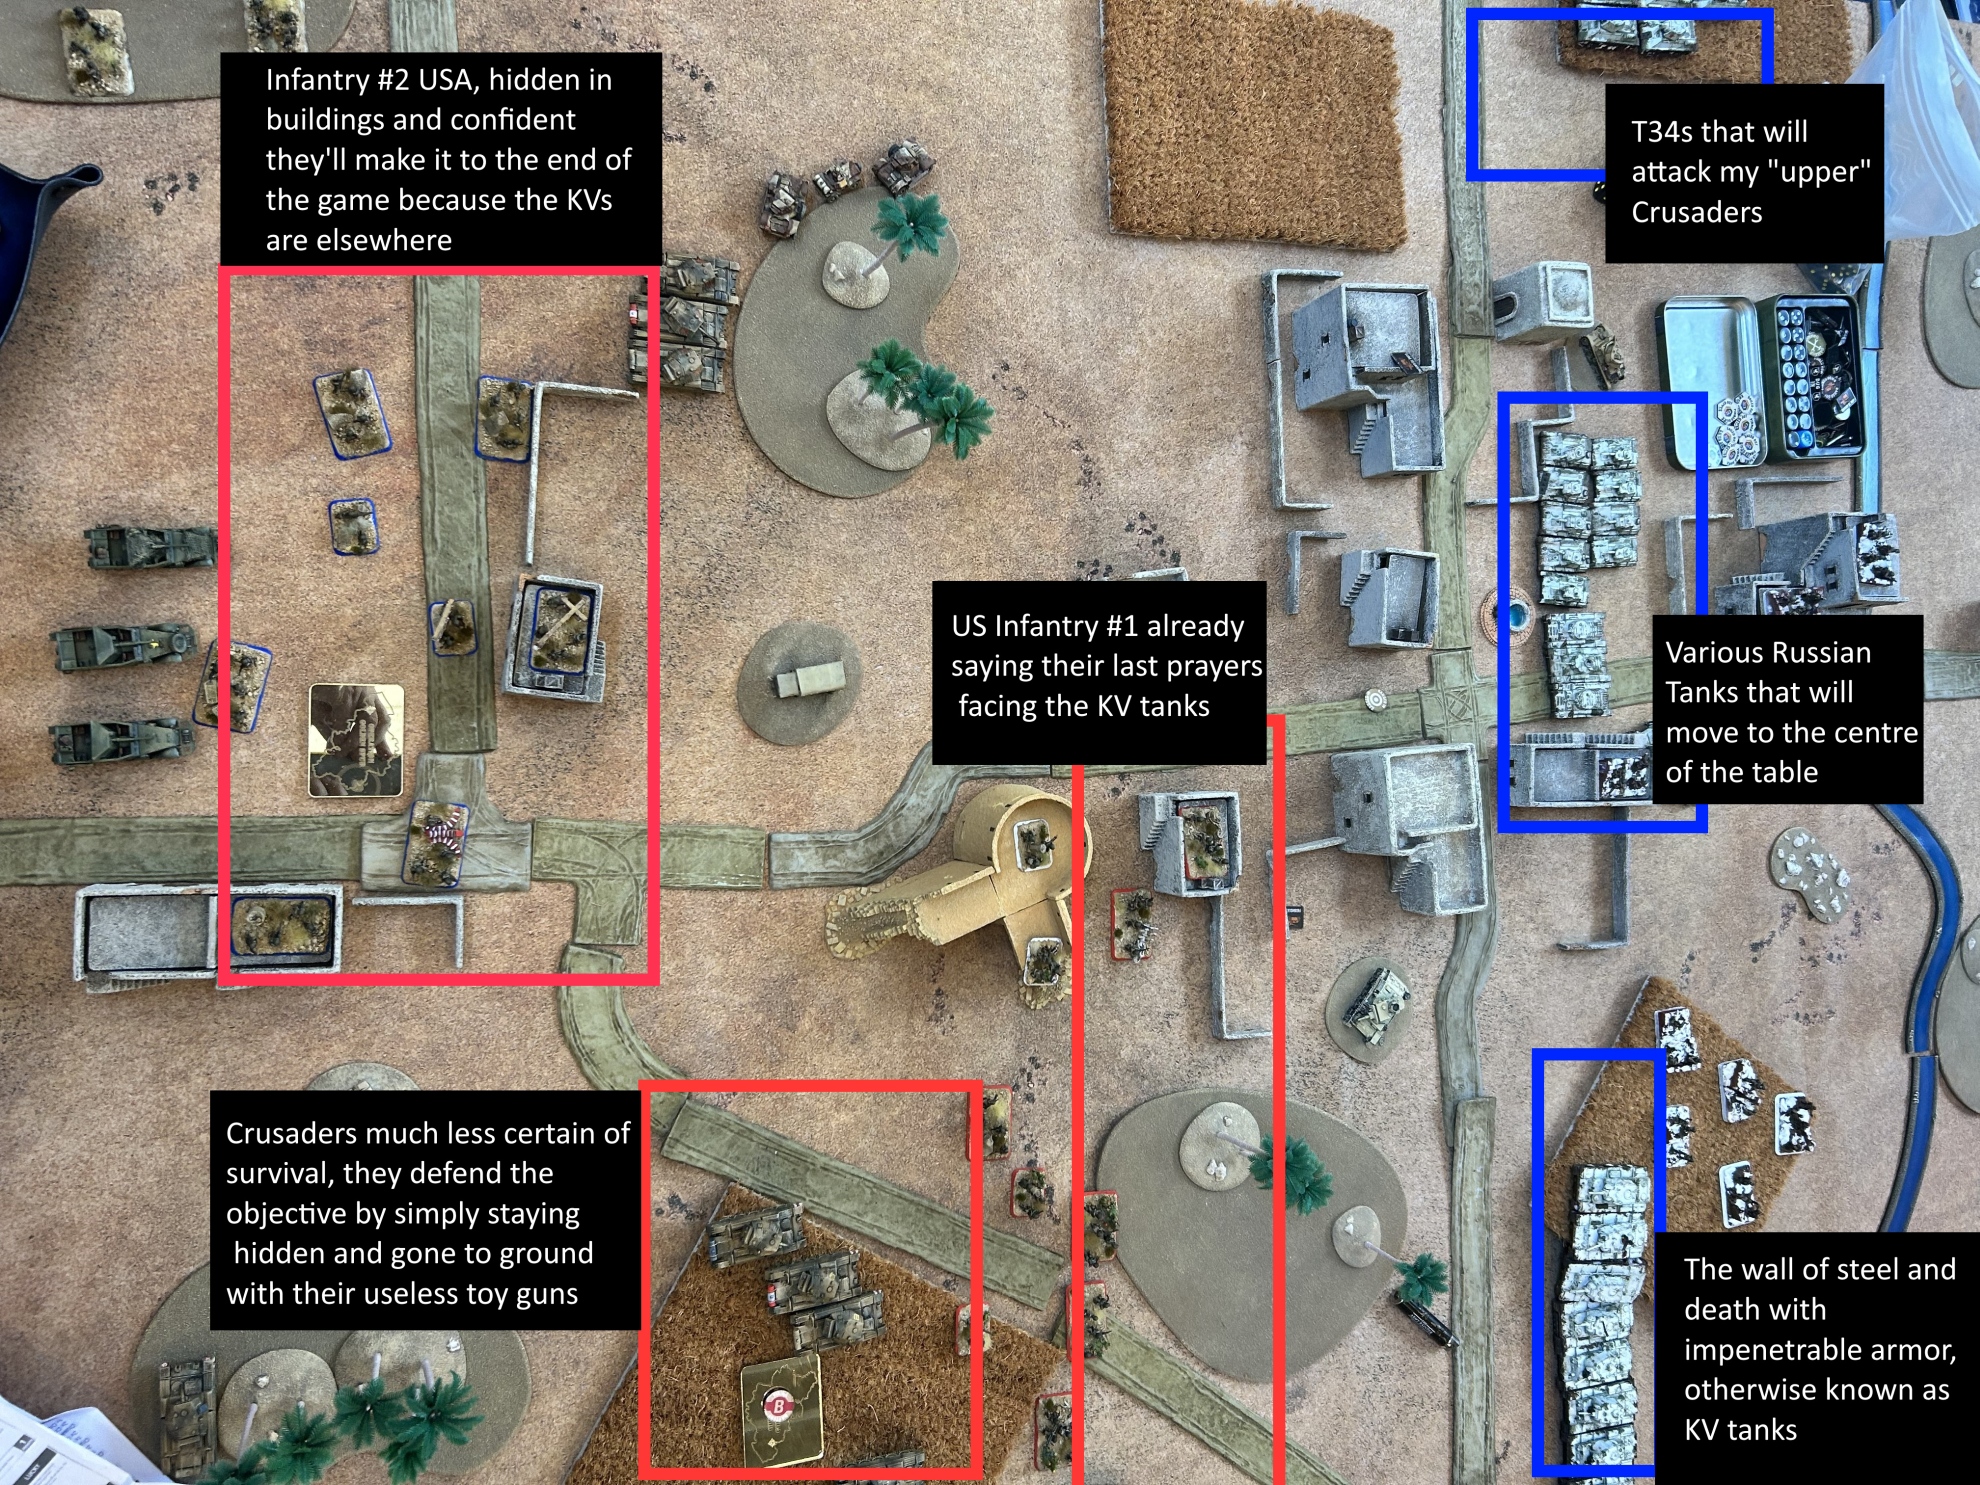
Deployment of the game with Sven: with nothing able to kill directly the KVs, I had to stay on the defensive and keep my head low. The village in the center of the table was a good obstacle to his advance, but the objective on the lower half was naked and open.
I maneuvered and he attacked, so we ended up with the Escape scenario. Not the best option, as not only do I have reserves, but they will come from behind the Russian deployment, on the opposite side I would need them to defend my objectives. I chose to deploy the Churchills outside, as they won’t be able to stop the KVs frontally either, together with a Crusader platoon. I positioned the Crusaders en masse on the exposed frontal lower-side objective, with the idea to keep them near the objective, gone to ground, to buy time for the Churchill to come from behind. The first US infantry platoon was in front of them, to buy even more time as a first line of defense. The other infantry was safely covering the other objective I placed in the middle of a small town, considering Sven couldn’t charge them into the buildings.
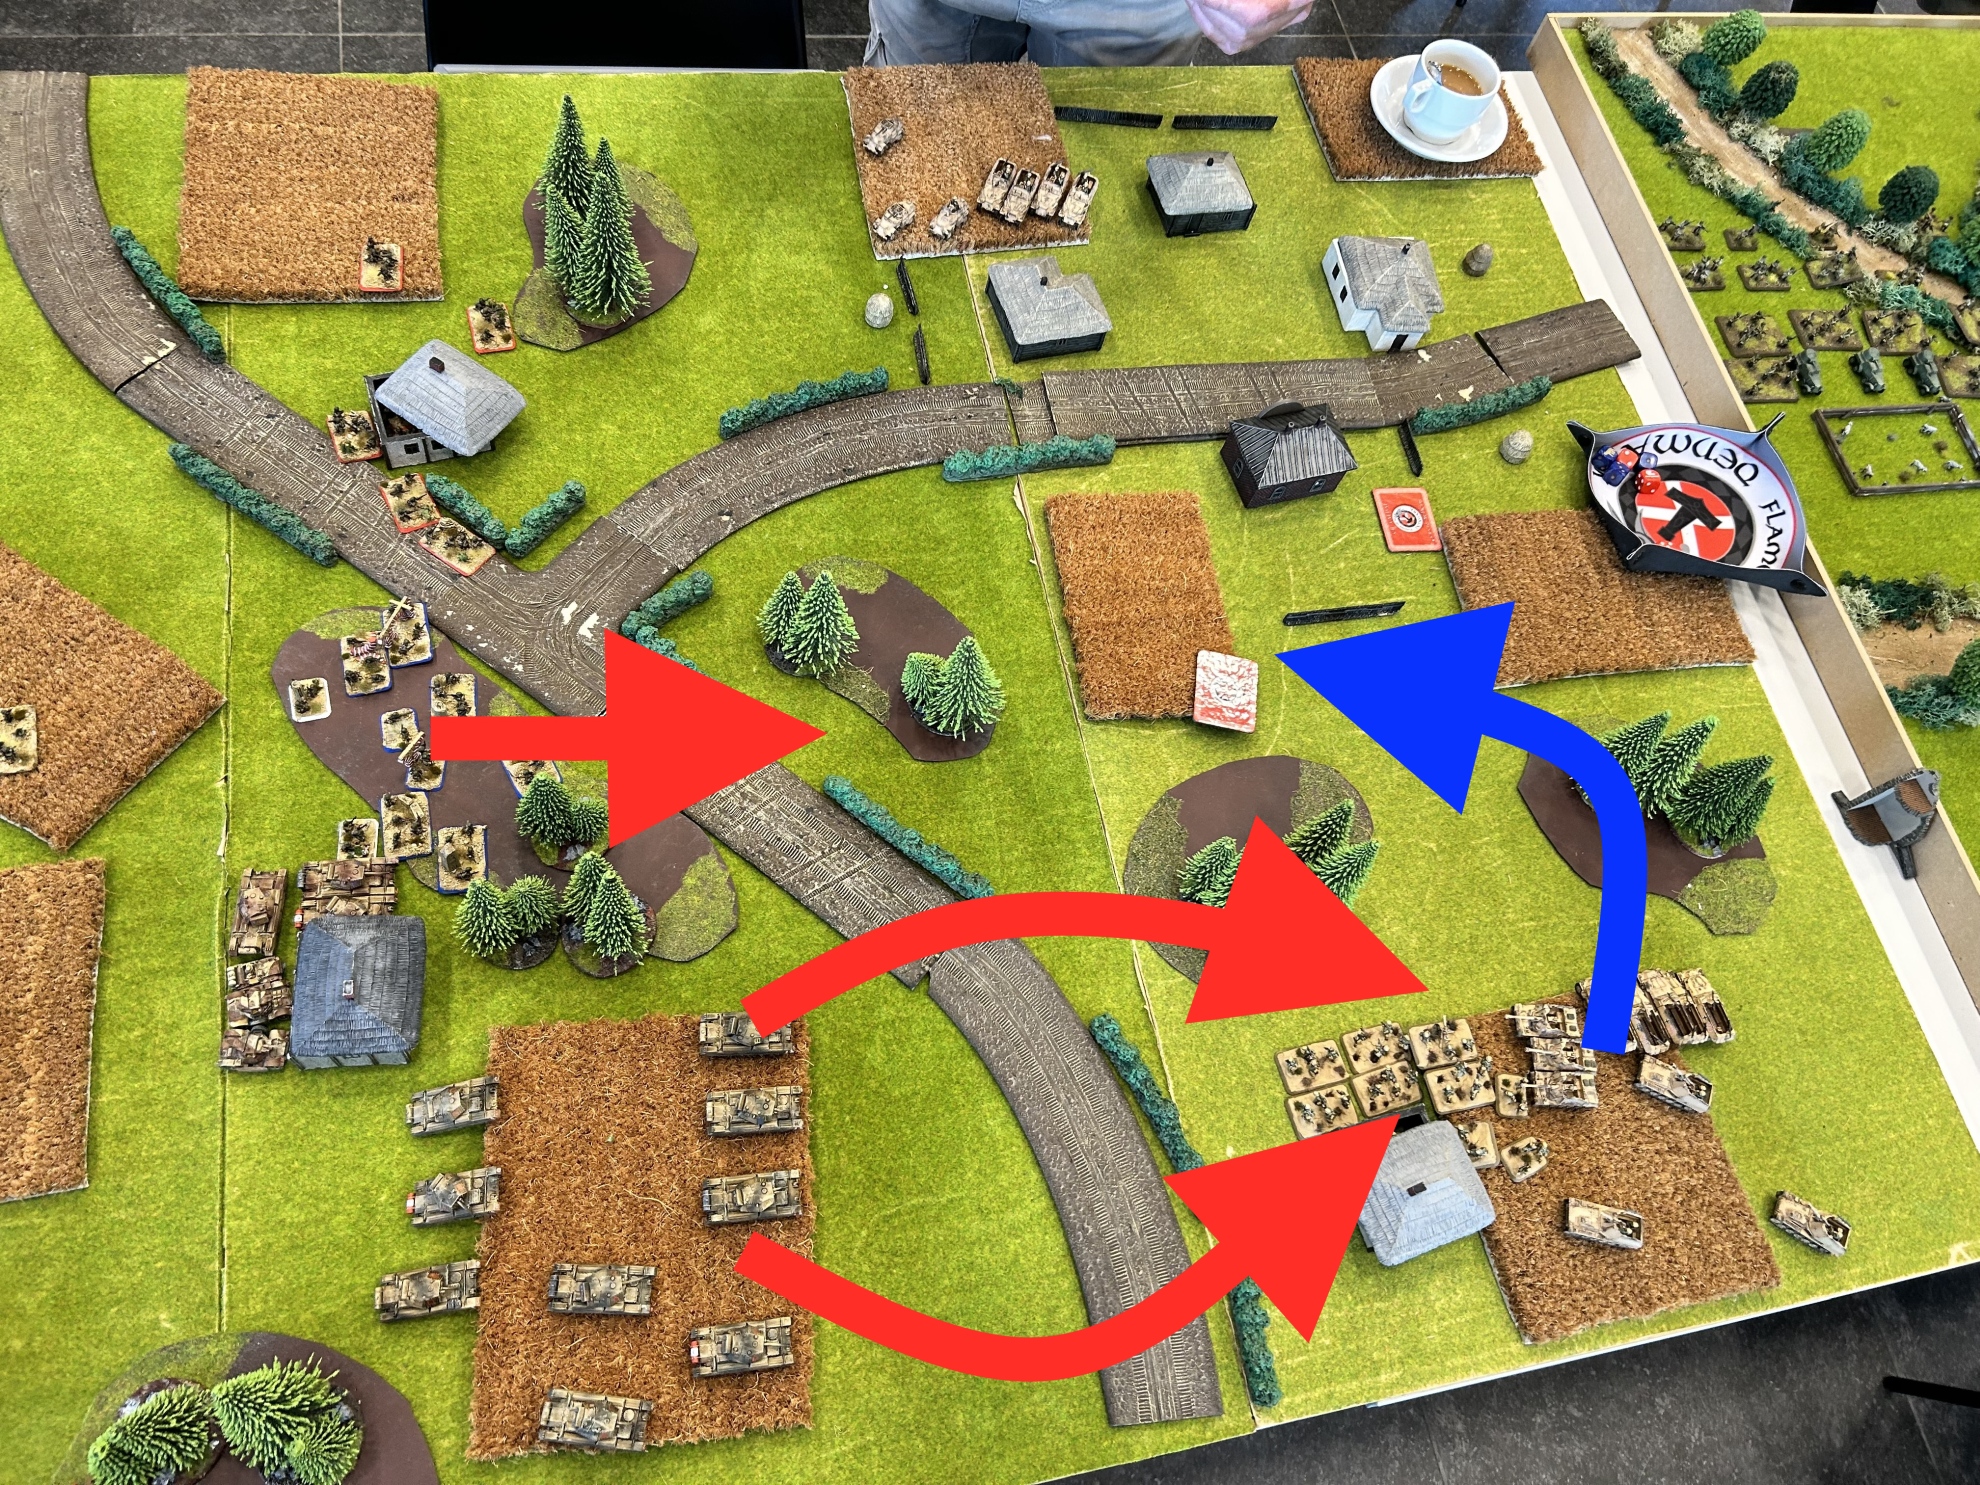
Sven devised the best plan: he massed the eight KVs on the lower objective and charged as fast as he could. At the same time, he sent the T-34s to keep my upper flank Crusader busy, while maintaining control of the center of the table with T-70s, Valentines, and supporting infantry.
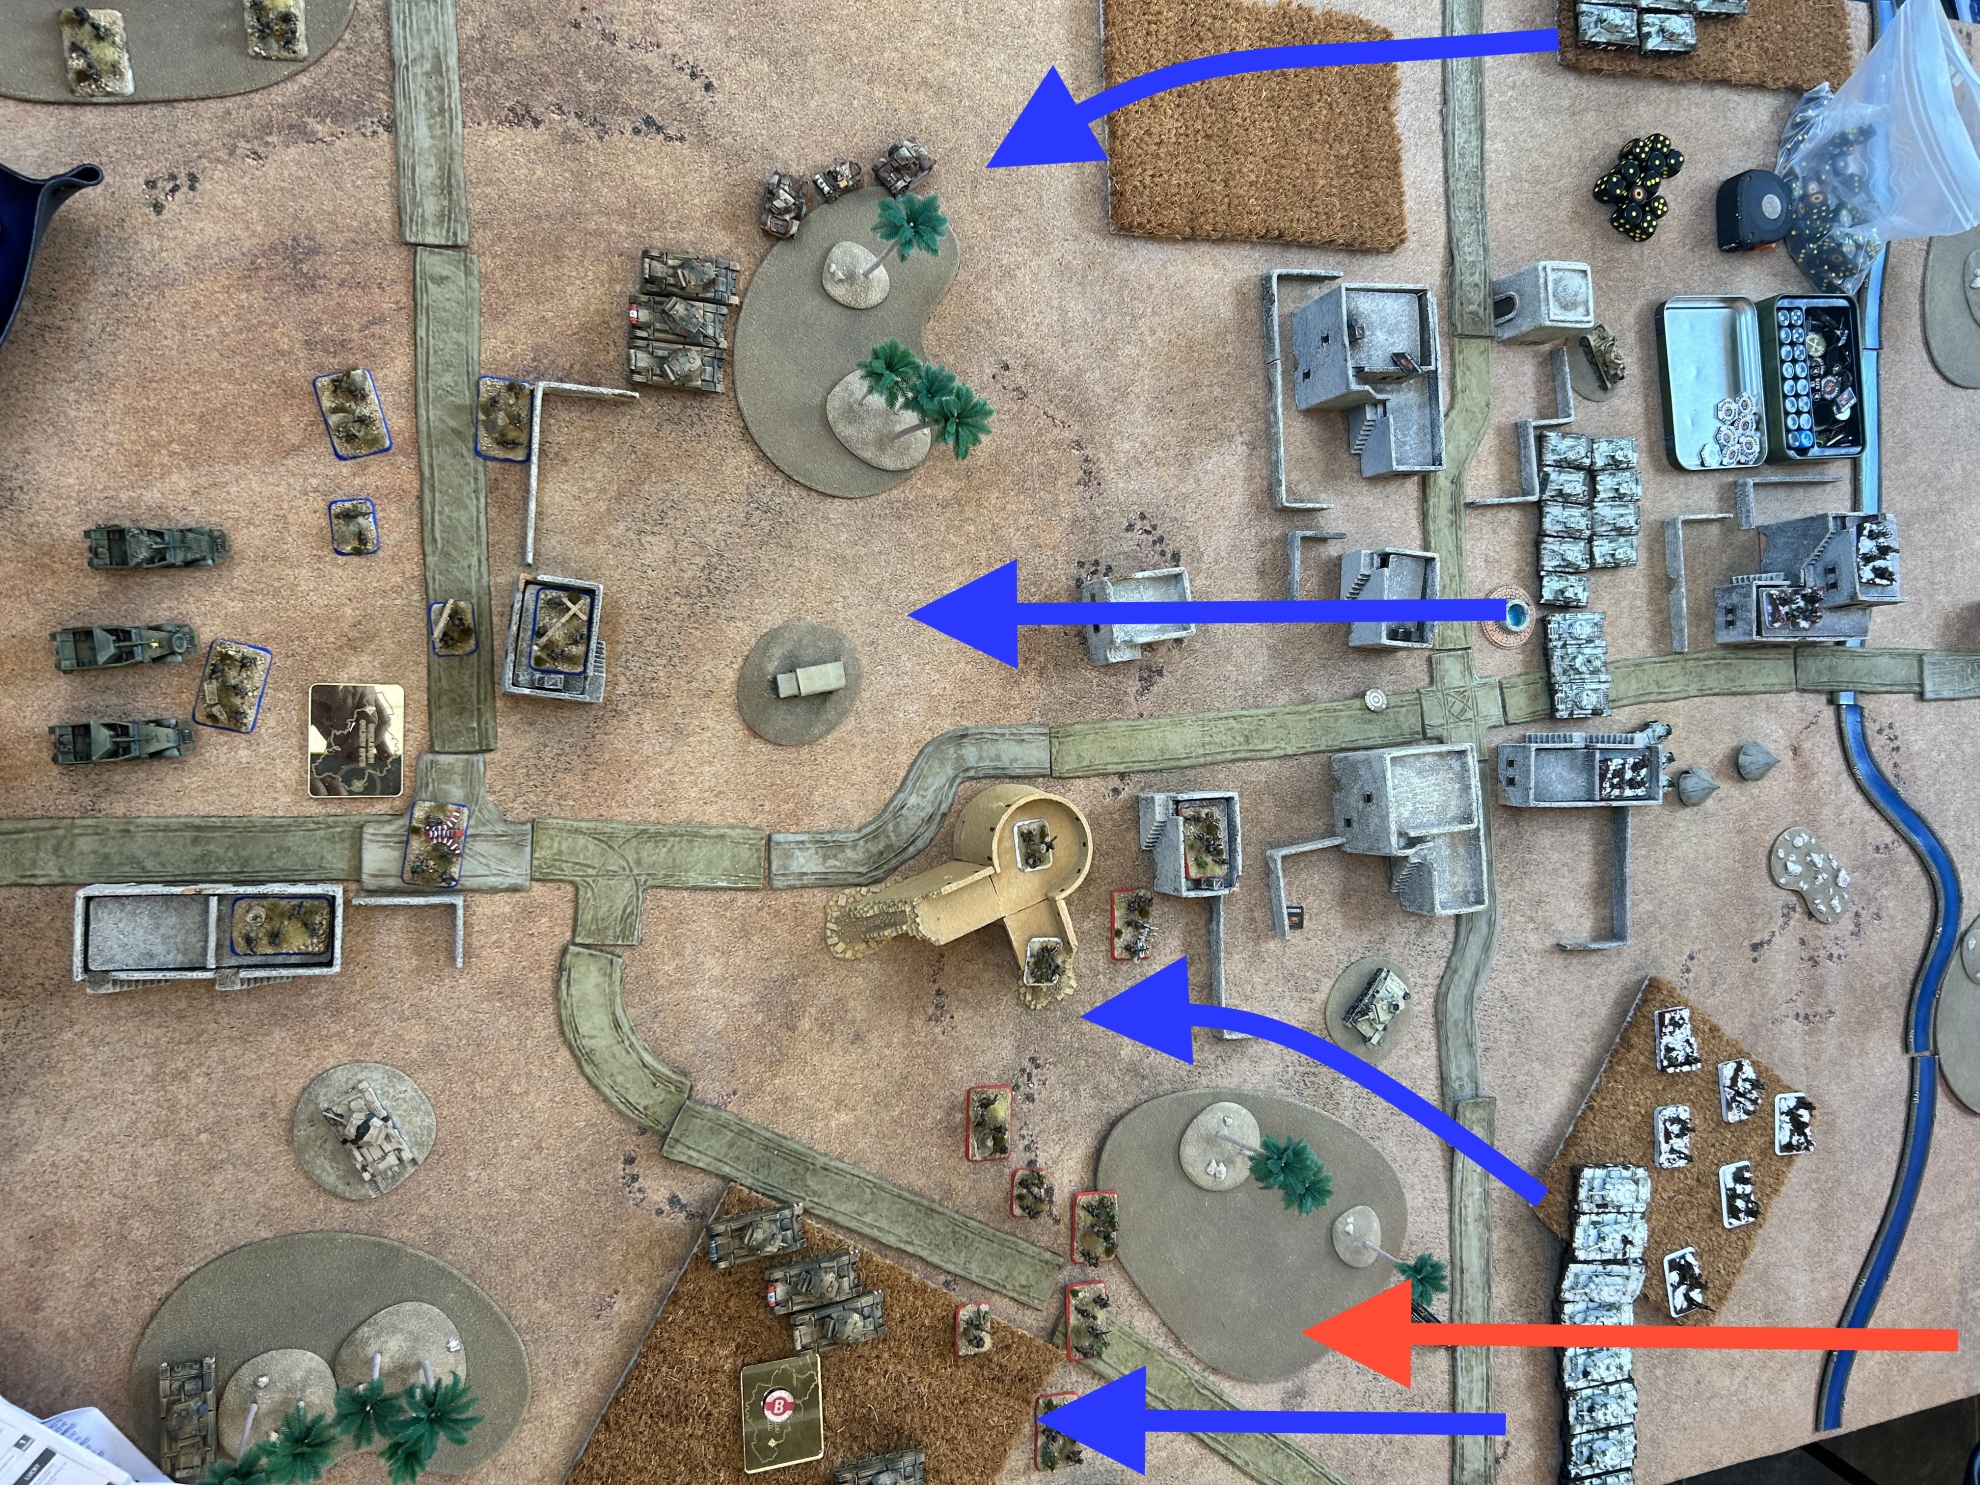
This was the only game where I was the defender. The “Red” US Infantry, understanding they couldn’t face the KVs, moved in the wood and in the buildings. Sven moved too close and I charged without being shot at. The Churchills will come from the right side, just behind the KV 8s.
My Churchill entered fairly soon and began to move behind the KVs’ tails. However, it was not an easy task for my guns to penetrate even their rear armor. Sven, however, might have felt a bit under pressure and moved too quickly into my deployment: he forgot that infantry can assault without being shot at if emerging from buildings, and my US guys managed to kill one KV and bail another with the bazooka, achieving a lucky 5 in the assault. Sven had to fall back: the assault was delayed and crippled to “only” two KV-1s.
He tried again to attack more directly with the KV-8 but was ineffective in shooting at my Crusaders, who were well hidden in the crop field. I moved a couple of US infantry to the flank of the KV-8s, fired at them from the rear with the Churchills, and managed to bail two of them. I charged the bailed ones with infantry and forced them to flee away (they have a counter-assault of 5+, so it wasn’t that difficult). Since I defended the objective after turn six, the game ended 7-2 in my favor.
Sven made a single mistake: he moved the KV-1s too close to the buildings to force the assault. For the US infantry, it was a slim chance, but it worked both in killing two KVs and delaying the assault for a couple of precious turns, allowing my Churchill to reach from the reserves.”
The overall team result was 3-1 for us.
Third Game, Raphael Bosson from Team Switzerland
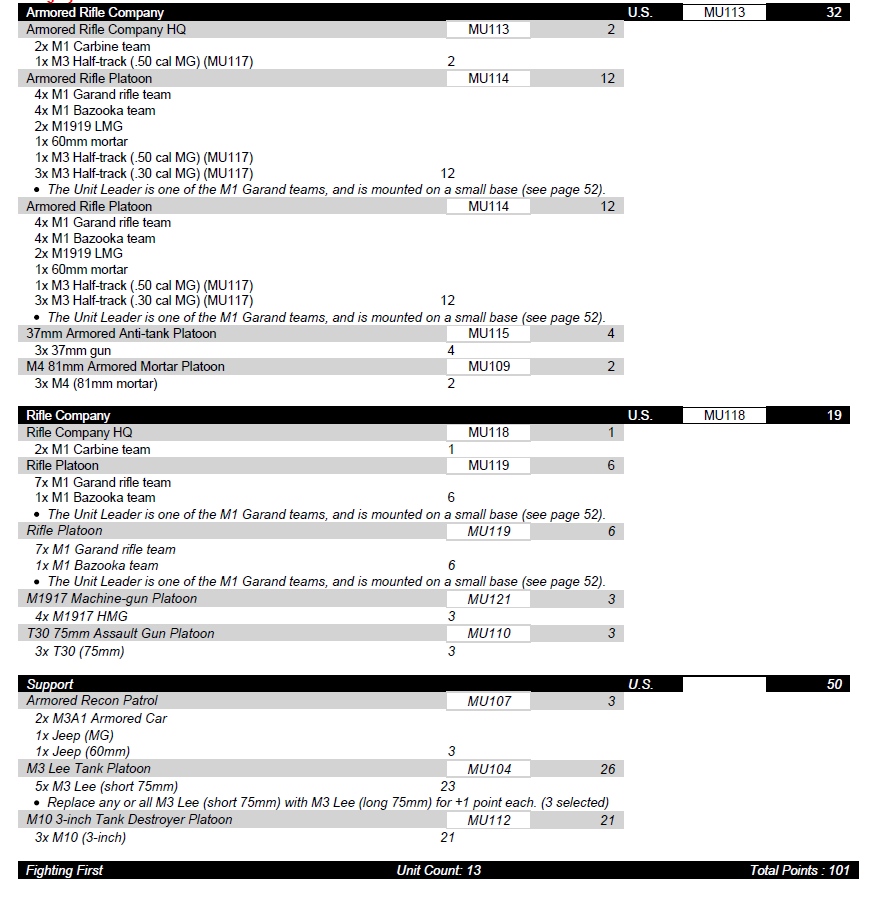
Our close friends from Switzerland were the next match-up – Captain Stefano Regazzoni always comes to FOW Milan Tournaments so we know each other very well. I met Raphael with his stubborn US double Rifle company. This was his list – just for the record, it includes 10 bazookas!
Obviously, he chose Defense and I was in Attack, so we ended up with the It’s a Trap! Scenario. This was a photo just after the deployment.
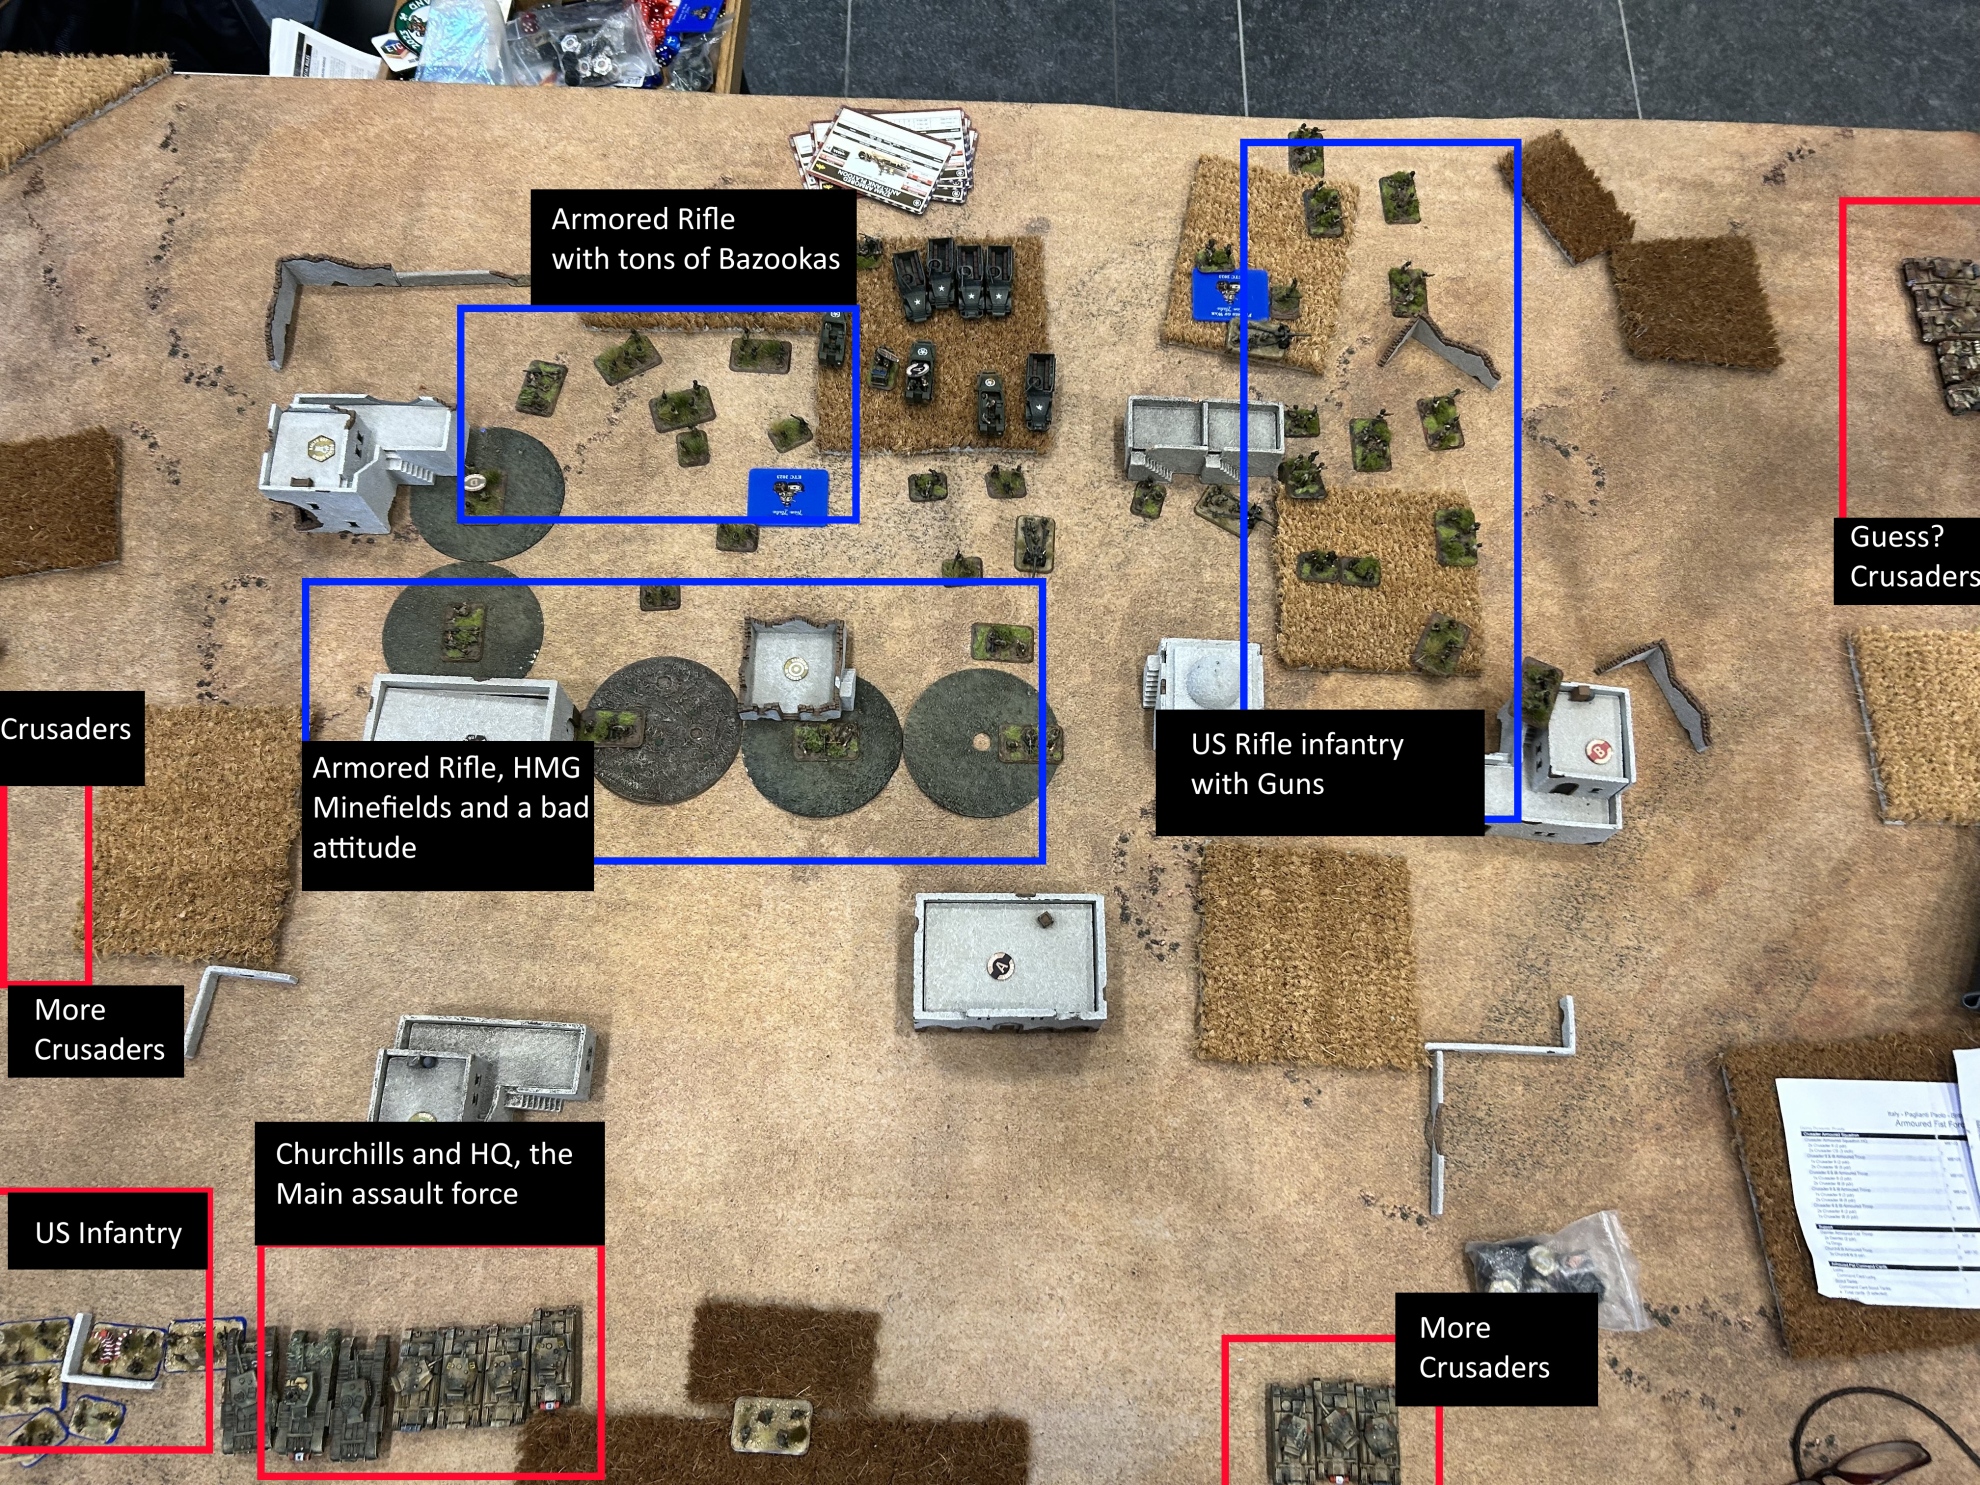
Lots of dug-in infantry and bazookas. The table was very open (no difficult except the buildings) but I used this to my advantage moving my Scout Crusaders in almost any rough goings/crop fields.
Raphael’s deployment was a tough nut to crack, with an incredible density of Anti-Tank weapons. He deployed the Armored platoons on my left, supported by the minefields, keeping the Rifle company with fewer bazookas on the right, but covered by the 37mm gun. He put the M10s in ambush and kept the M3 and some infantry in reserve.
As you can see from the photo, the table had some buildings in the center and only small patches of crop fields around the wings. I moved my Crusaders inside each of the crop fields for two reasons. First, they were fantastic for hiding and going to ground; also, by advancing rapidly with my platoons in the first round, I was limiting the area where he could deploy the feared M10s from ambush.
Infantry and Crocodiles moved into the left corner of Raphael’s deployment, using smoke and the buildings as a screen to avoid unwanted attention. Raphael decided to deploy the M10s in the center of the deployment, 16” away from my units (there was no spot to deploy them in cover, thanks to my fast-moving Crusaders) and they shot at a light tank platoon with no relevant effect – being Scouts, Crusaders were hit on 7+ due to being at long range, hidden, and gone to ground. The next turn, I destroyed the M10s with Crusader crossfire and began to move my US infantry to clear the minefields.
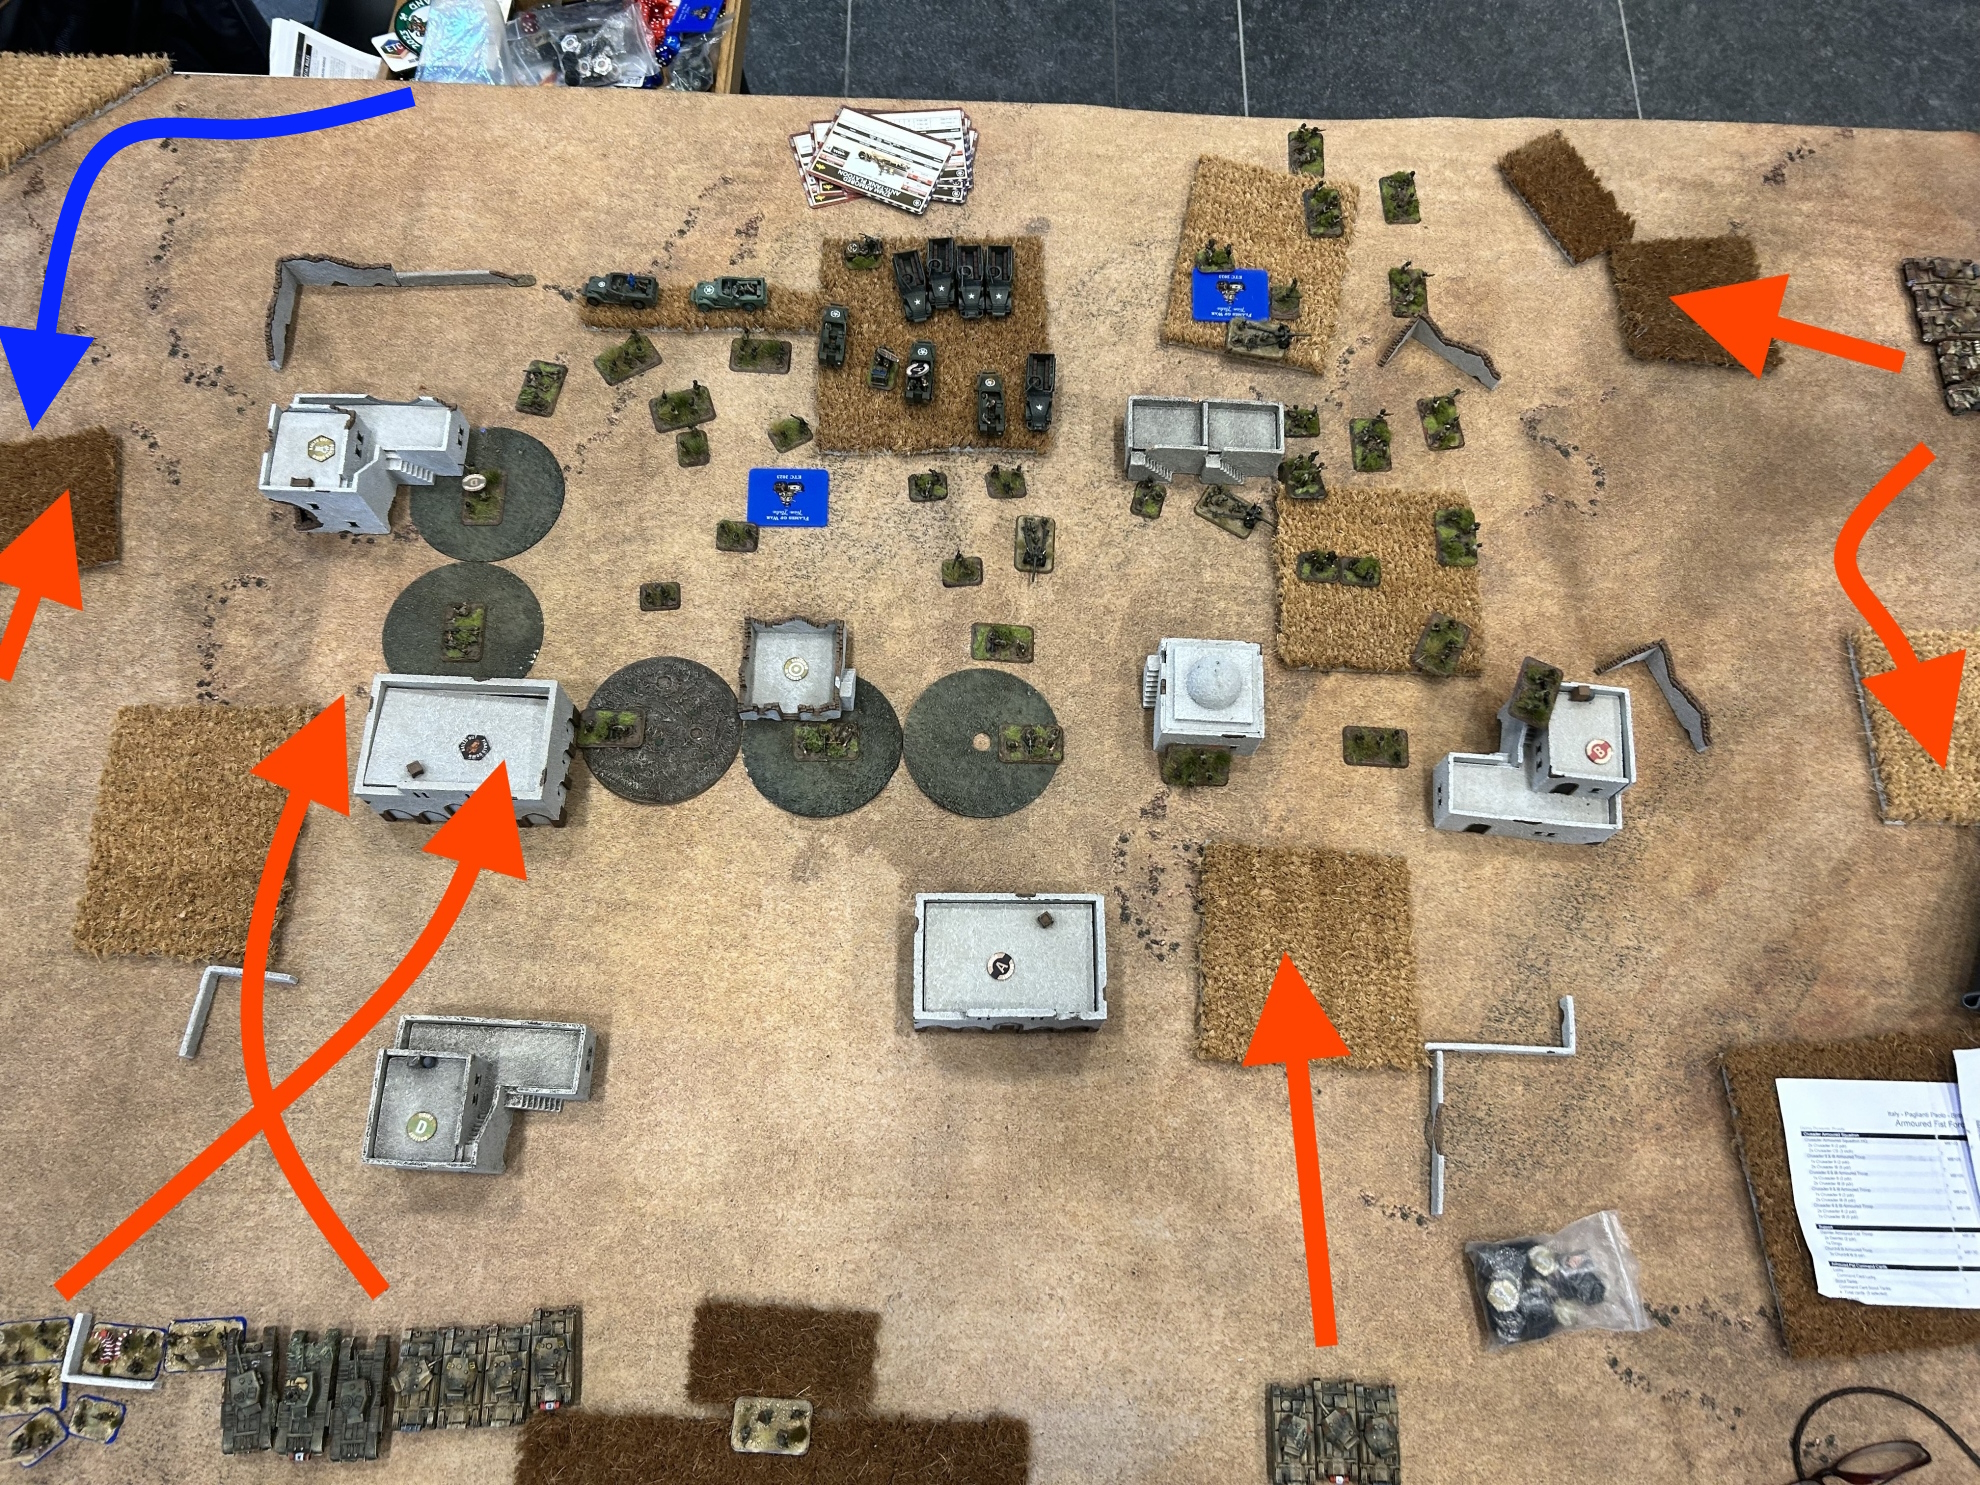
The Churchills advanced “masked” by the buildings, and the “Crusaders in the crops” pincer maneuver prevented Raphael from deploying the M10s ambush in the best spots. His sole error was to move the M3 Lee tanks behind my left flank and not behind his own first-line troops.
In the following rounds, I managed to clear the mines, but Raphael’s M3s entered from reserve: he moved them to my left wing and started shooting at my Crusaders, destroying one platoon of them. However, this maneuver left them exposed, and I destroyed them in return, focusing all my fire on them. With the back secured, I began to move slowly towards the objective. The only threat was the bazookas – I managed to eliminate half of them by concentrating my bombardments on the infantry in that corner from the very start of the battle. I killed some of them with targeted charges from my infantry, and then I delivered the final blow with the now unstoppable Churchills. 7-2 to me.
Raphael, as I mentioned, is very experienced, and assaulting his army was a challenging task. I believe he made only two mistakes: the first one was deploying the M10s in ambush just to shoot pointlessly at some Crusaders – I would have saved them for the Churchills once they attempted to move in on the objective. And secondly, the M3 Lee would have been more effective in the center, to assist the infantry and provide some return fire when I was going to assault the infantry.
The rest of the team did fairly well, and we ended up with a 3-3 tie, a perfect balance.”
Fourth game, Dave Mading from New Zealand
Dave has been a friend of mine for years; we used to play DBMM in the ’90s. We played in last year’s ETC (we had basically the same army) and we played again in ETC 2023, once again with very similar lists. Here is Dave’s one:
Basically, he didn’t take the Scout cards for his Crusaders and didn’t go for the Churchills, but he had a formidable supporting list of fast and dangerous Honeys, some good British artillery with Skill 3, and a Commando section to change objectives. We played both Attack and ended up with the Scouts Out mission. Here is a photo of the table:
My photo skills are much lower than my painting ones, and I managed to cut off my lower deployment in the photo. The two Crusader Platoons and the Scout Dailmer are in the lower part, just imagine them.
Dave deployed the Crusaders in his corner but had to keep the Honeys and the scouts with Spearhead in reserve. He couldn’t extend his deployment, but he concentrated his force around the inner objectives. I kept the Churchills and a Crusader in reserve, placed one infantry as close as I could to my exposed objective, and spearheaded with the Daimler and a couple of Crusader platoons. The idea was to attack at the fastest speed towards Dave’s exposed objective and try to exploit the fact that I deployed Scouts with Spearhead, extending my deployment, while Dave didn’t.
I moved the Daimler behind the line of trees in the center to hover over the objective and dashed with the Crusaders. Dave, seeing the vulnerability of the exposed objective, sent the commandos and some of his own Crusaders in advance. The next turn, I moved the Crusaders and shot at the infantry and Dave’s Crusaders, bailing the one that was close enough to provide support. And then I charged.
When two experienced players meet with similar armies, luck is one of the most important factors. Dave and I played for the second time at ETC with very similar lists.
Alas, the Commandos were difficult to crush, and we began the usual “dance” of assaults and counter-assaults. I was better at killing (4+), but Dave was better at counter-assaulting. He bailed two Crusaders, and I failed my counter. I hesitated a bit about using my Lucky card: if I were to flee away, I would lose at least two Crusaders and totally the momentum of the attack. I would have to wait for the Churchills from reserves to try again to win. In the end, I rerolled with the card for the counter, managed to roll a 5, and killed one more Commando; on the contrary, Dave rolled a “1” for his counter, had to flee, and lost the game. This is a situation where I’m happy to invest the Lucky Card 1 point!
No shame on Dave – it was just sheer luck. Actually, I attempted something really challenging, as charging with light tanks into the woods was formidable. The only small mistake was keeping the Humber Cars scouts in reserve and forgoing the Spearhead, which in this specific scenario are worth their weight in gold as they can extend the deployment in front of the enemy and project the attack on the exposed objective. 8-1 to me.
Team Italy was very fortunate overall as we scored 6-0 against New Zealand, one of the strongest teams in the tournament.
Fifth Game, Vincente Arroyo from Team USA
This unexpected victory has propelled us high in the rankings, and on Sunday morning, we found ourselves facing the formidable USA team, ETC 2022 winner. Also, I was going to meet my friend Vincente Arroyo again, who defeated me last year in the same tournament. This time he was playing a very good Italian List, you can find it here.
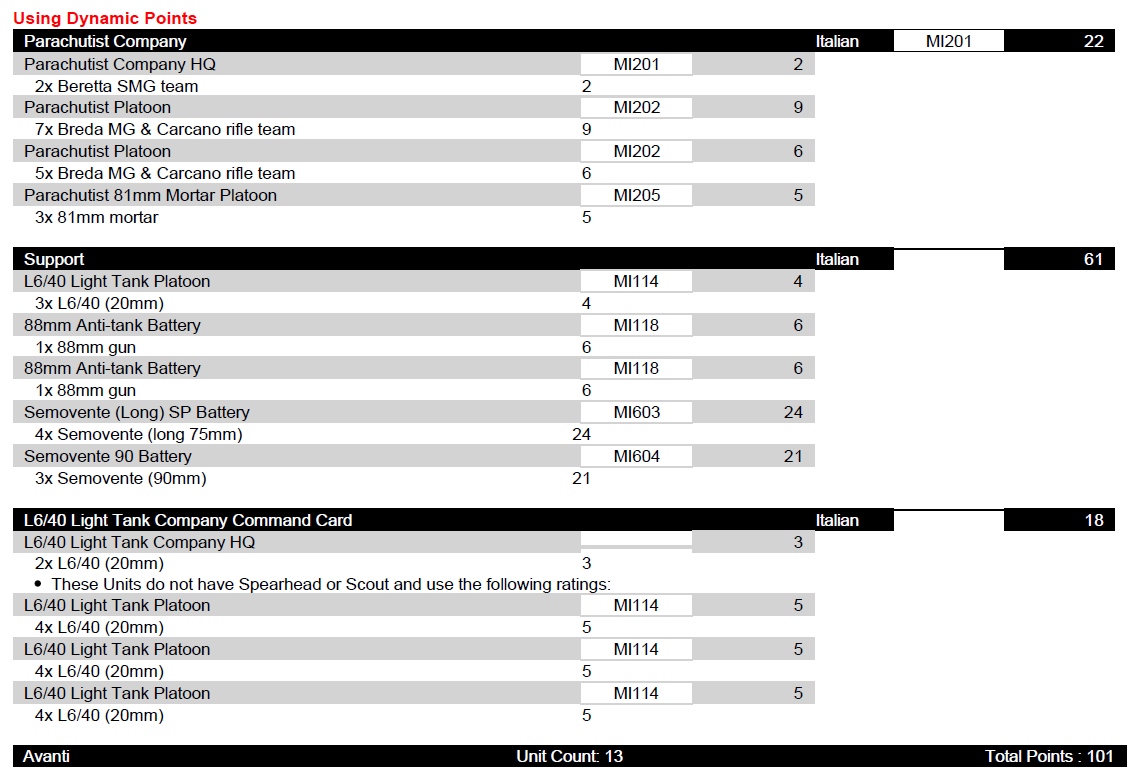
I simply hate L6s as they are fast, powerful (for their cost), and incredibly cheap. Basically 1 point per tank, and it’s like fighting power-armored infantry. You can’t stop them with machine guns, so you need to target L6s with cannons and divert some precious AT from more interesting targets.
We both Attacked, so we ended up with the Encounter Mission. Here is the table. We agreed the hedges were France-style bocage, so they blocked visibility and offered hard cover to infantry.
Vincent and I had both 41 points in reserve, entering from turn third. Mine were two platoons (Churchills + 1 Crusader troop), Vincente had 2 L6 units, one semovente, and one infantry.
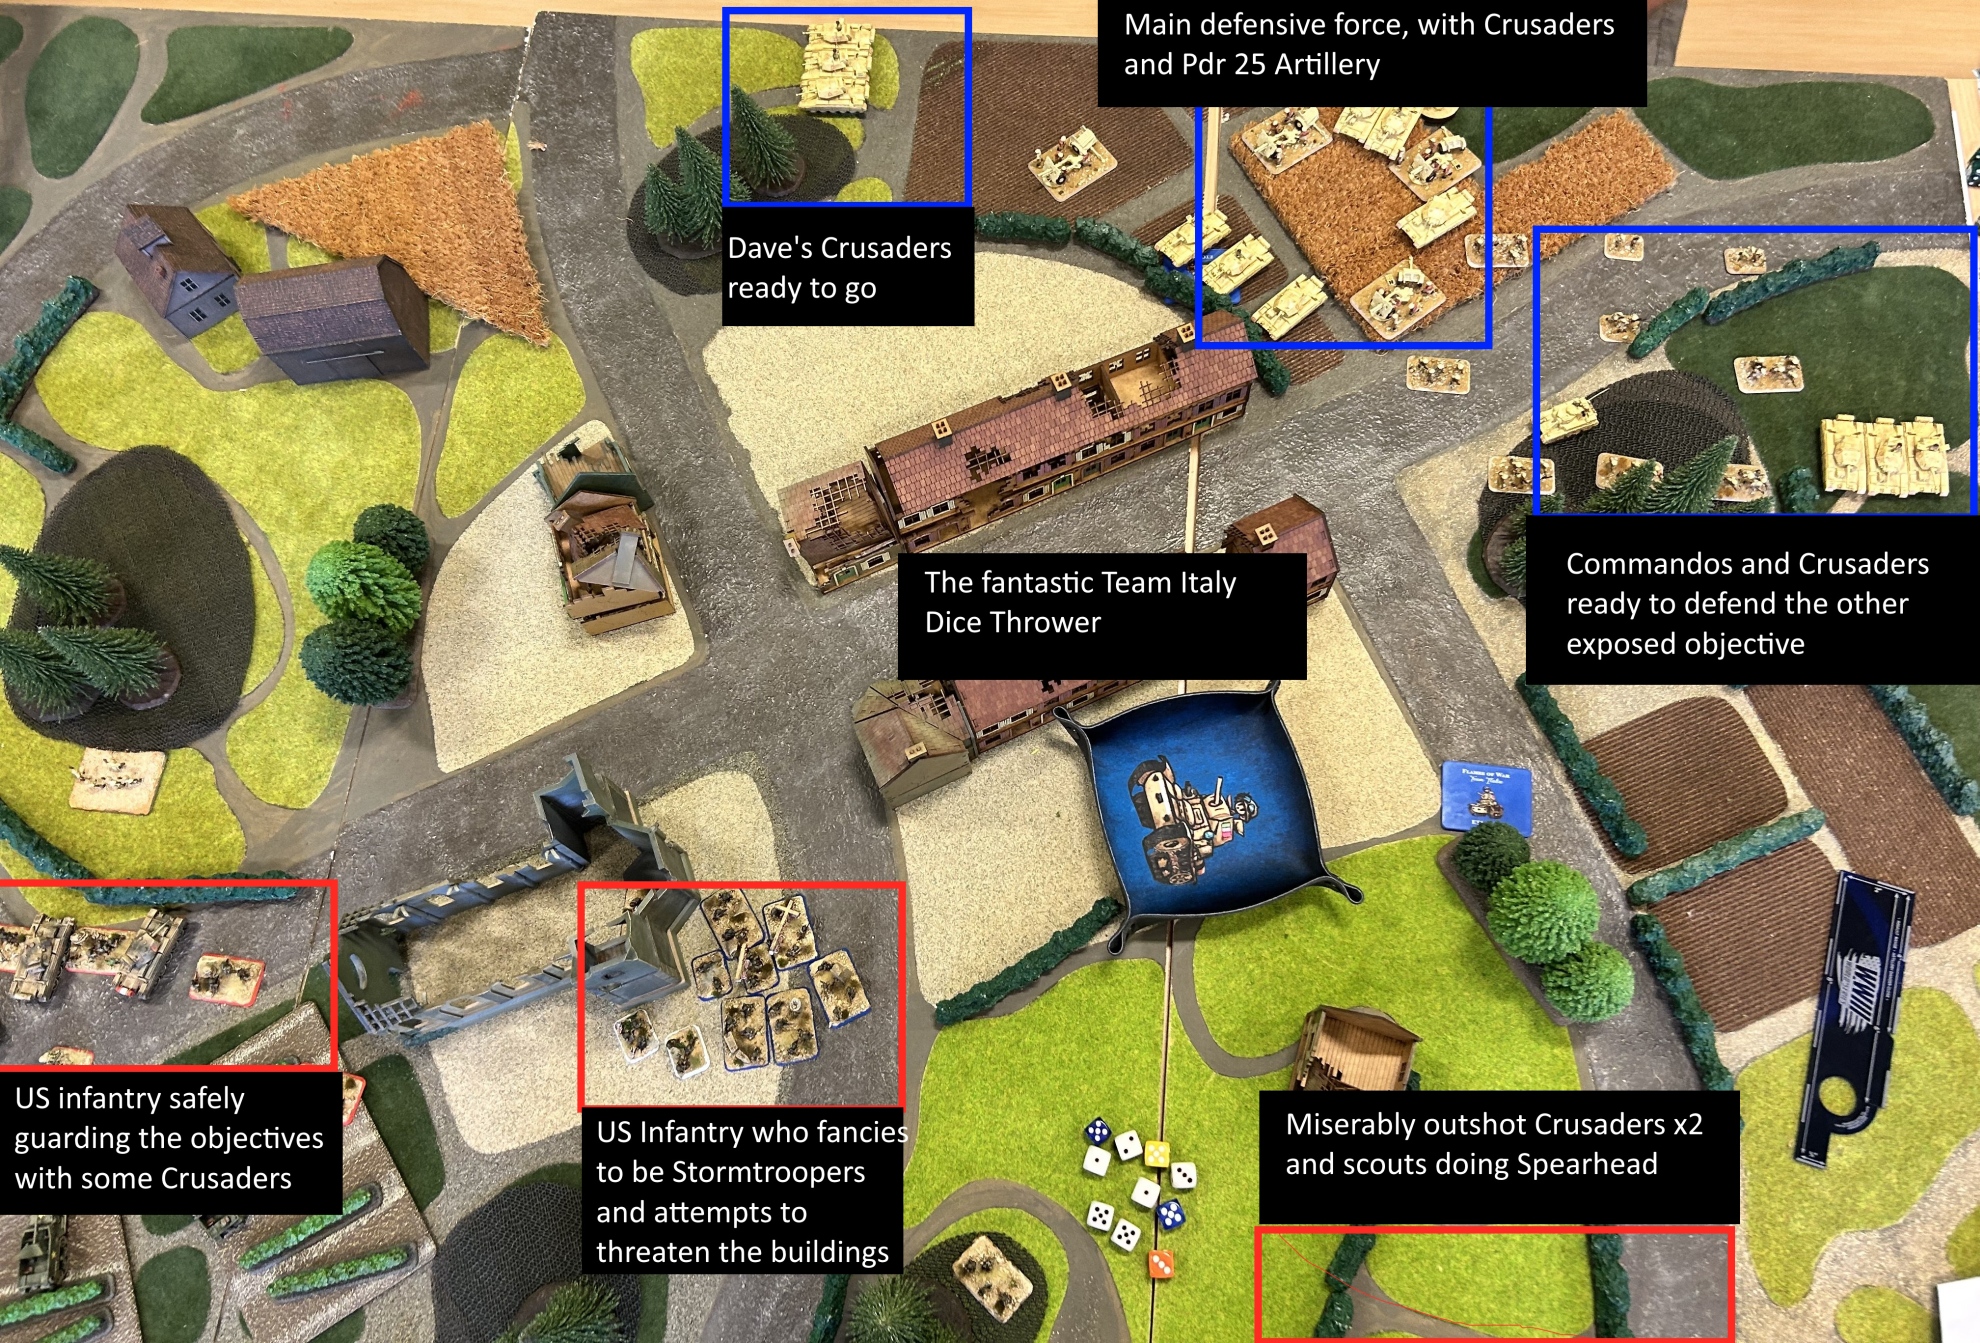
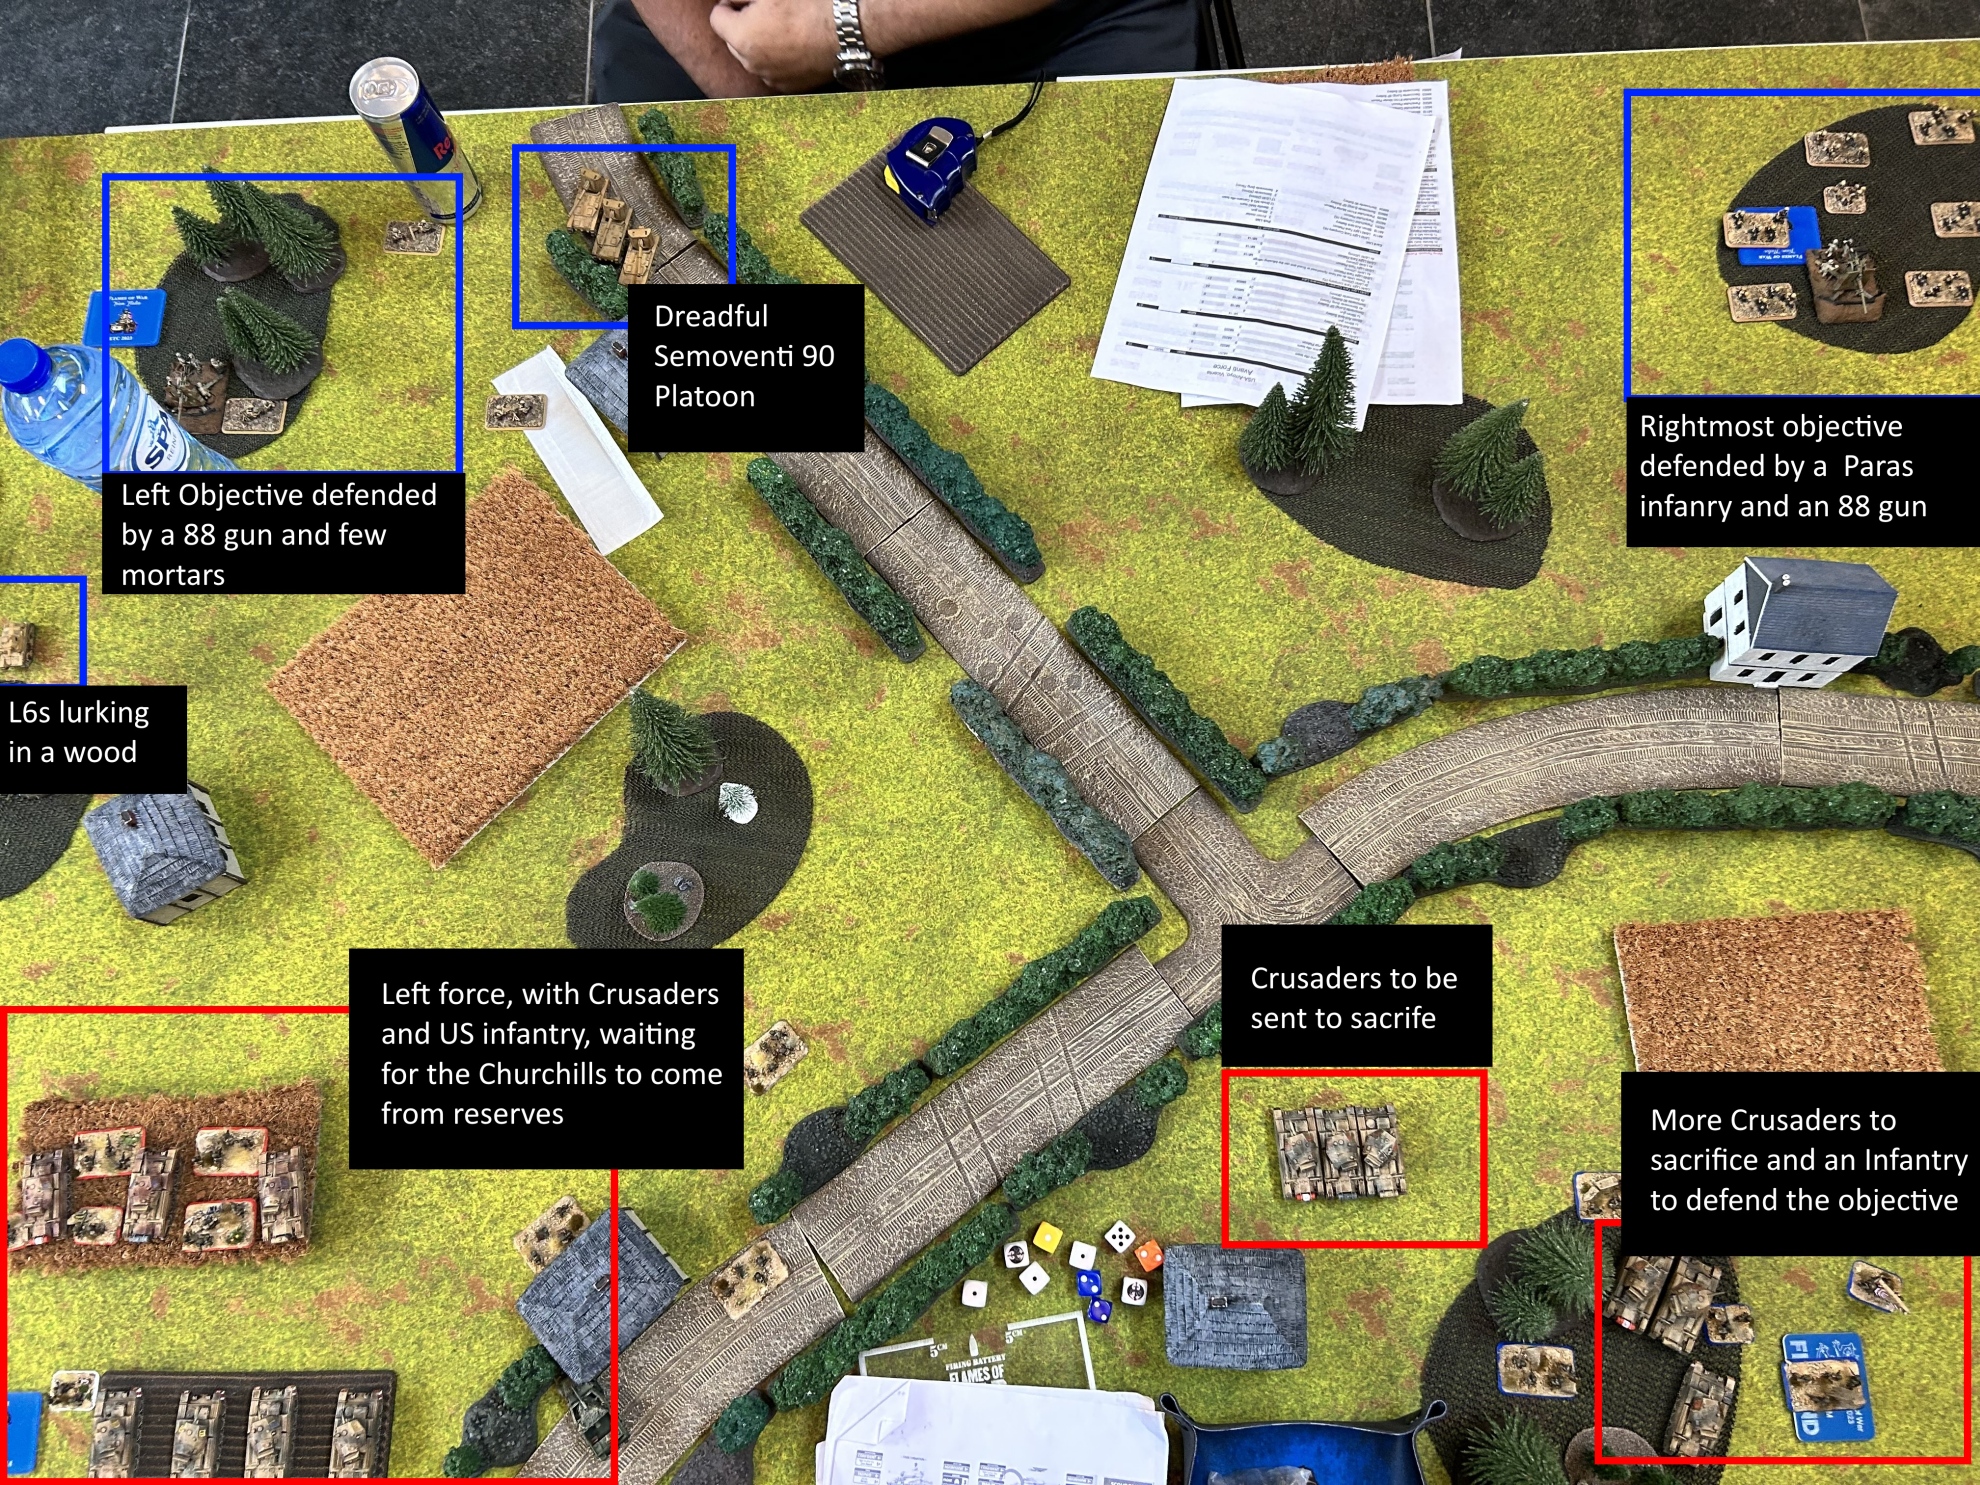
Vincent put in reserve a Parachutist platoon, some L6s, and the Semovente Long 75mm. He deployed one 88 gun on each objective in his half: the rightmost objective was defended by an infantry platoon, while the left one had one L6 platoon and the mortar parachutist. In the middle of the table, he kept the deadly Semovente 90 Battery to dominate the whole table with its firing line.

My first assault on Vincente’s position on the right. The two rightmost Crusaders rush through the half table enjoying the cover from the hedges and the woods, and then move on the right to charge the infantry, out of sight from the 88 gun. The plan didn’t work well, but was an attempt worth making.
I put in reserve the Churchill platoon and a Crusader, and deployed a US infantry platoon and a couple of Crusader troops on each objective, with mortars and T30s hidden from view. Since the Semoventi 90 and the 88s were the only Italian units to pose a threat to the Churchills, I started the game by moving the rightmost Crusader platoons to the center of the table, where they were hidden by the hedges.
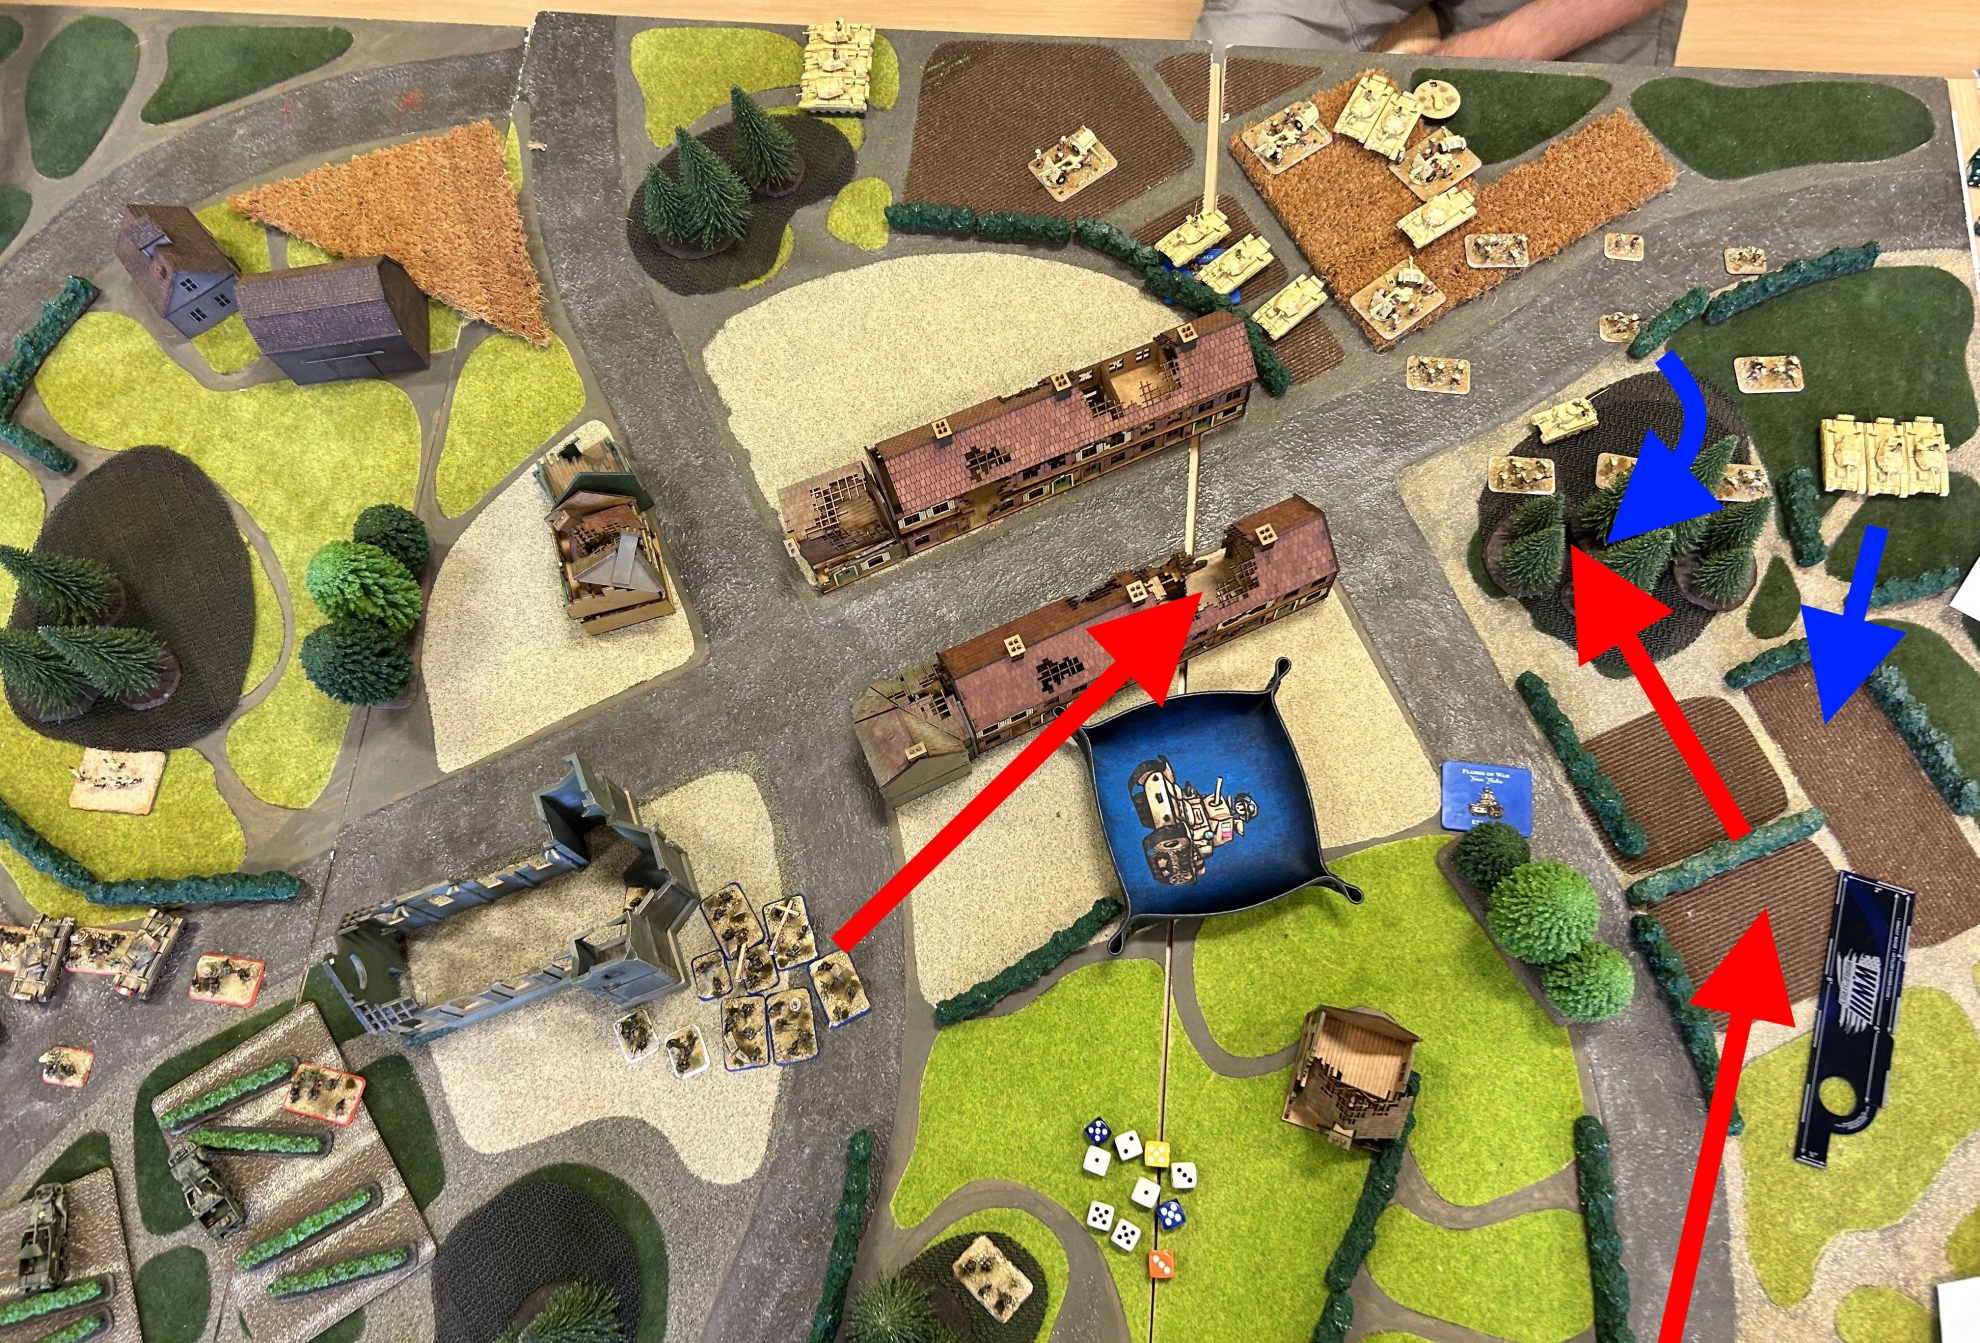
The plan was to sacrifice one of the platoons and kill the Semoventi 90 with the other, to clear the way for the Churchills once on the table. Vincente didn’t move aggressively in his first turns – he had more than half of his platoons outside in reserve, so he had to wait for them – and I saw an opportunity: with still a turn without reserves, I rushed the two Crusader platoons to the rightmost objective and, the subsequent turn, I charged the infantry in the wood. I attacked from the side, so the wood screened the Crusaders from the dangerous and murderous fire of the 88, and with a bit of luck, I managed to rout the infantry and automatically kill the 88 itself.
However, Vincente didn’t give up. He moved the fast-moving L6s toward the Crusaders and turned the Semovente 90 to focus all fire on the Crusaders that charged the infantry on the right. The concentrated fire, together with the other Semoventi Long 75mm emerging from reserves, wiped out one of the Crusader platoons and destroyed one tank of the other. I fell back with the remaining tanks toward my half table, to defend the objective with my tail between my legs.
Second attempt: with the best troops from the Italian list destroyed or on the right side, I moved all in the Churchills and the Crusaders on the left. They charged the infantry mortars destroyed the 88 gun masked by the smoke screens from the US ally, and then conquered the objective killing of the remaining L6s. Once again, the Churchills won the day.
On the other side, however, I advanced with my other Crusaders and took the chance to shoot at the rear of the Semoventi 90s. Vincente had to expose them to the other half of my army to be able to target the assaulting platoons, and I quickly got the opportunity to destroy them. With my Churchills on the table, I concentrated the other three Crusader platoons and the Churchills themselves on the other objective, screening the advance with some well-aimed US smoke screens. I charged the mortar platoon, killed the 88 with another charge, and took the objective, as it was defended only by harmless, for my heavy tanks, L6s. 6-3 to me, with a fair amount of luck.
Vincente played very well; I think his army is very good when he attacks vs defense, but struggles when he also has reserves. With so many cheap platoons, he was forced to keep out a lot of units, and with a scenario with Delayed Reserves, this meant he would have to wait until the sixth or seventh turn to have enough units to decisively attack one of my objectives. On the contrary, I could count on having over 90 points on the table as early as the third or fourth turn, with a bit of luck.
Tactically, I tried my luck with a hasty attack on the right side: if I were lucky, as with Dave from the New Zealand team, I could win quickly. Even if repulsed, I had enough time to create another attack on the left side, with the Semoventi 90s turned to wreck and Vincente’s best troops on the other side of the table.”
The team did well: we beat US 3-1.
Sixth game, Pawel Kuklinski from Team Poland
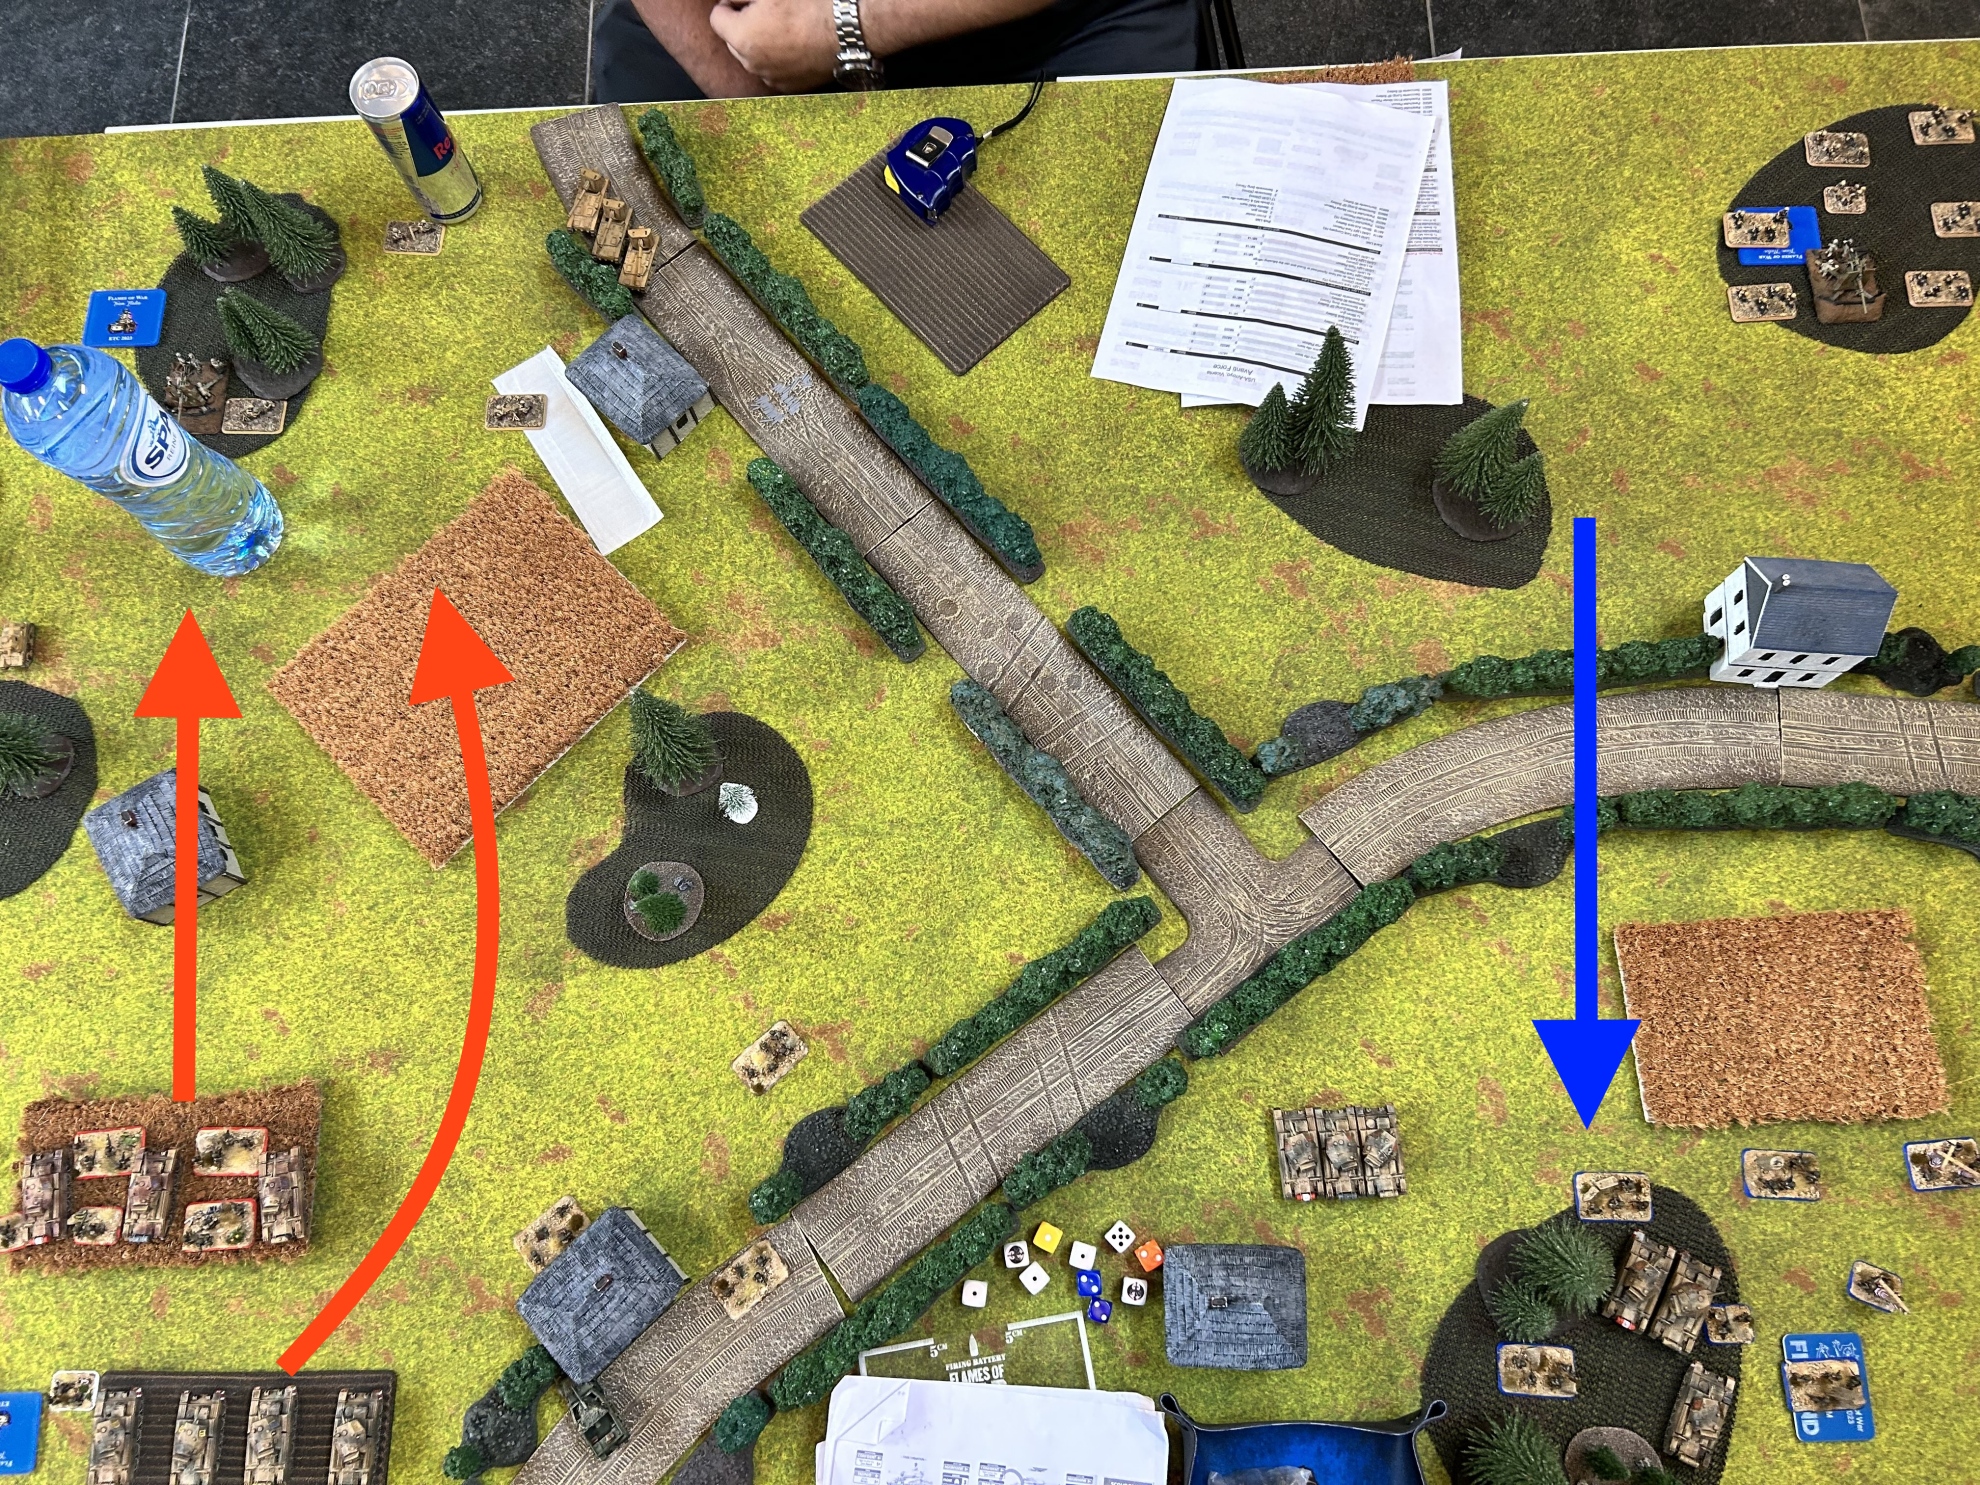
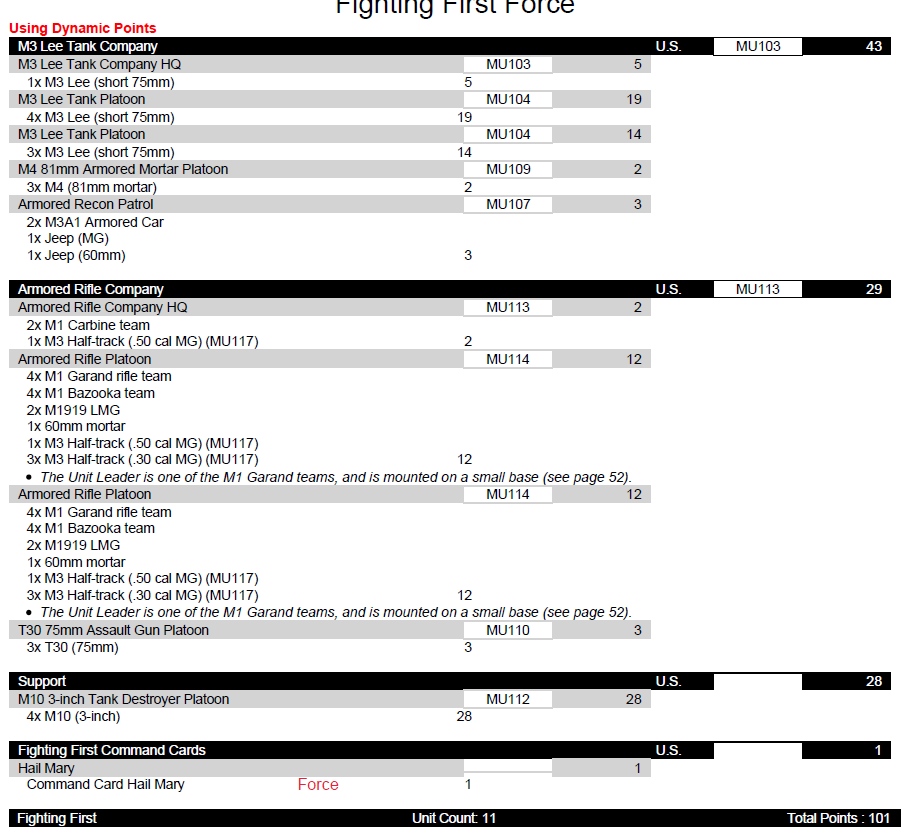
The last game was with our friends from Poland – one of the best, better-trained FoW teams in the world. Last year, they came in second, so we knew this would be a tough match. I ended up playing with Pawel, a very nice guy who is also a history teacher. He played a defensive Armored Rifle with an M3 Lee Company. Here is his list.
The table was a mess for me: an urban scenario with lots of buildings and ruined houses. US troops are very good at defending and very bad at assaulting, and since I can’t enter buildings with Crusaders, Uncle Sam’s troops were expected to put in extra effort and earn their pay. I attacked and he defended, so we ended up with the Hold the Pocket scenario.
Pawel put the five minefields in the only spot where there were no buildings, to create another obstacle for my tanks. He put had M3 Lee tanks in reserve and the M10s in ambush, as expected. He deployed one infantry platoon in front, on the more exposed objective, and the other in the building in the back to cover the other objective. I had no chance to assault this objective – I didn’t have troops to effectively assault an Armored Rifle unit barricaded in a building, and furthermore, there was the constant threat of reserves arriving on the flank. I placed that objective only to force Pawel to position one of the two infantry units far from the more advanced objective. For this reason, I concentrated all range in on the front objective area, and this proved to be one of the keys for the final result.
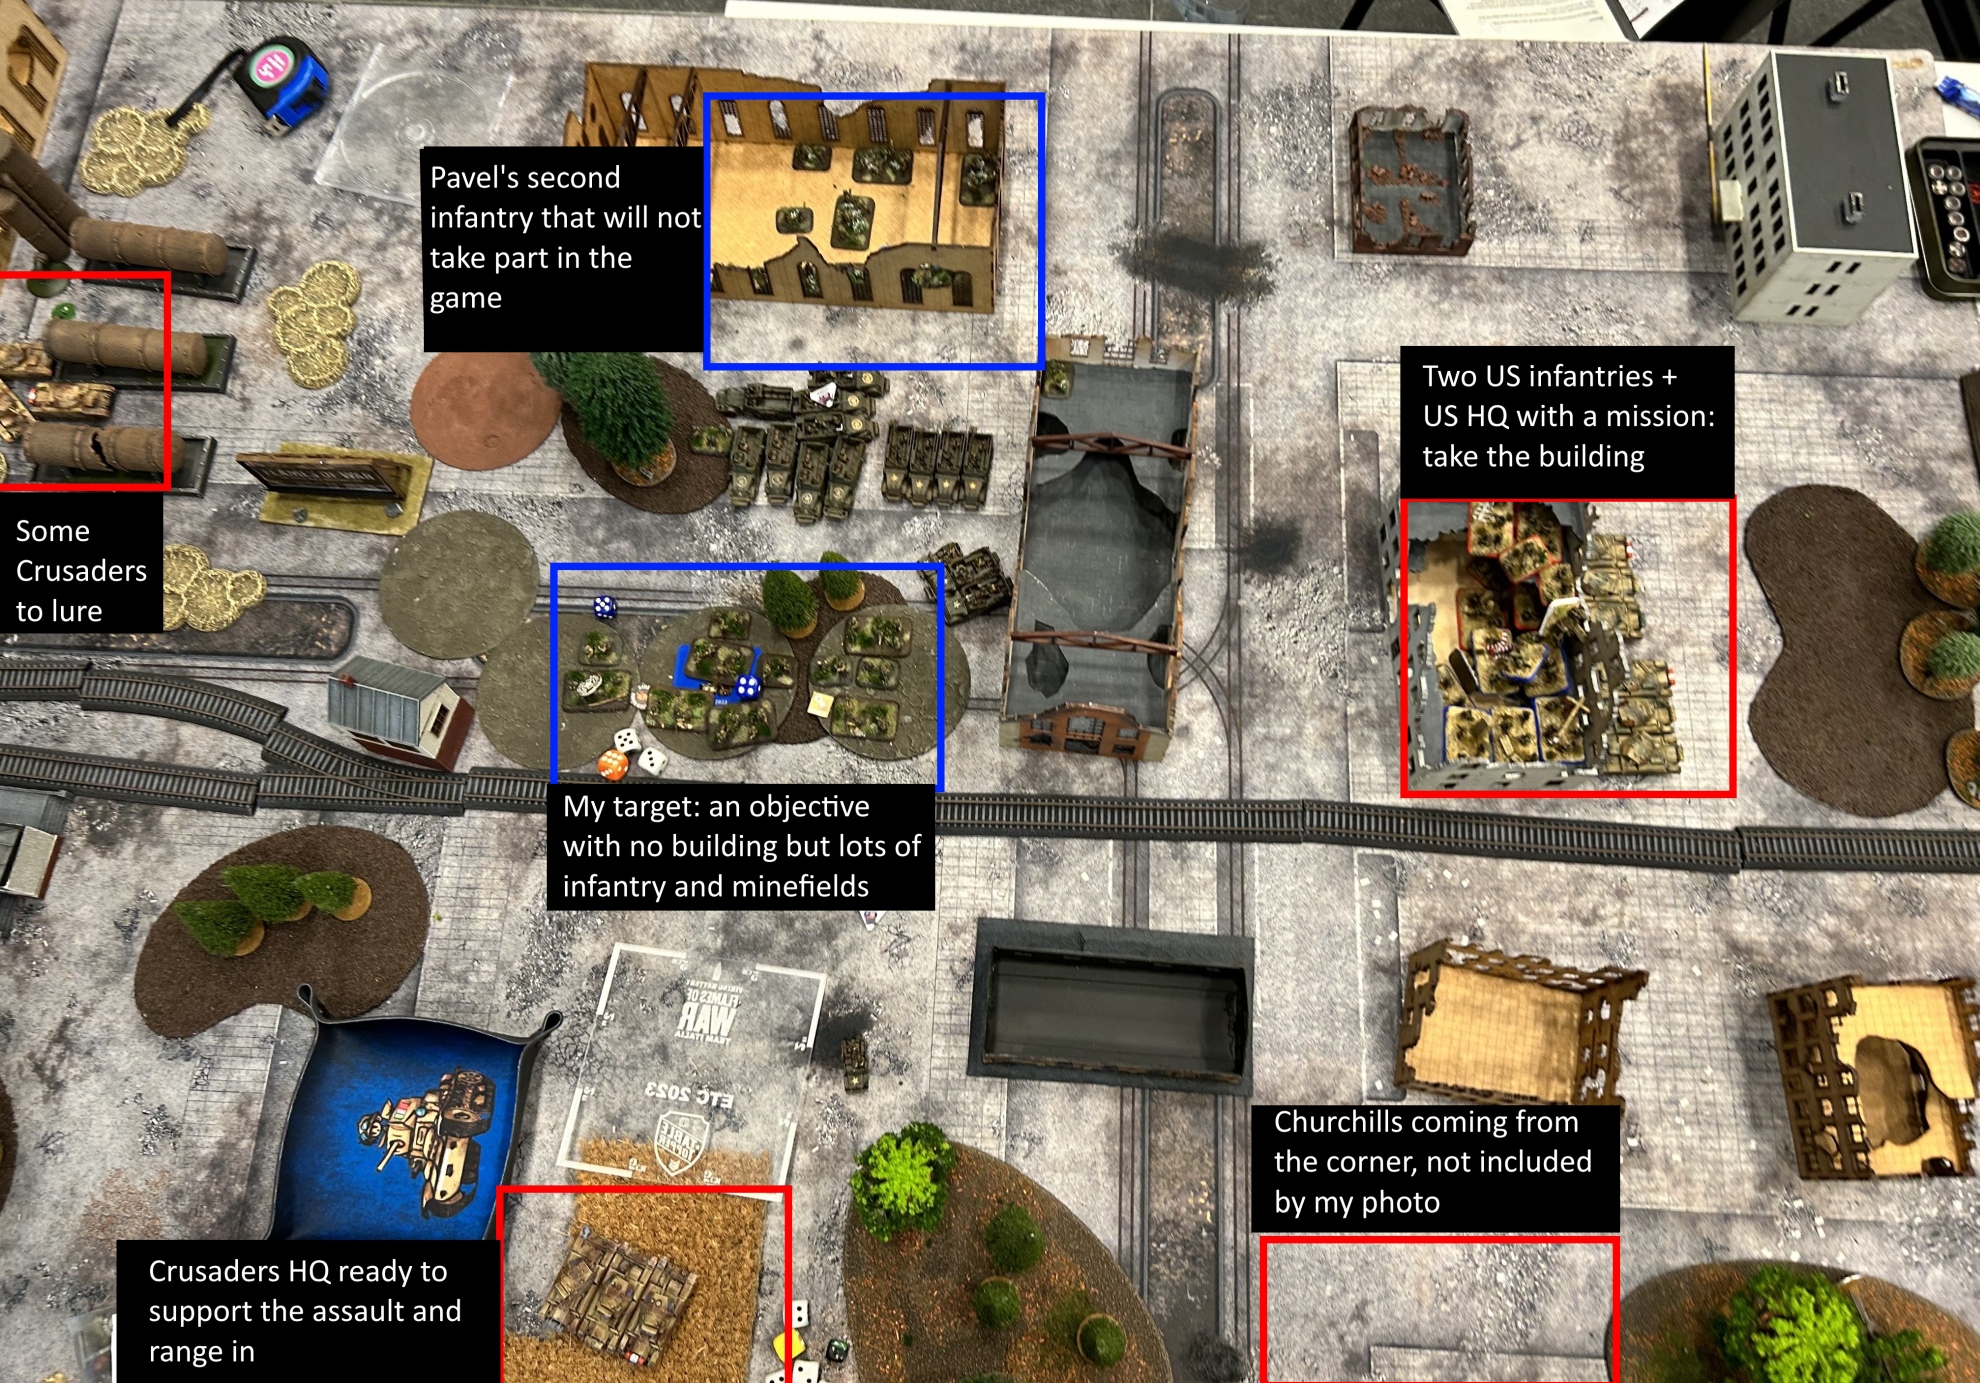
Pavel had to put one of his infantry in the objective near his table edge and the other on the front one, just under my range-in. This left the building on the right unguarded, and I put my two US infantry and the HQ ready to move inside it. The plan was to use some US infantry to un-mine the wood and allow the tanks to charge.
I used Spearhead to deploy the Crusaders closer to the objective but kept them obscured from the deployment area to avoid being fragged by the M10 ambush. Both US infantry troops and their HQ were on the right, to charge across the buildings, while the other Crusaders were spread around the table. This was the table after deployment.
In the first turn, I moved the US infantry from one building to the next, getting very close to Pawel’s flank. I began to shoot from the windows with my two Bazookas to destroy some transports, and Pawel returned fire – they were both ineffective. Frontally, I advanced with some Crusaders – this made them vulnerable but also forced Pawel to deploy the M10s in ambush 16″ away from my troops and well beyond the front line, as there were no hiding spots closer to the front and away from my troops. I also began to repeat bombardment on Pawel’s infantry in front of the deployment area and on the objective I was going to assault. These bombardments proved devastating for the US troops, and Pawel lost two-thirds of his units. With three bombardments in place, this was something I expected to happen.
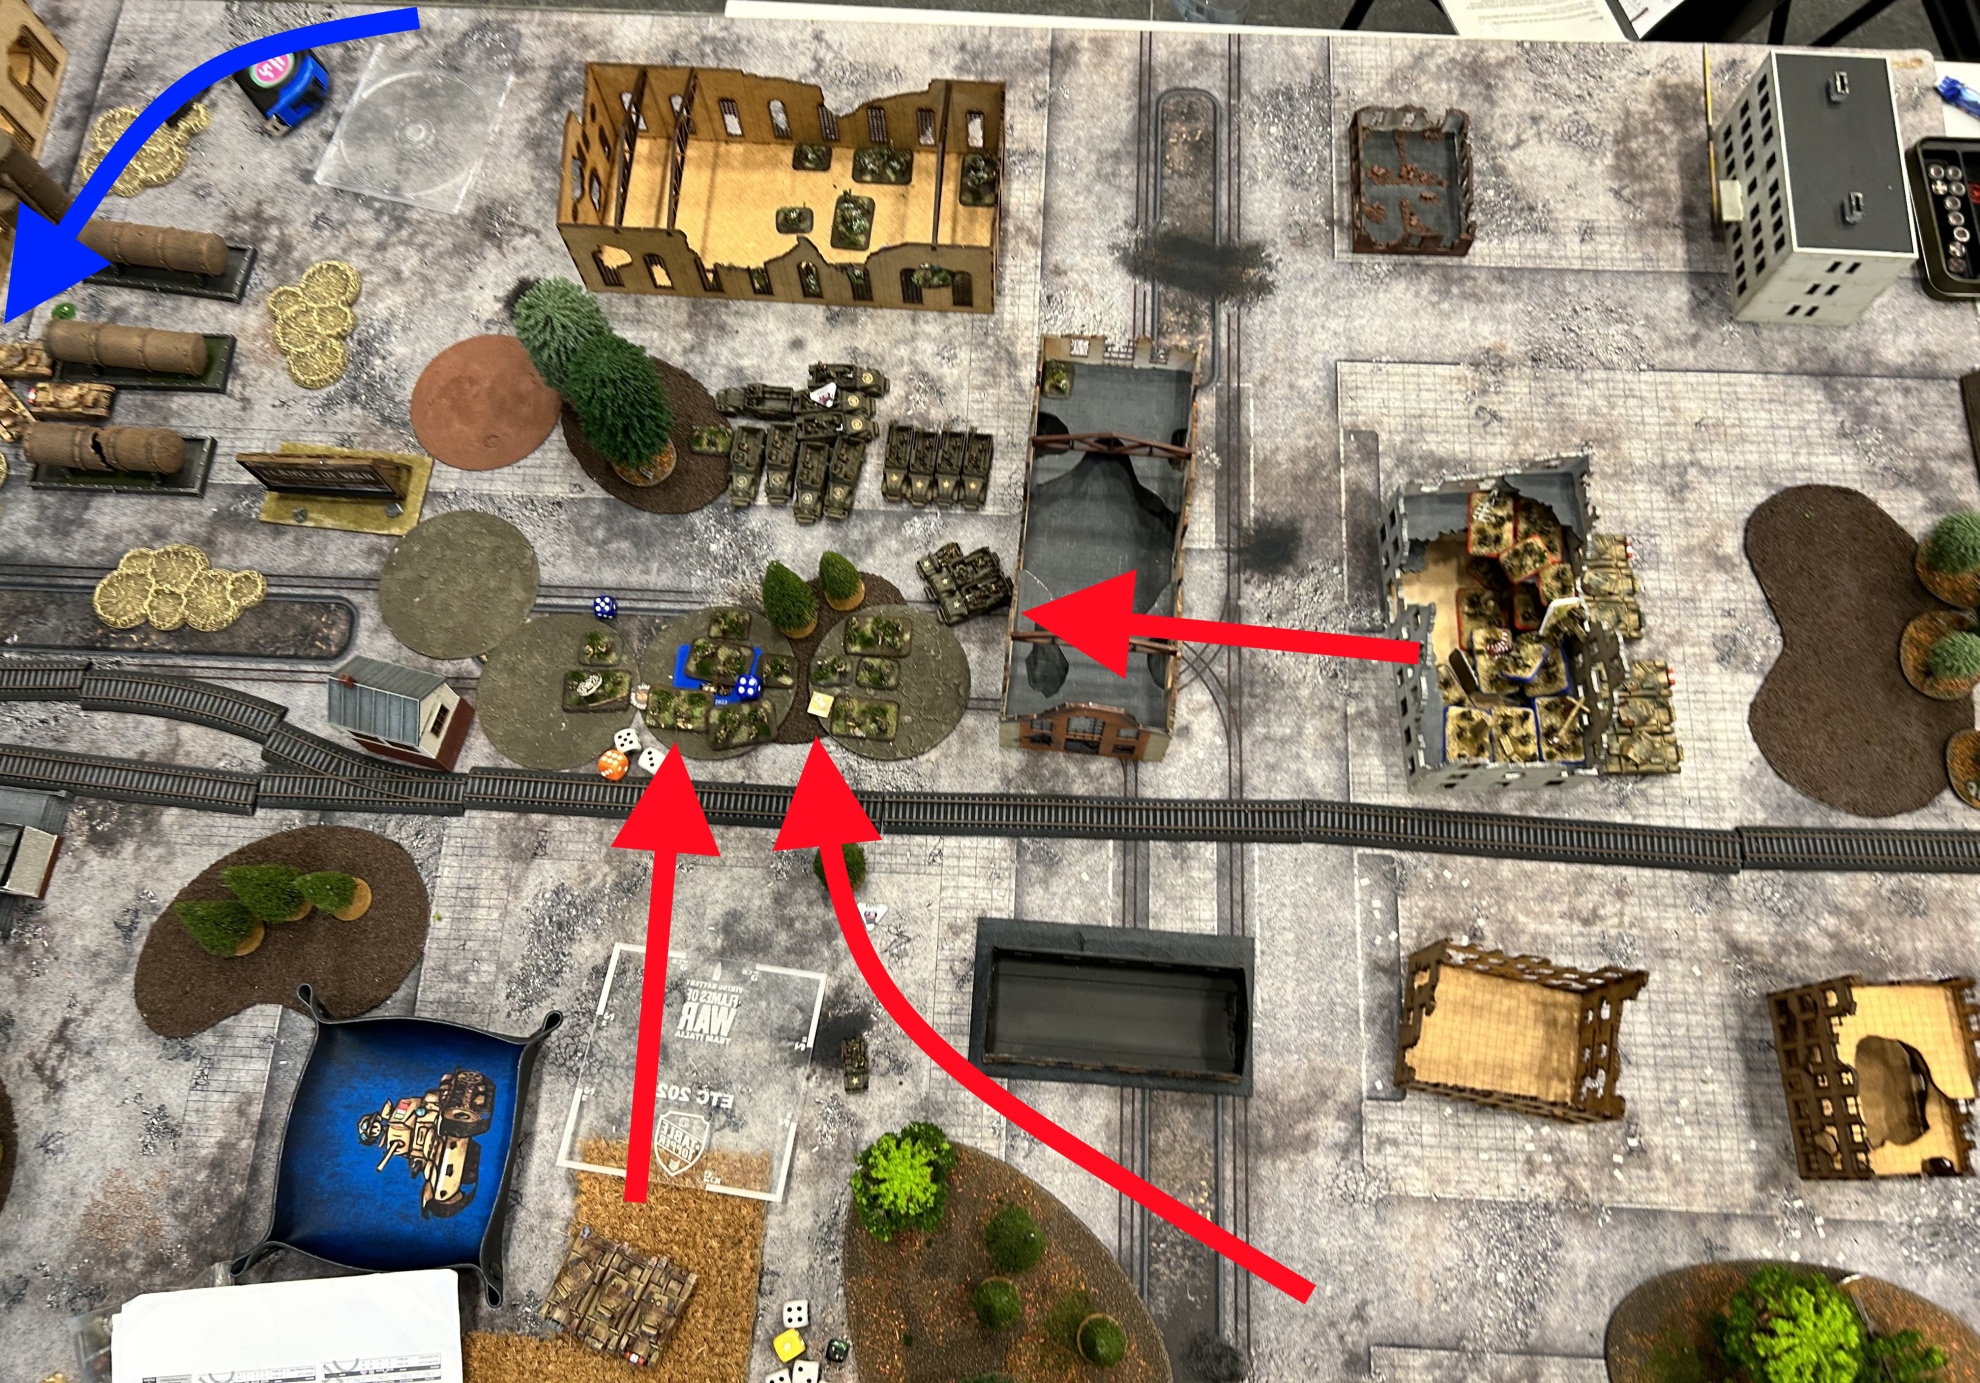
The US infantry earned their pay and pushed away their counterpart from the right-most minefield, and then they cleared it. This allowed the Churchills to enter the wood and charge the remnants of the US infantry platoon. The Transports didn’t contest the objective.
At turn 4, I shot a smoke barrage on my own US troops and charged Pawel’s infantry on the flank: the objective wasn’t to win the engagement but to push Pawel’s troops away and leave as many infantry as possible on the minefields, in order to clear them in the next turn. Moreover, Pawel’s units fleeing from the engagement had to pass through his own minefields, risking being eliminated by his own mines. Thanks to the proximity of the American HQ, which allowed for re-rolls on morale and counterattack tests, my platoon of US Rifles repelled Pawel’s and consolidated in the woods, protected by smoke.
In his turn, Pawel fired everything he had at my infantry, but a couple of them survived. After passing the rally test at the beginning of my turn, they cleared a couple of those nasty minefields. The path was clear for my Churchills, and they began to advance. Pawel’s M10s didn’t have a clear line of fire on them as the wood obstructed the line of sight. At the same time, Pawel’s reserves began to enter from his long table side: he sent a couple of M3 Lees to destroy my T30s, so I lost one of the bombardments.
He also used them to go around the large building on my left, and began to shoot at the Crusader platoons, destroying one of them. This flanking maneuver kept his tanks away from the real center of action, and my Churchills were able to assault the remnants of the American infantry without any major caliber weapons to worry about. One of the Churchills was destroyed by a lucky bazooka shot, but the other two were more than enough to clear the forest and win the game. 7-2 to me.
Pawel played very cautiously, making sure not to take any risks. His deployment was very strong thanks to the buildings. Without an effective assaulting infantry, I had to find a way to use my Churchills to deliver the decisive charge. I think Pawel’s only error was to deploy the Lee Platoons on the left corner of the table and use them to kill some Crusaders and the T30 mortar platoon. If he had sent them to the center of the deployment, behind the infantry, I wouldn’t have been able to charge the infantry into the forest so easily, as the Lee tanks’ cannons would have protected the US infantry.
The rest of the team didn’t have the same luck: we lost 1-3 – an honorable result against a very talented team.
Final thoughts
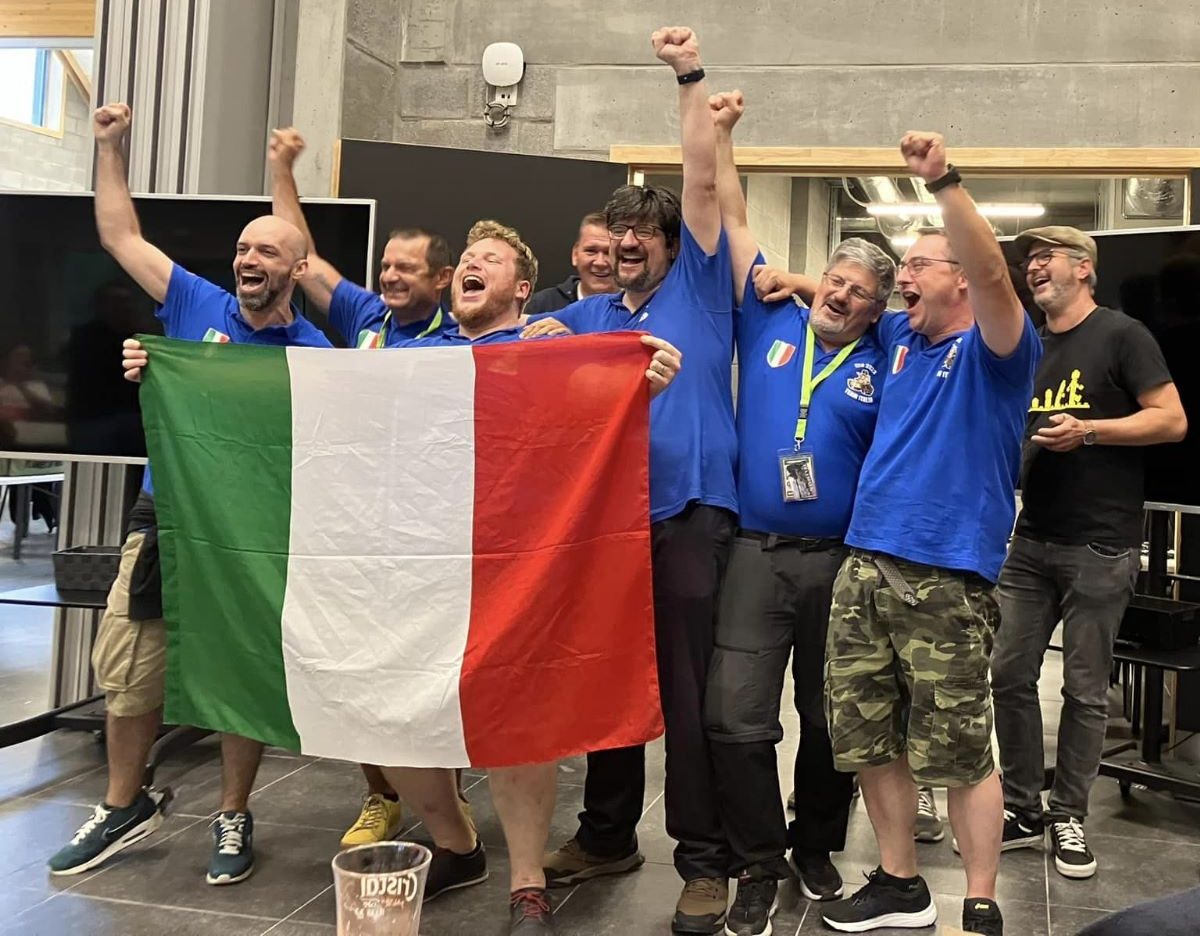
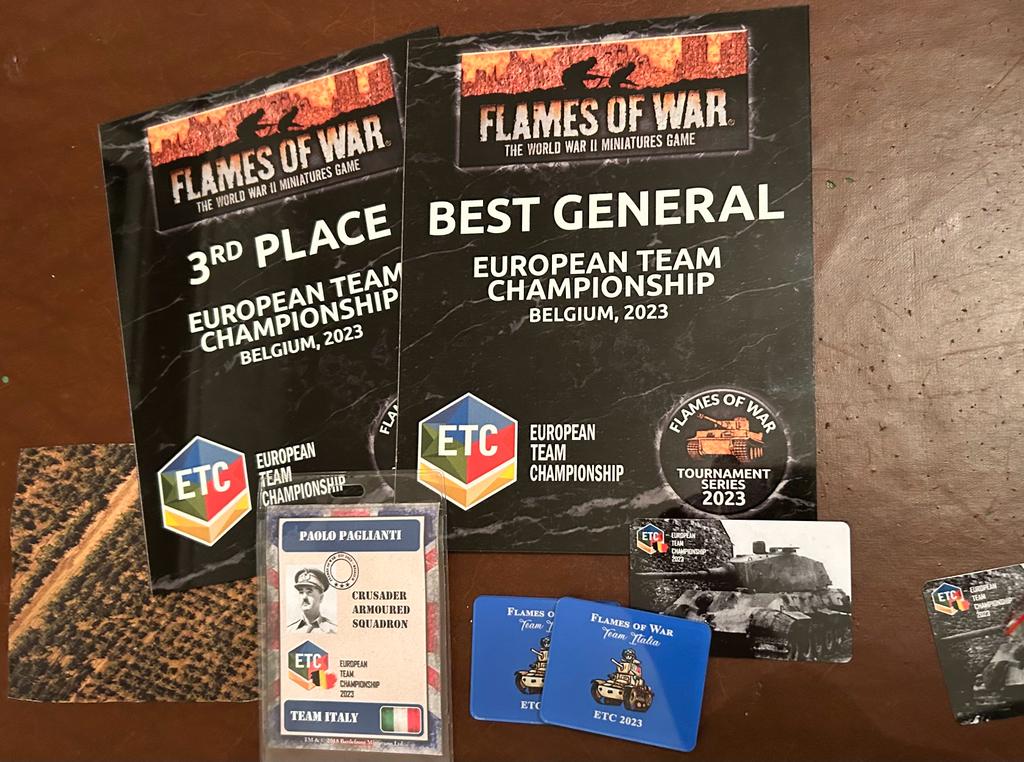
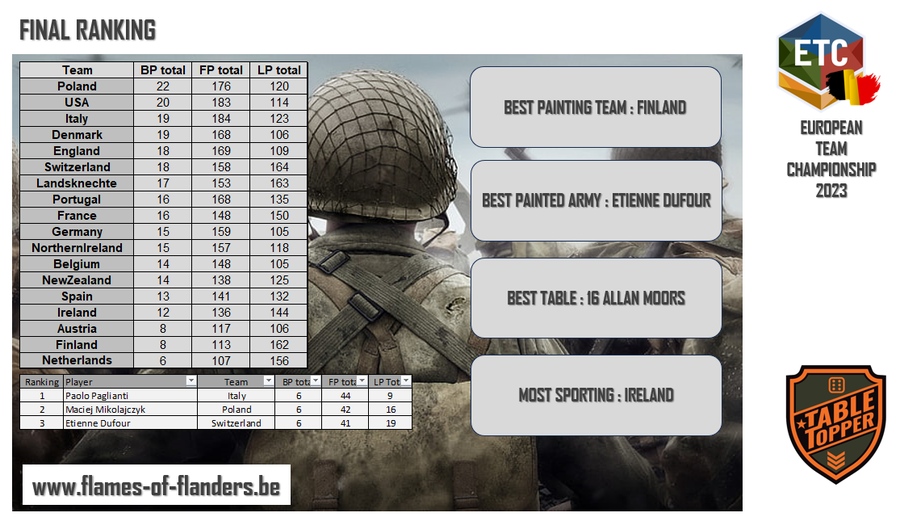
As we already reported, Team Italy ended up third in the competition, and we were very happy. Livio’s training proved a success, and we played to win the tournament with the Polish friends. Personally, I achieved a Grand Slam of six victories, so I couldn’t be happier. I also managed to have a slightly better total FOW points than the other two players who achieved a perfect score of six wins, the Swiss Etienne Dufur and the Polish Maciej Mikolajczyk, so I won the prize for Best General of the tournament. This is an unparalleled personal satisfaction: I definitely had a lot of luck, and I have to thank Lady Luck. But I’m also very pleased, especially because I won with an army I love (the British), which was considered at a disadvantage in the Mid-War period of Flames of War.
Congratulations Paolo. This is one of the best after-action reports I have ever read. Very clear photos and diagrams with perceptive narrative. Thank you. Which one are you in the team photo?
Thanks Paul, you flatter me 🙂
I’m the largest with beard 🙂